Garlic Parmesan Roasted Carrots Simple and Tasty Dish
. This link will guide you through all the steps to create this delightful dish. Garlic Parmesan roasted carrots are simple and tasty. You learned about essential ingredients, step-by-step cooking, and helpful tips. We covered variations, storage tips, and common questions. These carrots make a great side dish or even a main course. You can adjust the flavors as you like. Enjoy your cooking adventure and share your roasted carrot experience with others!](https://goldendishy.com/wp-content/uploads/2025/07/2b5541b4-7c05-48ff-a2b1-13aee86f691d.webp)
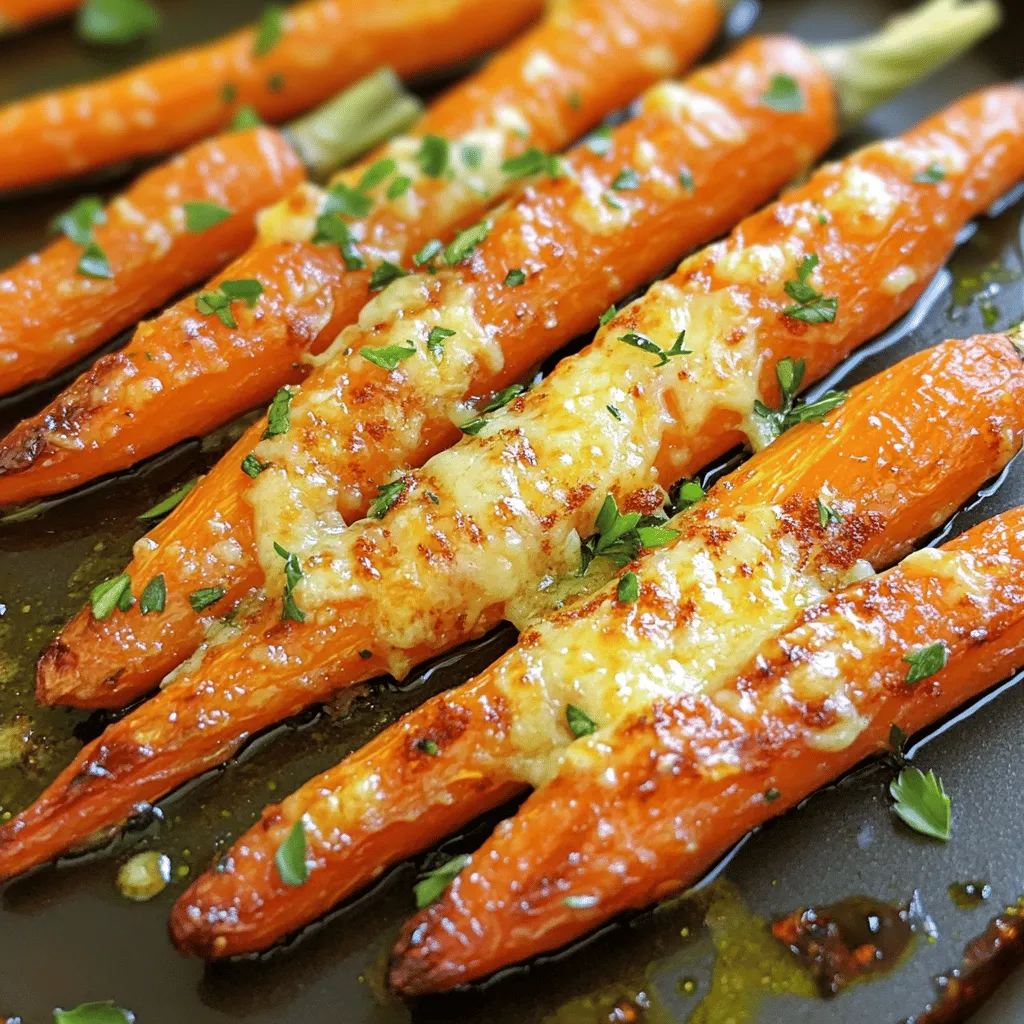
Looking for a simple and tasty side dish? Garlic Parmesan Roasted Carrots are your answer! This dish features sweet, tender carrots coated in rich garlic and cheesy goodness. With just a few easy steps and simple ingredients, you can enjoy a vibrant, flavorful veggie dish that’s sure to impress. Let’s dive in and discover how to make these mouthwatering roasted carrots a hit on your dinner table!
Ingredients
To make Garlic Parmesan Roasted Carrots, you need some simple ingredients. Here’s what you will need:
– Baby carrots
– Extra virgin olive oil
– Fresh garlic
– Dried thyme leaves
– Smoked paprika
– Parmesan cheese
– Sea salt and black pepper
– Fresh parsley (optional)
These ingredients come together to create a dish that shines with flavor. Baby carrots are sweet and tender, making them perfect for roasting. Extra virgin olive oil adds richness, while fresh garlic gives a bold taste. Dried thyme and smoked paprika bring warmth and depth to the dish.
Parmesan cheese melts beautifully, adding a savory, cheesy crust. Salt and pepper enhance the flavors, making each bite delightful. If you want, you can add fresh parsley for a splash of color and freshness.
Gather these items before you start cooking. Having everything ready makes the process smooth and fun.Enjoy the cooking journey!
Step-by-Step Instructions
Preparation Steps
– Preheat your oven to 425°F (220°C). This makes sure the oven is hot.
– In a large bowl, mix together 3 tablespoons of olive oil, 4 cloves of minced garlic, 1 teaspoon of dried thyme, 1 teaspoon of smoked paprika, sea salt, and black pepper. Stir until blended.
– Add 1 pound of peeled baby carrots to the bowl. Toss them well in the oil and spice mix, so they are covered evenly.
Roasting Process
– Line a baking sheet with parchment paper. Arrange the carrots on the sheet in a single layer. This helps them cook evenly.
– Roast the carrots for about 20 minutes. Halfway through, turn the carrots to ensure they roast on all sides.
Adding Parmesan
– After 20 minutes, take the baking sheet out of the oven. Sprinkle 1/2 cup of grated Parmesan cheese over the hot carrots. The cheese will stick nicely.
– Put the baking sheet back in the oven. Roast for another 5-7 minutes, until the cheese is melted and bubbly, creating a golden crust.
Enjoy these Garlic Parmesan Roasted Carrots as a flavorful side!
Tips & Tricks
Flavor Enhancements
To make your Garlic Parmesan Roasted Carrots even better, try adding more herbs or spices. Fresh herbs like rosemary or oregano bring a nice touch. You can also use a pinch of cayenne for some heat. Adjusting seasoning levels is key. Taste the oil and spice mix before adding carrots. You want it flavorful but not overpowering.
Cooking Techniques
For even roasting, make sure to spread the carrots in a single layer on the baking sheet. This allows hot air to circulate. Turn the carrots halfway through cooking. This helps them cook evenly and get that perfect caramelization. To avoid soggy carrots, do not crowd the baking sheet. If there are too many carrots, they will steam instead of roast.
Presentation Ideas
For serving, place the carrots on a rustic wooden platter. This makes for a beautiful presentation. Drizzle a bit of extra olive oil over the top for added shine. A sprinkle of fresh parsley adds a pop of color. It also gives a fresh taste that balances the richness of the cheese.

Variations
Alternative Ingredients
You can switch out baby carrots for other veggies. Try using sweet potatoes, bell peppers, or zucchini. Each veggie brings a unique taste and texture. Different cheese options also work well. Instead of Parmesan, you can use feta or cheddar for a twist.
Flavor Profiles
If you want a spicy kick, add red pepper flakes. They give the dish heat and flavor. For a sweeter touch, drizzle honey over the carrots before roasting. The honey caramelizes and adds a nice glaze.
Different Serving Styles
You can create a colorful vegetable medley. Mix roasted carrots with other veggies like broccoli or asparagus. This adds variety to your plate. Use Garlic Parmesan Roasted Carrots as a side dish or make them the main star with a protein. They pair well with chicken, fish, or steak, making every meal special.
Storage Info
Refrigerating Leftovers
Store your Garlic Parmesan Roasted Carrots in an airtight container. This keeps them fresh. They can last in the fridge for about 3 to 5 days. Before storing, let them cool to room temperature. This helps prevent moisture build-up. If you have extra Parmesan on top, it may become soggy.
Reheating Methods
You have two great options for reheating. The oven gives the best results. Preheat it to 350°F (175°C). Place the carrots on a baking sheet and heat for about 10 minutes. This method keeps them crispy. The microwave is faster but may make them soft. If you use the microwave, heat in short bursts. Check them often to avoid overcooking.
Freezing Tips
To freeze your roasted carrots, let them cool completely. Then, place them in a single layer on a baking sheet. Freeze them for about 1 hour. This helps them stay separate. After that, transfer them to a freezer bag for long-term storage. They can last up to 3 months in the freezer. When you want to use them, thaw them overnight in the fridge. Then, reheat as mentioned above.
FAQs
What are Garlic Parmesan Roasted Carrots?
Garlic Parmesan Roasted Carrots are a simple and tasty side dish. They feature sweet baby carrots coated in garlic and Parmesan cheese. Roasting brings out their natural sweetness while adding a crispy texture. The garlic adds a bold flavor, and the cheese creates a savory crust. This dish is perfect for family dinners or special occasions.
How long do I roast carrots?
I recommend roasting carrots for about 25 to 27 minutes. Preheat your oven to 425°F (220°C). Start with 20 minutes and turn them halfway. After that, add the cheese and roast for an extra 5 to 7 minutes. This timing ensures a tender inside and a golden crust.
Can I make this recipe ahead of time?
Yes, you can prepare the carrots in advance. Toss them in the oil and spices, then cover and refrigerate. When you’re ready, roast them straight from the fridge. This way, you save time when cooking for guests.
What dishes pair well with Garlic Parmesan Roasted Carrots?
These carrots make a great side for many dishes. They pair well with grilled chicken, steak, or fish. You can also serve them alongside pasta or a fresh salad. Their flavors enhance any meal, making them a versatile choice.This link will guide you through all the steps to create this delightful dish.
Garlic Parmesan roasted carrots are simple and tasty. You learned about essential ingredients, step-by-step cooking, and helpful tips. We covered variations, storage tips, and common questions. These carrots make a great side dish or even a main course. You can adjust the flavors as you like. Enjoy your cooking adventure and share your roasted carrot experience with others!
. This link will guide you through all the steps to create this delightful dish. Garlic Parmesan roasted carrots are simple and tasty. You learned about essential ingredients, step-by-step cooking, and helpful tips. We covered variations, storage tips, and common questions. These carrots make a great side dish or even a main course. You can adjust the flavors as you like. Enjoy your cooking adventure and share your roasted carrot experience with others!](https://goldendishy.com/wp-content/uploads/2025/07/2b5541b4-7c05-48ff-a2b1-13aee86f691d-300x300.webp)


![- 4 large eggs - 1 ripe avocado, mashed - 2 tablespoons Greek yogurt - 1 tablespoon Dijon mustard - 1 small red onion, finely chopped - 1 celery stalk, finely chopped - 1 tablespoon fresh lemon juice - 1 tablespoon fresh dill, chopped (or 1 teaspoon dried dill) - Salt and pepper to taste Gather these simple ingredients for a creamy and flavorful dish. The eggs provide protein, while the avocado brings richness. Greek yogurt adds a tangy creaminess that makes this salad stand out. Don't forget the Dijon mustard for a zesty kick. The red onion and celery add crunch and flavor. The fresh lemon juice brightens the dish and keeps it fresh. Dill offers a wonderful herbal note that complements the other flavors. For the full recipe, you can check out my detailed guide on making Avocado Egg Salad. This dish is not just easy but also very satisfying. Enjoy the blend of textures and tastes in every bite! - Place eggs in a saucepan with cold water. - Bring to a boil, then simmer for 9-12 minutes. Boiling eggs is simple. The cold water helps cook them evenly. If you like your yolks soft, aim for 9 minutes. For firmer yolks, 12 minutes works best. - Transfer to a bowl of ice water. - Peel under running water. After boiling, cool the eggs fast. The ice water stops the cooking. Let them sit for about 5-7 minutes. When peeling, run the eggs under water. This helps the shell come off easily. - Combine mashed avocado, Greek yogurt, Dijon mustard, and lemon juice. In a mixing bowl, mash the ripe avocado. Add Greek yogurt for creaminess, Dijon mustard for kick, and lemon juice for zest. Mix until smooth and creamy. - Add chopped eggs, onion, celery, and dill. - Fold gently to combine. Now, add the chopped eggs, onion, celery, and dill to the avocado mix. Use a spatula to fold everything together. Be gentle so the eggs stay in chunks. That’s how you get the perfect texture. For the full recipe, check out the details above! To make the best Avocado Egg Salad, start with the eggs. For a soft yolk, boil for 9 minutes. For a firm yolk, go for 12 minutes. Timing is key! After boiling, cool the eggs quickly. An ice bath is great for this. It stops the eggs from cooking further and makes peeling easy. For that rich and creamy texture, I use Greek yogurt instead of mayo. Greek yogurt adds protein and a tangy taste. If you want even more creaminess, check your avocado. A perfectly ripe avocado will give a smooth texture. If it's too firm, let it ripen a bit. Spice it up! A pinch of paprika or a dash of cayenne can add a kick. Fresh herbs can also change the game. Try adding dill, parsley, or chives for a flavor boost. Each herb brings a unique taste and aroma that makes this dish shine. These tips will help you create a delicious Avocado Egg Salad. For the complete recipe, check the [Full Recipe]. Enjoy your cooking! {{image_4}} You can easily swap ingredients to fit your diet. To make it vegan, use chickpeas instead of eggs. Just mash them up and mix well. They provide a nice texture and protein. For a lighter option, substitute Greek yogurt with low-fat yogurt. This keeps the salad creamy while cutting down on calories. Want to spice things up? Try adding diced bell peppers. They add crunch and a pop of color. You can also sprinkle in spices like paprika or garlic powder. These enhance the flavor and give your salad a unique twist. Experimenting with different herbs can also elevate your dish. How you serve this salad makes a big difference. You can spread it on toast or crackers for a quick snack. It also works great as a filling for sandwiches or wraps. This makes it perfect for lunch or picnics. You can even serve it in lettuce leaves for a light meal. Each option offers a new way to enjoy your creamy, flavorful dish. For the full recipe, check out Avocado Egg Salad with a Zesty Twist. To keep your avocado egg salad fresh, store it in the fridge. Use an airtight container to prevent air from spoiling the ingredients. This salad stays good for about 2-3 days. After that, the avocado may brown, and the flavor might fade. Always check for any off smells or changes in texture before eating leftovers. Freezing avocado egg salad is not recommended. The texture of avocado changes when frozen. If you freeze it, it may become mushy once thawed. Instead, prepare only what you need. If you have to freeze it, use an airtight container. This will help protect it from freezer burn. This salad is best served cold. If you must reheat it, do so gently. Use a microwave on low power for a short time. Stir it frequently to help maintain its texture. However, I suggest enjoying it cold for the best flavor and creaminess. If you want to mix things up, serve it on toasted bread or in a wrap. Enjoy the zesty taste! Yes, you can make Avocado Egg Salad ahead of time. It tastes even better after chilling. To prepare in advance, follow these tips: - Cook and cool the eggs, then chop them. - Mix the avocado, yogurt, mustard, and lemon juice. - Combine right before serving to keep the eggs fresh. - Store in an airtight container in the fridge for up to 24 hours. If you want creaminess, here are some substitutes: - Sour cream for a tangy flavor. - Silken tofu if you prefer a vegan option. - Cream cheese for a rich texture. Each option will change the taste a bit, so choose what you like best. To check if your avocado is ripe, look for these signs: - The skin should be dark green or black. - Gently press the avocado; it should yield slightly. - If it feels hard, it’s not ripe yet. Choose avocados that feel soft but not too mushy for the best results. Yes, store-bought mayonnaise works well in this recipe. Use it if you prefer a classic taste. Here’s how: - Replace Greek yogurt with an equal amount of mayo. - Mix it with the avocado and mustard for a creamy blend. This will give your egg salad a rich flavor. To make Avocado Egg Salad fit dietary needs, try these suggestions: - For nut-free, just stick to the original recipe. - For lactose-free, use a dairy-free yogurt or mayo. - For vegan, swap eggs with mashed chickpeas for protein. These options keep your dish tasty and inclusive. In this blog post, I shared a simple recipe for Avocado Egg Salad. We reviewed key ingredients, including eggs, avocado, and Greek yogurt. You learned steps to boil and mix the ingredients perfectly. I also offered tips for adding flavor and making dietary swaps. This dish is fun, healthy, and easy to make. Try it your way and enjoy the flavors! Whether you eat it in a wrap or on toast, it will be a hit. Prepare it fresh or store leftovers; you won't regret it.](https://goldendishy.com/wp-content/uploads/2025/06/e93c3c70-9342-49f9-9c4a-33a1a85bd889-768x768.webp)

![- 2 cups Granny Smith apples, diced into bite-sized pieces - 1 cup celery, finely sliced - 1 cup red grapes, halved - 1 cup walnuts, coarsely chopped for texture - 1/2 cup plain Greek yogurt, for creaminess - 1/4 cup mayonnaise, to enhance richness - 1 tablespoon fresh lemon juice, to brighten flavors - 1 teaspoon honey, to balance tartness - Salt and freshly ground black pepper, to taste This classic Waldorf salad features fresh produce that bursts with flavor. I love using Granny Smith apples because they add a nice crunch and tartness. They pair perfectly with the sweet red grapes. Celery provides a refreshing crunch, making every bite enjoyable. You also need walnuts for a rich nutty flavor and a great texture. I like to coarsely chop them to keep some larger pieces for crunch. The creamy dressing comes from a mix of plain Greek yogurt and mayonnaise. This blend adds richness and keeps the salad light. Add fresh lemon juice to keep the apples bright and tasty. A touch of honey balances the tartness of the apples and grapes. Seasoning with salt and black pepper enhances the overall taste. This mix of ingredients creates a delightful and colorful salad that is perfect for any meal. For the full recipe, check out the detailed instructions to create this refreshing Waldorf salad. Start by dicing the Granny Smith apples into bite-sized pieces. This makes them easy to eat. To keep the apples fresh and bright, toss them in lemon juice right away. The juice helps stop browning. Next, slice the celery into thin pieces. You want them crunchy and fresh. Then, halve the red grapes. This adds a sweet and juicy burst to the salad. For the dressing, take a bowl and combine plain Greek yogurt and mayonnaise. This mix brings creaminess and smoothness to your salad. Add honey, salt, and black pepper. Whisk these together until you have a smooth, even texture. This dressing is key to making your salad flavorful. In a large bowl, fold the diced apples, sliced celery, halved grapes, and chopped walnuts together. Be gentle to keep all the pieces intact. Then, pour the creamy dressing over the salad. Carefully mix everything to coat the ingredients evenly. Taste the salad and adjust flavors if needed. Add more salt, pepper, or honey for balance. Let it chill for at least 30 minutes so the flavors blend well. Serve it on crisp lettuce leaves for a bright and tasty dish. For the full recipe, check the earlier sections. To keep your apples fresh, start by using lemon juice. After dicing Granny Smith apples, toss them in lemon juice right away. This helps prevent browning. You can also use a mix of water and lemon juice. Soak the diced apples for a few minutes. Drain and dry them before adding to your salad. This step keeps your salad looking vibrant. You can adjust the sweetness and tanginess of your Waldorf salad. If you want more sweetness, add extra honey. For a tangier taste, increase the lemon juice. You can also try different dressings. A bit of apple cider vinegar can give a nice twist. Experiment with your flavors until you find what you love. For a beautiful presentation, serve your salad on crisp lettuce leaves. Use romaine or butter lettuce for a nice touch. You can also add fresh herbs as a garnish. Chopped mint or parsley can add color. Serve the salad in a clear bowl to show off the bright colors. This makes your dish not only tasty but also eye-catching. For more details, refer to the Full Recipe. {{image_4}} You can switch up the fruits in Waldorf salad. Try using ripe pears or sweet strawberries. Each fruit gives a new flavor twist. You can also use different nuts. Pecans or almonds add a nice crunch. Each change can make the salad feel fresh and new. If you want a vegan version, swap Greek yogurt with plant-based yogurt. Use a vegan mayo for creaminess. For gluten-free diets, ensure your mayonnaise is gluten-free. You can also make a low-fat dressing. Use low-fat yogurt and reduce the mayo. These options keep the salad tasty while meeting dietary needs. Waldorf salad shines as both a side dish and a main course. Serve it alongside grilled chicken for a hearty meal. You can also pair it with other salads for a light lunch. Mixing flavors and textures makes it exciting. For a fun twist, serve it in endive leaves or on a bed of spinach. This adds a lovely presentation and taste. For the full recipe, check out the [Full Recipe]. To store leftover Waldorf salad, place it in an airtight container. Make sure to seal it tightly. This keeps the salad fresh and prevents any unwanted smells. Keep it in the fridge right after serving. If you have any extra lettuce, store it separately to keep it crisp. Waldorf salad tastes best when eaten within three days. After that, the apples may start to brown and lose their crunch. The salad will still be safe to eat for up to five days, but the texture might change. Waldorf salad is best served cold. If you need to serve it after refrigeration, just give it a gentle stir. If the salad seems a bit too thick, add a splash of lemon juice or a bit of yogurt to loosen it up. Avoid reheating, as it can change the texture and taste. Enjoy it fresh for the best flavor! Waldorf Salad dates back to the late 1800s. It first appeared at the Waldorf Astoria Hotel in New York City. Chef Oscar Tschirky created this dish for a charity ball. The original recipe included only apples, celery, and mayonnaise. Over time, people added nuts, grapes, and yogurt for extra flavor. Today, we enjoy many versions of this classic salad. Yes, you can prepare Waldorf Salad ahead of time. Make the salad and store it in the fridge. Keep it covered to keep it fresh. I recommend waiting to add nuts until serving. This keeps them crunchy. If you want to serve it later, mix all the ingredients except the dressing. Add the dressing just before serving for the best taste. You can easily swap out some ingredients in Waldorf Salad. Use different fruits like pears or strawberries if you like. If you prefer a vegan option, replace yogurt and mayo with avocado or a plant-based yogurt. For nuts, use almonds or pecans instead of walnuts. These options let you customize the salad to your taste. This blog post covered the making of a Waldorf Salad. You learned about fresh ingredients like apples, celery, and grapes. We discussed how to prepare them, make a tasty dressing, and mix everything together. I shared tips for keeping your apples crisp and customizing flavor. You can also try different fruits and nuts or adapt the recipe for dietary needs. Enjoy your Waldorf Salad, and remember to store it correctly for the best taste. Happy eating!](https://goldendishy.com/wp-content/uploads/2025/06/f7b618e5-0e03-408a-a1e5-f7591c04b926-768x768.webp)
