Garlic Lemon Roasted Shrimp Tasty and Simple Dish

Craving a quick and tasty seafood dish? Look no further! Garlic Lemon Roasted Shrimp is not only simple to prepare, but it’s bursting with flavor. In this post, I’ll guide you through the easy steps to whip up this mouthwatering dish that’s perfect for any night of the week. Whether you’re a busy parent or a cooking newbie, you’ll impress your family and friends with this delightful meal in no time!
Ingredients
Essential Ingredients for Garlic Lemon Roasted Shrimp
– 1 pound large shrimp, peeled and deveined
– 4 cloves garlic, finely minced
– 1/4 cup fresh lemon juice
– Zest from 1 lemon
– 1/4 cup extra virgin olive oil
For this dish, I prefer using large shrimp. They hold flavor well and cook quickly. Fresh garlic gives the best taste. The lemon juice and zest add brightness, making the shrimp pop. Extra virgin olive oil helps everything blend and adds richness.
Optional Flavor Enhancers
– 1 teaspoon smoked paprika
– 1/2 teaspoon red pepper flakes
– Salt and freshly ground black pepper
Smoked paprika adds a nice depth. If you like heat, red pepper flakes can spice things up. Always use salt and freshly ground black pepper to make the flavors shine.
Garnish Requirements
– 2 tablespoons fresh parsley, finely chopped
Fresh parsley not only adds color but also a hint of freshness. It makes your dish look great and taste even better.
This recipe is simple yet full of flavor.
Step-by-Step Instructions
Preparing the Oven and Baking Sheet
– Preheat the oven to 400°F (200°C).
– Line a baking sheet with parchment paper.
Mixing the Ingredients
– Combine shrimp with garlic, lemon juice, zest, and seasonings.
– Marinate the shrimp for 15-20 minutes.
In this step, I use fresh shrimp and mix it with garlic, lemon juice, and zest. The garlic gives a strong flavor, while lemon adds brightness. I also add olive oil, smoked paprika, and red pepper flakes if you like heat. Salt and pepper help balance the taste. Marinating helps the shrimp soak in these wonderful flavors.
Roasting the Shrimp
– Arrange shrimp on the baking sheet.
– Roast for 8-10 minutes, stirring halfway through.
Once marinated, I place the shrimp in a single layer on the baking sheet. This way, they roast evenly. After 8-10 minutes, the shrimp should be pink and opaque. Stirring halfway ensures every piece cooks well. When they come out, they smell amazing and look delicious. I always let them rest for a minute before serving.
Tips & Tricks
Perfecting the Marinade
Marinating shrimp is key to taste. I suggest marinating for 15-20 minutes. This time lets the flavors blend well. Adjust the salt and pepper to your liking. If you want it spicy, add more red pepper flakes.
Achieving the Ideal Roast
Do not overcrowd the baking sheet. This helps the shrimp cook evenly. If they are crowded, they will steam rather than roast. Look for shrimp that are pink and opaque. This shows they are fully cooked.
Serving Suggestions
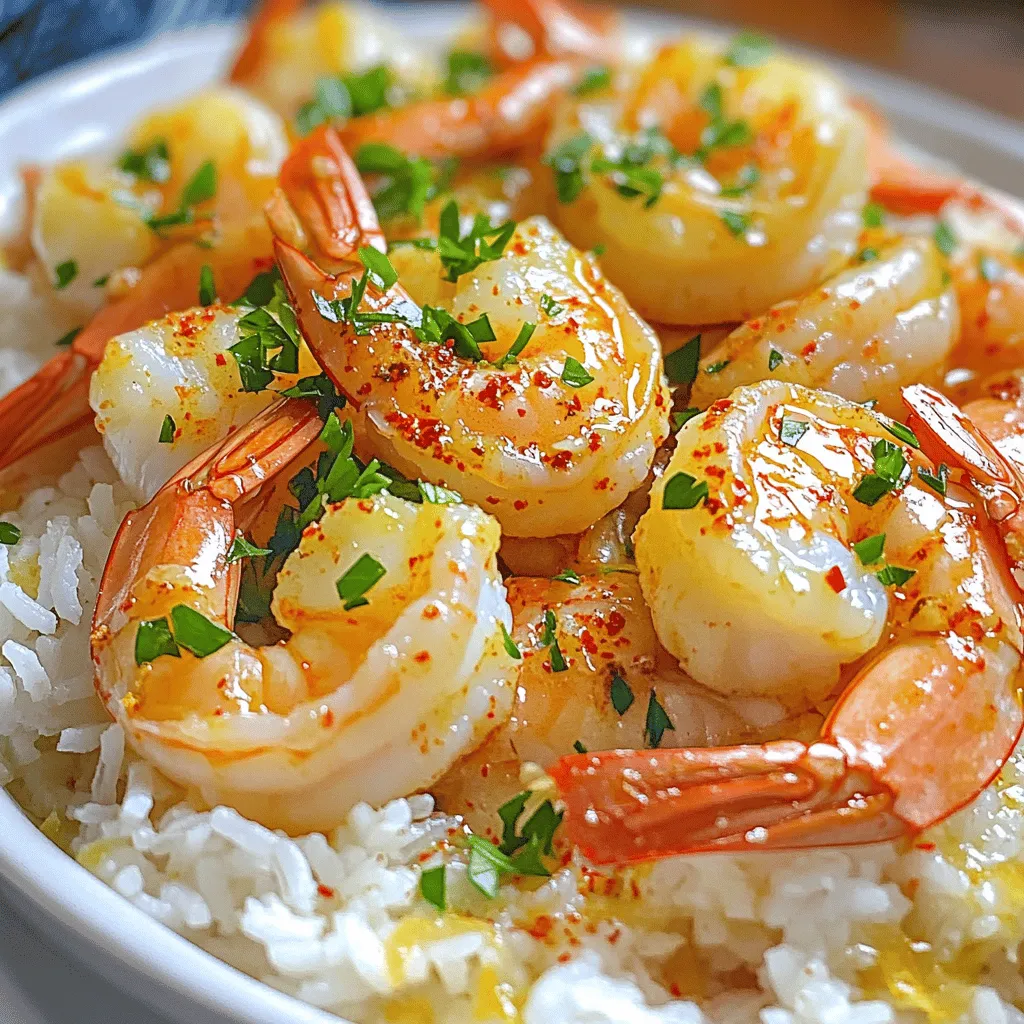
Serve roasted shrimp with fluffy jasmine rice or a fresh salad. You can drizzle some leftover marinade over the shrimp before serving. This adds extra flavor and brightness to the dish.

Variations
Spicy Garlic Lemon Shrimp
To make your dish spicy, add more red pepper flakes. Start with one teaspoon for heat. You can adjust it based on your taste. If you love spice, go ahead and double the amount! This adds a nice kick and balances the lemon flavor. The heat complements the garlic well, making each bite exciting.
Herb-Infused Shrimp
Mix in fresh herbs like thyme or rosemary for a new twist. Chop the herbs finely and add them to the shrimp mixture. About two tablespoons of each herb will do. The herbs add depth and freshness. They bring a lovely aroma as they roast with the shrimp. You can play with other herbs too, like basil or dill.
Garlic Lemon Shrimp Skewers
To turn this recipe into skewers, thread the marinated shrimp onto skewers. Use metal or soaked wooden skewers. Make sure the shrimp are evenly spaced. This helps them cook evenly. Grill the skewers on medium heat for about 2-3 minutes per side. You can serve them with a lemon wedge for an extra burst of flavor. Skewers make for fun finger food at gatherings.
Storage Info
Proper Storage Techniques
To keep your garlic lemon roasted shrimp fresh, cool them first. Let the shrimp sit at room temperature for about 10-15 minutes after roasting. This step helps prevent moisture build-up. Next, place the shrimp in airtight containers. These containers help keep out air and moisture, which can spoil the dish.
Shelf Life
In the fridge, your shrimp will stay good for up to three days. If you want to store them longer, use your freezer. Shrimp can last for up to three months in the freezer. Just make sure to seal them well to avoid freezer burn.
Reheating Tips
When you are ready to enjoy your shrimp again, reheat them gently. The best way is to use a skillet over low heat. This method warms the shrimp without drying them out. You can also use the microwave. If you choose this method, heat in short intervals of about 30 seconds. Check often to avoid overcooking.
FAQs
How can I tell if shrimp are cooked?
You can tell shrimp are cooked by their color and texture. Look for a bright pink hue. The shrimp should also feel firm to the touch and opaque. If they appear gray or translucent, they need more time.
Can I use frozen shrimp for this recipe?
Yes, you can use frozen shrimp. Start by thawing them in cold water. This usually takes about 10-15 minutes. After thawing, pat them dry with paper towels. Then, you can follow the recipe as is. The same marination time applies, so let them sit in the marinade for 15-20 minutes.
What can I substitute for olive oil?
If you don’t have olive oil, you can use other oils. Canola oil and avocado oil work well for roasting. Both have high smoke points and mild flavors. You can also try melted butter for a richer taste.
Garlic lemon roasted shrimp is a simple dish with big flavors. We covered the key ingredients needed, like fresh shrimp, garlic, and lemon. You learned how to mix, marinate, and roast shrimp. Tips for cooking them just right help avoid overcooking. Consider adding your own twist with spices or herbs for variety. Proper storage will keep your leftovers fresh. Enjoy making this tasty meal, and share it with others!


![- 2 boneless, skinless chicken breasts, sliced into thin strips - 8 ounces of fettuccine pasta - 4 cloves of garlic, finely minced - 1 cup of heavy cream - 1 teaspoon of Italian seasoning blend - ½ teaspoon of red pepper flakes (optional, for heat) - ½ cup of freshly grated Parmesan cheese - Fresh parsley, finely chopped, for a vibrant garnish - 1 tablespoon of extra virgin olive oil - 1 cup of chicken broth - Salt and freshly cracked black pepper, to taste When I prepare Creamy Garlic Chicken Pasta, I focus on fresh ingredients. The chicken must be juicy, the garlic fragrant, and the cream rich. I love using fettuccine because it holds the sauce well. The heavy cream makes the dish smooth and creamy, while the garlic brings a lovely flavor. For seasoning, I often use an Italian blend. It gives warmth and depth to the dish. The red pepper flakes add a tiny kick, but you can skip them if you want a milder taste. Fresh parsley not only adds color but also a fresh taste. Grated Parmesan cheese is a must for that cheesy goodness. Gathering these ingredients helps me create a quick and tasty meal. It’s all about balance—rich cream, savory garlic, and hearty chicken come together perfectly. If you want to see the full process, check out the Full Recipe. Start with a large pot. Fill it with water and add salt. Bring the water to a rolling boil. Once boiling, add 8 ounces of fettuccine pasta. Cook the pasta for about 8-10 minutes until it is al dente. When it’s done, drain the pasta in a colander. Remember to save about ½ cup of the pasta water for later. Grab a large skillet and place it over medium-high heat. Pour in 1 tablespoon of olive oil and let it warm up. While the oil heats, season 2 sliced chicken breasts with salt and pepper. Add the chicken strips to the hot skillet in a single layer. Cook them for about 5-6 minutes until golden brown and fully cooked. Once cooked, take the chicken out and keep it warm on a plate. In the same skillet, lower the heat to medium. Add 4 cloves of minced garlic and sauté for 1-2 minutes. Keep an eye on the garlic; you don’t want it to burn. After the garlic is fragrant, pour in 1 cup of chicken broth. Let it come to a gentle simmer. Next, stir in 1 cup of heavy cream, 1 teaspoon of Italian seasoning, and red pepper flakes if you like some heat. Allow this mixture to simmer for about 3-4 minutes until it thickens. Now it’s time to combine everything. Add the cooked fettuccine and the chicken back into the skillet. Toss them gently until they are well coated in the creamy sauce. If the sauce seems too thick, slowly add some reserved pasta water until you reach your desired consistency. Finally, sprinkle in ½ cup of grated Parmesan cheese. Stir it until it melts and blends into the sauce. Taste and adjust seasoning with salt and pepper if needed. For the full experience, check the Full Recipe. To make the cream sauce just right, simmering is key. Simmering helps all the flavors blend well. It also thickens the sauce without burning it. Keep the heat low, and stir often. This way, you can avoid garlic burnout. Garlic can turn bitter if cooked too long. Sauté it just until it smells good and turns light gold. Adjusting your seasonings can elevate this dish. Taste as you go. If you want more flavor, add salt or pepper. You can also use homemade broth for a fresh taste. Store-bought broth works too, but watch for added salt. This can affect your dish's flavor. Always check the label to control the salt level. Plating your creamy garlic chicken pasta can make a big difference. Use shallow bowls for a nice look. Make sure to spread the chicken and sauce evenly. For garnish, sprinkle fresh parsley on top. You can also add more Parmesan for richness. A drizzle of olive oil adds a shiny touch. Your guests will love the look and taste! {{image_4}} You can easily boost the nutrition of your creamy garlic chicken pasta by adding vegetables. I love using fresh spinach or mushrooms for a tasty twist. Spinach wilts nicely, adding color and flavor. Mushrooms bring a rich, earthy taste. To cook these veggies, add them to the skillet right after you sauté the garlic. Stir them in for just a few minutes until they're tender. This way, they soak up the garlic flavor while keeping their crunch. Switching up your pasta can bring new life to this dish. You can use whole wheat or gluten-free pasta if you want healthier options. Different pasta shapes, like penne or rotini, also work well. Just remember, cooking times may change. Whole wheat pasta takes a bit longer, while gluten-free pasta cooks faster. Keep an eye on it, and taste for doneness. If you want to try something new, swap the chicken for shrimp or tofu. Shrimp is quick to cook and adds a nice seafood flavor. Just sauté it for about 3-4 minutes until it turns pink. Tofu is a great plant-based option. Cut it into cubes and sauté it until golden brown. Adjust the cooking times based on what you choose to ensure all proteins are cooked through. Feel free to get creative with your creamy garlic chicken pasta. With these variations, you can make it your own! For a full recipe, check out the [Full Recipe]. To keep your Creamy Garlic Chicken Pasta fresh, store it in the fridge. Place the pasta in an airtight container. This helps prevent it from drying out. Make sure to consume it within three to four days for the best taste. When reheating, use the stovetop for the best results. Add a splash of chicken broth or water to help revive the sauce. Heat over low to medium heat, stirring often. This avoids overcooking the chicken and pasta. If you prefer the microwave, use a microwave-safe dish. Cover it with a lid or a damp paper towel to keep moisture in. Heat it in short bursts, stirring in between. Yes, you can freeze Creamy Garlic Chicken Pasta! However, the cream sauce may change texture. To freeze, let it cool completely. Place it in a freezer-safe container and seal tightly. Use it within one to two months. When ready to eat, thaw it overnight in the fridge. Reheat gently on the stovetop, adding a bit more cream or broth to restore creaminess. Making Creamy Garlic Chicken Pasta is quick and easy! It takes about 10 minutes to prep and 20 minutes to cook. In total, you're looking at around 30 minutes. This dish is perfect for a weeknight meal when you want something tasty without spending hours in the kitchen. Yes, you can easily make this recipe dairy-free! For the cream, use coconut cream or cashew cream instead. Both give a nice texture. Instead of Parmesan cheese, try nutritional yeast or a dairy-free cheese. This way, you still get a creamy dish without any dairy! Creamy Garlic Chicken Pasta pairs well with many side dishes. A simple green salad with a lemon vinaigrette adds freshness. You can also serve garlic bread for a comforting touch. If you prefer vegetables, steamed broccoli or roasted asparagus work well too. These sides balance the richness of the pasta nicely. Absolutely! You can control the spice level by adjusting the red pepper flakes. If you want more heat, add more flakes. For a milder dish, you can skip them entirely. Feel free to experiment until you get the flavor just right for your taste buds. You learned how to make Creamy Garlic Chicken Pasta with key ingredients like chicken, garlic, and cream. We walked through each step, from cooking pasta to making a rich sauce. I shared tips for perfecting flavors, including optional veggie and protein swaps. Storing leftovers was also covered. Remember, this dish is versatile and easy to adapt. Explore your creativity in the kitchen! Enjoy your meal and share the joy of cooking with others.](https://goldendishy.com/wp-content/uploads/2025/06/75e46cf8-cdb7-4cdf-96b4-9ca11b1b9102-768x768.webp)

![- 1 pre-made pie crust - 2 medium zucchinis, grated - 2 cups fresh spinach, chopped - 1 small onion, finely chopped - 3 large eggs - 1 cup milk I love using a pre-made pie crust for this quiche. It saves time and effort. The zucchinis bring a fresh taste, while the spinach adds color and nutrients. Eggs and milk create a rich, creamy texture that binds everything together. - 1 teaspoon garlic powder - Salt and pepper to taste - 1 tablespoon olive oil Garlic powder gives this dish a warm flavor. I always add salt and pepper to enhance the taste. Olive oil is perfect for cooking the veggies and adds a nice depth of flavor. - 1 cup shredded mozzarella cheese - 1/2 cup grated Parmesan cheese Cheese is key for a tasty quiche. Mozzarella melts beautifully, while Parmesan adds a sharp, salty kick. Together, they create a delightful flavor mix that elevates your dish. Don't forget to check the full recipe for complete details! First, heat olive oil in a skillet over medium heat. Add the finely chopped onion. Sauté it for about 3-4 minutes until it turns soft and clear. Next, add the grated zucchini and chopped spinach. Stir often and cook for about 5 minutes. The veggies should become tender, and any extra water will cook off. I love adding garlic powder, salt, and pepper to boost the flavor. After cooking, take it off the heat and let it cool for a moment. In a large bowl, whisk together the eggs and milk until they blend smoothly. This is where the magic begins! Next, add in the shredded mozzarella and grated Parmesan cheese. Fold them in gently. This mixture will bring richness to your quiche. It’s important that the cheese mixes well but still keeps some texture. Now, pour the vegetable and egg mixture into the prepared pie crust. Spread it out evenly to help it cook well. Place the quiche in your preheated oven. Bake for 30-35 minutes. You’ll know it’s ready when the edges turn golden brown and a toothpick inserted in the center comes out clean. Let it cool for about 10 minutes before slicing. This resting time helps enhance the flavors. You can find the full recipe in the previous section for all these steps! To get the best texture for your quiche, you must control moisture. Zucchini has a lot of water, which can make your quiche soggy. To fix this, grate the zucchini and lightly salt it. Let it sit for 10 minutes, then squeeze out the excess liquid. This step is key to a firm quiche. The cooking time can vary based on your oven. I find that checking it a few minutes early helps. If the edges look golden and a toothpick comes out clean, it's ready! For more flavor, consider adding fresh herbs like thyme or basil. A pinch of red pepper flakes can add a nice kick. You can also play with spices, like paprika or onion powder. Each of these can change the taste in a fun way. Cheese is another way to boost flavor. While mozzarella and Parmesan are great, try using feta or goat cheese for a tangy twist. These types add both creaminess and a bit of zest to the dish. When serving your zucchini spinach quiche, aim for a bright plate. A colorful plate makes a dish look more appealing. Add fresh basil or parsley on top for an eye-catching touch. You can also serve it with a light salad drizzled with citrus vinaigrette. This adds freshness and balance. For a photo-worthy presentation, slice the quiche into neat pieces. Arrange them in a circle on the plate. This simple trick makes your dish look polished and ready for sharing. Don't forget to snap a picture before you dig in! For the complete recipe, check out the [Full Recipe]. {{image_4}} You can switch up the veggies in your quiche. Broccoli, bell peppers, or mushrooms work great. Each veggie brings its own taste and texture. You can also try seasonal additions. In spring, add asparagus, and in fall, use roasted squash. This keeps your quiche fresh and exciting. If you need a gluten-free quiche, use a gluten-free crust. Many stores sell these now, or you can make your own. If you make your crust, use almond flour or coconut flour for a nice texture. You may need to adjust the liquid in the filling. This helps keep the quiche moist and tasty. Making mini quiches is fun and easy. You can use a muffin tin for individual servings. Just pour the mixture into each cup and fill them about three-quarters full. Bake for about 20-25 minutes. Keep an eye on them to avoid burning. These mini quiches are perfect for snacks or brunch. You can even freeze them for later! Check out the Full Recipe for more details. To keep your quiche fresh, store it in an airtight container. This helps keep moisture out. It stays fresh in the fridge for up to three days. If you plan to eat it later, cover it tightly with plastic wrap or foil. You can freeze your quiche before or after baking. If freezing before baking, wrap it well. This way, you can bake it fresh later. For freezing after baking, let it cool completely first. Store it in an airtight container. It can last up to three months in the freezer. When ready to eat, thaw it in the fridge overnight. For the best taste, reheat your quiche in the oven. Set it to 350°F (175°C) and heat for about 15-20 minutes. This keeps the crust crispy. You can also use a microwave for quick heating. However, the crust may not stay as crunchy. Heat slices for about 1-2 minutes. Always check that it's hot in the middle before serving. You can tell the quiche is done by looking for a few key signs. The edges should be golden brown, and the center should be firm. If you gently shake the quiche, it should not jiggle. Another great way to check is with a toothpick. Insert it into the center of the quiche. If it comes out clean, your quiche is ready to enjoy. Yes, you can use frozen spinach in this recipe. However, it’s important to make a few adjustments. First, thaw the spinach completely and drain any excess water. This helps prevent the quiche from becoming too watery. You may also want to chop the spinach further after thawing. This ensures even distribution in your quiche. Zucchini spinach quiche pairs well with many side dishes. A simple green salad with a light vinaigrette works great. You can also serve it with roasted vegetables for added flavor. If you want something heartier, serve it alongside a bowl of creamy tomato soup. This combination makes for a balanced and tasty meal. This blog post covers how to make a tasty zucchini and spinach quiche. You learned about the main ingredients, like pre-made crust and eggs, plus the best seasonings. I shared step-by-step instructions for preparing and baking. You also got tips for perfecting texture and ideas for variations. Making this dish can be easy and fun. Enjoy experimenting with flavors and ingredients. Whether you serve it for breakfast or dinner, this quiche will impress. Get cooking and enjoy your delicious creation!](https://goldendishy.com/wp-content/uploads/2025/06/2284a9f2-dfec-450d-ba9a-23981f99d5f6-768x768.webp)


