Looking for an easy yet flavorful dish? This Garlic Herb Turkey Tenderloin recipe is just what you need. With tender meat and fresh herbs, it’s a sure hit for any dinner. I’ll take you step by step through the simple process, from prepping the turkey to serving it perfectly. Get ready to impress your family or guests with this tasty and healthy meal that’s quick to make!
Why I Love This Recipe
- Flavorful Herb Blend: The combination of fresh garlic, rosemary, and thyme creates a fragrant and savory herb paste that infuses the turkey with delicious flavor.
- Moist and Tender: Searing the tenderloin before roasting locks in moisture, ensuring each slice is juicy and tender, perfect for any occasion.
- Quick and Easy: With just 15 minutes of prep time, this recipe is ideal for a weeknight dinner without sacrificing flavor or presentation.
- Versatile Serving Options: The turkey pairs beautifully with a variety of sides, from sautéed greens to roasted vegetables, making it a flexible dish for any meal.
Ingredients
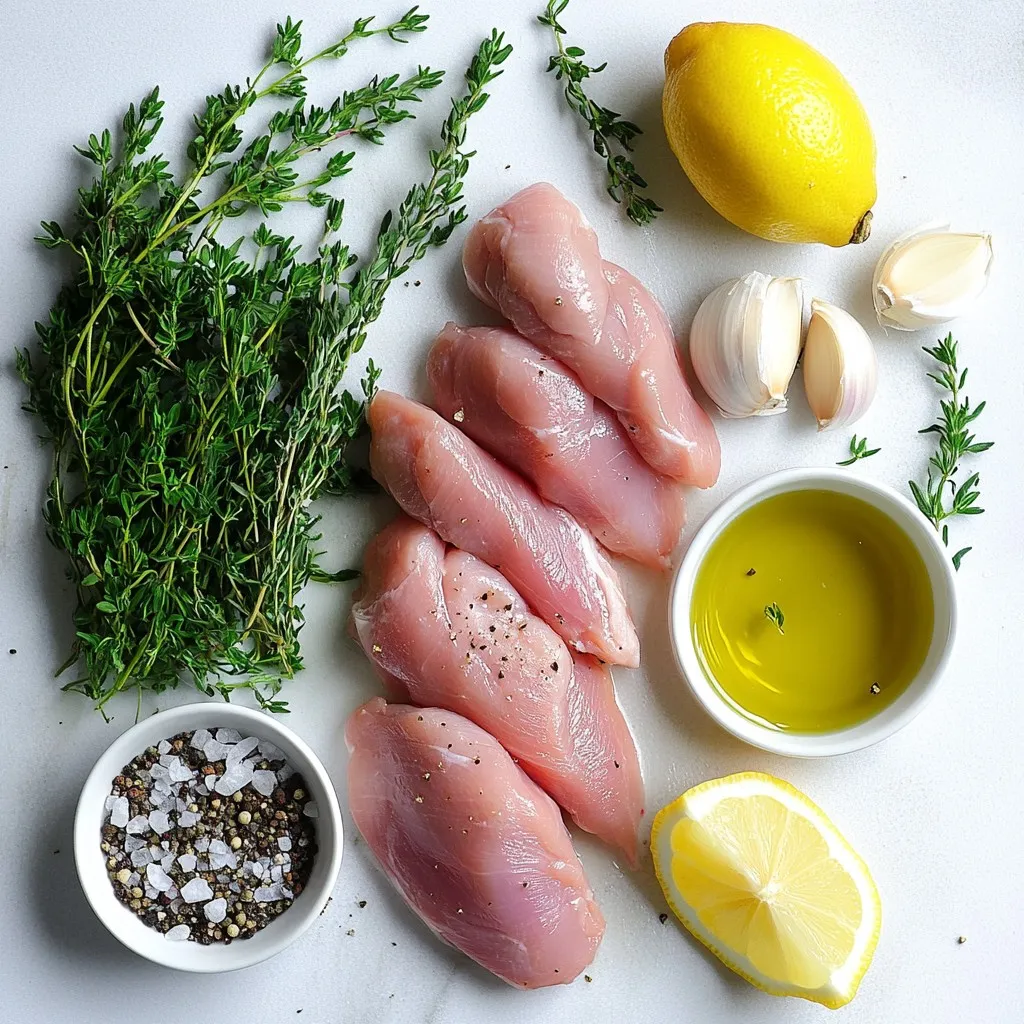
List of Ingredients
– 1.5 lbs turkey tenderloin
– 4 cloves garlic, finely minced
– 2 tablespoons fresh rosemary, finely chopped
– 2 tablespoons fresh thyme, finely chopped
– 1 tablespoon olive oil
– 1 teaspoon salt
– ½ teaspoon freshly ground black pepper
– 1 tablespoon fresh lemon juice
– Optional: fresh parsley for garnish
Gathering your ingredients is the first step to making this dish shine. Start with 1.5 pounds of turkey tenderloin. This cut is lean and cooks quickly, which is perfect for a busy weeknight.
Next, you need four cloves of garlic. Mince them finely to release all the bold flavors. Use two tablespoons each of fresh rosemary and fresh thyme, both chopped. These herbs add a lovely aroma and taste.
You will also need a tablespoon of olive oil. This oil helps the herbs stick to the turkey and adds a nice richness.
For seasoning, grab a teaspoon of salt and half a teaspoon of freshly ground black pepper. These will enhance all the flavors in your dish.
Finally, don’t forget a tablespoon of fresh lemon juice. It brightens the dish and balances the savory flavors. If you want, you can garnish with fresh parsley for a pop of color and freshness on your plate.
Having these ingredients ready will make your cooking process smooth and enjoyable!
Step-by-Step Instructions
Preparation Steps
1. Preheat your oven to 375°F (190°C). This step helps cook the turkey evenly.
2. In a small bowl, mix 4 minced garlic cloves, 2 tablespoons of chopped rosemary, 2 tablespoons of chopped thyme, 1 tablespoon of olive oil, 1 teaspoon of salt, ½ teaspoon of black pepper, and 1 tablespoon of lemon juice. Stir until you form a fragrant herb paste.
3. Pat the turkey tenderloin dry with a paper towel. This step is key for a nice sear.
Cooking Steps
1. Generously rub the herb paste all over the turkey. Make sure it’s well coated. For more flavor, let it sit for 30 minutes or overnight in the fridge.
2. Heat a large, oven-safe skillet over medium-high heat. Add a drizzle of olive oil to coat the pan.
3. Once the oil shimmers, add the turkey tenderloin. Sear each side for 2-3 minutes until it’s golden brown. This creates a crust that keeps moisture in.
4. Transfer the skillet to your preheated oven. Roast the turkey for 25-30 minutes. It’s done when a thermometer reads 165°F (74°C).
Finishing Touches
1. After taking it out, let the turkey rest for 5-10 minutes. This helps the juices spread throughout.
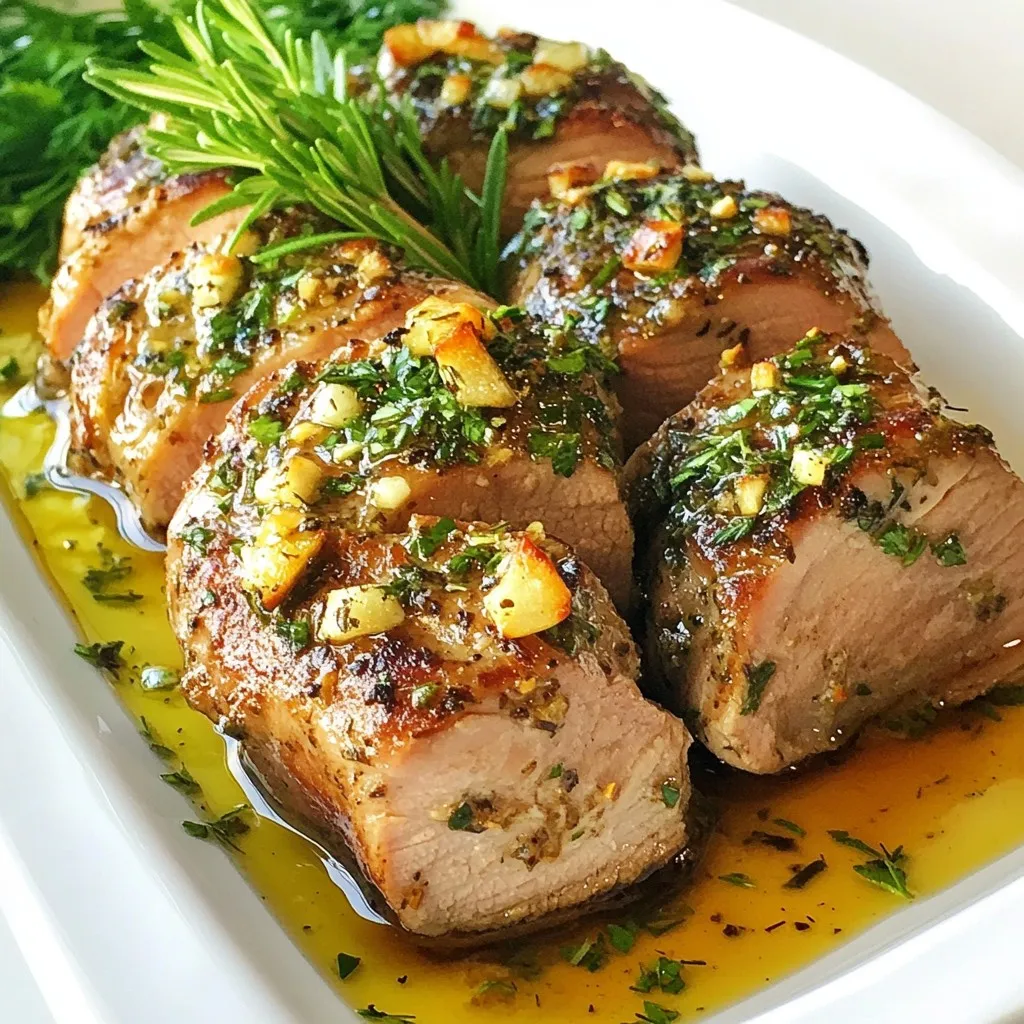
2. Slice the turkey into medallions. Arrange them on a platter. For color, sprinkle finely chopped parsley on top.
Tips & Tricks
Selection Tips
– Choose turkey tenderloins that are pink and moist.
– Look for ones with no bruises or dark spots.
– Fresh herbs make a big difference in flavor.
– Use rosemary and thyme for a fragrant taste.
Cooking Tips
– Sear the turkey on medium-high heat.
– This creates a nice brown crust.
– Cook it for about 2-3 minutes on each side.
– Roast it at 375°F for 25-30 minutes.
– Check that the inside reaches 165°F for safety.
Serving Suggestions
– Serve the turkey with sautéed greens or roasted veggies.
– Arrange the medallions nicely on a platter.
– Garnish with fresh parsley for color.
– This makes your meal look and taste great!
Pro Tips
- Marination Matters: Allow the turkey tenderloin to marinate for at least 30 minutes, or overnight, to deepen the flavors and enhance tenderness.
- Pat it Dry: Always pat the turkey tenderloin dry before cooking to ensure a better sear and a crispy exterior.
- Rest Before Slicing: Let the turkey rest for 5-10 minutes after roasting to allow the juices to redistribute, resulting in a juicier final dish.
- Use a Meat Thermometer: For perfect doneness, always check the internal temperature of the turkey, aiming for 165°F (74°C) in the thickest part.
Variations
Flavor Variations
You can switch up the taste of your garlic herb turkey tenderloin easily. Here are some fun ideas:
– Alternative herbs and spices: Try using fresh basil or oregano for a twist. You can also add a pinch of smoked paprika for a smoky flavor.
– Adding citrus flavors: Squeeze some orange or lime juice into your herb paste. This will give the turkey a fresh and zesty taste.
Cooking Method Alternatives
If you want to change how you cook the turkey, consider these methods:
– Grilling instructions: Preheat your grill to medium-high heat. Rub the turkey with the herb paste and place it on the grill. Cook for about 15-20 minutes, turning it often. Use a meat thermometer to check for doneness.
– Slow cooker option: Place the marinated turkey in a slow cooker. Add a splash of chicken broth. Cook on low for 4-6 hours. This will make the turkey super tender and juicy.
Dietary Considerations
You can make this dish fit different diets with simple changes:
– Gluten-free adaptations: This recipe is already gluten-free! Just ensure that all ingredients, like the broth or spices, are certified gluten-free.
– Low-carb variations: The turkey itself is low in carbs. Serve it with a side of steamed broccoli or cauliflower rice for a filling meal that fits a low-carb plan.
Storage Info
Storing Leftovers
To keep your garlic herb turkey tenderloin fresh, let it cool first. Place it in an airtight container. This helps keep the flavors locked in. You can also wrap it tightly in plastic wrap. Store it in the fridge right away. The turkey lasts about 3 to 4 days. If you want it to last longer, consider freezing it. Frozen turkey can stay good for up to 3 months. Just remember to let it cool completely before freezing.
Reheating Tips
When you’re ready to enjoy leftovers, reheating is key. The best method is to use the oven. Preheat your oven to 325°F (165°C). Place the turkey in a baking dish. Add a splash of broth or water to keep it juicy. Cover the dish with foil to trap moisture. Heat for about 15 to 20 minutes, or until warmed through. If you prefer the microwave, use it on low power. Heat in short bursts, checking often to avoid drying it out. Whichever way you choose, these tips help keep your turkey tender and tasty.
FAQs
Common Questions
How long to cook turkey tenderloin per pound?
Cook turkey tenderloin for 25-30 minutes per pound at 375°F (190°C). Always check with a meat thermometer. The turkey should reach 165°F (74°C).
Can I prepare the herb paste in advance?
Yes, you can make the herb paste a day ahead. Store it in the fridge so the flavors blend well.
What should I serve with turkey tenderloin?
Serve turkey tenderloin with sautéed greens, roasted veggies, or mashed potatoes. A fresh salad also pairs nicely for a complete meal.
Cooking Tips
Is it necessary to marinate the turkey?
Marinating the turkey adds flavor. If you have time, let it rest for 30 minutes or overnight for richer taste.
How do I know when the turkey is done?
Use an instant-read thermometer to check the thickest part of the turkey. It should read 165°F (74°C) for safe eating.
Substitution Questions
Can I use dried herbs instead of fresh?
Yes, you can use dried herbs. Use one-third of the amount since dried herbs are stronger in flavor.
What can I use if I don’t have lemon juice?
If you lack lemon juice, use vinegar or lime juice as a substitute. Both add a nice tang.
This blog post covers how to cook a tasty turkey tenderloin. We explored the key ingredients, preparation steps, and cooking methods. I shared tips for selection, cooking, and serving to help you impress your guests. Variations can switch up flavors and methods to fit your needs. Proper storage and reheating processes keep your leftovers fresh. In short, cooking turkey tenderloin is simple and rewarding. Enjoy your meal and share your own ideas to make it even bette


