Garlic Herb Roasted Potatoes Flavorful and Easy Dish
. It includes detailed steps and all the ingredients needed for this dish. Enjoy your cooking! We explored the best ingredients for Garlic Herb Roasted Potatoes and detailed how to prepare them. I shared step-by-step instructions and helpful tips for perfect roasting. We also discussed variations to keep your dishes exciting and how to store leftovers effectively. Remember, the right techniques can make your roasted potatoes shine. With practice, you can impress friends and family with your cooking. Enjoy your culinary adventure!](https://goldendishy.com/wp-content/uploads/2025/06/ecc3322d-c379-4f60-a513-14af97ee26fb.webp)
Looking for a side dish that impresses? Garlic Herb Roasted Potatoes combine ease and flavor. With just a few ingredients, you can create a dish that steals the show. I’ll guide you through each step, from selecting the best potatoes to achieving that perfect golden crust. Ready to elevate your meals? Let’s dive into this delicious recipe!
Ingredients
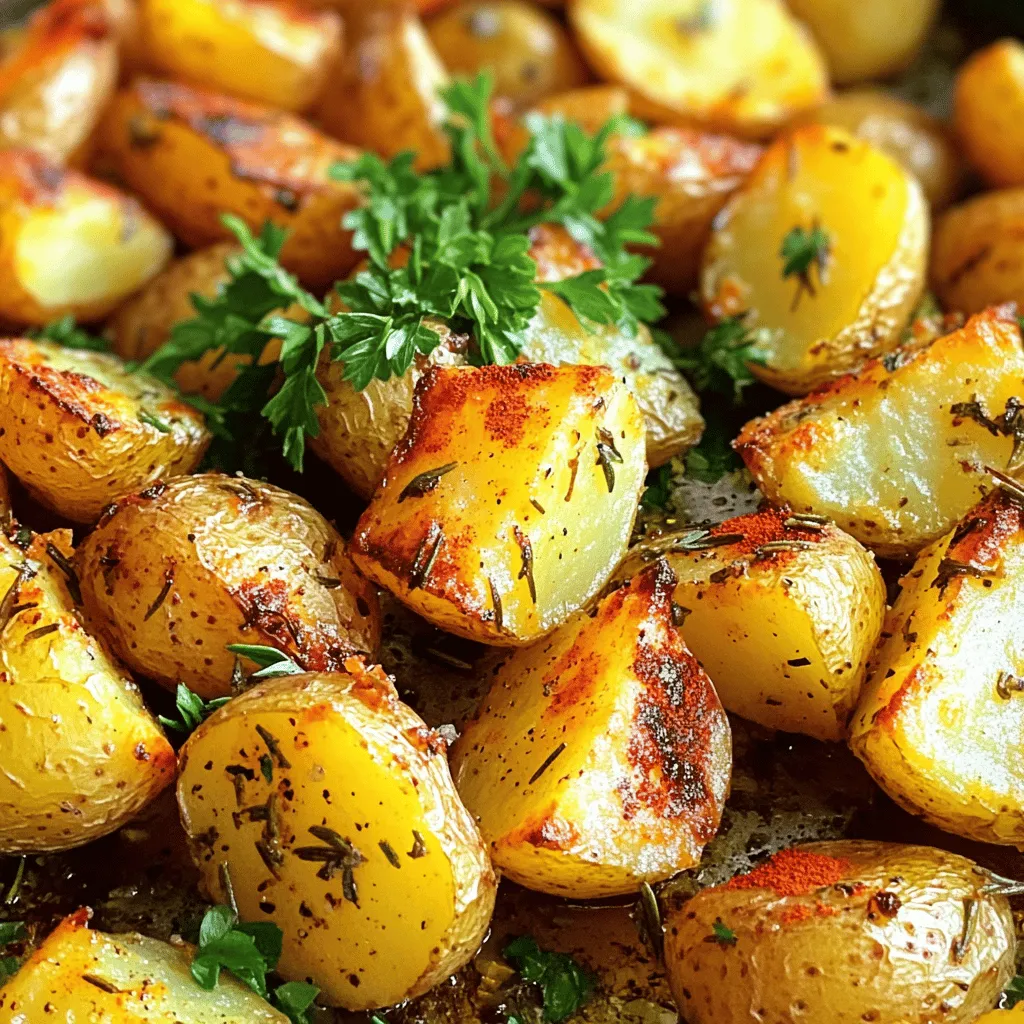
Detailed Ingredients List
– 2 pounds baby Yukon gold potatoes, halved
– 4 tablespoons extra virgin olive oil
– 4 cloves garlic, finely minced
– 1 tablespoon fresh rosemary, finely chopped
– 1 tablespoon fresh thyme, finely chopped
– 1 teaspoon smoked paprika
– Salt and freshly cracked black pepper to taste
– Fresh parsley, finely chopped, for garnish (optional)
Measurement Conversions
– 2 pounds = 32 ounces
– 4 tablespoons = 1/4 cup
– 1 tablespoon = 3 teaspoons
Key Ingredient Features
Baby Yukon gold potatoes are creamy and buttery. Their thin skins add great texture. Garlic brings a strong, savory taste. Using fresh herbs like rosemary and thyme adds brightness. Smoked paprika gives a warm, rich flavor. Olive oil helps crisp the potatoes while adding healthy fat. This mix creates a dish that is simple yet delicious.
Step-by-Step Instructions
Preheat Your Oven
First, preheat your oven to 400°F (200°C). This heat helps the potatoes roast well.
Prepare the Potatoes
Next, take 2 pounds of baby Yukon gold potatoes. Cut each potato in half. This size helps them cook quickly and evenly.
Seasoning Mix
In a big bowl, add the halved potatoes. Pour in 4 tablespoons of extra virgin olive oil. Then, add 4 cloves of minced garlic, 1 tablespoon of chopped rosemary, and 1 tablespoon of chopped thyme. Sprinkle in 1 teaspoon of smoked paprika. Add salt and cracked black pepper to taste. Mix everything well so each potato gets coated in the tasty herbs and oil.
Roasting Process
Now, line a large baking sheet with parchment paper. Spread the coated potatoes in a single layer on the sheet. Make sure they are not crowded. This helps them roast better. Place the baking sheet in the oven. Roast the potatoes for 30-35 minutes. Halfway through, flip them over to brown on both sides. They should look golden brown and be soft when you poke them with a fork.
Finishing Touches
Once the potatoes are done, take them out of the oven. Let them cool for a couple of minutes. This resting time lets the flavors mix nicely.
Serving Suggestions
For a nice touch, sprinkle freshly chopped parsley on the warm potatoes. You can also add a lemon wedge on the side. A quick squeeze of lemon gives a bright flavor that works well with the herbs. Enjoy your Garlic Herb Roasted Potatoes!
Tips & Tricks
Achieving Perfect Roasting
For perfect roasted potatoes, start with the right temperature. Preheat your oven to 400°F (200°C). This heat helps the potatoes become crispy outside and soft inside. Use baby Yukon gold potatoes. Their shape and waxy texture make them ideal for roasting. Cut them in half for even cooking. Spread them out on a baking sheet. Give them space to breathe. This helps them roast, not steam.
Common Mistakes to Avoid
One common mistake is overcrowding the baking sheet. If potatoes touch, they will not brown well. Another mistake is not seasoning enough. Salt and pepper bring out the flavors. Toss the potatoes well in the seasoning mix. Lastly, do not skip flipping them halfway. This ensures even browning on all sides.
Flavor Enhancements
To boost flavor, add fresh herbs and spices. Rosemary and thyme work well together. Smoked paprika adds a nice depth. You can also try garlic powder for extra garlic flavor. For a zesty finish, add lemon juice before serving. Fresh parsley on top adds color and freshness.

Variations
Herb Substitutions
You can switch up the herbs. Try using fresh basil or oregano. If you love a bit of heat, add fresh dill or sage for a unique twist. Each herb brings its own taste, letting you create new flavors each time.
Extra Ingredients to Add
Want to mix it up? You can add bell peppers or red onions. These veggies roast well and add sweetness. For a kick, toss in some crushed red pepper flakes. Cheese lovers can sprinkle some grated Parmesan on top before serving.
Cooking Method Alternatives
If you don’t want to roast, try boiling the potatoes first. Boil them until fork-tender, then toss with the herbs and oil. Next, pan-fry them for a crispy finish. You can also use an air fryer for quick, crispy potatoes without the oven. Each method gives a tasty result!
Storage Info
Storing Leftovers
After enjoying your Garlic Herb Roasted Potatoes, store any leftovers in a sealed container. Keep them in the fridge for up to three days. This helps keep the flavors fresh and tasty. Let them cool before sealing to avoid moisture buildup.
Reheating Instructions
To reheat, preheat your oven to 350°F (175°C). Spread the potatoes on a baking sheet. Heat for about 10 to 15 minutes or until they are warm. This method keeps them crispy. You can also use a microwave, but they may lose some crispiness. Heat in short bursts, stirring in between.
Freezing Tips
If you want to freeze your Garlic Herb Roasted Potatoes, make sure they are completely cool first. Place them in a freezer bag or an airtight container. They can last up to two months in the freezer. To reheat frozen potatoes, bake them straight from the freezer at 375°F (190°C) for about 20 to 25 minutes. This keeps them golden and delicious.
FAQs
What is the best type of potato for roasting?
The best type of potato for roasting is Yukon gold. They are creamy and have a nice texture. They hold their shape well during cooking. Red potatoes are also a great choice. They have a slight sweetness and a thin skin. Both types give you a crispy outside and fluffy inside.
Can I make Garlic Herb Roasted Potatoes in advance?
Yes, you can make Garlic Herb Roasted Potatoes in advance. You can roast them a day before serving. Just let them cool down and store them in the fridge. When ready to serve, reheat them in the oven. This keeps them crispy and tasty.
How do I make Garlic Herb Roasted Potatoes crispy?
To make your Garlic Herb Roasted Potatoes crispy, start with dry potatoes. Rinse them and then pat them dry. Use enough oil to coat them well. Spread the potatoes out on the baking sheet. Give them space to allow hot air to circulate. Flip them halfway through cooking for even crispiness.It includes detailed steps and all the ingredients needed for this dish. Enjoy your cooking!
We explored the best ingredients for Garlic Herb Roasted Potatoes and detailed how to prepare them. I shared step-by-step instructions and helpful tips for perfect roasting. We also discussed variations to keep your dishes exciting and how to store leftovers effectively.
Remember, the right techniques can make your roasted potatoes shine. With practice, you can impress friends and family with your cooking. Enjoy your culinary adventure!
. It includes detailed steps and all the ingredients needed for this dish. Enjoy your cooking! We explored the best ingredients for Garlic Herb Roasted Potatoes and detailed how to prepare them. I shared step-by-step instructions and helpful tips for perfect roasting. We also discussed variations to keep your dishes exciting and how to store leftovers effectively. Remember, the right techniques can make your roasted potatoes shine. With practice, you can impress friends and family with your cooking. Enjoy your culinary adventure!](https://goldendishy.com/wp-content/uploads/2025/06/ecc3322d-c379-4f60-a513-14af97ee26fb-300x300.webp)


![- 1 pound fresh shrimp, peeled and deveined - 3 tablespoons unsalted butter, divided - 4 cloves garlic, finely minced - 1 teaspoon smoked paprika - 1 teaspoon ground cumin - Salt and freshly ground black pepper, to taste - 8 small corn tortillas - 1 cup red cabbage, finely shredded - 1 ripe avocado, sliced into thin wedges - Fresh cilantro leaves, roughly chopped, for garnish - Lime wedges, cut into quarters, for serving To make these garlic butter grilled shrimp tacos, you need fresh shrimp. I recommend getting shrimp that are firm and have a nice sheen. Make sure they are peeled and deveined for easy eating. Butter is key for adding richness. Use unsalted butter so you can control the saltiness. Garlic adds a wonderful aroma and flavor. Mince it finely for the best taste. For spices, smoked paprika brings a deep, smoky flavor. Ground cumin adds warmth. Be sure to season with salt and black pepper to taste. Corn tortillas are the perfect wrap. They are soft and add a nice corn flavor. Red cabbage gives a crunchy texture and a pop of color. Sliced avocado adds creaminess. Fresh cilantro gives a burst of freshness. Finally, lime wedges add a zesty kick. To see the full recipe, check out the [Full Recipe]. To start, melt 2 tablespoons of unsalted butter in a large skillet. Use medium heat. Once the butter is melted, add 4 cloves of minced garlic. Sauté the garlic for 1-2 minutes. It should smell great and turn a light golden color. Be careful not to burn the garlic! Next, stir in 1 teaspoon of smoked paprika and 1 teaspoon of ground cumin. Add a pinch of salt and fresh black pepper to taste. Mix well. This creates a tasty marinade for the shrimp. Now, add 1 pound of peeled and deveined shrimp to the skillet. Cook the shrimp for 3-4 minutes. Stir occasionally to make sure they cook evenly. You will know they are done when they turn opaque and pink. This buttery garlic mixture makes them extra delicious! While the shrimp cooks, take another skillet and heat it over medium-high heat. Warm each of the 8 small corn tortillas for about 30 seconds on each side. You want them to be soft and flexible. Look for slight char marks on the tortillas. This adds great flavor! To build your tacos, take a warm tortilla and layer some cooked shrimp in the center. Then, top it with shredded red cabbage and avocado slices. The cabbage adds crunch, while the avocado gives creaminess. Finish off your tacos by adding fresh cilantro on top. Serve them with lime wedges on the side for a zesty touch. For a nice presentation, arrange the tacos on a colorful platter. You can add extra cilantro and lime wedges to make it look even better. Enjoy every bite with a squeeze of lime! When picking shrimp, you have two main choices: fresh or frozen. Fresh shrimp can taste better, but frozen shrimp is often just as good. If you choose frozen shrimp, look for those that are flash-frozen right after harvest. This keeps them fresh and tasty. Size matters too! For tacos, I suggest using medium to large shrimp. They hold up well in the taco and give you a satisfying bite. Aim for shrimp that are about 21 to 30 per pound. To boost the flavor, you can swap the spices. Try adding chili powder or even a pinch of cayenne for heat. If you want a smoky taste, smoked paprika works wonders. You can also mix in some lime zest for a bright kick. To elevate your tacos, think about toppings. Mango salsa adds sweetness, while jalapeños bring heat. A drizzle of sour cream or a splash of hot sauce can make your tacos sing. Do not overcook your shrimp. They cook quickly and should only take 3-4 minutes. When they turn pink and opaque, they are done. Overcooking makes them tough and rubbery. For the tortillas, warmth is key. Heat them in a hot skillet for about 30 seconds on each side. This gives them a nice char and keeps them soft. You can also wrap them in a clean towel to keep them warm while you assemble your tacos. {{image_4}} You can switch the shrimp for other proteins. Chicken is a great option. Use boneless chicken breasts cut into bite-sized pieces. Season them like the shrimp. Cook until golden brown and juicy. Fish also works well. Choose firm fish like mahi-mahi or cod. Grill or pan-fry the fish until flaky. For a vegetarian twist, try veggies or tofu. Grilled bell peppers, onions, and zucchini make a colorful filling. Tofu absorbs flavors well, so marinate it before grilling. Want to spice things up? Add jalapeños or your favorite hot sauce. Slice jalapeños and mix them in with the shrimp. This adds a nice kick. You can change the toppings too. Mango salsa adds sweetness and freshness. Just mix diced mango, red onion, and lime juice. Another tasty option is crema. This creamy sauce balances the spices. Mix sour cream with lime juice and a pinch of salt. Serve your tacos with tasty sides. A fresh salad pairs well. Try a simple cucumber and tomato salad. Rice and beans are classic choices too. Cilantro lime rice adds bright flavor. For drinks, grab a cold beer or a zesty margarita. A light, fruity drink will complement the meal. Explore the full recipe for more ideas. To keep your garlic butter grilled shrimp tacos fresh, store them in an airtight container. Place the shrimp and toppings in separate containers. This helps maintain the flavors and textures. For the tortillas, wrap them in foil or plastic wrap. This keeps them soft and prevents them from drying out. Use them within three days for the best taste. To reheat the shrimp, place them in a skillet over low heat. Add a splash of water or a bit of butter to keep them moist. Heat for about five minutes, stirring gently. For the tortillas, warm them in a dry skillet for about 30 seconds each side. This method helps keep them soft and adds a nice char. Avoid using the microwave, as it may make them chewy. Yes, you can freeze grilled shrimp! Cool the shrimp completely before placing them in a freezer-safe bag. Squeeze out as much air as possible to prevent freezer burn. They can last up to three months in the freezer. When you're ready to use them, thaw overnight in the fridge. For meal prep, consider freezing the shrimp without the seasonings. This way, you can add fresh spices when you cook them later. You can tell when shrimp are cooked by looking for a few signs. First, they change color from grey to bright pink. Second, they curl into a C shape. Finally, perfectly cooked shrimp feel firm to the touch. If they are tough or rubbery, they may be overcooked. The cooking time is usually 3-4 minutes, but this can vary with size. Yes, you can prepare some parts of the tacos in advance. Cook the shrimp and store them in the fridge for up to two days. You can also warm the tortillas just before serving. If you want to save time, chop the cabbage and avocado ahead of time. Just remember to squeeze lime juice on the avocado to keep it fresh and green. Some great sides to serve with shrimp tacos include: - Cilantro lime rice - Black beans - Corn salad - Chips with salsa - Grilled vegetables These sides balance the flavors of the shrimp tacos and make the meal more complete. You can also serve a light salad to add freshness. You learned how to make delicious shrimp tacos from scratch. We covered fresh ingredients, step-by-step cooking, and tasty toppings. Remember, fresh shrimp and warm tortillas make a big difference. You can customize flavors with spices or different proteins. Enjoy serving them with a refreshing drink on the side. Proper storage will keep your leftovers tasty too. Whether you’re cooking for one or many, these tacos are a hit. Enjoy your cooking and get ready for a yummy meal.](https://goldendishy.com/wp-content/uploads/2025/06/f6806160-83d3-4aa8-a207-34a87a11273f-768x768.webp)