Garlic Herb Butter Steak Juicy and Flavorful Delight

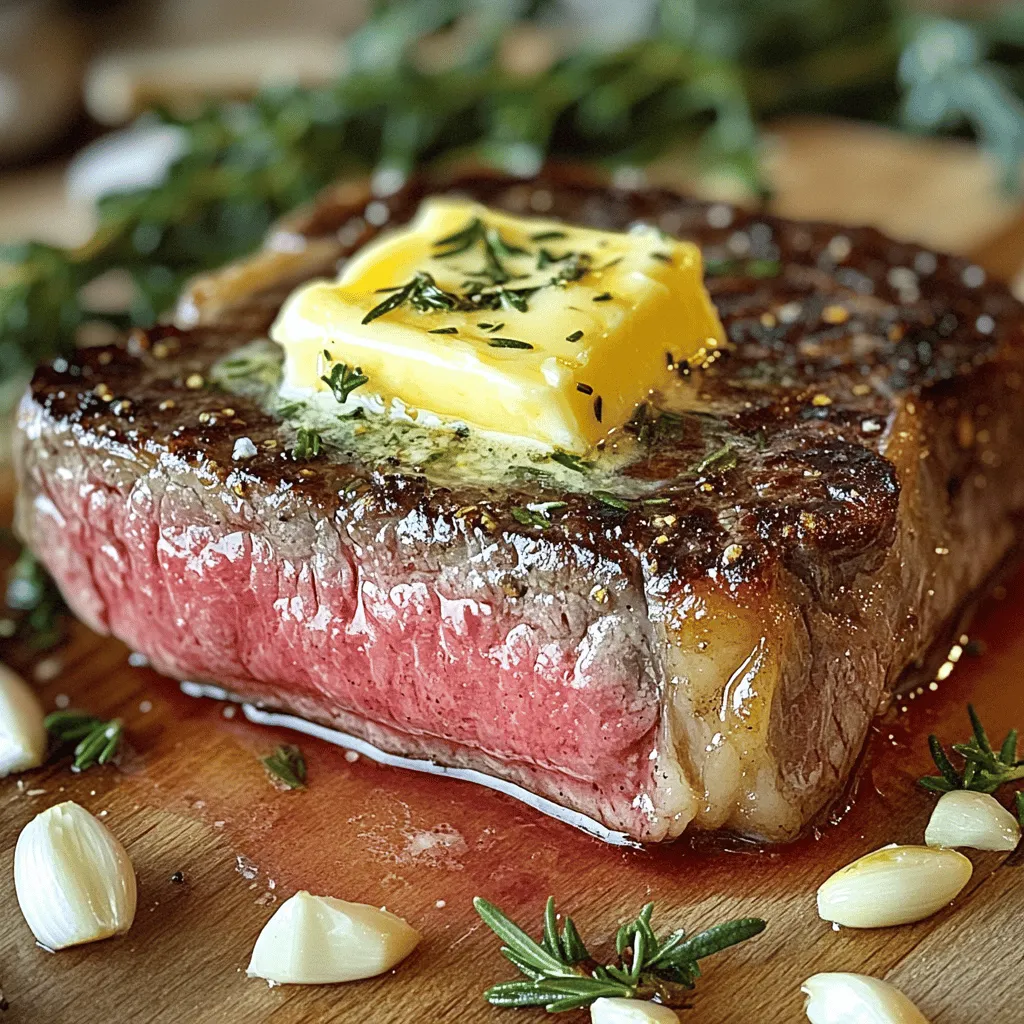
Are you ready to elevate your steak game? My Garlic Herb Butter Steak recipe is your ticket to a juicy, flavorful delight that will impress any guest. With just a few simple ingredients like fresh herbs and garlic butter, you can create a dish that bursts with taste. Follow my easy step-by-step guide to achieve the perfect cook every time. Let’s dive in and transform your dinner into a gourmet experience!
Ingredients
Main Ingredients
– 2 ribeye or sirloin steaks (1 inch thick)
– 4 tablespoons unsalted butter, divided
– 4 cloves garlic, finely minced
Fresh Herbs
– 2 tablespoons fresh rosemary leaves, finely chopped
– 2 tablespoons fresh thyme leaves, finely chopped
Seasoning and Oil
– Kosher salt and freshly cracked black pepper to taste
– 1 tablespoon extra virgin olive oil
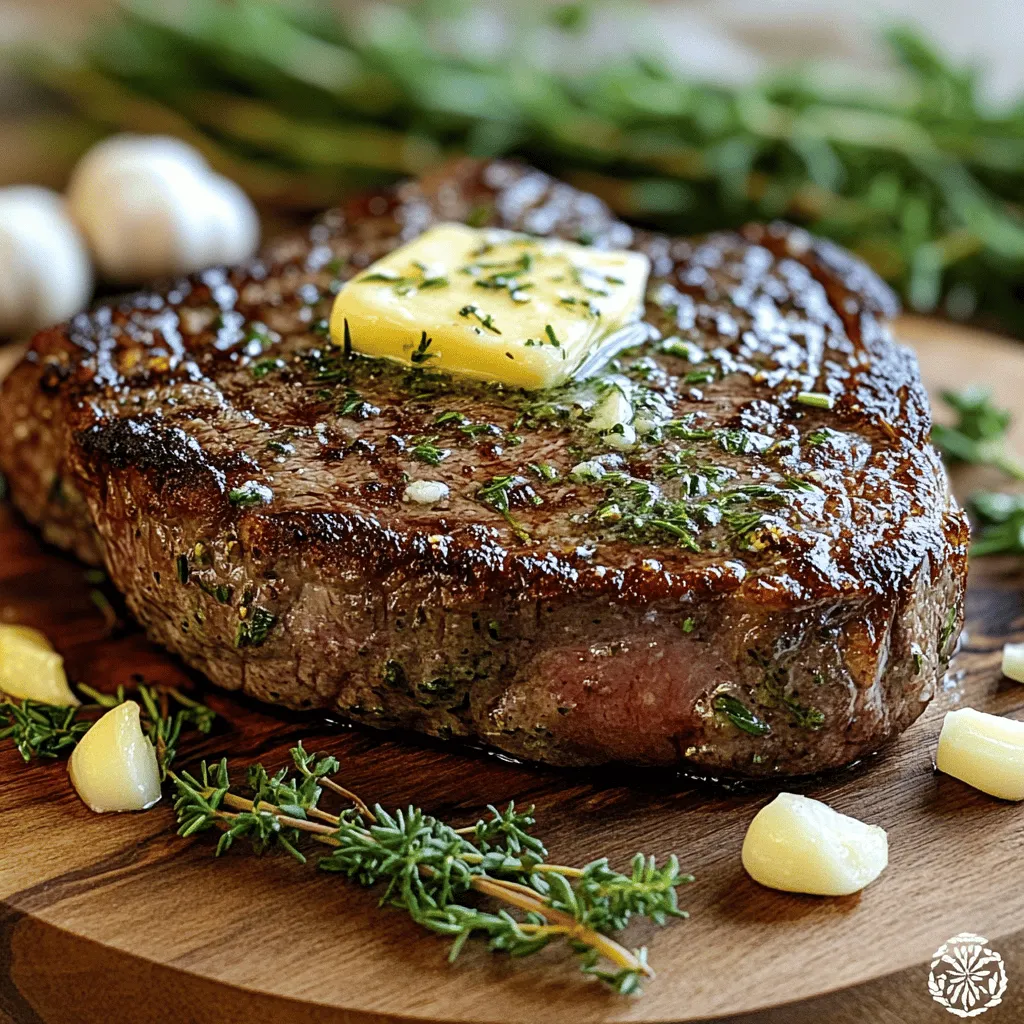
The beauty of garlic herb butter steak lies in its simple yet rich flavors. Using high-quality cuts like ribeye or sirloin makes a big difference. They are tender and juicy, perfect for this dish.
You will need unsalted butter for this recipe. It allows you to control the salt in the dish. Fresh garlic adds a punch of flavor that makes your steak shine.
Herbs like rosemary and thyme bring an earthy taste that pairs well with beef. Chop them finely to mix easily into your butter.
For seasoning, kosher salt and black pepper are key. They enhance the steak’s natural flavors without overpowering them. A drizzle of extra virgin olive oil adds richness and helps the steak sear beautifully.
This mix of ingredients makes the steak juicy and flavorful.
Step-by-Step Instructions
Preparing the Steaks
– Remove steaks from the refrigerator and let them reach room temperature.
– Pat the steaks dry and season generously with salt and pepper.
Starting with room temperature steaks helps them cook evenly. Use paper towels to pat them dry. This keeps them from steaming in the pan. Season both sides well with salt and pepper. This step adds great flavor.
Making the Garlic Herb Butter
– Combine softened butter with minced garlic and chopped herbs.
– Stir well and set aside.
For the garlic herb butter, take softened butter and mix in minced garlic. Add chopped rosemary and thyme. Stir until all ingredients blend well. This mixture adds rich flavor to the finished dish.
Cooking the Steaks
– Heat olive oil in a cast-iron skillet.
– Sear steaks for 4-5 minutes on each side for medium-rare.
Heat olive oil in your skillet until it shimmers. Carefully add the seasoned steaks. Sear them for about 4-5 minutes on each side for medium-rare. Adjust the time for your desired doneness.
Basting with Butter
– Add remaining butter during last minute of cooking.
– Baste steaks continuously for enhanced flavor.
In the last minute, add the remaining butter to the pan. Use a spoon to baste the steaks with the melting butter. This step enhances the flavor and makes the meat tender.
Resting the Steaks
– Transfer cooked steaks to a cutting board.
– Allow to rest for 5-10 minutes before slicing.
Once cooked, move the steaks to a cutting board. Let them rest for 5-10 minutes. This helps the juices redistribute, ensuring every bite stays juicy.
Serving Suggestions
– Slice steaks against the grain.
– Top with garlic herb butter and any remaining skillet butter.
After resting, slice the steaks against the grain for tenderness. Serve them topped with the garlic herb butter and any butter left in the skillet. For extra flavor, add fresh herbs on top. Enjoy this savory dish with your favorite sides!
Tips & Tricks
Choosing the Right Cut of Steak
When picking a steak, consider ribeye and sirloin. Ribeye is rich and tender. It has a lot of fat, which adds flavor. Sirloin is leaner and firmer but still tasty. Thickness matters too. A steak that is 1 inch thick cooks evenly. Thicker cuts take longer to cook, so watch them closely.
Achieving Perfect Doneness
To check if your steak is done, use a thermometer. For medium-rare, aim for 130°F. Insert the probe into the thickest part. If you prefer it more cooked, adjust your timing. Each degree counts. Remember, the steak will keep cooking after you take it off the heat.
Enhancing Flavor
You can change the flavors with substitutes. If you don’t have garlic, try shallots or onion. Fresh herbs like parsley or basil also work well. For a kick, add spices like paprika or chili flakes. Hot sauce can boost the flavor too. Experiment with what you like to make your steak special.

Variations
Different Cuts of Steak
You can use many cuts for this garlic herb butter steak. Ribeye and sirloin work great, but tenderloin is a real treat. Tenderloin is very soft and melts in your mouth. Flank steak is another choice. It offers a leaner option with a nice flavor. If you want to save some cash, flank steak is budget-friendly. You can still enjoy tasty steak without spending too much.
Herb Butter Variations
Herb butter is key to this dish’s flavor. You can add a variety of herbs or spices. Try mixing in parsley or chives for a fresh twist. If you like a kick, add red pepper flakes. You can also infuse your butter with lemon zest. The bright citrus flavor adds a lovely touch. Smoked paprika can give your butter a nice smoky taste. Both options bring new life to your garlic herb butter.
Cooking Methods
You can cook your garlic herb butter steak in several ways. Grilling gives a great smoky flavor. Just make sure your grill is hot before adding the steak. Pan-searing is another easy method. A cast-iron skillet gives a nice crust. If you prefer, you can bake your steak in the oven. Bake it at 400°F for a juicy steak that’s easy to cook. Each method brings out different flavors and textures, so choose what you like best!
Storage Info
Storing Leftovers
To keep your garlic herb butter steak fresh, refrigerate it right away. Place the steak in an airtight container. This helps keep the meat juicy and full of flavor. You can store it for up to three days. For the garlic herb butter, use a small jar or wrap it well in plastic wrap. This prevents it from absorbing other smells in the fridge.
Reheating Instructions
When reheating your steak, avoid using a microwave. Microwaves can dry out the meat. Instead, use a skillet over low heat. Add a splash of water or broth to keep it moist. Cover the skillet with a lid to trap steam. This method helps keep your steak tender and flavorful. For the garlic herb butter, you can melt it gently in a small pan when ready to use.
Freezing Options
Yes, you can freeze garlic herb butter steak! Wrap it tightly in foil or freezer bags. This keeps out air and prevents freezer burn. It can last up to three months in the freezer. For the garlic herb butter, scoop it into ice cube trays and freeze. Once frozen, pop the cubes into a freezer bag. This way, you can use just what you need later.
FAQs
What is the best temperature to cook steak?
The best temperature for cooking steak varies by how you like it. Here are the ideal internal temperatures for different doneness levels:
– Rare: 125°F (52°C)
– Medium Rare: 135°F (57°C)
– Medium: 145°F (63°C)
– Medium Well: 150°F (66°C)
– Well Done: 160°F (71°C)
Use a meat thermometer for accuracy. Insert it into the thickest part of the steak for the best reading.
How do I know when my steak is done?
To know if your steak is done, watch for these signs:
– Color: The outside should be browned.
– Touch: Press the steak; it should feel firm but not hard.
– Juices: The juices should run clear when you cut into it.
– Thermometer: Use a meat thermometer for exact doneness.
These signs help you cook steak perfectly every time.
Can I make garlic herb butter ahead of time?
Yes, you can make garlic herb butter ahead of time. Here’s how:
– Mix and Store: Combine the butter, garlic, and herbs and store it in an airtight container.
– Refrigerate: Keep it in the fridge for up to one week.
– Freeze: For longer storage, freeze it in small portions. Wrap it tightly in plastic wrap.
This makes cooking easy when you’re short on time.
What side dishes go well with garlic herb butter steak?
Many side dishes pair nicely with garlic herb butter steak. Here are some tasty options:
– Roasted Vegetables: Carrots, Brussels sprouts, or asparagus.
– Mashed Potatoes: Creamy and rich, they complement the steak.
– Green Salad: A fresh salad with vinaigrette adds crunch.
– Rice Pilaf: Fluffy rice with herbs balances the meal.
These sides enhance the steak’s flavors and create a complete meal.
In this post, we explored how to cook a delicious garlic herb butter steak. We shared key ingredients, step-by-step cooking instructions, and helpful tips. You learned how to choose the right cut and achieve your preferred doneness. The variations also offer creative ideas for steak lovers. Finally, we discussed proper storage and reheating methods to keep your steak tasty. With this knowledge, you can impress anyone at your table with a mouthwatering meal. Enjoy your cooking journey!


![- 1 pound (450g) potato gnocchi - 2 cups marinara sauce - 1 cup ricotta cheese - 1 cup shredded mozzarella cheese - 1/2 cup grated Parmesan cheese - 1 cup baby spinach, roughly chopped - 1/2 cup cherry tomatoes, halved - 1 tablespoon olive oil - 1 teaspoon garlic powder - Salt and pepper to taste - Fresh basil leaves for garnish Cooking gnocchi is simple. You only need a few key ingredients to make this dish shine. Start with potato gnocchi. It gives a soft, fluffy texture. Marinara sauce adds a rich flavor. Ricotta cheese adds creaminess. Mozzarella and Parmesan bring that cheesy goodness. Don’t forget the fresh spinach. It adds color and nutrition. Cherry tomatoes offer a juicy burst in each bite. Olive oil helps everything meld together. Garlic powder adds depth. Finally, you can season with salt and pepper to your liking. - Alternative cheeses for different flavors: You can swap ricotta for cottage cheese. Use provolone or gouda instead of mozzarella for a twist. - Gluten-free gnocchi options: Look for gnocchi made with rice or corn flour. They work just as well! - Seasonal vegetables to replace spinach or tomatoes: Try bell peppers or zucchini in place of spinach. Fresh asparagus or roasted squash can replace tomatoes too. These substitutions keep the dish fresh and exciting. You can adjust based on what you have or what is in season. Check out the Full Recipe for more details on how to create this loaded baked gnocchi dish! - Preheat the oven to 400°F (200°C). - In a large pot, bring salted water to a boil. - Carefully add the potato gnocchi to the boiling water. - Cook until the gnocchi float, about 2-3 minutes. - Use a slotted spoon to transfer them to a colander. - In a big mixing bowl, combine the drained gnocchi with marinara sauce. - Add ricotta cheese, chopped baby spinach, and garlic powder. - Season with a pinch of salt and pepper. - Gently fold the mixture so all gnocchi get coated. - Take a baking dish and grease it with olive oil. - Transfer the gnocchi mixture to the dish, spreading it evenly. - Top the mix with mozzarella and Parmesan cheese. - Scatter halved cherry tomatoes over the cheese layer. - Drizzle olive oil on top for a nice glaze. - Bake in the preheated oven for 20-25 minutes. - Look for bubbly and golden cheese. - Once baked, remove the dish and let it cool. - Garnish with fresh basil leaves before serving. This loaded baked gnocchi dish is a savory delight that brings comfort and joy. For the full recipe, check out the detailed instructions. Enjoy your cooking! To get that perfect gooey cheese texture, use a mix of cheeses. I like ricotta for creaminess and mozzarella for stretch. Bake the dish until the cheese bubbles and starts to brown. Keep an eye on it to avoid burning. For an even golden-brown top, spread the cheese evenly. A light drizzle of olive oil helps too. You can customize this dish for different diets. For a vegan version, swap the cheese with plant-based options. Low-carb eaters can use cauliflower gnocchi instead of potato gnocchi. Try adding different seasonings. Red pepper flakes add heat, while Italian herbs bring freshness. You can also toss in cooked meats for more flavor. Serve the loaded gnocchi in colorful bowls for a nice look. This helps show off the melted cheese and bright tomatoes. Garnish with fresh basil leaves for a pop of color. A sprinkle of cracked black pepper can add an extra touch. For an elegant finish, drizzle a bit of olive oil on top. For the full recipe, check out the [Full Recipe]. {{image_4}} You can change up the flavor by using different sauces. Pesto sauce gives a fresh taste. It pairs well with the gnocchi's soft texture. Spinach-based sauces add a nice green color and taste. They also boost the nutrition. You can also try a cream or Alfredo sauce. This makes the dish rich and creamy. Each sauce brings its own twist to the meal. Adding proteins makes your loaded baked gnocchi heartier. You can use chicken for a classic touch. Sliced sausage adds a nice zing. If you want a plant-based option, mushrooms work great. They soak up flavors and add depth. Tofu is another good choice for a vegetarian boost. These proteins will fill you up and keep the dish exciting. Want to spice things up? You can add heat with red pepper flakes or jalapeños. They give the dish a nice kick. If you prefer smoky flavors, try smoked paprika or bacon bits. These flavors create a unique twist. You might even consider adding a sweet element, like caramelized onions. This balances the savory notes and adds depth. Each of these enhancements can make your dish special. To keep your loaded baked gnocchi fresh, let it cool. Then, place it in an airtight container. This helps prevent moisture loss. You can also use a glass dish with a lid. Make sure to store it in the fridge. This way, it stays safe to eat for later. When reheating, use the oven for the best results. Preheat it to 350°F (175°C). Place the gnocchi in an oven-safe dish, cover it with foil, and heat for about 15-20 minutes. You can also use a microwave, but it may not keep the texture. If you want to freeze it, do so before baking. Wrap it tightly in plastic wrap, then in foil. It can last up to three months in the freezer. In the fridge, loaded baked gnocchi lasts about three to four days. Check for any changes in smell or color to spot spoilage. If you see mold or it smells off, it’s best to throw it away. Enjoy your delicious meal, and don’t hesitate to check out the Full Recipe for more on this tasty dish! Baked gnocchi is done when the cheese is bubbly and golden. It should smell amazing too! Check the edges for a nice brown color. The dish usually takes 20-25 minutes in the oven. Yes, you can make Loaded Baked Gnocchi ahead! Prepare it and store it in the fridge. Just cover it well. When ready to eat, bake it straight from the fridge. You may need to add a few extra minutes to the cooking time. Great side dishes include a simple green salad or garlic bread. You can also serve roasted veggies for a healthy touch. Pairing with a light soup can make it a cozy meal too. Absolutely! Frozen gnocchi works well for this recipe. Just cook it according to the package instructions. Then, follow the steps in the Full Recipe to make it tasty. Yes, Loaded Baked Gnocchi is perfect for meal prep! You can portion it out for easy lunches or dinners. Just store it in airtight containers in the fridge. Enjoy it throughout the week! Loaded Baked Gnocchi is a fun dish you can easily make. You learned about the great ingredients, simple steps to prepare, and ways to customize it. Remember to enjoy experimenting with flavors and textures. You can adapt it to fit your taste. Whether you're storing leftovers or reheating, you can keep it fresh. This dish not only warms your belly but also sparks creativity in your kitchen. Dive in and enjoy making this delicious meal!](https://goldendishy.com/wp-content/uploads/2025/06/a4704798-2aa5-49c0-949b-2886f6a00168-768x768.webp)

![- Bell peppers and their colors: You can use four large bell peppers. Choose any color you like: red, yellow, green, or orange. Each adds its own taste and look to the dish. - Protein options: For the filling, you can select either ground turkey or beef. Both options will give you a hearty and satisfying meal. - Base ingredients: You will need one cup of cooked rice. You can use either white or brown rice. Additionally, add one cup of black beans, rinsed and drained, and one cup of corn. You can choose fresh, frozen, or canned corn. - Flavor enhancers: To boost the flavor, use one cup of salsa. You can pick your favorite brand or make it homemade. Also, add one tablespoon of taco seasoning. You can use store-bought or make your own. - Toppings: For the top of the peppers, use one cup of shredded cheddar cheese. This cheese gives a nice gooey texture. You can add extra cheese for a more decadent touch. Fresh cilantro is a great garnish, adding color and a bit of fresh flavor. You can find the full recipe in the earlier sections of this article. Happy cooking! Preheat the oven to 375°F (190°C). This helps cook the peppers evenly. While it heats, grab a baking dish. Set it aside for the stuffed peppers. Prepare the bell peppers by slicing the tops off. Remove the seeds and membranes, which can taste bitter. Brush each pepper with olive oil. This adds flavor and helps them roast nicely. Place the peppers upright in the baking dish. Cook the meat in a large skillet over medium heat. Add 1 pound of ground turkey or beef. Break it apart with a spatula as it cooks. Make sure it browns well. Once cooked, drain any excess fat. This keeps the filling lean and tasty. Next, add rice, black beans, corn, salsa, and seasoning to the skillet. Use 1 cup of cooked rice, 1 cup of rinsed black beans, and 1 cup of corn. Pour in 1 cup of salsa and 1 tablespoon of taco seasoning. Sprinkle some salt and pepper too. Mix everything well. Simmer the mixture for about 5 minutes. This lets the flavors meld together, making the filling more delicious. Stir it occasionally to avoid sticking. Now, mix in half of the shredded cheddar cheese. This makes the filling creamy and rich. Remove the skillet from heat. Stuff the peppers by spooning the mixture into each one. Press down gently to pack it in well. This ensures every bite is full of flavor. Top with more cheese by sprinkling the remaining cheddar over each filled pepper. It will melt and brown nicely while baking. Bake the peppers by covering the baking dish with aluminum foil. Place it in the oven for 25-30 minutes. In the last 10 minutes, remove the foil. This helps the cheese bubble and turn golden. Once done, cool the peppers for a few minutes before serving. The filling will be very hot. If you like, garnish with fresh cilantro for extra flavor. Enjoy your taco stuffed bell peppers! Remember, you can find the full recipe above for all the details. How to choose fresh bell peppers: Pick bell peppers that are firm and shiny. Look for smooth skin with no blemishes. A good pepper feels heavy for its size. Colors like red, yellow, and orange are sweeter. Green peppers are a bit more bitter. All colors work well in this dish. Ensuring optimal cooking temperature and timing: Set your oven to 375°F (190°C) before you start cooking. This temperature helps the peppers cook evenly. Bake them for 25-30 minutes. In the last 10 minutes, uncover the dish to let the cheese brown. Suggestions for additional spices or ingredients: Add cumin or chili powder for an extra kick. You can also mix in diced tomatoes or jalapeños for more flavor. If you love heat, try adding some hot sauce to the filling. Offering a vegetarian option: For a vegetarian version, swap the meat for lentils or extra beans. You can use quinoa instead of rice for a healthy twist. This way, everyone can enjoy taco stuffed bell peppers! Plating ideas for presentation: Serve the peppers on a colorful platter. You can place them upright for a fun look. Add a dollop of sour cream on the side. Fresh cilantro on top adds a pop of green. Recommended side dishes for a complete meal: Pair your stuffed peppers with a fresh salad or tortilla chips. A side of guacamole or salsa also works great. These sides make the meal more fun and filling. For the full details, check out the Full Recipe! {{image_4}} You can mix up the protein in taco stuffed bell peppers. If you want a meatless option, try using black beans or lentils. They add great flavor and protein. For a twist, you can also use ground chicken or pork. When it comes to cheese, feel free to get creative. While cheddar is classic, you might try Monterey Jack or pepper jack for extra spice. You can also use cream cheese for a creamier filling. For salsa, any kind works! Chunky salsa adds texture, while smooth salsa blends in. You can even make your own with fresh tomatoes, onions, and peppers. Grilling adds a smoky flavor. Wrap the stuffed peppers in foil and place them on the grill. Cook for about 15 to 20 minutes until tender. You can also use a slow cooker. Place the stuffed peppers in the slow cooker with a bit of sauce. Cook on low for 4 to 6 hours for a hands-off approach. If you need a quick meal, the microwave is your friend. Just place the stuffed peppers in a microwave-safe dish. Cover with a lid or plastic wrap. Heat for about 5 to 7 minutes, checking for doneness. Using seasonal veggies makes your dish brighter. In summer, add fresh zucchini or corn. In fall, consider adding diced sweet potatoes or pumpkin. These add flavor and nutrition. For holidays, you can theme your peppers. For Halloween, use orange peppers and stuff them with spicy fillings. For Christmas, use red and green peppers and add festive spices. It’s a fun way to celebrate! For the full recipe, check out [Full Recipe]. To store leftovers, place the stuffed peppers in an airtight container. This keeps them fresh and tasty. You can keep them in the fridge for up to three days. Make sure they cool down first to avoid steam build-up. If you want to save some for later, freezing is a great option. Wrap each stuffed pepper tightly in plastic wrap. Then, place them in a freezer-safe bag. They can last for up to three months in the freezer. When you’re ready to eat, thaw them overnight in the fridge. To reheat, bake at 350°F (175°C) for about 25 minutes, or until heated through. For easy meal prep, you can cook a big batch in advance. Make the filling and stuff the peppers ahead of time. Store them in the fridge for two days before baking. This way, you can have a quick meal ready on busy nights. You can also use different colors of bell peppers for fun and variety. What can I substitute for rice in the recipe? You can use quinoa or cauliflower rice instead of regular rice. Quinoa adds protein and fiber. Cauliflower rice keeps it low-carb. Both options work well and keep the dish tasty. How do I know when the peppers are fully cooked? The peppers should be tender but not mushy. You can poke them with a fork. If they give easily but hold their shape, they are ready. The cheese should be melted and bubbly on top too! Caloric content and portion sizes Each stuffed pepper is about 300 calories. This includes the filling and toppings. If you use ground turkey, it may be lower in calories. Adjust the portion size based on your hunger. Health benefits of ingredients used Bell peppers are rich in vitamins A and C. They help boost your immune system. Black beans provide protein and fiber, promoting good digestion. Corn adds vitamins and a sweet crunch. What drinks pair well with taco stuffed bell peppers? A refreshing drink like lemonade or iced tea works great. For adults, a light beer or margarita adds fun. Choose drinks that balance the spice of the peppers. Can taco stuffed bell peppers be made in advance for gatherings? Yes! You can prepare the stuffed peppers ahead of time. Just store them in the fridge. Bake them when your guests arrive. They will taste fresh and hot from the oven! For the full recipe, check the earlier section. Taco stuffed bell peppers are fun and easy to make. We covered the key ingredients, steps, and helpful tips for a great dish. You learned how to mix flavors and pack ingredients for maximum yum. With ideas for storage and meal prep, you’re ready to enjoy these peppers anytime. Get creative with variations to keep things fresh. Whether for a family dinner or a gathering, these peppers can impress. Happy cooking!](https://goldendishy.com/wp-content/uploads/2025/06/e36cd186-0c48-4bd5-9184-2d07a9c06671-768x768.webp)
![For this vegan creamy pesto pasta, you will need: - 8 oz whole wheat pasta (spaghetti or fusilli) - 2 cups fresh basil leaves, packed - 1/4 cup pine nuts (or walnuts) - 2 tablespoons nutritional yeast - 3 cloves of garlic, minced - 1/2 cup raw cashews, soaked for 2 hours - 1/4 cup extra virgin olive oil - Juice of 1 fresh lemon - Salt and pepper, to taste - 1 cup cherry tomatoes, halved (for garnish) - Extra fresh basil leaves (for garnish) You can adjust the recipe to your taste. Here are some ideas: - Swap pine nuts for sunflower seeds for a nut-free option. - Add spinach or arugula for more greens. - Include red pepper flakes for spice. - Mix in cooked chickpeas for added protein. To get the best flavor, choose fresh basil that is vibrant and fragrant. Look for basil leaves without any yellow or brown spots. For nuts, check that they are fresh and not stale. Store nuts in an airtight container to keep them crunchy. If you can, buy from local sources to get the best quality. For a great flavor, toast the nuts lightly before using them in the pesto. This will bring out their natural oils and enhance the taste. You can find the full recipe in the earlier section. Enjoy your cooking! To start, fill a large pot with water. Add a good amount of salt to the water. Bring the water to a rolling boil over high heat. Once it boils, add 8 oz of whole wheat pasta. Cook the pasta according to the package instructions. It usually takes 8-10 minutes to become al dente. Before draining, reserve 1/2 cup of the starchy pasta water. Drain the pasta in a colander and set it aside. Next, grab a high-speed blender or food processor. Add 2 cups of fresh basil leaves, packed. Then, add 1/4 cup of pine nuts, or walnuts if you prefer. Toss in 2 tablespoons of nutritional yeast for a cheesy flavor. Add 3 cloves of minced garlic and 1/2 cup of soaked raw cashews. Pour in 1/4 cup of extra virgin olive oil and the juice of 1 lemon. Season with salt and pepper. Blend on high until smooth and creamy. If the pesto is too thick, add the reserved pasta water slowly until you reach the right texture. Now, return the drained pasta to the pot over low heat. Pour the creamy pesto sauce over the pasta. Gently toss the pasta in the sauce until all the strands are coated. If the pesto is still thick, stir in more reserved pasta water, 1 tablespoon at a time. Taste the pasta and adjust the seasoning as you like. You can add more salt, pepper, or lemon juice for a brighter flavor. To serve, divide the creamy pesto pasta into bowls. Top with halved cherry tomatoes for color and extra fresh basil leaves for garnish. Enjoy your delicious vegan creamy pesto pasta! For the full recipe, check back to the ingredients section. To make your vegan creamy pesto pasta smooth, you need the right balance. Soak the cashews for at least two hours. This softens them, making it easy to blend. When you blend, start with only a little water. You can add more later if needed. This helps you control the creaminess. If your pesto feels thick, just add the reserved pasta water slowly. This way, you can keep the right texture without losing flavor. One mistake is not seasoning enough. Always taste your pesto before serving. If it lacks flavor, add more salt, pepper, or lemon juice. Another common error is overcooking the pasta. Make sure to check the package time and cook until al dente. This way, the pasta stays firm and absorbs the sauce better. Lastly, don’t skip the nutritional yeast. It gives the dish a cheesy flavor that enhances the whole meal. To boost the taste of your vegan creamy pesto pasta, try adding fresh lemon zest. It brightens the dish and adds freshness. You can also mix in roasted cherry tomatoes or sautéed veggies. They add texture and extra flavor. If you want some heat, sprinkle in red pepper flakes for a spicy kick. Experiment with herbs too! Fresh parsley or arugula can create new flavor layers. For the full recipe, check out the detailed instructions above. {{image_4}} You can easily swap different pasta types in this recipe. Whole wheat pasta gives a nutty taste. However, you can use any pasta you like. Spaghetti and fusilli are great choices for this vegan creamy pesto. You may also try penne, farfalle, or even zoodles (zucchini noodles) for a fun twist. For a protein boost, add chickpeas or tofu. Chickpeas add a lovely texture and flavor. Just rinse and drain a can of chickpeas, then toss them in with the pasta and pesto. Tofu is another great option. Use firm tofu, cut it into cubes, and pan-fry until golden. Stir it into the pasta for a filling meal. If gluten-free is your goal, choose gluten-free pasta. Many brands offer options made from rice or quinoa. These pastas cook well and taste great in this dish. You can also use lentil pasta for an extra protein kick. Just follow the cooking instructions on the package for the best results. For the complete recipe, check out the [Full Recipe]. After enjoying your vegan creamy pesto pasta, store leftovers in an airtight container. Let the pasta cool down before sealing. This keeps the flavor fresh. In the fridge, it lasts up to three days. If you want to keep it longer, consider freezing. When reheating, use a skillet over low heat. Add a splash of water or vegetable broth to keep it moist. Stir gently until warm. You can also use the microwave, but cover the dish to avoid drying out the pasta. Heat in short bursts and stir in between. To freeze homemade pesto, scoop the sauce into ice cube trays. This way, you can take out just what you need later. Once frozen, pop the cubes into a zip-top bag and store in the freezer for up to three months. When ready to use, thaw in the fridge or add directly to hot pasta. This method keeps the flavor vibrant and fresh. Yes, you can make this recipe nut-free. Instead of cashews, use silken tofu. It gives a creamy texture without nuts. You can also skip the pine nuts or use seeds like sunflower seeds. They add a nice crunch and flavor. I recommend whole wheat pasta for this dish. Spaghetti and fusilli are great choices. They hold the creamy pesto well. You can also try gluten-free pasta if needed. Just cook it according to the package instructions for the best results. The creamy pesto sauce lasts 3 to 5 days in the fridge. Store it in an airtight container. If you see any browning, just stir it before using. You can also freeze it for up to 3 months. Just thaw it in the fridge before using. For the full recipe, check the earlier section. This blog post covered how to create a creamy pesto dish. We discussed key ingredients, cooking pasta, and making the sauce. I shared tips for texture and flavor, and we explored variations like using different pasta or adding protein. Finally, I offered advice on storing your leftovers. Keep these ideas in mind for a tasty meal any day. Enjoy your cooking and have fun with your flavors!](https://goldendishy.com/wp-content/uploads/2025/07/fd183fbf-2652-43f5-b73c-64ca9eb8edeb-768x768.webp)
