Garlic Butter Steak Bites Flavorful and Easy Recipe

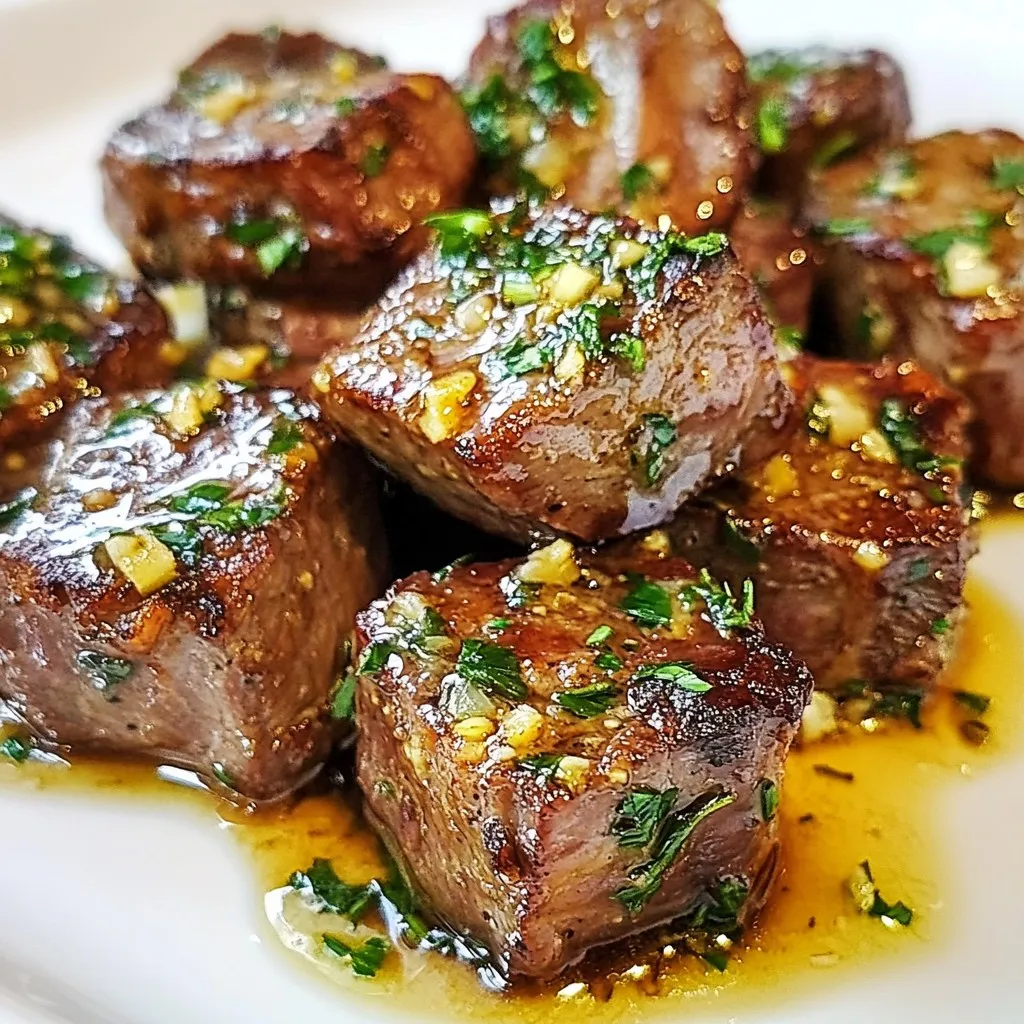
Looking to impress with a quick and tasty dish? Garlic Butter Steak Bites will be your new favorite! This easy recipe combines tender sirloin steak with rich butter and garlic for a flavor explosion in every bite. Whether it’s a weeknight dinner or a fancy gathering, you can whip this up in no time. Grab your ingredients, and let’s get cooking!
Why I Love This Recipe
- Quick and Easy: This recipe comes together in just 20 minutes, making it perfect for weeknight dinners or last-minute guests.
- Flavor Explosion: The combination of garlic, butter, and fresh herbs creates a mouthwatering flavor that elevates the simple steak bites.
- Versatile Serving Options: Enjoy these steak bites as an appetizer or over mashed potatoes for a hearty meal, easily adapting to your dining needs.
- Impressive Presentation: Garnished with fresh parsley, these steak bites look stunning on the plate, perfect for impressing family and friends.
Ingredients
Required Ingredients
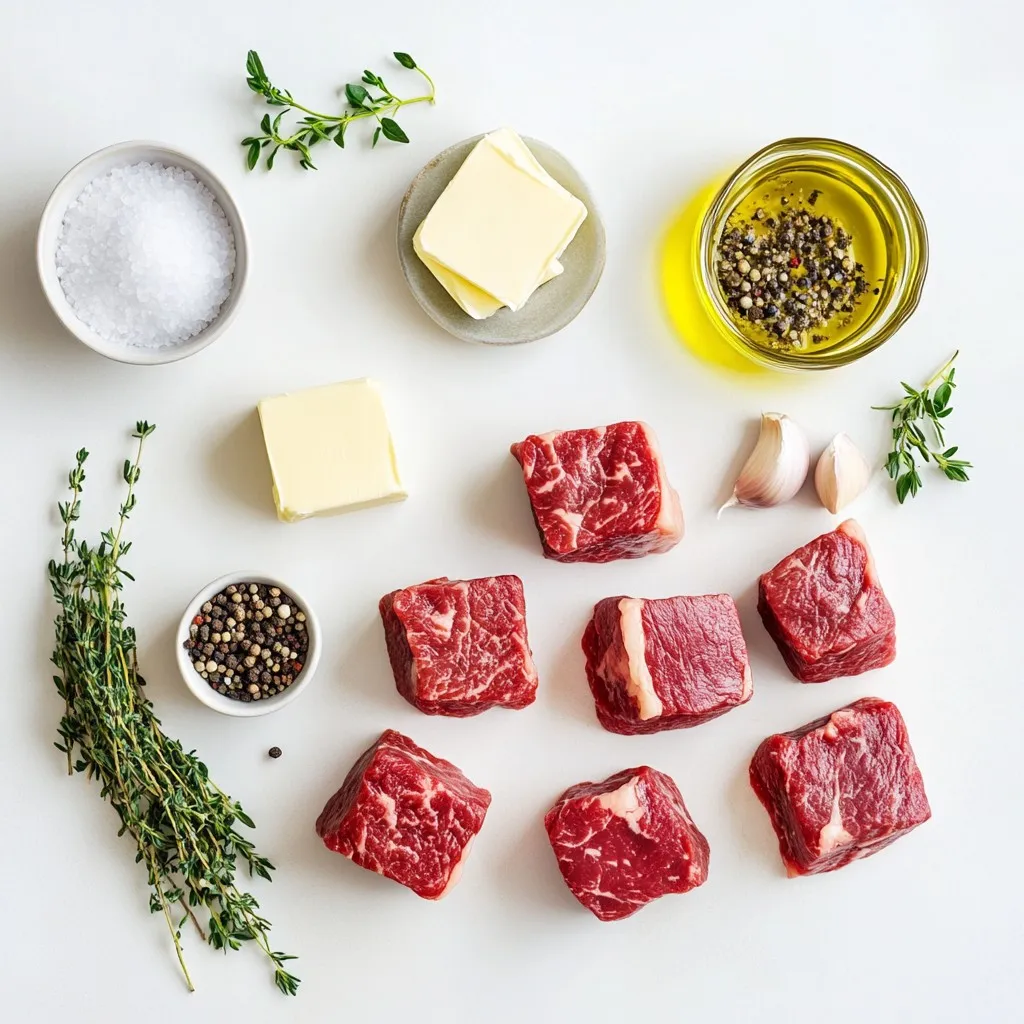
– 1 pound sirloin steak, cut into 1-inch cubes
– 4 tablespoons unsalted butter
– 4 cloves garlic, finely minced
– 1 teaspoon fresh rosemary, chopped
– 1 teaspoon fresh thyme, chopped
– Salt and freshly ground black pepper
– 1 tablespoon extra virgin olive oil
– Fresh parsley, chopped (for garnish)
To make garlic butter steak bites, you need a few key ingredients. First, choose a good cut of beef. I like sirloin steak for its flavor and tenderness. Cut the steak into 1-inch cubes. This size cooks quickly and evenly.
Next, we add the star of the dish: garlic. Four cloves of finely minced garlic give the dish a wonderful aroma and taste. Fresh herbs like rosemary and thyme add depth. Their flavors shine through in every bite.
Don’t forget the butter! Four tablespoons of unsalted butter create a rich, smooth sauce. It makes the dish feel special. Lastly, a sprinkle of salt and freshly ground black pepper will enhance all the flavors. A drizzle of extra virgin olive oil helps in cooking.
Optional Ingredients
– Side dish suggestions: creamy mashed potatoes, steamed vegetables, fresh salad
– Additional herbs and spices: chili flakes for heat, lemon zest for brightness
While the required ingredients are essential, optional ingredients can enhance your meal. For sides, creamy mashed potatoes perfectly complement the steak. You can also serve steamed vegetables or a fresh salad for balance.
If you want more flavor, consider adding chili flakes for some heat. A touch of lemon zest can brighten up the dish. Feel free to get creative with herbs and spices to match your taste!

Step-by-Step Instructions
Preparation Steps
Patting steak cubes dry
First, I pat the sirloin steak cubes dry using paper towels. This helps the steak sear better. A dry surface means a nice crust.
Seasoning the steak
Next, I season the steak cubes. I sprinkle salt and freshly ground black pepper all over. This adds great flavor to the meat and makes it tasty.
Cooking Process
Heating the skillet
Now, I heat a large skillet over medium-high heat. I add one tablespoon of extra virgin olive oil. When the oil shimmers, it’s ready for the steak.
Searing the steak bites
I carefully add the seasoned steak bites in a single layer. I make sure not to crowd the pan. I sear each side for 2-3 minutes. I want a rich, golden-brown crust.
Making the garlic butter
Once the steak is cooked to my liking, I lower the heat to medium-low. I push the steak to one side of the skillet. This leaves room for the garlic butter.
Final Touches
Coating the steak in garlic butter
Next, I drop in 4 tablespoons of unsalted butter, followed by 4 minced garlic cloves, chopped rosemary, and thyme. I let the butter melt and the garlic cook for 1-2 minutes. The smell is amazing!
Serving the dish
Finally, I toss the steak bites in the garlic butter until coated. I remove the skillet from heat and serve the steak bites on a dish. I garnish with fresh parsley for color and taste.
Tips & Tricks
Achieving the Perfect Sear
To get that nice crust on your steak bites, pat them dry. Use paper towels to soak up any moisture. This step is key for a great sear. If the steak is wet, it will steam instead of sear.
If you have many steak bites, cook them in batches. Overcrowding the pan leads to uneven cooking. Each piece needs space to brown well. A hot, dry skillet helps you achieve that perfect golden crust.
Flavor Enhancements
You can elevate the flavor by adding fresh herbs. Try using fresh basil or oregano. They pair well with the garlic and butter.
Adjust the cooking time to match your taste. For rare steak, sear for about 2 minutes per side. For medium, aim for 3 minutes. Use a meat thermometer for best results. For medium-rare, you want a temperature of 130°F.
Pro Tips
- Choose the Right Cut: Select a well-marbled sirloin steak for optimal flavor and tenderness. The fat content enhances the juiciness of the bites.
- Let It Rest: After cooking, allow the steak bites to rest for a few minutes. This redistributes the juices, ensuring a more flavorful and moist bite.
- Experiment with Herbs: Feel free to mix and match herbs in the garlic butter. Fresh oregano or parsley can add a unique twist to the flavor profile.
- Use High Heat: Ensure your skillet is hot enough before adding the steak. A good sear locks in flavor and creates that delicious crust.

Variations
Different Meat Options
You can use different cuts of steak for this dish. While sirloin is great, ribeye or tenderloin adds more flavor and tenderness. Just cut the meat into 1-inch cubes like the sirloin. Each cut has its own unique taste and texture.
If you want a lighter option, try chicken or shrimp. For chicken, use boneless breasts or thighs, cut into bite-sized pieces. For shrimp, choose large, peeled, and deveined shrimp. Cook them the same way as the steak, but adjust the cooking time. Shrimp cooks fast, so watch it closely.
Flavor Twists
To spice things up, add chili flakes. This will give your garlic butter steak bites a nice kick. Start with a small amount and taste as you go. You can always add more for a bolder flavor.
Using different aromatics can also change the dish. Adding lemon zest gives a fresh, bright taste. You can also try herbs like oregano or basil for a unique twist. These small changes can make your steak bites exciting and new every time you cook them.
Storage Info
Storing Leftovers
After enjoying your garlic butter steak bites, let them cool at room temperature. Avoid leaving them out for more than two hours. Once cooled, place them in an airtight container. This helps keep the flavor fresh. Store the container in the fridge for up to three days. If you want to keep them longer, consider freezing them. Use a freezer-safe container or a zip-top bag for this purpose.
Reheating Method
To reheat your steak bites, use a skillet or microwave. For the skillet, heat it over medium-low. Add a little oil or butter to keep them juicy. Stir the bites for about 5 minutes until they are warm. If using the microwave, place the steak bites in a microwave-safe dish. Cover it with a lid or microwave-safe wrap. Heat in short bursts of 30 seconds, stirring in between. This way, they retain their taste and texture.
FAQs
Common Questions about Garlic Butter Steak Bites
How do I make my steak bites more flavorful?
To enhance flavor, use fresh herbs like rosemary and thyme. Season the steak well with salt and pepper. Let the meat rest after cooking so it stays juicy. You can also try adding spices like smoked paprika for extra depth.
Can I use frozen steak for this recipe?
Yes, you can use frozen steak. However, thaw it completely before cooking. Pat it dry to help get a good sear. Searing frozen steak directly can lead to steam instead of a nice crust.
What are good sides to serve with garlic butter steak bites?
Good sides include creamy mashed potatoes, steamed vegetables, or a fresh salad. These sides balance the rich flavors of the steak bites. You can also serve them with crusty bread to soak up the garlic butter.
How do I know when steak bites are cooked to medium-rare?
For medium-rare, aim for an internal temperature of 130°F. Use a meat thermometer to check. The steak should feel firm but still have some give. Color should be a warm pink in the center.
In this post, we explored how to make garlic butter steak bites. We covered required and optional ingredients, plus step-by-step cooking instructions. I shared tips for perfecting your sear and enhancing flavor. You can even try variations like different meats or adding spices. Lastly, we went over storage and reheating tips.
Enjoy this dish, knowing it’s easy and tasty. You can impress anyone with your cooking skill

Sizzling Garlic Butter Steak Bites
Ingredients
- 1 pound sirloin steak, cut into 1-inch cubes
- 4 tablespoons unsalted butter
- 4 cloves garlic, finely minced
- 1 teaspoon fresh rosemary, chopped
- 1 teaspoon fresh thyme, chopped
- to taste Salt and freshly ground black pepper
- 1 tablespoon extra virgin olive oil
- to garnish Fresh parsley, chopped
Instructions
- Prepare the Steak: Start by patting the sirloin steak cubes dry with absorbent paper towels. This helps achieve a beautiful sear. Generously season the steak with salt and freshly ground black pepper on all sides for enhanced flavor.
- Heat the Skillet: Place a large, heavy-bottomed skillet over medium-high heat. Add the extra virgin olive oil to the pan and allow it to heat until shimmering, indicating that it’s hot enough for searing.
- Sear the Steak: Carefully add the seasoned steak bites to the skillet in a single layer. Do not overcrowd the pan; if necessary, cook in batches to ensure even cooking. Sear for approximately 2-3 minutes on each side until a rich, golden-brown crust develops.
- Make Garlic Butter: Once the steak bites are cooked to your desired doneness (about 130°F for medium-rare), lower the heat to medium-low. Gently push the seared steak to one side of the skillet to create space for the garlic butter mixture.
- Add Butter and Aromatics: In the open area of the skillet, drop in the unsalted butter, followed by the finely minced garlic, chopped rosemary, and thyme. Allow the butter to melt and the garlic to cook, releasing its aromatic essence, about 1-2 minutes, taking care to prevent burning.
- Coat the Steak: Once the garlic becomes fragrant, toss the steak bites in the sizzling garlic butter until they are thoroughly coated and heated through.
- Serve: Remove the skillet from heat and transfer the garlic butter steak bites to a serving dish. Garnish generously with freshly chopped parsley to add a vibrant touch.


![- 2 medium zucchinis - 1 cup cherry tomatoes - 1/4 cup fresh basil leaves The fresh produce makes this dish feel bright and lively. Zucchini adds a crunchy texture, while cherry tomatoes bring a sweet burst. Basil gives a fragrant touch that brightens every bite. When you use fresh ingredients, you elevate the salad. - 1 cup fresh mozzarella balls Fresh mozzarella balls, or bocconcini, are creamy and soft. They add richness to the salad that balances the fresh flavors. Their bite-sized shape makes them easy to enjoy. I recommend using high-quality mozzarella for the best taste. - 2 tablespoons balsamic glaze - 2 tablespoons extra-virgin olive oil - Salt and black pepper - 1 clove garlic (optional) The dressing ties all the ingredients together. Balsamic glaze provides sweetness and depth, while olive oil adds richness. Salt and pepper enhance the natural flavors. If you want an extra kick, add minced garlic. It brings a wonderful aroma and taste to the dish. For the full recipe, check out the detailed instructions on how to make this fresh and flavorful dish. To start, you need to spiralize the zucchinis. This will make long, noodle-like strands. A spiralizer works best for this task. If you do not have one, you can use a vegetable peeler. Just slice thin ribbons of zucchini instead. Next, combine all salad components in a large bowl. Add the spiralized zucchini, cherry tomatoes, and fresh mozzarella balls. This colorful mix creates a vibrant base for your salad. In a small bowl, whisk together balsamic glaze and olive oil. This will help blend the flavors nicely. If you want a bolder taste, add minced garlic to the dressing. The garlic gives it a nice kick. Now, pour the dressing over the zucchini noodle mixture. Sprinkle salt and black pepper to taste. These simple seasonings enhance the dish's flavors. Use your hands or tongs to toss the salad gently. Make sure all the ingredients are well coated. To finish, add the torn basil leaves on top of the salad. This adds a fresh aroma and flavor. Gently toss the salad again to mix the basil throughout. For serving, you can put it in a big bowl. A light drizzle of balsamic glaze on top makes it look even better. For the full details, check out the [Full Recipe]. If you want to switch things up, there are great options. For mozzarella, try using burrata. Burrata is creamier and adds a rich twist. You can also use vegan cheese if you prefer a plant-based option. For the dressing, consider a light vinaigrette. A mix of lemon juice, olive oil, and a dash of mustard works well. This gives a fresh flavor while cutting calories. To keep the salad fresh, store it properly. Use an airtight container to keep the salad from getting soggy. If you layer the ingredients, place the zucchini at the bottom. This helps keep moisture away from the tomatoes and cheese. On busy days, you can prep the salad in advance. Spiralize the zucchini and chop the tomatoes ahead of time. Just add the dressing and basil when you're ready to eat. This saves you time without losing flavor. To boost the taste, consider adding fresh herbs like oregano or parsley. They add depth and freshness. You can also sprinkle in some crushed red pepper for a bit of heat. For extra crunch, serve the salad with toasted pine nuts or sunflower seeds. These add a nice texture contrast and make the dish even more enjoyable. You can find the full recipe [here](#). {{image_4}} You can add protein to your Zucchini Noodle Caprese Salad for a fuller meal. Here are two great options: - Grilled chicken or shrimp: Both add a tasty twist and extra nutrients. Cook them simply with salt, pepper, and olive oil. Slice and mix them in. - Chickpeas for a vegetarian option: These add a nice crunch and plant-based protein. Just rinse and toss them in for a hearty touch. Mixing up flavors can keep this salad exciting. Here are some ideas: - Adding different dressing styles: Try pesto, ranch, or lemon vinaigrette for a fresh taste. Each will give your salad a unique flair. - Incorporating seasonal vegetables: Add bell peppers, corn, or avocado. These can enhance the texture and flavor while keeping it fresh and vibrant. How you serve this salad can change its vibe. Consider these styles: - Zucchini noodle bowls: Serve it in deep bowls for a casual gathering. It makes it easy for guests to dig in. - Plated salads for special occasions: For a fancy dinner, plate it neatly. This elevates the look and makes it feel more special. These variations can help you customize your Zucchini Noodle Caprese Salad. Choose your favorites to make it truly yours! For the full recipe, check out the details above. To store leftovers, place your Zucchini Noodle Caprese Salad in an airtight container. This keeps the salad fresh and prevents odors from mixing. Use a container that fits the salad snugly to minimize air exposure. Ideal storage containers: - Glass containers with tight lids - BPA-free plastic containers - Silicone food bags Zucchini noodles can stay fresh in the fridge for about 2 to 3 days. Cherry tomatoes and mozzarella also last up to this time frame. Always check for signs of spoilage. Signs of spoilage: - Slimy texture on zucchini - Mold growth on tomatoes - Sour smell from mozzarella Freezing zucchini noodles is a great way to keep them longer. However, fresh zucchini noodles can lose their texture when thawed. To freeze, spiralize the zucchini and place it in a freezer-safe bag. Remove as much air as possible before sealing. Best practices for freezing prepared salad: - Avoid freezing with the dressing; add it later. - Store without fresh basil, as it does not freeze well. - Use within 1 to 2 months for the best flavor. For the full recipe, refer back to the Zucchini Noodle Caprese Salad section. Zucchini noodles last about 3 to 5 days in the fridge. Store them in an airtight container. They will keep fresh and crisp during this time. If they start to look slimy, it’s best to toss them out. Yes, you can use other vegetables. Some great alternatives are carrots, cucumbers, and sweet potatoes. Each offers a unique taste and texture, making your salad fun and versatile. Yes, this salad is gluten-free. The main ingredients contain no gluten. Zucchini, tomatoes, and cheese all fit into a gluten-free diet. Enjoy this dish without worry! You can prep some parts ahead. Spiralize the zucchini and cut the tomatoes a day before. However, add the dressing just before serving. This keeps the salad fresh and crunchy. This salad pairs well with grilled chicken or shrimp. It also goes great with crusty bread or a light soup. For drinks, try a crisp white wine or sparkling water. Enjoy the mix of flavors! For the full recipe, check out the details above! This blog explored a delicious and fresh Zucchini Noodle Caprese Salad. You learned about key ingredients like zucchini, cherry tomatoes, and mozzarella. The instructions simplified making this dish with easy steps. Tips offered ways to customize and store your salad. Variations let you add protein or seasonal flavors. This salad is perfect for any meal. With its bright flavors, it suits busy days or special occasions. Enjoy your cooking adventure and make this salad often!](https://goldendishy.com/wp-content/uploads/2025/07/4c5bc4a7-43a5-40d0-aa85-49819cbbae48-768x768.webp)
![To make Cheesy Ranch Potatoes, you will need a few simple items. Gather these ingredients before you start cooking: - 2 pounds baby potatoes, halved - 1 cup shredded sharp cheddar cheese - ½ cup creamy sour cream - 1 packet ranch dressing mix (about 1 ounce) - 3 tablespoons extra virgin olive oil - 1 teaspoon garlic powder - 1 teaspoon onion powder - Salt and freshly ground black pepper to taste - 2 green onions, finely sliced (for garnish) Each ingredient plays a key role in creating that cheesy, ranch-flavored goodness. The baby potatoes serve as the base, providing a tender texture. Sharp cheddar cheese adds a rich, creamy taste. Sour cream brings a tangy flavor, while the ranch dressing mix ties everything together with its herby notes. The garlic and onion powders enhance the overall taste, making every bite delicious. Don't forget the green onions; they add a fresh crunch on top! For the complete recipe, check out the [Full Recipe]. - Preheat the oven to 400°F (200°C). This makes sure your potatoes cook evenly. - In a large bowl, mix the olive oil, ranch dressing mix, garlic powder, onion powder, salt, and pepper. Stir until well combined. - Add the halved baby potatoes to the bowl. Toss them until every piece is coated in the ranch mixture. This step adds great flavor. - Line a baking sheet with parchment paper. This helps with easy cleanup. - Spread the coated potatoes on the lined baking sheet in a single layer. This helps them roast evenly. - Roast the potatoes for 25-30 minutes. They should turn golden brown and be tender when pierced. - Take the baking sheet out of the oven and sprinkle cheddar cheese over the hot potatoes. - Return the baking sheet to the oven for 5-7 minutes. Wait until the cheese melts and bubbles. - Drizzle sour cream over the cheesy potatoes and top with sliced green onions. This adds a fresh touch. Check out the Full Recipe for more details! To make Cheesy Ranch Potatoes, start by preheating your oven to 400°F (200°C). This helps the potatoes roast evenly. Spread the potatoes out on a lined baking sheet. This ensures they cook well and get crispy. Check for doneness by piercing them with a fork. They should be tender and golden brown. To boost flavor, try adding herbs like parsley or dill. You can also mix in spices like paprika or cayenne for a kick. If you want a different cheese, use mozzarella or pepper jack. Each type brings a unique taste and texture to the dish. For serving, use a colorful bowl to show off the cheesy ranch potatoes. Add a sprinkle of extra cheddar on top for flair. You can also place whole green onion tops around the edge for a fresh look. These simple steps make your dish appealing and ready for guests. For the full recipe, follow the steps provided in the earlier sections. Enjoy your cooking! {{image_4}} You can make Cheesy Ranch Potatoes even more fun with simple swaps. - Using different types of cheese: Try mozzarella for a milder taste or pepper jack for a kick. You can even mix cheeses for a rich flavor. - Substituting Greek yogurt for sour cream: Greek yogurt gives you a nice tang and adds protein. It’s a healthier option that keeps your potatoes creamy. Change the flavor to keep things exciting. - Spicy ranch version: Add a teaspoon of cayenne pepper to the ranch mix. This will give your potatoes a nice heat. - Herb-infused options: Mix in dried herbs like thyme or rosemary. This adds a fresh taste that pairs well with the cheese. Making Cheesy Ranch Potatoes work for everyone is easy! - Vegan adaptations: Swap the cheese for a vegan cheese and use coconut yogurt. This keeps all the creamy goodness without dairy. - Gluten-free adjustments: Use a gluten-free ranch mix. Most ranch mixes are gluten-free, but always check the labels. Feel free to explore these variations to make this dish your own! For the full recipe, check out Cheesy Ranch Potatoes Delight. To keep your cheesy ranch potatoes fresh, store them in the fridge. Place them in an airtight container. They will last about 3 to 5 days. Make sure they cool completely before sealing. For longer storage, you can freeze them. Put the cooled potatoes in a freezer-safe bag. They can last up to 2 months in the freezer. To reheat your potatoes, the best method is using an oven. Preheat the oven to 350°F (175°C). Spread the potatoes on a baking sheet. Heat them for about 15 to 20 minutes. This will help keep the texture crispy. You can also use a microwave. Place the potatoes in a microwave-safe dish. Heat them in short bursts of 1 minute. Stir in between to ensure even heating. To keep flavor and texture, avoid reheating them too long. If they dry out, add a little bit of sour cream or cheese on top. These tips will help you enjoy the cheesy ranch potatoes just as much as the first time. You can tell the potatoes are done by checking a few signs. First, they should be golden brown and crispy on the outside. Second, when you poke them with a fork, they should feel soft inside. If the fork slides in easily, your potatoes are ready to enjoy! Yes, you can prepare Cheesy Ranch Potatoes ahead of time! Start by following the recipe steps, but stop before roasting. Cover the potatoes and store them in the fridge for up to 24 hours. When you’re ready to bake, simply add extra time in the oven if they are cold. This way, you can enjoy them fresh without much fuss. These cheesy potatoes pair well with many dishes. Serve them alongside grilled chicken or steak for a filling meal. They also go great with a fresh salad or steamed veggies. For a fun twist, try them with barbecue or as a side for tacos. The options are endless, making it easy to create a delicious meal. For the complete cooking steps, check out the Cheesy Ranch Potatoes Delight 🥔. In this blog post, we covered how to make Cheesy Ranch Potatoes. We started with the ingredients, then walked through easy steps to prepare and roast them. I shared helpful tips, variations, and storage info to keep your dish fresh. These potatoes are a tasty side for any meal. You can customize them to fit your taste. Enjoy making this dish, and let it add flavor to your table!](https://goldendishy.com/wp-content/uploads/2025/06/4f138a04-3393-4361-b7e8-8b602e29b2ef-768x768.webp)

