Garlic Butter Herb Mushrooms Flavorful Delight Recipe

Get ready to elevate your meals with my Garlic Butter Herb Mushrooms. This flavorful delight comes together quickly using fresh ingredients like buttery mushrooms, garlic, and fragrant herbs. Perfect for any dish or just on their own, these savory bites will impress your family and friends. Join me as I share the simple steps to create this mouthwatering side dish that packs a punch of flavor in every bite!
Ingredients
Main Ingredients
– 500g fresh button mushrooms, thoroughly cleaned and stems trimmed
– 4 tablespoons unsalted butter
– 3 cloves of garlic, finely minced
– 1 tablespoon fresh thyme leaves, stripped from the stem
– 1 tablespoon fresh parsley, finely chopped
Additional Seasonings
– 1 teaspoon dried oregano
– Sea salt and freshly ground black pepper, to taste
– Zest of 1 lemon, finely grated
– 2 tablespoons fresh lemon juice, squeezed
Serving Suggestions
– Pair with warm, crusty bread for a delightful experience.
– Garnish with extra fresh herbs for added color and flavor.
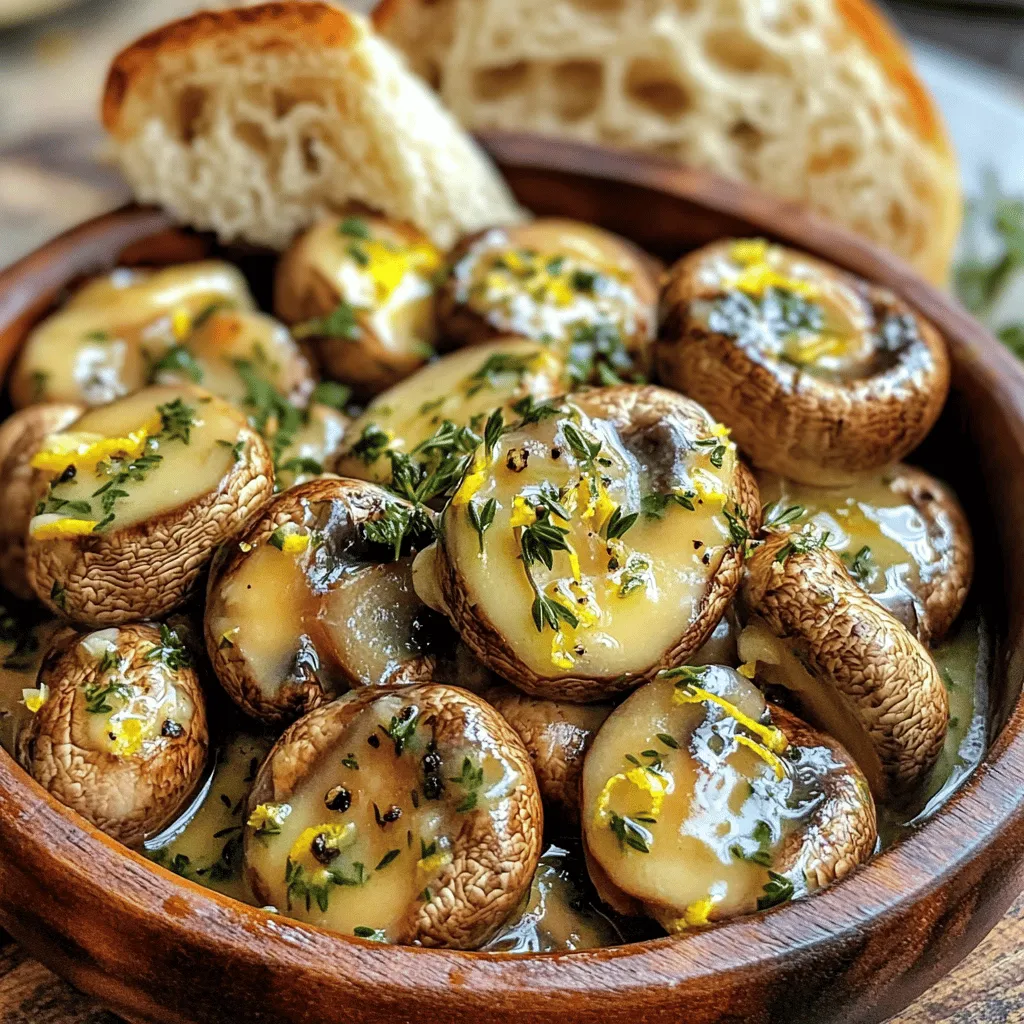
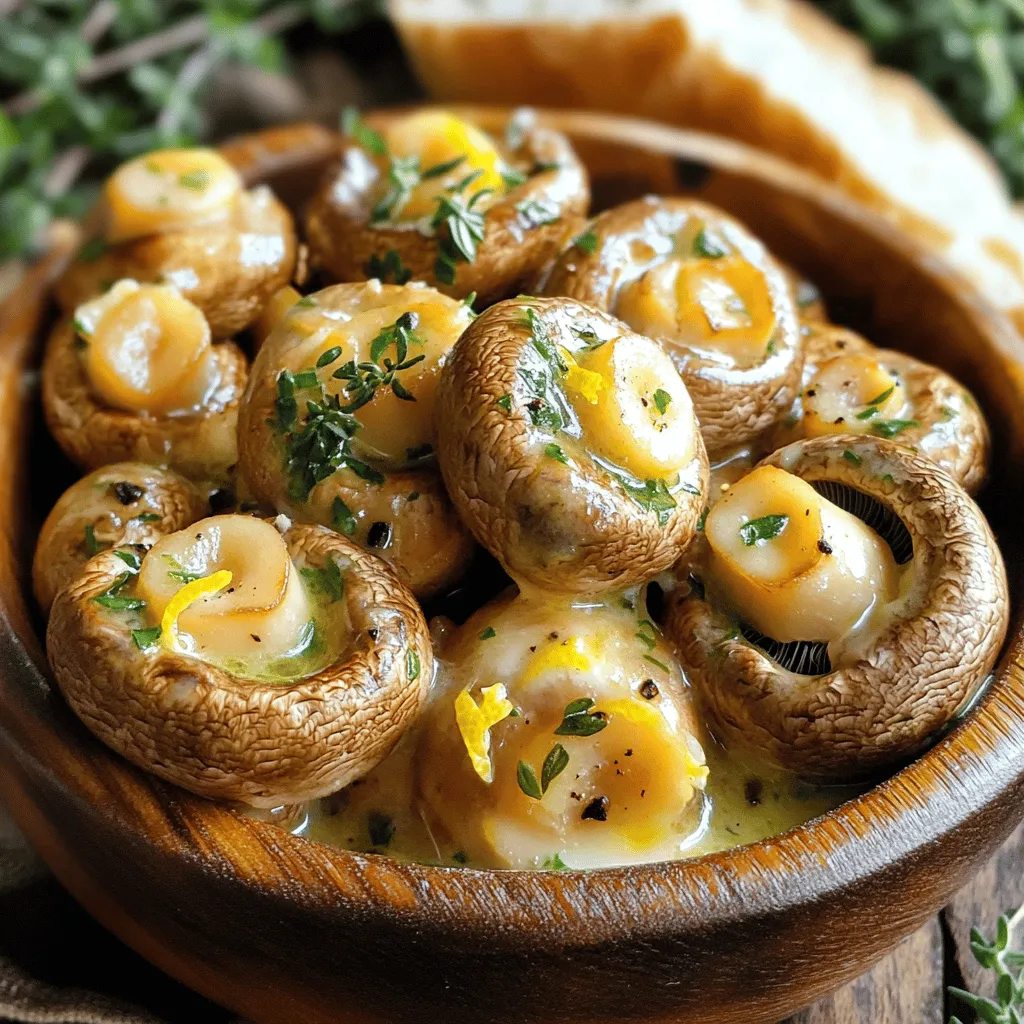
Garlic butter herb mushrooms are a treat! With just a few simple ingredients, you create a rich and tasty dish. Fresh button mushrooms are the star here. They soak up the buttery garlic goodness and shine through.
Unsalted butter adds a creamy base. I love using it because it lets the garlic’s flavor pop. Fresh herbs like thyme and parsley bring a garden-fresh taste that brightens the dish.
Seasonings are key! Dried oregano adds depth, while sea salt and black pepper balance the flavors. Lemon zest and juice give a refreshing kick. You can taste the layers of flavor with every bite.
For serving, I suggest warm, crusty bread. It’s perfect for soaking up the leftover butter sauce. Plus, a sprinkle of fresh herbs on top makes the dish look beautiful. Enjoy your flavorful delight!
Step-by-Step Instructions
Preparing the Skillet
– Melting the butter
Start by taking a large skillet. Put it on medium heat. Add the unsalted butter. Watch it melt until it foams lightly. This step gives the dish a rich flavor.
– Sautéing the garlic
When the butter is foamy, add three cloves of minced garlic. Stir it often for one to two minutes. The garlic should become fragrant but not brown. This step adds a nice depth to the dish.
Cooking the Mushrooms
– Sautéing technique
Next, raise the heat to medium-high. Add 500 grams of cleaned button mushrooms. Make sure to arrange them in a single layer. This helps them cook evenly.
– Cooking time and temperature
Sauté the mushrooms for five to seven minutes. Turn them occasionally. You want them to turn golden and tender. This cooking method enhances their natural flavor.
Adding Flavor
– Incorporating herbs and seasoning
After the mushrooms are cooked, sprinkle in fresh thyme, parsley, and dried oregano. Add a pinch of sea salt and freshly cracked black pepper. Toss everything together well.
– Final touches with lemon
Remove the skillet from heat. Add lemon zest and lemon juice. Mix gently to coat the mushrooms. This brightens the flavors and adds a fresh twist. Taste your dish and adjust the seasoning if needed. Enjoy the burst of flavor!
Tips & Tricks
Perfecting the Sauté
To achieve even cooking, place your mushrooms in a single layer. This helps them cook at the same rate. If you crowd the pan, some will steam instead of sauté. Adjust your heat levels carefully. Start at medium to melt the butter and sauté the garlic. Then, raise it to medium-high when you add the mushrooms. This prevents burning and keeps the flavor bright.
Flavor Enhancements
You can boost flavor by adding more herbs. Try rosemary or basil for a different twist. If you want a citrus kick, swap lemon for lime or orange juice. Each brings a unique taste that complements the mushrooms well.
Presentation Tips
Serve your garlic butter herb mushrooms in a rustic wooden bowl for style. A splash of color comes from extra fresh herbs on top. You can also pair them with warm, crusty bread. This way, your guests can soak up the delicious butter sauce. It’s a simple detail that makes a big difference!

Variations
Different Mushroom Types
You can swap the button mushrooms for other tasty varieties. Cremini mushrooms add a deeper flavor. Portobello mushrooms bring a hearty texture. Shiitake mushrooms offer a nice umami kick. Each type adds its own unique taste to the dish. You can mix and match for your perfect blend.
Dietary Adjustments
If you’re vegan, use plant-based butter instead of unsalted butter. This keeps the dish creamy and rich. For gluten-free options, ensure your butter and other ingredients are certified gluten-free. You can enjoy the full flavor without worry about dietary needs.
Flavorful Additions
Want to jazz up your mushrooms? Try adding a sprinkle of cheese like Parmesan or feta. A drizzle of balsamic glaze can add a sweet tang. You can also toss in some red pepper flakes for a spicy kick. Each addition can make your dish even more special and fun!
Storage Info
Proper Storage Techniques
To keep garlic butter herb mushrooms fresh, store them in the fridge. Use an airtight container. This helps keep moisture out and flavor in. For best results, eat them within three days. If you need to store them longer, freeze them. For freezing, place the cooled mushrooms in a freezer-safe bag. Remove as much air as you can before sealing.
Reheating Tips
When it’s time to enjoy your mushrooms again, reheating them right is key. I recommend using a skillet on low heat. This helps keep the butter sauce intact. Stir gently to warm them evenly. You can also use a microwave, but do it in short bursts. This prevents them from getting too mushy.
Shelf Life
These tasty mushrooms last about three days in the fridge. In the freezer, they can last up to two months. Just remember to label your containers with the date. This way, you can enjoy your garlic butter herb mushrooms without worry!
FAQs
How do you clean mushrooms?
To clean mushrooms, use a damp cloth or paper towel. Gently wipe each mushroom to remove dirt. Avoid soaking them in water, as they absorb moisture. This can make them soggy during cooking. Trim the stems if needed, but keep the caps whole for better flavor.
Can you use canned mushrooms for this recipe?
You can use canned mushrooms, but they may change the texture. Canned mushrooms are softer and lack that crispy bite. Fresh mushrooms have a stronger taste and a firmer texture, which makes the dish more enjoyable. If you must use canned, drain and rinse them well to remove excess salt.
What can I serve with garlic butter herb mushrooms?
These mushrooms pair well with many dishes. Consider serving them with:
– Grilled chicken or steak
– Pasta with olive oil or cream sauce
– Risotto for a creamy side
– Crusty bread to soak up the sauce
– A fresh salad for a balanced meal
Feel free to mix and match!
This blog post covered how to make garlic butter herb mushrooms. We discussed main ingredients, cooking steps, and tips for the best results. You learned about storage and reheating.
In conclusion, this dish is easy and fun to make. Explore variations and tweaks to match your taste. Enjoy serving these mushrooms with your favorite sides and impress everyone at the table. Your kitchen adventures start here!


![- 4 medium zucchinis, sliced into 1/2-inch thick rounds - 4 tablespoons extra virgin olive oil - 2 tablespoons freshly squeezed lemon juice - 1 teaspoon freshly grated lemon zest - 2 teaspoons dried oregano - 1 teaspoon garlic powder - 1 teaspoon sea salt - 1/2 teaspoon freshly cracked black pepper - 2 tablespoons fresh parsley, finely chopped (for garnish) You can use other oils for grilling. Avocado oil or sesame oil works well. If you have fresh herbs, use them instead of dried ones. Fresh oregano or basil adds great flavor. Adjust the amount based on your taste. When selecting zucchinis, look for ones that are firm and shiny. Avoid any that feel soft or have blemishes. Choose smaller zucchinis for a sweeter taste. Check for seasonal zucchinis in late summer. They are often at their best during this time. To make the marinade, start with a large bowl. Add the olive oil, lemon juice, and lemon zest. Next, sprinkle in the dried oregano, garlic powder, sea salt, and black pepper. Whisk everything together until mixed well. This blend of flavors makes your zucchini taste great. Marinating time is key. Let the zucchini sit in the marinade for 10 to 15 minutes. This helps the zucchini soak up the zesty flavors. Skipping this step means missing out on rich taste. First, preheat your grill to medium-high heat, about 400°F (200°C). A hot grill gives your zucchini nice grill marks and a smoky flavor. When ready, carefully place the marinated zucchini rounds on the grill. Cook them for 3 to 4 minutes on each side. Watch for tender slices with grill marks. This means they are perfectly grilled. When done, transfer the zucchini to a serving platter. Arrange them in a fan shape for a pretty look. For garnish, sprinkle fresh parsley on top. This adds a pop of color and a burst of flavor. You can also drizzle extra olive oil and sprinkle sea salt for extra taste. Enjoy your Lemon Herb Grilled Zucchini! For the complete recipe, check the [Full Recipe]. To avoid sticking on the grill, start with a clean grill. Oil the grates well before adding zucchini. This creates a non-stick surface. Use a paper towel dipped in oil to wipe the grates. For even cooking, cut zucchini into uniform pieces. I recommend 1/2-inch thick rounds. This size cooks well without burning. Grill over medium-high heat for best results. You can boost flavor with fresh herbs like basil or thyme. They add a nice twist. For a bit of heat, try red pepper flakes or sliced jalapeños. Both pair well with the lemony taste. The best grill types for zucchini are gas or charcoal grills. Both give great flavor and heat. A grill basket can help keep slices from falling through the grates. Use tongs for safe flipping. For a great grilling experience, have a spatula and a timer handy. These tools help track cooking time and make flipping easy. For the complete process, check the Full Recipe. {{image_4}} You can change the flavors of your grilled zucchini by trying different herbs and spices. Instead of oregano, use thyme or basil for a fresh twist. You can also add a pinch of red pepper flakes for a little heat. Mixing in some smoked paprika can give your dish a nice depth. Incorporating other citrus flavors makes the marinade even more fun. Try lime or orange juice instead of lemon. Both options add a unique taste that pairs well with zucchini. You can also mix lemon with lime for a zesty combo. Grilled zucchini pairs well with many other vegetables. Bell peppers, eggplant, and asparagus are great choices. You can slice them into similar sizes for even cooking. Cooking times vary, so keep an eye on your veggies. Zucchini takes about 3-4 minutes per side. Bell peppers need about 5-7 minutes, while eggplant may take up to 8 minutes. This way, you can enjoy a colorful mix on your plate. Grilled zucchini makes a tasty side dish for many meals. It pairs well with proteins like grilled chicken, fish, or steak. You can also serve it alongside grains like quinoa or couscous for a filling meal. For fun side dish ideas, try serving grilled zucchini with a yogurt sauce. A sprinkle of feta cheese or a handful of nuts can also add a nice touch. For more flavor, drizzle balsamic glaze over the top. For a complete guide to making this dish, check out the Full Recipe. To store leftover grilled zucchini, let it cool first. Place it in an airtight container. This keeps it fresh and prevents odors from mixing. You can store it in the fridge. It usually lasts for about 3 to 5 days. Reheating grilled zucchini can be tricky. The best method is to use a skillet. Heat the skillet over medium-low heat. Add a small drizzle of olive oil. Place the zucchini in the skillet. Cook it for about 2 to 3 minutes on each side. This keeps the texture nice and firm. You can also add it to pasta or salads for a tasty twist. Yes, you can freeze grilled zucchini! To do this, let it cool completely first. Then, arrange the slices in a single layer on a baking sheet. Freeze them for about 1 to 2 hours. Once frozen, transfer the slices to a freezer bag. Remove as much air as possible. Grilled zucchini can last for up to 3 months in the freezer. When ready to use, thaw it in the fridge overnight. You can also toss it directly into soups or stews. For the full recipe, check out the Lemon Herb Grilled Zucchini recipe. To cut zucchini for grilling, slice it into 1/2-inch thick rounds. This thickness helps the zucchini cook evenly and stay firm. You can also cut them into long strips if you prefer a different shape. Just ensure your slices are uniform. This way, they will grill at the same rate. For added flavor, you can cut the zucchini lengthwise and brush the cut sides with olive oil. Yes, you can prepare Lemon Herb Grilled Zucchini ahead of time. To do this, marinate the zucchini slices a few hours before grilling. You can store them in the fridge for up to 24 hours in the marinade. This will enhance the flavor. Just remember to grill them right before serving for the best taste and texture. If grilling later, store the grilled zucchini in an airtight container. Grilled zucchini is very healthy. It is low in calories and high in vitamins. Zucchini is a great source of vitamin C, which boosts your immune system. It also contains potassium, which helps with heart health. Plus, grilling keeps the zucchini's nutrients intact while adding a nice smoky flavor. Enjoy it as a side dish or in salads. You can find the full recipe in the main article. In this article, we covered the key ingredients for Lemon Herb Grilled Zucchini and preparation steps. You learned how to marinate, grill, and enhance flavors. I shared tips for choosing fresh zucchini and creative variations. Remember, fresh ingredients lead to the best taste. Enjoy experimenting with different herbs or vegetables. Grilled zucchini is not just simple but also healthy and tasty. Now, you are ready to impress at your next meal!](https://goldendishy.com/wp-content/uploads/2025/06/34b028ee-fd33-4782-b46e-eaef12af4b53-768x768.webp)
![- 1 pound fresh asparagus, trimmed - 3 tablespoons unsalted butter - 2 tablespoons freshly squeezed lemon juice - Zest of 1 lemon - 2 cloves garlic, finely minced Fresh asparagus is key to this dish. When you choose asparagus, look for bright green stalks that feel firm. The butter adds richness, while the lemon juice and zest bring a bright, zesty punch. Garlic gives a nice aroma and flavor, making the dish exciting. - Salt and freshly ground black pepper, to taste Salt and pepper enhance all the flavors. Use good-quality salt for the best taste. Freshly ground black pepper adds warmth and a bit of spice. - 1 tablespoon fresh parsley, finely chopped (for garnish) Fresh parsley adds color and freshness. You can also use lemon wedges for extra zing. They allow you to customize how much lemon flavor you want. These small touches make the dish look and taste even better. For the full recipe, check out the details above! Start by washing the fresh asparagus. Rinse it well under cool water to remove dirt. Next, trim the tough ends. You can snap them off or cut 1-2 inches from the bottom. This makes the asparagus more tender and easy to eat. In a large skillet, melt the unsalted butter over medium heat. Watch for the butter to bubble and foam; this means it is hot enough. Once it is ready, add the minced garlic. Cook the garlic for about 30 seconds and stir often. It should smell great but not turn brown. Brown garlic can taste bitter. Now, add the trimmed asparagus to the skillet. Toss it gently in the garlic butter. Make sure each piece gets coated well. Sauté the asparagus for 4-6 minutes. Turn it with tongs so it cooks evenly. You want it bright green and still a bit crisp. Once cooked, drizzle the lemon juice over the asparagus and sprinkle the zest on top. Season with salt and black pepper. Toss everything together to mix the flavors. Finally, transfer the asparagus to a serving dish. Garnish with chopped parsley for a lovely look. For the complete recipe, check the [Full Recipe]. To cook asparagus just right, start with fresh, vibrant stalks. Look for asparagus that is firm and bright green. Trim the ends, as they can be tough. When cooking, aim for a tender yet crisp texture. Sauté for 4 to 6 minutes. The color should become a vivid green. If you want to test doneness, simply pierce a stalk with a fork. It should be easy to pierce but still hold its shape. If you're out of any ingredients, don't worry! You can swap unsalted butter for olive oil. This will give a different flavor but still taste great. For lemon juice, you can use lime juice instead. If you lack fresh garlic, try garlic powder. Use half the amount, as it's stronger. Fresh parsley can be replaced with basil or cilantro for a fun twist. These substitutions keep the dish flavorful while using what you have. How you present your dish matters! Arrange the asparagus neatly on a white platter. This will highlight the bright green color. For a pop of color, add lemon wedges around the sides. This not only looks nice but also invites guests to add more lemon. You can sprinkle extra parsley on top for a fresh look. A simple, clean presentation makes your lemon butter asparagus look gourmet. {{image_4}} You can make Lemon Butter Asparagus a full meal by adding protein. Chicken or shrimp works well. For chicken, use thin strips and sauté them in the butter first. Cook until they turn golden brown. Then, add the asparagus and follow the recipe as usual. For shrimp, add them after the garlic. Cook until they turn pink, then toss in the asparagus. This adds flavor and makes it more filling. To spice things up, add red pepper flakes. Just a pinch can bring a nice kick. You can mix them in with the garlic for a burst of heat. If you love bold flavors, try adding lemon zest or herbs like thyme or basil. These add depth and make the dish more exciting. Feel free to mix in other seasonal vegetables. Cherry tomatoes, bell peppers, or snap peas all pair nicely with asparagus. Add them in the skillet after the garlic to keep them fresh. This not only enhances the taste but also boosts the nutrition of your dish. For the full recipe, check out the details above. After enjoying your Lemon Butter Asparagus, you might have some left. Store it in an airtight container. Keep it in the fridge for up to three days. The asparagus will stay fresh, but it may lose its crispness over time. To reheat, use a skillet over medium heat. Add a splash of water or a bit of butter. This helps keep the asparagus moist. Cook for about 3-4 minutes. Stir occasionally until warm. You can also use a microwave. Heat in 30-second bursts until hot. Freezing is a great option if you want to save this dish for later. Start by blanching the asparagus for 2-3 minutes in boiling water. Then, cool it quickly in ice water. Once cool, drain and pat dry. Place it in a freezer-safe bag, removing as much air as possible. It can stay frozen for up to three months. When you're ready to eat, thaw it in the fridge overnight before reheating. Yes, you can use frozen asparagus. It is a great option if fresh asparagus is not available. Just remember to thaw it first. Drain any excess water before cooking. You may need to adjust cooking time. Frozen asparagus cooks faster, so keep an eye on it. Aim for a tender yet crisp texture. Lemon Butter Asparagus pairs well with many dishes. Here are some ideas: - Grilled chicken - Pan-seared fish - Quinoa or rice - Pasta with olive oil - A fresh salad These options balance the flavors and add variety to your meal. Making lemon butter sauce is simple. Here’s how: 1. Melt butter in a pan over medium heat. 2. Add minced garlic and sauté until fragrant. 3. Stir in freshly squeezed lemon juice and zest. 4. Season with salt and pepper. This easy lemon butter sauce elevates many dishes, not just asparagus. For the full recipe, refer to the earlier sections. In this post, we covered everything you need for Lemon Butter Asparagus. I shared the fresh ingredients, pantry staples, and optional garnishes. We went through step-by-step instructions to prepare and cook each part. Tips and tricks helped you perfect your dish and suggested tasty variations. Finally, I gave you storage info and answered common questions. Embrace this dish, and enjoy your cooking adventure!](https://goldendishy.com/wp-content/uploads/2025/07/9c4cbd12-069a-483d-8240-a9afe0533cf0-768x768.webp)


