Garlic Butter Green Beans Flavorful and Easy Side Dish
![- 1 pound fresh green beans, trimmed - 4 tablespoons unsalted butter - 4 cloves garlic, finely minced - 1 teaspoon fresh lemon zest - 1 tablespoon fresh lemon juice - 1/2 teaspoon red pepper flakes (optional for heat) - Salt and freshly ground black pepper to taste - 1/4 cup sliced almonds, toasted (for garnish) Fresh green beans are key for this dish. Look for bright, crisp beans without blemishes. The unsalted butter lets you control the salt level. Garlic adds a strong, savory taste, so use fresh cloves when possible. Lemon zest and juice brighten the dish, adding a nice tang. Red pepper flakes give a little kick, but you can skip them if you want a milder flavor. Toasted almonds add a crunchy finish, so don’t skip them! If you can’t find fresh green beans, frozen ones work too. Just thaw and drain them first. For a dairy-free option, use olive oil instead of butter. You can swap garlic for shallots for a milder taste. If you don’t like lemon, try lime juice or vinegar for acidity. Instead of almonds, use walnuts or pine nuts for a different crunch. Feel free to mix and match these options to fit your taste! For the full recipe, check out the step-by-step guide to make these tasty Garlic Butter Green Beans. 1. Boil Water: Start by filling a large pot with water. Add salt and bring it to a boil. 2. Trim Beans: While waiting, trim the ends of the green beans. This simple step makes them easier to eat. 3. Ice Bath Ready: Prepare a bowl with ice water. This will help stop the cooking later. 1. Blanch the Beans: Once the water is boiling, add the green beans. Cook them for 3-4 minutes. They should be bright green and crisp-tender. 2. Cool Down: Quickly move the beans to the ice bath. Let them cool for about 5 minutes. Drain the beans and set them aside. 3. Melt Butter: In a large skillet, add butter over medium heat. Wait until it melts and bubbles. 4. Add Garlic: Put in the minced garlic. Sauté for about 30 seconds. Be careful not to brown the garlic. It can turn bitter. 5. Combine Beans: Add the blanched green beans to the skillet. Toss them gently in the garlic butter. Cook for 4-5 minutes until heated through. 6. Finish with Flavor: Stir in lemon zest, lemon juice, and optional red pepper flakes. Season with salt and pepper. Mix well. 1. Serving Dish: Carefully transfer the green beans to a serving dish. 2. Garnish: Sprinkle toasted almond slices on top. This adds crunch and looks lovely. 3. Presentation: Arrange the green beans neatly. Place lemon wedges on the side for extra flair. Enjoy your Garlic Butter Green Beans! You can find the Full Recipe linked here. To make the best garlic butter green beans, start with fresh green beans. Look for beans that are bright green and firm. Trim the ends for a clean look. Blanching is key. It keeps the beans bright and crisp. Use a large pot of salted water for boiling. An ice bath helps stop the cooking. This gives you that perfect crunch! To add more flavor, try using garlic oil instead of butter. This gives a nice twist to the dish. Adding lemon zest brightens the taste too. If you like spice, sprinkle in red pepper flakes. For extra crunch, toast almond slices before adding them on top. These small steps really boost the flavor and texture. One common mistake is overcooking the beans. They should be crisp-tender, not mushy. Be careful with the garlic; it can burn quickly. If it turns brown, it will taste bitter. Also, don’t skip the ice bath after blanching. It keeps your beans looking fresh and vibrant. Following these tips will help you create a stunning side dish. For a full recipe, check out the complete details above. {{image_4}} You can change the flavor of garlic butter green beans easily. Try adding herbs like thyme or basil for a fresh twist. If you prefer a spicy kick, use diced jalapeños instead of red pepper flakes. For a unique taste, mix in some soy sauce or balsamic vinegar. These additions bring out different flavors and keep the dish exciting. Want to make your green beans a full meal? Consider adding protein. Cooked chicken or shrimp pairs well with the garlic butter. Just toss them in the skillet with the green beans. For a plant-based option, add chickpeas or tofu. These ingredients not only enhance flavor but also make the dish heartier. Switching ingredients based on the season can elevate your green beans. In spring, consider adding fresh peas for sweetness. During summer, cherry tomatoes add a burst of flavor. In fall, roasted butternut squash brings warmth. Winter calls for crispy Brussels sprouts for a crunchy contrast. These swaps keep your dish fresh and interesting all year round. For the complete recipe, check out the [Full Recipe]. To store leftover Garlic Butter Green Beans, place them in an airtight container. Make sure they are completely cool before sealing. This helps keep them fresh. Store the container in the fridge for up to three days. When you want to enjoy your leftovers, you can reheat them easily. You can use the microwave or a skillet. For the microwave, heat for about 30 seconds. Stir and check if they are warm enough. If using a skillet, add a little butter and heat on low. Stir until hot, about 3-4 minutes. You can freeze Garlic Butter Green Beans, but they may lose some crunch. To freeze, first, blanch the beans as in the recipe. Cool them in ice water, then drain well. Place the beans in a freezer-safe bag. Remove as much air as possible before sealing. They can freeze for up to three months. When you are ready to use them, thaw overnight in the fridge before reheating. For the full recipe, check out the details above. To make Garlic Butter Green Beans vegan, swap the butter for vegan butter or olive oil. Use the same amount for a rich flavor. The garlic and lemon will still shine through. This change keeps the dish tasty while meeting vegan needs. The best ways to prepare green beans include blanching, steaming, or sautéing. Blanching keeps them bright and crisp. Sautéing with garlic, like in this recipe, adds great flavor. You can also roast them for a lovely char. Each method brings out the green beans' natural sweetness. Yes, you can make Garlic Butter Green Beans ahead of time. Cook them fully and let them cool. Store in an airtight container in the fridge for up to three days. When ready to serve, reheat in a pan. This keeps the flavors fresh and vibrant. For the full recipe, check out the details above. You learned about the key ingredients for Garlic Butter Green Beans and how to use them. I shared tips to make your dish better, avoid common mistakes, and add variety. You'll know how to store leftovers, reheat, and even freeze them. Remember to tweak the recipe based on your taste or what you have on hand. Cooking should be fun, so feel free to try new things. Enjoy making this dish and impressing your family or friends!](https://goldendishy.com/wp-content/uploads/2025/07/f7ec476a-8ba6-4070-896d-8b390928597f.webp)
Looking for a quick and tasty side dish? Look no further than Garlic Butter Green Beans! This dish bursts with flavor and pairs well with any meal. I’ll guide you through easy steps, share useful tips, and show you how to store leftovers. With simple ingredients and a few minutes, you can impress anyone at your table. Let’s dive into this delicious recipe!
Ingredients
List of Ingredients
– 1 pound fresh green beans, trimmed
– 4 tablespoons unsalted butter
– 4 cloves garlic, finely minced
– 1 teaspoon fresh lemon zest
– 1 tablespoon fresh lemon juice
– 1/2 teaspoon red pepper flakes (optional for heat)
– Salt and freshly ground black pepper to taste
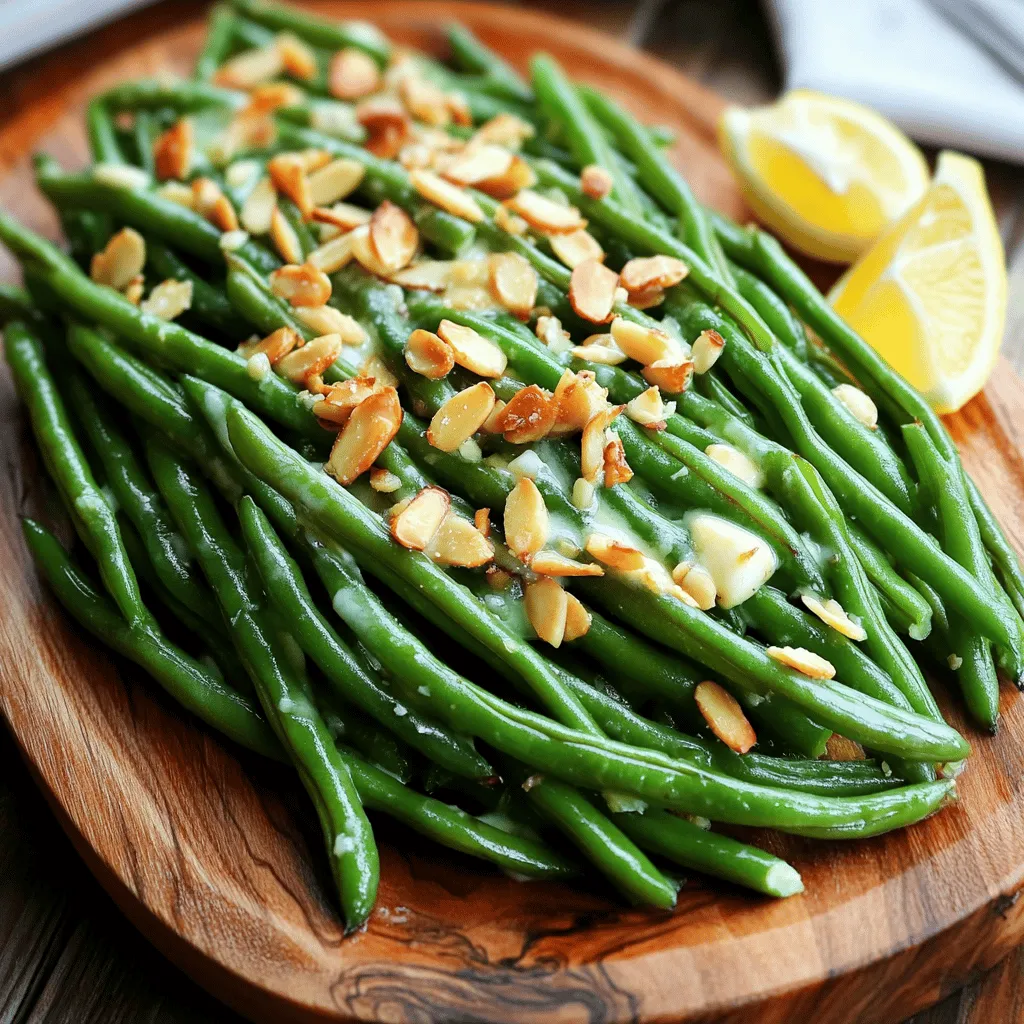
– 1/4 cup sliced almonds, toasted (for garnish)
Ingredient Notes
Fresh green beans are key for this dish. Look for bright, crisp beans without blemishes. The unsalted butter lets you control the salt level. Garlic adds a strong, savory taste, so use fresh cloves when possible. Lemon zest and juice brighten the dish, adding a nice tang. Red pepper flakes give a little kick, but you can skip them if you want a milder flavor. Toasted almonds add a crunchy finish, so don’t skip them!
Substitutions and Alternatives
If you can’t find fresh green beans, frozen ones work too. Just thaw and drain them first. For a dairy-free option, use olive oil instead of butter. You can swap garlic for shallots for a milder taste. If you don’t like lemon, try lime juice or vinegar for acidity. Instead of almonds, use walnuts or pine nuts for a different crunch. Feel free to mix and match these options to fit your taste!
Step-by-Step Instructions
Preparation Steps
1. Boil Water: Start by filling a large pot with water. Add salt and bring it to a boil.
2. Trim Beans: While waiting, trim the ends of the green beans. This simple step makes them easier to eat.
3. Ice Bath Ready: Prepare a bowl with ice water. This will help stop the cooking later.
Cooking Process
1. Blanch the Beans: Once the water is boiling, add the green beans. Cook them for 3-4 minutes. They should be bright green and crisp-tender.
2. Cool Down: Quickly move the beans to the ice bath. Let them cool for about 5 minutes. Drain the beans and set them aside.
3. Melt Butter: In a large skillet, add butter over medium heat. Wait until it melts and bubbles.
4. Add Garlic: Put in the minced garlic. Sauté for about 30 seconds. Be careful not to brown the garlic. It can turn bitter.
5. Combine Beans: Add the blanched green beans to the skillet. Toss them gently in the garlic butter. Cook for 4-5 minutes until heated through.
6. Finish with Flavor: Stir in lemon zest, lemon juice, and optional red pepper flakes. Season with salt and pepper. Mix well.
Plating the Dish
1. Serving Dish: Carefully transfer the green beans to a serving dish.
2. Garnish: Sprinkle toasted almond slices on top. This adds crunch and looks lovely.
3. Presentation: Arrange the green beans neatly. Place lemon wedges on the side for extra flair. Enjoy your Garlic Butter Green Beans!
Tips & Tricks
Expert Cooking Tips
To make the best garlic butter green beans, start with fresh green beans. Look for beans that are bright green and firm. Trim the ends for a clean look. Blanching is key. It keeps the beans bright and crisp. Use a large pot of salted water for boiling. An ice bath helps stop the cooking. This gives you that perfect crunch!
Ways to Enhance Flavor
To add more flavor, try using garlic oil instead of butter. This gives a nice twist to the dish. Adding lemon zest brightens the taste too. If you like spice, sprinkle in red pepper flakes. For extra crunch, toast almond slices before adding them on top. These small steps really boost the flavor and texture.
Common Mistakes to Avoid
One common mistake is overcooking the beans. They should be crisp-tender, not mushy. Be careful with the garlic; it can burn quickly. If it turns brown, it will taste bitter. Also, don’t skip the ice bath after blanching. It keeps your beans looking fresh and vibrant. Following these tips will help you create a stunning side dish.

Variations
Different Flavor Profiles
You can change the flavor of garlic butter green beans easily. Try adding herbs like thyme or basil for a fresh twist. If you prefer a spicy kick, use diced jalapeños instead of red pepper flakes. For a unique taste, mix in some soy sauce or balsamic vinegar. These additions bring out different flavors and keep the dish exciting.
Add-ins for Protein
Want to make your green beans a full meal? Consider adding protein. Cooked chicken or shrimp pairs well with the garlic butter. Just toss them in the skillet with the green beans. For a plant-based option, add chickpeas or tofu. These ingredients not only enhance flavor but also make the dish heartier.
Seasonal Ingredient Swaps
Switching ingredients based on the season can elevate your green beans. In spring, consider adding fresh peas for sweetness. During summer, cherry tomatoes add a burst of flavor. In fall, roasted butternut squash brings warmth. Winter calls for crispy Brussels sprouts for a crunchy contrast. These swaps keep your dish fresh and interesting all year round.
Storage Info
How to Store Leftovers
To store leftover Garlic Butter Green Beans, place them in an airtight container. Make sure they are completely cool before sealing. This helps keep them fresh. Store the container in the fridge for up to three days.
Reheating Instructions
When you want to enjoy your leftovers, you can reheat them easily. You can use the microwave or a skillet. For the microwave, heat for about 30 seconds. Stir and check if they are warm enough. If using a skillet, add a little butter and heat on low. Stir until hot, about 3-4 minutes.
Freezing Advice
You can freeze Garlic Butter Green Beans, but they may lose some crunch. To freeze, first, blanch the beans as in the recipe. Cool them in ice water, then drain well. Place the beans in a freezer-safe bag. Remove as much air as possible before sealing. They can freeze for up to three months. When you are ready to use them, thaw overnight in the fridge before reheating.
FAQs
How to make Garlic Butter Green Beans vegan?
To make Garlic Butter Green Beans vegan, swap the butter for vegan butter or olive oil. Use the same amount for a rich flavor. The garlic and lemon will still shine through. This change keeps the dish tasty while meeting vegan needs.
What are the best ways to prepare green beans?
The best ways to prepare green beans include blanching, steaming, or sautéing. Blanching keeps them bright and crisp. Sautéing with garlic, like in this recipe, adds great flavor. You can also roast them for a lovely char. Each method brings out the green beans’ natural sweetness.
Can I make Garlic Butter Green Beans ahead of time?
Yes, you can make Garlic Butter Green Beans ahead of time. Cook them fully and let them cool. Store in an airtight container in the fridge for up to three days. When ready to serve, reheat in a pan. This keeps the flavors fresh and vibrant.
You learned about the key ingredients for Garlic Butter Green Beans and how to use them. I shared tips to make your dish better, avoid common mistakes, and add variety. You’ll know how to store leftovers, reheat, and even freeze them. Remember to tweak the recipe based on your taste or what you have on hand. Cooking should be fun, so feel free to try new things. Enjoy making this dish and impressing your family or friends!
![- 1 pound fresh green beans, trimmed - 4 tablespoons unsalted butter - 4 cloves garlic, finely minced - 1 teaspoon fresh lemon zest - 1 tablespoon fresh lemon juice - 1/2 teaspoon red pepper flakes (optional for heat) - Salt and freshly ground black pepper to taste - 1/4 cup sliced almonds, toasted (for garnish) Fresh green beans are key for this dish. Look for bright, crisp beans without blemishes. The unsalted butter lets you control the salt level. Garlic adds a strong, savory taste, so use fresh cloves when possible. Lemon zest and juice brighten the dish, adding a nice tang. Red pepper flakes give a little kick, but you can skip them if you want a milder flavor. Toasted almonds add a crunchy finish, so don’t skip them! If you can’t find fresh green beans, frozen ones work too. Just thaw and drain them first. For a dairy-free option, use olive oil instead of butter. You can swap garlic for shallots for a milder taste. If you don’t like lemon, try lime juice or vinegar for acidity. Instead of almonds, use walnuts or pine nuts for a different crunch. Feel free to mix and match these options to fit your taste! For the full recipe, check out the step-by-step guide to make these tasty Garlic Butter Green Beans. 1. Boil Water: Start by filling a large pot with water. Add salt and bring it to a boil. 2. Trim Beans: While waiting, trim the ends of the green beans. This simple step makes them easier to eat. 3. Ice Bath Ready: Prepare a bowl with ice water. This will help stop the cooking later. 1. Blanch the Beans: Once the water is boiling, add the green beans. Cook them for 3-4 minutes. They should be bright green and crisp-tender. 2. Cool Down: Quickly move the beans to the ice bath. Let them cool for about 5 minutes. Drain the beans and set them aside. 3. Melt Butter: In a large skillet, add butter over medium heat. Wait until it melts and bubbles. 4. Add Garlic: Put in the minced garlic. Sauté for about 30 seconds. Be careful not to brown the garlic. It can turn bitter. 5. Combine Beans: Add the blanched green beans to the skillet. Toss them gently in the garlic butter. Cook for 4-5 minutes until heated through. 6. Finish with Flavor: Stir in lemon zest, lemon juice, and optional red pepper flakes. Season with salt and pepper. Mix well. 1. Serving Dish: Carefully transfer the green beans to a serving dish. 2. Garnish: Sprinkle toasted almond slices on top. This adds crunch and looks lovely. 3. Presentation: Arrange the green beans neatly. Place lemon wedges on the side for extra flair. Enjoy your Garlic Butter Green Beans! You can find the Full Recipe linked here. To make the best garlic butter green beans, start with fresh green beans. Look for beans that are bright green and firm. Trim the ends for a clean look. Blanching is key. It keeps the beans bright and crisp. Use a large pot of salted water for boiling. An ice bath helps stop the cooking. This gives you that perfect crunch! To add more flavor, try using garlic oil instead of butter. This gives a nice twist to the dish. Adding lemon zest brightens the taste too. If you like spice, sprinkle in red pepper flakes. For extra crunch, toast almond slices before adding them on top. These small steps really boost the flavor and texture. One common mistake is overcooking the beans. They should be crisp-tender, not mushy. Be careful with the garlic; it can burn quickly. If it turns brown, it will taste bitter. Also, don’t skip the ice bath after blanching. It keeps your beans looking fresh and vibrant. Following these tips will help you create a stunning side dish. For a full recipe, check out the complete details above. {{image_4}} You can change the flavor of garlic butter green beans easily. Try adding herbs like thyme or basil for a fresh twist. If you prefer a spicy kick, use diced jalapeños instead of red pepper flakes. For a unique taste, mix in some soy sauce or balsamic vinegar. These additions bring out different flavors and keep the dish exciting. Want to make your green beans a full meal? Consider adding protein. Cooked chicken or shrimp pairs well with the garlic butter. Just toss them in the skillet with the green beans. For a plant-based option, add chickpeas or tofu. These ingredients not only enhance flavor but also make the dish heartier. Switching ingredients based on the season can elevate your green beans. In spring, consider adding fresh peas for sweetness. During summer, cherry tomatoes add a burst of flavor. In fall, roasted butternut squash brings warmth. Winter calls for crispy Brussels sprouts for a crunchy contrast. These swaps keep your dish fresh and interesting all year round. For the complete recipe, check out the [Full Recipe]. To store leftover Garlic Butter Green Beans, place them in an airtight container. Make sure they are completely cool before sealing. This helps keep them fresh. Store the container in the fridge for up to three days. When you want to enjoy your leftovers, you can reheat them easily. You can use the microwave or a skillet. For the microwave, heat for about 30 seconds. Stir and check if they are warm enough. If using a skillet, add a little butter and heat on low. Stir until hot, about 3-4 minutes. You can freeze Garlic Butter Green Beans, but they may lose some crunch. To freeze, first, blanch the beans as in the recipe. Cool them in ice water, then drain well. Place the beans in a freezer-safe bag. Remove as much air as possible before sealing. They can freeze for up to three months. When you are ready to use them, thaw overnight in the fridge before reheating. For the full recipe, check out the details above. To make Garlic Butter Green Beans vegan, swap the butter for vegan butter or olive oil. Use the same amount for a rich flavor. The garlic and lemon will still shine through. This change keeps the dish tasty while meeting vegan needs. The best ways to prepare green beans include blanching, steaming, or sautéing. Blanching keeps them bright and crisp. Sautéing with garlic, like in this recipe, adds great flavor. You can also roast them for a lovely char. Each method brings out the green beans' natural sweetness. Yes, you can make Garlic Butter Green Beans ahead of time. Cook them fully and let them cool. Store in an airtight container in the fridge for up to three days. When ready to serve, reheat in a pan. This keeps the flavors fresh and vibrant. For the full recipe, check out the details above. You learned about the key ingredients for Garlic Butter Green Beans and how to use them. I shared tips to make your dish better, avoid common mistakes, and add variety. You'll know how to store leftovers, reheat, and even freeze them. Remember to tweak the recipe based on your taste or what you have on hand. Cooking should be fun, so feel free to try new things. Enjoy making this dish and impressing your family or friends!](https://goldendishy.com/wp-content/uploads/2025/07/f7ec476a-8ba6-4070-896d-8b390928597f-300x300.webp)


![- 4 large eggs - 1 ripe avocado, mashed - 2 tablespoons Greek yogurt - 1 tablespoon Dijon mustard - 1 small red onion, finely chopped - 1 celery stalk, finely chopped - 1 tablespoon fresh lemon juice - 1 tablespoon fresh dill, chopped (or 1 teaspoon dried dill) - Salt and pepper to taste Gather these simple ingredients for a creamy and flavorful dish. The eggs provide protein, while the avocado brings richness. Greek yogurt adds a tangy creaminess that makes this salad stand out. Don't forget the Dijon mustard for a zesty kick. The red onion and celery add crunch and flavor. The fresh lemon juice brightens the dish and keeps it fresh. Dill offers a wonderful herbal note that complements the other flavors. For the full recipe, you can check out my detailed guide on making Avocado Egg Salad. This dish is not just easy but also very satisfying. Enjoy the blend of textures and tastes in every bite! - Place eggs in a saucepan with cold water. - Bring to a boil, then simmer for 9-12 minutes. Boiling eggs is simple. The cold water helps cook them evenly. If you like your yolks soft, aim for 9 minutes. For firmer yolks, 12 minutes works best. - Transfer to a bowl of ice water. - Peel under running water. After boiling, cool the eggs fast. The ice water stops the cooking. Let them sit for about 5-7 minutes. When peeling, run the eggs under water. This helps the shell come off easily. - Combine mashed avocado, Greek yogurt, Dijon mustard, and lemon juice. In a mixing bowl, mash the ripe avocado. Add Greek yogurt for creaminess, Dijon mustard for kick, and lemon juice for zest. Mix until smooth and creamy. - Add chopped eggs, onion, celery, and dill. - Fold gently to combine. Now, add the chopped eggs, onion, celery, and dill to the avocado mix. Use a spatula to fold everything together. Be gentle so the eggs stay in chunks. That’s how you get the perfect texture. For the full recipe, check out the details above! To make the best Avocado Egg Salad, start with the eggs. For a soft yolk, boil for 9 minutes. For a firm yolk, go for 12 minutes. Timing is key! After boiling, cool the eggs quickly. An ice bath is great for this. It stops the eggs from cooking further and makes peeling easy. For that rich and creamy texture, I use Greek yogurt instead of mayo. Greek yogurt adds protein and a tangy taste. If you want even more creaminess, check your avocado. A perfectly ripe avocado will give a smooth texture. If it's too firm, let it ripen a bit. Spice it up! A pinch of paprika or a dash of cayenne can add a kick. Fresh herbs can also change the game. Try adding dill, parsley, or chives for a flavor boost. Each herb brings a unique taste and aroma that makes this dish shine. These tips will help you create a delicious Avocado Egg Salad. For the complete recipe, check the [Full Recipe]. Enjoy your cooking! {{image_4}} You can easily swap ingredients to fit your diet. To make it vegan, use chickpeas instead of eggs. Just mash them up and mix well. They provide a nice texture and protein. For a lighter option, substitute Greek yogurt with low-fat yogurt. This keeps the salad creamy while cutting down on calories. Want to spice things up? Try adding diced bell peppers. They add crunch and a pop of color. You can also sprinkle in spices like paprika or garlic powder. These enhance the flavor and give your salad a unique twist. Experimenting with different herbs can also elevate your dish. How you serve this salad makes a big difference. You can spread it on toast or crackers for a quick snack. It also works great as a filling for sandwiches or wraps. This makes it perfect for lunch or picnics. You can even serve it in lettuce leaves for a light meal. Each option offers a new way to enjoy your creamy, flavorful dish. For the full recipe, check out Avocado Egg Salad with a Zesty Twist. To keep your avocado egg salad fresh, store it in the fridge. Use an airtight container to prevent air from spoiling the ingredients. This salad stays good for about 2-3 days. After that, the avocado may brown, and the flavor might fade. Always check for any off smells or changes in texture before eating leftovers. Freezing avocado egg salad is not recommended. The texture of avocado changes when frozen. If you freeze it, it may become mushy once thawed. Instead, prepare only what you need. If you have to freeze it, use an airtight container. This will help protect it from freezer burn. This salad is best served cold. If you must reheat it, do so gently. Use a microwave on low power for a short time. Stir it frequently to help maintain its texture. However, I suggest enjoying it cold for the best flavor and creaminess. If you want to mix things up, serve it on toasted bread or in a wrap. Enjoy the zesty taste! Yes, you can make Avocado Egg Salad ahead of time. It tastes even better after chilling. To prepare in advance, follow these tips: - Cook and cool the eggs, then chop them. - Mix the avocado, yogurt, mustard, and lemon juice. - Combine right before serving to keep the eggs fresh. - Store in an airtight container in the fridge for up to 24 hours. If you want creaminess, here are some substitutes: - Sour cream for a tangy flavor. - Silken tofu if you prefer a vegan option. - Cream cheese for a rich texture. Each option will change the taste a bit, so choose what you like best. To check if your avocado is ripe, look for these signs: - The skin should be dark green or black. - Gently press the avocado; it should yield slightly. - If it feels hard, it’s not ripe yet. Choose avocados that feel soft but not too mushy for the best results. Yes, store-bought mayonnaise works well in this recipe. Use it if you prefer a classic taste. Here’s how: - Replace Greek yogurt with an equal amount of mayo. - Mix it with the avocado and mustard for a creamy blend. This will give your egg salad a rich flavor. To make Avocado Egg Salad fit dietary needs, try these suggestions: - For nut-free, just stick to the original recipe. - For lactose-free, use a dairy-free yogurt or mayo. - For vegan, swap eggs with mashed chickpeas for protein. These options keep your dish tasty and inclusive. In this blog post, I shared a simple recipe for Avocado Egg Salad. We reviewed key ingredients, including eggs, avocado, and Greek yogurt. You learned steps to boil and mix the ingredients perfectly. I also offered tips for adding flavor and making dietary swaps. This dish is fun, healthy, and easy to make. Try it your way and enjoy the flavors! Whether you eat it in a wrap or on toast, it will be a hit. Prepare it fresh or store leftovers; you won't regret it.](https://goldendishy.com/wp-content/uploads/2025/06/e93c3c70-9342-49f9-9c4a-33a1a85bd889-768x768.webp)

![- 2 medium zucchinis - 1 cup cherry tomatoes - 1/4 cup fresh basil leaves The fresh produce makes this dish feel bright and lively. Zucchini adds a crunchy texture, while cherry tomatoes bring a sweet burst. Basil gives a fragrant touch that brightens every bite. When you use fresh ingredients, you elevate the salad. - 1 cup fresh mozzarella balls Fresh mozzarella balls, or bocconcini, are creamy and soft. They add richness to the salad that balances the fresh flavors. Their bite-sized shape makes them easy to enjoy. I recommend using high-quality mozzarella for the best taste. - 2 tablespoons balsamic glaze - 2 tablespoons extra-virgin olive oil - Salt and black pepper - 1 clove garlic (optional) The dressing ties all the ingredients together. Balsamic glaze provides sweetness and depth, while olive oil adds richness. Salt and pepper enhance the natural flavors. If you want an extra kick, add minced garlic. It brings a wonderful aroma and taste to the dish. For the full recipe, check out the detailed instructions on how to make this fresh and flavorful dish. To start, you need to spiralize the zucchinis. This will make long, noodle-like strands. A spiralizer works best for this task. If you do not have one, you can use a vegetable peeler. Just slice thin ribbons of zucchini instead. Next, combine all salad components in a large bowl. Add the spiralized zucchini, cherry tomatoes, and fresh mozzarella balls. This colorful mix creates a vibrant base for your salad. In a small bowl, whisk together balsamic glaze and olive oil. This will help blend the flavors nicely. If you want a bolder taste, add minced garlic to the dressing. The garlic gives it a nice kick. Now, pour the dressing over the zucchini noodle mixture. Sprinkle salt and black pepper to taste. These simple seasonings enhance the dish's flavors. Use your hands or tongs to toss the salad gently. Make sure all the ingredients are well coated. To finish, add the torn basil leaves on top of the salad. This adds a fresh aroma and flavor. Gently toss the salad again to mix the basil throughout. For serving, you can put it in a big bowl. A light drizzle of balsamic glaze on top makes it look even better. For the full details, check out the [Full Recipe]. If you want to switch things up, there are great options. For mozzarella, try using burrata. Burrata is creamier and adds a rich twist. You can also use vegan cheese if you prefer a plant-based option. For the dressing, consider a light vinaigrette. A mix of lemon juice, olive oil, and a dash of mustard works well. This gives a fresh flavor while cutting calories. To keep the salad fresh, store it properly. Use an airtight container to keep the salad from getting soggy. If you layer the ingredients, place the zucchini at the bottom. This helps keep moisture away from the tomatoes and cheese. On busy days, you can prep the salad in advance. Spiralize the zucchini and chop the tomatoes ahead of time. Just add the dressing and basil when you're ready to eat. This saves you time without losing flavor. To boost the taste, consider adding fresh herbs like oregano or parsley. They add depth and freshness. You can also sprinkle in some crushed red pepper for a bit of heat. For extra crunch, serve the salad with toasted pine nuts or sunflower seeds. These add a nice texture contrast and make the dish even more enjoyable. You can find the full recipe [here](#). {{image_4}} You can add protein to your Zucchini Noodle Caprese Salad for a fuller meal. Here are two great options: - Grilled chicken or shrimp: Both add a tasty twist and extra nutrients. Cook them simply with salt, pepper, and olive oil. Slice and mix them in. - Chickpeas for a vegetarian option: These add a nice crunch and plant-based protein. Just rinse and toss them in for a hearty touch. Mixing up flavors can keep this salad exciting. Here are some ideas: - Adding different dressing styles: Try pesto, ranch, or lemon vinaigrette for a fresh taste. Each will give your salad a unique flair. - Incorporating seasonal vegetables: Add bell peppers, corn, or avocado. These can enhance the texture and flavor while keeping it fresh and vibrant. How you serve this salad can change its vibe. Consider these styles: - Zucchini noodle bowls: Serve it in deep bowls for a casual gathering. It makes it easy for guests to dig in. - Plated salads for special occasions: For a fancy dinner, plate it neatly. This elevates the look and makes it feel more special. These variations can help you customize your Zucchini Noodle Caprese Salad. Choose your favorites to make it truly yours! For the full recipe, check out the details above. To store leftovers, place your Zucchini Noodle Caprese Salad in an airtight container. This keeps the salad fresh and prevents odors from mixing. Use a container that fits the salad snugly to minimize air exposure. Ideal storage containers: - Glass containers with tight lids - BPA-free plastic containers - Silicone food bags Zucchini noodles can stay fresh in the fridge for about 2 to 3 days. Cherry tomatoes and mozzarella also last up to this time frame. Always check for signs of spoilage. Signs of spoilage: - Slimy texture on zucchini - Mold growth on tomatoes - Sour smell from mozzarella Freezing zucchini noodles is a great way to keep them longer. However, fresh zucchini noodles can lose their texture when thawed. To freeze, spiralize the zucchini and place it in a freezer-safe bag. Remove as much air as possible before sealing. Best practices for freezing prepared salad: - Avoid freezing with the dressing; add it later. - Store without fresh basil, as it does not freeze well. - Use within 1 to 2 months for the best flavor. For the full recipe, refer back to the Zucchini Noodle Caprese Salad section. Zucchini noodles last about 3 to 5 days in the fridge. Store them in an airtight container. They will keep fresh and crisp during this time. If they start to look slimy, it’s best to toss them out. Yes, you can use other vegetables. Some great alternatives are carrots, cucumbers, and sweet potatoes. Each offers a unique taste and texture, making your salad fun and versatile. Yes, this salad is gluten-free. The main ingredients contain no gluten. Zucchini, tomatoes, and cheese all fit into a gluten-free diet. Enjoy this dish without worry! You can prep some parts ahead. Spiralize the zucchini and cut the tomatoes a day before. However, add the dressing just before serving. This keeps the salad fresh and crunchy. This salad pairs well with grilled chicken or shrimp. It also goes great with crusty bread or a light soup. For drinks, try a crisp white wine or sparkling water. Enjoy the mix of flavors! For the full recipe, check out the details above! This blog explored a delicious and fresh Zucchini Noodle Caprese Salad. You learned about key ingredients like zucchini, cherry tomatoes, and mozzarella. The instructions simplified making this dish with easy steps. Tips offered ways to customize and store your salad. Variations let you add protein or seasonal flavors. This salad is perfect for any meal. With its bright flavors, it suits busy days or special occasions. Enjoy your cooking adventure and make this salad often!](https://goldendishy.com/wp-content/uploads/2025/07/4c5bc4a7-43a5-40d0-aa85-49819cbbae48-768x768.webp)
