Easy Garlic Parmesan Knots Tasty and Simple Treat
![To make easy garlic parmesan knots, gather these key items: - 1 package (16 oz) refrigerated pizza dough - 4 tablespoons unsalted butter, melted - 4 cloves garlic, minced - 1/4 cup grated Parmesan cheese - 1/2 teaspoon salt - 1/4 teaspoon black pepper These ingredients create the base for your tasty knots. The pizza dough gives them a nice texture, while butter and garlic add rich flavor. You might consider adding these for extra taste: - 1 tablespoon fresh parsley, chopped (or 1 teaspoon dried parsley) - Pinch of red pepper flakes Fresh parsley adds color and a fresh taste. Red pepper flakes give a little heat, so use them if you like spice. To make your cooking easier, have these tools on hand: - Sharp knife or pizza cutter - Baking sheet - Parchment paper - Small bowl - Pastry brush Using these tools helps with cutting the dough and baking the knots evenly. They make the process smooth and simple. For the full recipe, refer to the details above. Start by preheating your oven to 400°F (200°C). This heat helps the knots rise and bake well. Line a baking sheet with parchment paper. This keeps the knots from sticking. Next, take the refrigerated pizza dough. Roll it out on a clean, floured surface. Aim for a rectangle about ¼ inch thick. This thickness ensures even cooking. Slice the dough into strips. Each strip should be about 1 inch wide and 6 inches long. Take one strip and tie it into a knot. Tuck the ends underneath to keep them secure. Place each knot on the prepared baking sheet, leaving space between them. In a small bowl, combine melted butter, minced garlic, salt, black pepper, and red pepper flakes if desired. This garlic butter mixture gives the knots a rich flavor. Use a brush to apply the mixture on top of each knot. Make sure to get some garlic pieces on top. Now, it’s time to bake! Place the baking sheet in the oven and bake for 12-15 minutes. Watch for a golden brown color on the knots. When done, take them out and let them cool for a few minutes. Brush any leftover garlic butter on top for extra flavor. You can find the full recipe in the ingredients section. To get your knots just right, oven temperature matters. Always preheat to 400°F (200°C). This helps them cook evenly. Roll your pizza dough to about ¼ inch thick. If it's too thick, the knots may not cook well inside. Cut the strips 1 inch wide and 6 inches long. This size allows them to twist easily and cook evenly. For a burst of flavor, use fresh garlic. Fresh garlic gives more taste than jarred. Add herbs like rosemary or thyme for more depth. You can also mix in different cheeses, like mozzarella or cheddar. A pinch of red pepper flakes adds a nice kick. Try different spices to find your perfect blend. One common mistake is overcrowding the baking sheet. Leave space between knots so they rise well. Don't skip brushing the garlic butter mixture on top. It adds flavor and a nice shine. Lastly, keep an eye on them while baking. They can go from golden brown to burnt quickly. For the full recipe, click here: [Full Recipe]. {{image_4}} You can play with the cheese in your garlic knots. Instead of Parmesan, try mozzarella for a melty twist. You might also use cheddar for a sharp taste. Goat cheese adds creaminess, while feta offers a salty kick. Combine different cheeses for a fun mix. Each choice brings a unique flavor to your knots. Want to spice things up? Add herbs like oregano or thyme for extra flavor. A pinch of cayenne pepper gives a nice heat. You could also add lemon zest for a fresh twist. Try mixing in Italian seasoning for a classic touch. Be creative to find your perfect blend of spices. If you want to change the base, you have options. You can use bread dough for a fluffier texture. Biscuit dough makes a quick and easy choice, too. For a gluten-free option, try a gluten-free pizza dough. Each dough type gives a different taste and texture to your knots. Check out the Full Recipe for more ideas. To store your leftover garlic parmesan knots, first let them cool down. Place them in an airtight container. This keeps them fresh and prevents drying out. If you plan to eat them in a day or two, the fridge works well. For longer storage, the freezer is a better choice. Reheating your garlic parmesan knots is easy. For the best taste, use the oven. Preheat it to 350°F (175°C). Place the knots on a baking sheet. Heat them for about 5-7 minutes. This restores the crispy texture. You can also use a microwave. Heat them for about 30 seconds. However, the texture may not be as nice as oven heating. If you want to freeze garlic parmesan knots, wrap them well. Use plastic wrap or aluminum foil. Then, place them in a freezer bag. Squeeze out as much air as you can. They can stay in the freezer for up to three months. When ready to eat, thaw them in the fridge overnight. Reheat as described earlier. Your knots will taste almost fresh! For the full recipe, check out the earlier section. Yes, you can use homemade dough. Just make sure it has the right texture. If your dough is soft, it may not hold the knot shape well. Use a simple recipe that yields a stretchy and firm dough for best results. This way, you get that fresh flavor and texture right from your kitchen. Garlic parmesan knots last about 2-3 days at room temperature. Store them in an airtight container to keep them fresh. If you want to save them longer, put them in the fridge, where they can last up to a week. Just remember, they taste best when fresh! Yes, you can make garlic knots without garlic. You can swap garlic with herbs or spices. Try using Italian seasoning or even pesto for flavor. This way, you still get a tasty knot without the garlic punch. Garlic parmesan knots pair well with many dishes. You can serve them with marinara sauce for dipping. They also go great alongside pasta, salads, or soups. If you want a fun snack, try them with cheese or charcuterie boards. The options are endless! You’ve learned how to make delicious garlic parmesan knots. We covered all the key ingredients, tools, and step-by-step baking instructions. I shared tips to avoid common mistakes and enhance flavors. You also discovered fun variations and how to store and reheat your knots. With these skills, you can impress anyone at your next meal. Enjoy your tasty creation and make it your own! Happy cooking!](https://goldendishy.com/wp-content/uploads/2025/07/36d16f76-26da-465a-ba33-0a5ce8f4ea78.webp)
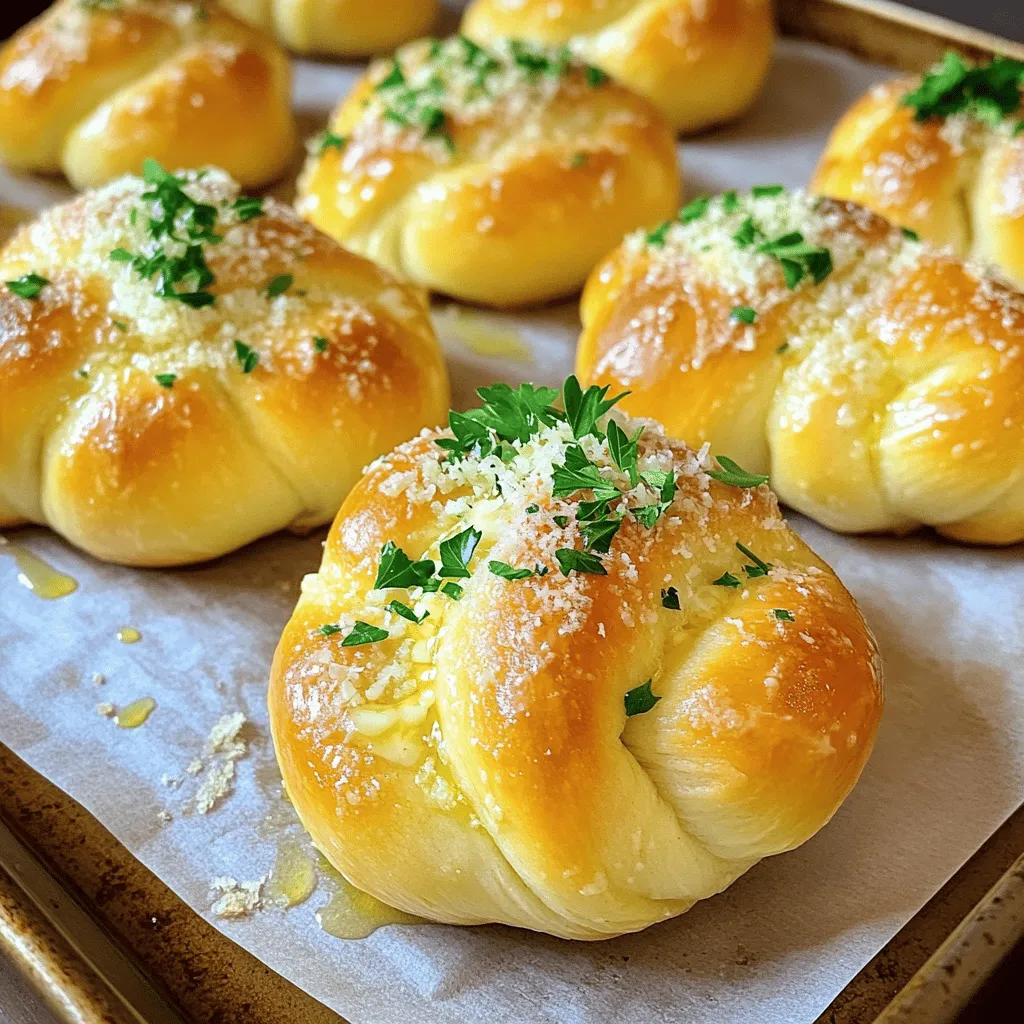
Are you ready to impress your family with a tasty snack? My Easy Garlic Parmesan Knots are not only simple to make, but they also pack a punch of flavor. With just a few ingredients, you can whip up soft, buttery knots that everyone will love. Follow my step-by-step guide, and I’ll make sure you can master these delightful treats. Let’s get started on this mouthwatering adventure!
Ingredients
Required Ingredients
To make easy garlic parmesan knots, gather these key items:
– 1 package (16 oz) refrigerated pizza dough
– 4 tablespoons unsalted butter, melted
– 4 cloves garlic, minced
– 1/4 cup grated Parmesan cheese
– 1/2 teaspoon salt
– 1/4 teaspoon black pepper
These ingredients create the base for your tasty knots. The pizza dough gives them a nice texture, while butter and garlic add rich flavor.
Optional Ingredients
You might consider adding these for extra taste:
– 1 tablespoon fresh parsley, chopped (or 1 teaspoon dried parsley)
– Pinch of red pepper flakes
Fresh parsley adds color and a fresh taste. Red pepper flakes give a little heat, so use them if you like spice.
Recommended Tools
To make your cooking easier, have these tools on hand:
– Sharp knife or pizza cutter
– Baking sheet
– Parchment paper
– Small bowl
– Pastry brush
Using these tools helps with cutting the dough and baking the knots evenly. They make the process smooth and simple.
Step-by-Step Instructions
Preheat the Oven
Start by preheating your oven to 400°F (200°C). This heat helps the knots rise and bake well. Line a baking sheet with parchment paper. This keeps the knots from sticking.
Preparing the Dough
Next, take the refrigerated pizza dough. Roll it out on a clean, floured surface. Aim for a rectangle about ¼ inch thick. This thickness ensures even cooking.
Forming the Knots
Slice the dough into strips. Each strip should be about 1 inch wide and 6 inches long. Take one strip and tie it into a knot. Tuck the ends underneath to keep them secure. Place each knot on the prepared baking sheet, leaving space between them.
Applying the Garlic Butter Mixture
In a small bowl, combine melted butter, minced garlic, salt, black pepper, and red pepper flakes if desired. This garlic butter mixture gives the knots a rich flavor. Use a brush to apply the mixture on top of each knot. Make sure to get some garlic pieces on top.
Baking the Knots
Now, it’s time to bake! Place the baking sheet in the oven and bake for 12-15 minutes. Watch for a golden brown color on the knots. When done, take them out and let them cool for a few minutes. Brush any leftover garlic butter on top for extra flavor.
Tips & Tricks
Ensuring Perfectly Cooked Knots
To get your knots just right, oven temperature matters. Always preheat to 400°F (200°C). This helps them cook evenly. Roll your pizza dough to about ¼ inch thick. If it’s too thick, the knots may not cook well inside. Cut the strips 1 inch wide and 6 inches long. This size allows them to twist easily and cook evenly.
Flavor Enhancements
For a burst of flavor, use fresh garlic. Fresh garlic gives more taste than jarred. Add herbs like rosemary or thyme for more depth. You can also mix in different cheeses, like mozzarella or cheddar. A pinch of red pepper flakes adds a nice kick. Try different spices to find your perfect blend.
Common Mistakes to Avoid
One common mistake is overcrowding the baking sheet. Leave space between knots so they rise well. Don’t skip brushing the garlic butter mixture on top. It adds flavor and a nice shine. Lastly, keep an eye on them while baking. They can go from golden brown to burnt quickly.

Variations
Cheese Variations
You can play with the cheese in your garlic knots. Instead of Parmesan, try mozzarella for a melty twist. You might also use cheddar for a sharp taste. Goat cheese adds creaminess, while feta offers a salty kick. Combine different cheeses for a fun mix. Each choice brings a unique flavor to your knots.
Spice Variations
Want to spice things up? Add herbs like oregano or thyme for extra flavor. A pinch of cayenne pepper gives a nice heat. You could also add lemon zest for a fresh twist. Try mixing in Italian seasoning for a classic touch. Be creative to find your perfect blend of spices.
Dough Alternatives
If you want to change the base, you have options. You can use bread dough for a fluffier texture. Biscuit dough makes a quick and easy choice, too. For a gluten-free option, try a gluten-free pizza dough. Each dough type gives a different taste and texture to your knots.
Storage Info
How to Store Leftovers
To store your leftover garlic parmesan knots, first let them cool down. Place them in an airtight container. This keeps them fresh and prevents drying out. If you plan to eat them in a day or two, the fridge works well. For longer storage, the freezer is a better choice.
Reheating Instructions
Reheating your garlic parmesan knots is easy. For the best taste, use the oven. Preheat it to 350°F (175°C). Place the knots on a baking sheet. Heat them for about 5-7 minutes. This restores the crispy texture. You can also use a microwave. Heat them for about 30 seconds. However, the texture may not be as nice as oven heating.
Freezing Tips
If you want to freeze garlic parmesan knots, wrap them well. Use plastic wrap or aluminum foil. Then, place them in a freezer bag. Squeeze out as much air as you can. They can stay in the freezer for up to three months. When ready to eat, thaw them in the fridge overnight. Reheat as described earlier. Your knots will taste almost fresh!
FAQs
Can I use homemade dough instead of refrigerated pizza dough?
Yes, you can use homemade dough. Just make sure it has the right texture. If your dough is soft, it may not hold the knot shape well. Use a simple recipe that yields a stretchy and firm dough for best results. This way, you get that fresh flavor and texture right from your kitchen.
How long do garlic parmesan knots last?
Garlic parmesan knots last about 2-3 days at room temperature. Store them in an airtight container to keep them fresh. If you want to save them longer, put them in the fridge, where they can last up to a week. Just remember, they taste best when fresh!
Can I make garlic knots without garlic?
Yes, you can make garlic knots without garlic. You can swap garlic with herbs or spices. Try using Italian seasoning or even pesto for flavor. This way, you still get a tasty knot without the garlic punch.
What can I serve with garlic parmesan knots?
Garlic parmesan knots pair well with many dishes. You can serve them with marinara sauce for dipping. They also go great alongside pasta, salads, or soups. If you want a fun snack, try them with cheese or charcuterie boards. The options are endless!
You’ve learned how to make delicious garlic parmesan knots. We covered all the key ingredients, tools, and step-by-step baking instructions. I shared tips to avoid common mistakes and enhance flavors. You also discovered fun variations and how to store and reheat your knots. With these skills, you can impress anyone at your next meal. Enjoy your tasty creation and make it your own! Happy cooking!
![To make easy garlic parmesan knots, gather these key items: - 1 package (16 oz) refrigerated pizza dough - 4 tablespoons unsalted butter, melted - 4 cloves garlic, minced - 1/4 cup grated Parmesan cheese - 1/2 teaspoon salt - 1/4 teaspoon black pepper These ingredients create the base for your tasty knots. The pizza dough gives them a nice texture, while butter and garlic add rich flavor. You might consider adding these for extra taste: - 1 tablespoon fresh parsley, chopped (or 1 teaspoon dried parsley) - Pinch of red pepper flakes Fresh parsley adds color and a fresh taste. Red pepper flakes give a little heat, so use them if you like spice. To make your cooking easier, have these tools on hand: - Sharp knife or pizza cutter - Baking sheet - Parchment paper - Small bowl - Pastry brush Using these tools helps with cutting the dough and baking the knots evenly. They make the process smooth and simple. For the full recipe, refer to the details above. Start by preheating your oven to 400°F (200°C). This heat helps the knots rise and bake well. Line a baking sheet with parchment paper. This keeps the knots from sticking. Next, take the refrigerated pizza dough. Roll it out on a clean, floured surface. Aim for a rectangle about ¼ inch thick. This thickness ensures even cooking. Slice the dough into strips. Each strip should be about 1 inch wide and 6 inches long. Take one strip and tie it into a knot. Tuck the ends underneath to keep them secure. Place each knot on the prepared baking sheet, leaving space between them. In a small bowl, combine melted butter, minced garlic, salt, black pepper, and red pepper flakes if desired. This garlic butter mixture gives the knots a rich flavor. Use a brush to apply the mixture on top of each knot. Make sure to get some garlic pieces on top. Now, it’s time to bake! Place the baking sheet in the oven and bake for 12-15 minutes. Watch for a golden brown color on the knots. When done, take them out and let them cool for a few minutes. Brush any leftover garlic butter on top for extra flavor. You can find the full recipe in the ingredients section. To get your knots just right, oven temperature matters. Always preheat to 400°F (200°C). This helps them cook evenly. Roll your pizza dough to about ¼ inch thick. If it's too thick, the knots may not cook well inside. Cut the strips 1 inch wide and 6 inches long. This size allows them to twist easily and cook evenly. For a burst of flavor, use fresh garlic. Fresh garlic gives more taste than jarred. Add herbs like rosemary or thyme for more depth. You can also mix in different cheeses, like mozzarella or cheddar. A pinch of red pepper flakes adds a nice kick. Try different spices to find your perfect blend. One common mistake is overcrowding the baking sheet. Leave space between knots so they rise well. Don't skip brushing the garlic butter mixture on top. It adds flavor and a nice shine. Lastly, keep an eye on them while baking. They can go from golden brown to burnt quickly. For the full recipe, click here: [Full Recipe]. {{image_4}} You can play with the cheese in your garlic knots. Instead of Parmesan, try mozzarella for a melty twist. You might also use cheddar for a sharp taste. Goat cheese adds creaminess, while feta offers a salty kick. Combine different cheeses for a fun mix. Each choice brings a unique flavor to your knots. Want to spice things up? Add herbs like oregano or thyme for extra flavor. A pinch of cayenne pepper gives a nice heat. You could also add lemon zest for a fresh twist. Try mixing in Italian seasoning for a classic touch. Be creative to find your perfect blend of spices. If you want to change the base, you have options. You can use bread dough for a fluffier texture. Biscuit dough makes a quick and easy choice, too. For a gluten-free option, try a gluten-free pizza dough. Each dough type gives a different taste and texture to your knots. Check out the Full Recipe for more ideas. To store your leftover garlic parmesan knots, first let them cool down. Place them in an airtight container. This keeps them fresh and prevents drying out. If you plan to eat them in a day or two, the fridge works well. For longer storage, the freezer is a better choice. Reheating your garlic parmesan knots is easy. For the best taste, use the oven. Preheat it to 350°F (175°C). Place the knots on a baking sheet. Heat them for about 5-7 minutes. This restores the crispy texture. You can also use a microwave. Heat them for about 30 seconds. However, the texture may not be as nice as oven heating. If you want to freeze garlic parmesan knots, wrap them well. Use plastic wrap or aluminum foil. Then, place them in a freezer bag. Squeeze out as much air as you can. They can stay in the freezer for up to three months. When ready to eat, thaw them in the fridge overnight. Reheat as described earlier. Your knots will taste almost fresh! For the full recipe, check out the earlier section. Yes, you can use homemade dough. Just make sure it has the right texture. If your dough is soft, it may not hold the knot shape well. Use a simple recipe that yields a stretchy and firm dough for best results. This way, you get that fresh flavor and texture right from your kitchen. Garlic parmesan knots last about 2-3 days at room temperature. Store them in an airtight container to keep them fresh. If you want to save them longer, put them in the fridge, where they can last up to a week. Just remember, they taste best when fresh! Yes, you can make garlic knots without garlic. You can swap garlic with herbs or spices. Try using Italian seasoning or even pesto for flavor. This way, you still get a tasty knot without the garlic punch. Garlic parmesan knots pair well with many dishes. You can serve them with marinara sauce for dipping. They also go great alongside pasta, salads, or soups. If you want a fun snack, try them with cheese or charcuterie boards. The options are endless! You’ve learned how to make delicious garlic parmesan knots. We covered all the key ingredients, tools, and step-by-step baking instructions. I shared tips to avoid common mistakes and enhance flavors. You also discovered fun variations and how to store and reheat your knots. With these skills, you can impress anyone at your next meal. Enjoy your tasty creation and make it your own! Happy cooking!](https://goldendishy.com/wp-content/uploads/2025/07/36d16f76-26da-465a-ba33-0a5ce8f4ea78-300x300.webp)


![To make Cranberry Orange Energy Bites, you need the right mix of flavors and textures. Here’s what you will need: - 1 cup rolled oats - 1/2 cup almond butter - 1/4 cup honey or maple syrup - 1/2 cup dried cranberries, finely chopped - Zest of 1 medium orange - 1/4 cup freshly squeezed orange juice - 1/4 cup chia seeds - 1/2 teaspoon ground cinnamon - Pinch of sea salt - Optional: 1/4 cup chopped nuts or seeds These ingredients come together to create a tasty and healthy snack. The oats provide fiber and energy. Almond butter adds protein and a creamy texture. Honey or maple syrup gives a touch of sweetness, while dried cranberries add a chewy burst of flavor. The zest and juice of the orange brighten the bites, making them refreshing. Chia seeds add crunch and healthy omega-3s. You can also mix in nuts or seeds for extra texture. They can make your bites even more filling. You can find the full recipe for the perfect energy bites in the recipe section above. - Mixing the Base Ingredients Start by taking a large bowl. Add 1 cup of rolled oats, 1/2 cup of almond butter, and 1/4 cup of honey or maple syrup. Mix with a sturdy spoon until everything blends well. This base forms the heart of your energy bites. - Adding Flavorful Components Next, stir in 1/2 cup of finely chopped dried cranberries, the zest of 1 medium orange, and 1/4 cup of freshly squeezed orange juice. Also, add 1/4 cup of chia seeds, 1/2 teaspoon of ground cinnamon, and a pinch of sea salt. Keep mixing until you see a uniform color and texture. - Achieving the Right Texture Use your hands or a spatula to mix the ingredients thoroughly. You want a sticky but manageable consistency. If it feels too dry, add a bit more orange juice. If it’s too wet, sprinkle in extra oats until it feels just right. - Rolling Into Balls After you’ve mixed everything, cover the bowl with plastic wrap or a lid. Chill the mixture in the fridge for about 30 minutes. Once chilled, take portions and roll them into 1-inch balls. You should get about 15 to 20 bites. - Optional Coating with Nuts or Seeds For added crunch and flavor, roll some of the balls in chopped nuts or seeds. This step is optional, but it gives a nice touch to each bite. - Chilling the Mixture After rolling, arrange the energy bites on a plate. You can chill them for an extra 10 to 15 minutes to firm them up even more. This makes them easier to eat. - Presentation Tips For a pretty display, stack the energy bites or place them in a rustic jar. You can sprinkle some extra orange zest on top for color and aroma. Enjoy your tasty, nutritious snack! Check the [Full Recipe] for more details. - Best Practices for Freshness: Store energy bites in an airtight container. This keeps them moist and tasty. - Duration of Shelf Life: These bites last up to 1 week in the fridge. After that, they may dry out. - Freezing Energy Bites for Later Use: You can freeze these bites. Place them in a single layer on a tray. Once frozen, store them in a bag. They can last for up to 3 months. - Preparing in Bulk: Make a double batch! This way, you always have a quick snack ready. - Overmixing or Undermixing: Mix just enough to combine all ingredients. Too much mixing can make them tough. - Adjusting Consistency: If the mixture is too dry, add more juice. If too wet, mix in more oats. Always aim for a sticky but manageable mixture. For the full recipe, check out Cranberry Orange Energy Bites. {{image_4}} You can mix things up by adding different nuts. Walnuts, almonds, or pecans give a nice crunch. Just chop them finely and fold them into the mix. You can use about 1/4 cup of your choice. Incorporating other fruits can also change the flavor. Try using dried apricots, raisins, or figs. They add sweetness and texture. Just chop them to match the size of the cranberries. If you want a vegan option, swap honey for maple syrup. This keeps the bites sweet without using animal products. Almond butter is already vegan, so you’re set there! For gluten-free substitutions, choose certified gluten-free oats. Most oats are naturally gluten-free but can get cross-contaminated. Make sure to check the label. Using different nut butters can change the taste and texture. Peanut butter or cashew butter works great. Just use the same amount as almond butter. Adjusting crunchiness with seeds is another fun option. Add chia seeds or flaxseeds for some extra bite. You can also toss in sunflower seeds for a nut-free crunch. The cranberry orange energy bites are packed with nutrients. Each ingredient brings unique health benefits. - Rolled oats offer fiber, which helps digestion and keeps you full. - Almond butter is a great source of healthy fats and protein. - Dried cranberries add antioxidants that fight free radicals. - Chia seeds are rich in omega-3s and help with heart health. - Orange juice boosts your immune system with vitamin C. These bites provide energy and nutrients to fuel your day. They are perfect for a quick boost before a workout or during a busy afternoon. How many bites should you eat for a snack? I suggest two to three bites. This gives you enough energy without overdoing it. Each bite is satisfying. Dietary recommendations may vary. Listen to your body. If you feel hungry after two bites, enjoy another! Balance is key. Each bite contains about 70 calories. This makes it easy to track your snack intake. If you want fewer calories, consider adjusting the recipe. You can reduce the honey or use less nut butter. This way, you can fit these bites into your dietary goals without losing flavor. For more details, check the full recipe. Enjoy these tasty energy bites while staying mindful of your nutrition! Cranberry orange energy bites can last up to one week in the fridge. Store them in an airtight container to keep them fresh. If you want to keep them longer, you can freeze them. They can last up to three months in the freezer. Just thaw them in the fridge before enjoying. Yes, you can substitute almond butter with other nut butters. Peanut butter, cashew butter, or sunflower seed butter work well. Each will give a unique taste. Make sure to choose one that fits your dietary needs. You can use the mixture for various snacks. Try spreading it on toast or mixing it into yogurt. You can also make energy bars by pressing the mixture into a pan and slicing it. This way, you have more options for your snack. To make them sweeter, you can add more honey or maple syrup. You can also mix in some chocolate chips or dried fruits like dates. Adjust the sweetness based on your taste. This way, you can create a snack that you love. Yes, there are many alternatives for honey or maple syrup. You can use agave nectar, brown rice syrup, or coconut nectar. Each of these will add a different sweetness. Just make sure to adjust the amount based on how sweet you want your bites to be. For the full recipe, check out the recipe section above. These Cranberry Orange Energy Bites are simple to make and taste great. You mix healthy ingredients, shape them into bites, and enjoy a tasty snack. Remember to store them properly to keep them fresh. You can also tweak ingredients for your tastes or diet. With these tips and flavor ideas, you’ll enjoy these bites any time you need a quick boost. Get creative and make this snack your own!](https://goldendishy.com/wp-content/uploads/2025/06/5774e534-56b3-4e6d-8a48-215f930e3d22-768x768.webp)
![- 4 medium zucchinis, sliced into 1/2-inch thick rounds - 4 tablespoons extra virgin olive oil - 2 tablespoons freshly squeezed lemon juice - 1 teaspoon freshly grated lemon zest - 2 teaspoons dried oregano - 1 teaspoon garlic powder - 1 teaspoon sea salt - 1/2 teaspoon freshly cracked black pepper - 2 tablespoons fresh parsley, finely chopped (for garnish) You can use other oils for grilling. Avocado oil or sesame oil works well. If you have fresh herbs, use them instead of dried ones. Fresh oregano or basil adds great flavor. Adjust the amount based on your taste. When selecting zucchinis, look for ones that are firm and shiny. Avoid any that feel soft or have blemishes. Choose smaller zucchinis for a sweeter taste. Check for seasonal zucchinis in late summer. They are often at their best during this time. To make the marinade, start with a large bowl. Add the olive oil, lemon juice, and lemon zest. Next, sprinkle in the dried oregano, garlic powder, sea salt, and black pepper. Whisk everything together until mixed well. This blend of flavors makes your zucchini taste great. Marinating time is key. Let the zucchini sit in the marinade for 10 to 15 minutes. This helps the zucchini soak up the zesty flavors. Skipping this step means missing out on rich taste. First, preheat your grill to medium-high heat, about 400°F (200°C). A hot grill gives your zucchini nice grill marks and a smoky flavor. When ready, carefully place the marinated zucchini rounds on the grill. Cook them for 3 to 4 minutes on each side. Watch for tender slices with grill marks. This means they are perfectly grilled. When done, transfer the zucchini to a serving platter. Arrange them in a fan shape for a pretty look. For garnish, sprinkle fresh parsley on top. This adds a pop of color and a burst of flavor. You can also drizzle extra olive oil and sprinkle sea salt for extra taste. Enjoy your Lemon Herb Grilled Zucchini! For the complete recipe, check the [Full Recipe]. To avoid sticking on the grill, start with a clean grill. Oil the grates well before adding zucchini. This creates a non-stick surface. Use a paper towel dipped in oil to wipe the grates. For even cooking, cut zucchini into uniform pieces. I recommend 1/2-inch thick rounds. This size cooks well without burning. Grill over medium-high heat for best results. You can boost flavor with fresh herbs like basil or thyme. They add a nice twist. For a bit of heat, try red pepper flakes or sliced jalapeños. Both pair well with the lemony taste. The best grill types for zucchini are gas or charcoal grills. Both give great flavor and heat. A grill basket can help keep slices from falling through the grates. Use tongs for safe flipping. For a great grilling experience, have a spatula and a timer handy. These tools help track cooking time and make flipping easy. For the complete process, check the Full Recipe. {{image_4}} You can change the flavors of your grilled zucchini by trying different herbs and spices. Instead of oregano, use thyme or basil for a fresh twist. You can also add a pinch of red pepper flakes for a little heat. Mixing in some smoked paprika can give your dish a nice depth. Incorporating other citrus flavors makes the marinade even more fun. Try lime or orange juice instead of lemon. Both options add a unique taste that pairs well with zucchini. You can also mix lemon with lime for a zesty combo. Grilled zucchini pairs well with many other vegetables. Bell peppers, eggplant, and asparagus are great choices. You can slice them into similar sizes for even cooking. Cooking times vary, so keep an eye on your veggies. Zucchini takes about 3-4 minutes per side. Bell peppers need about 5-7 minutes, while eggplant may take up to 8 minutes. This way, you can enjoy a colorful mix on your plate. Grilled zucchini makes a tasty side dish for many meals. It pairs well with proteins like grilled chicken, fish, or steak. You can also serve it alongside grains like quinoa or couscous for a filling meal. For fun side dish ideas, try serving grilled zucchini with a yogurt sauce. A sprinkle of feta cheese or a handful of nuts can also add a nice touch. For more flavor, drizzle balsamic glaze over the top. For a complete guide to making this dish, check out the Full Recipe. To store leftover grilled zucchini, let it cool first. Place it in an airtight container. This keeps it fresh and prevents odors from mixing. You can store it in the fridge. It usually lasts for about 3 to 5 days. Reheating grilled zucchini can be tricky. The best method is to use a skillet. Heat the skillet over medium-low heat. Add a small drizzle of olive oil. Place the zucchini in the skillet. Cook it for about 2 to 3 minutes on each side. This keeps the texture nice and firm. You can also add it to pasta or salads for a tasty twist. Yes, you can freeze grilled zucchini! To do this, let it cool completely first. Then, arrange the slices in a single layer on a baking sheet. Freeze them for about 1 to 2 hours. Once frozen, transfer the slices to a freezer bag. Remove as much air as possible. Grilled zucchini can last for up to 3 months in the freezer. When ready to use, thaw it in the fridge overnight. You can also toss it directly into soups or stews. For the full recipe, check out the Lemon Herb Grilled Zucchini recipe. To cut zucchini for grilling, slice it into 1/2-inch thick rounds. This thickness helps the zucchini cook evenly and stay firm. You can also cut them into long strips if you prefer a different shape. Just ensure your slices are uniform. This way, they will grill at the same rate. For added flavor, you can cut the zucchini lengthwise and brush the cut sides with olive oil. Yes, you can prepare Lemon Herb Grilled Zucchini ahead of time. To do this, marinate the zucchini slices a few hours before grilling. You can store them in the fridge for up to 24 hours in the marinade. This will enhance the flavor. Just remember to grill them right before serving for the best taste and texture. If grilling later, store the grilled zucchini in an airtight container. Grilled zucchini is very healthy. It is low in calories and high in vitamins. Zucchini is a great source of vitamin C, which boosts your immune system. It also contains potassium, which helps with heart health. Plus, grilling keeps the zucchini's nutrients intact while adding a nice smoky flavor. Enjoy it as a side dish or in salads. You can find the full recipe in the main article. In this article, we covered the key ingredients for Lemon Herb Grilled Zucchini and preparation steps. You learned how to marinate, grill, and enhance flavors. I shared tips for choosing fresh zucchini and creative variations. Remember, fresh ingredients lead to the best taste. Enjoy experimenting with different herbs or vegetables. Grilled zucchini is not just simple but also healthy and tasty. Now, you are ready to impress at your next meal!](https://goldendishy.com/wp-content/uploads/2025/06/34b028ee-fd33-4782-b46e-eaef12af4b53-768x768.webp)


![To make the best roasted garlic hummus, gather these key ingredients: - 1 can (15 oz) chickpeas, thoroughly drained and rinsed - 1/4 cup creamy tahini - 1/4 cup high-quality olive oil, plus extra for drizzling - 4 cloves of roasted garlic - 2 tablespoons freshly squeezed lemon juice - 1/2 teaspoon ground cumin - Sea salt, to taste - Water, as needed for desired consistency - Sweet paprika and finely chopped fresh parsley for garnish These ingredients create a rich and creamy dip that bursts with flavor. The roasted garlic adds a sweet, mellow taste that enhances the overall profile of the hummus. You can customize your hummus with these optional ingredients: - Spices like smoked paprika or cayenne for heat - Fresh herbs such as basil or cilantro for added freshness - A splash of balsamic vinegar for depth - Roasted red peppers for a sweet and smoky twist These additions can help you explore new flavors and keep your hummus exciting. Here’s a quick look at the health benefits of the main ingredients: - Chickpeas: High in protein and fiber, they help keep you full. - Tahini: Made from sesame seeds, it provides healthy fats and calcium. - Olive oil: A heart-healthy fat that can lower bad cholesterol levels. - Garlic: Known for its immune-boosting properties and flavor. - Lemon juice: Adds vitamin C and brightens the flavor. This hummus is not just tasty; it’s also packed with nutrients. You can enjoy it guilt-free as a snack or appetizer. For the complete recipe, check out the full recipe section. To roast garlic, first, preheat your oven to 400°F (200°C). Take your garlic cloves and wrap them in aluminum foil. Drizzle a little olive oil over the cloves before sealing the packet. Place the foil packet in the oven and roast for about 30-35 minutes. The garlic should turn soft and golden brown. After roasting, let it cool for a few minutes before you touch it. This step brings out the sweet, rich flavor of the garlic. In a food processor, add the following ingredients: - 1 can (15 oz) chickpeas, thoroughly drained and rinsed - 1/4 cup creamy tahini - 1/4 cup high-quality olive oil, plus extra for drizzling - 4 cloves of roasted garlic - 2 tablespoons freshly squeezed lemon juice - 1/2 teaspoon ground cumin - Sea salt, to taste Blend these ingredients until they become silky smooth. You may need to stop and scrape down the sides to ensure even mixing. This step creates a rich and creamy base for your hummus. If your hummus is too thick, add water a little at a time. Start with one tablespoon and blend again until you reach your preferred creamy texture. Taste your hummus and adjust the seasoning. You might want more sea salt, lemon juice, or roasted garlic to suit your taste. For the full recipe, refer to the provided instructions. Enjoy making this delicious dip! To make your hummus extra creamy, use dry chickpeas. Soak them overnight and cook until soft. This gives a smoother texture. If you use canned chickpeas, rinse them well. It helps remove some of the canning liquid, which can make hummus taste tinny. Always blend your mixture well. Stop and scrape the sides of the bowl as needed. This step ensures every bit gets mixed in. Roasting garlic is easy and adds great flavor. Start by preheating your oven to 400°F (200°C). Wrap the garlic cloves in aluminum foil. Drizzle a little olive oil on top. Seal the foil tightly and bake for about 30-35 minutes. The cloves should be soft and golden brown. Let them cool before you handle them. You can use the roasted garlic in your hummus or on bread for a tasty treat. Roasted garlic hummus is very versatile. You can serve it with fresh veggie sticks like carrots, cucumbers, and bell peppers. Pita bread, toasted or soft, makes a great dipper too. For a fun twist, try pairing it with warm pita chips. Add a sprinkle of sweet paprika and fresh parsley on top for color. This makes your dish look beautiful and tasty. Don't forget to check out the Full Recipe for more details! {{image_4}} You can boost the taste of your roasted garlic hummus with spices and herbs. Try adding paprika for a smoky kick or chili powder for heat. Fresh herbs like cilantro or basil can add a bright touch. A pinch of za'atar brings an earthy flavor, while a dash of black pepper enhances the taste. Mix and match to find your favorite combination! Though chickpeas are classic, other beans and peas work well too. White beans like cannellini add creaminess and a mild taste. Black beans give a rich color and unique flavor. You can even use peas for a sweet twist. Each option brings its own character, so experiment to discover what you love! Roasted garlic hummus shines as a dip, but it can do much more. Spread it on sandwiches or wraps for a flavorful layer. Use it as a base for veggie pizzas or flatbreads. Pair it with crackers or pita chips for a fun snack. You can even dollop it on salads for added creaminess. The options are endless! For the full recipe, check out the detailed steps to make your own roasted garlic hummus. To keep your roasted garlic hummus fresh, place it in an airtight container. Make sure to press a piece of plastic wrap against the hummus before sealing. This helps to keep the air out and maintain its creamy texture. Store it in the fridge for up to one week. Always use a clean spoon when scooping out hummus. This avoids introducing bacteria that can spoil your dip. You can freeze roasted garlic hummus for longer storage. Use a freezer-safe container or a resealable bag. Leave some space at the top, as the hummus may expand when frozen. It can last for about three months in the freezer. To use, thaw it overnight in the fridge before serving. Stir well after thawing to restore its smooth consistency. Homemade hummus can last for about a week when stored correctly in the fridge. If you notice any off smells or changes in color, it’s best to discard it. Always trust your senses. Freshness is key for the best flavor. If you made a big batch, consider freezing a portion for later use. Check the [Full Recipe] for tips on making the perfect hummus. You can easily make roasted garlic hummus vegan. The main ingredients are already plant-based. Just use chickpeas, roasted garlic, olive oil, lemon juice, and seasoning. Ensure your tahini is vegan too. Most brands are, but it’s good to check the label. If you don’t have tahini, don’t worry! You can use sunflower seed butter or almond butter. These will change the flavor a bit, but they still taste great. You can also skip it entirely. Just add a bit more olive oil for creaminess. Check the texture while blending. If the hummus feels hard to mix, it’s too thick. Add water, one tablespoon at a time, until it smooths out. If it’s runny, add more chickpeas or tahini to thicken it. Always taste as you go! For the full recipe and precise steps, check the Full Recipe section. Roasted garlic hummus is simple to make and enjoy. You learned about key ingredients, how to roast garlic, and tips for creamy texture. Variations add excitement to the dish, while proper storage keeps it fresh. This tasty dip fits many diets and pairs well with many foods. Now, it’s time to get creative in the kitchen. Make your version and share it with friends. You’ll love the flavor and fun it brings! Enjoy your hummus journey!](https://goldendishy.com/wp-content/uploads/2025/07/73315b96-5df4-4df6-b272-95a468d12cec-768x768.webp)