Looking for a dessert that’s both rich and healthy? Try my Dark Chocolate Avocado Mousse! This creamy treat uses simple, wholesome ingredients to deliver a deliciously indulgent experience without the guilt. I’ll guide you through every step, from selecting ingredients to serving tips. You won’t believe how easy and satisfying this mousse is. Let’s dive in and create a dessert that’s sure to impress!
Why I Love This Recipe
- Healthy Indulgence: This mousse combines the richness of dark chocolate with the creaminess of avocado, making it a guilt-free dessert that feels indulgent.
- Quick and Easy: With just a few simple ingredients and minimal prep time, you can whip up this delicious treat in no time.
- Customizable Sweetness: The recipe allows you to adjust the sweetness to your liking, ensuring that it meets your personal taste preferences perfectly.
- Elegant Presentation: Serving it in clear glass bowls not only showcases the beautiful color but also adds a touch of sophistication to your dessert table.
Ingredients
Main Ingredients List
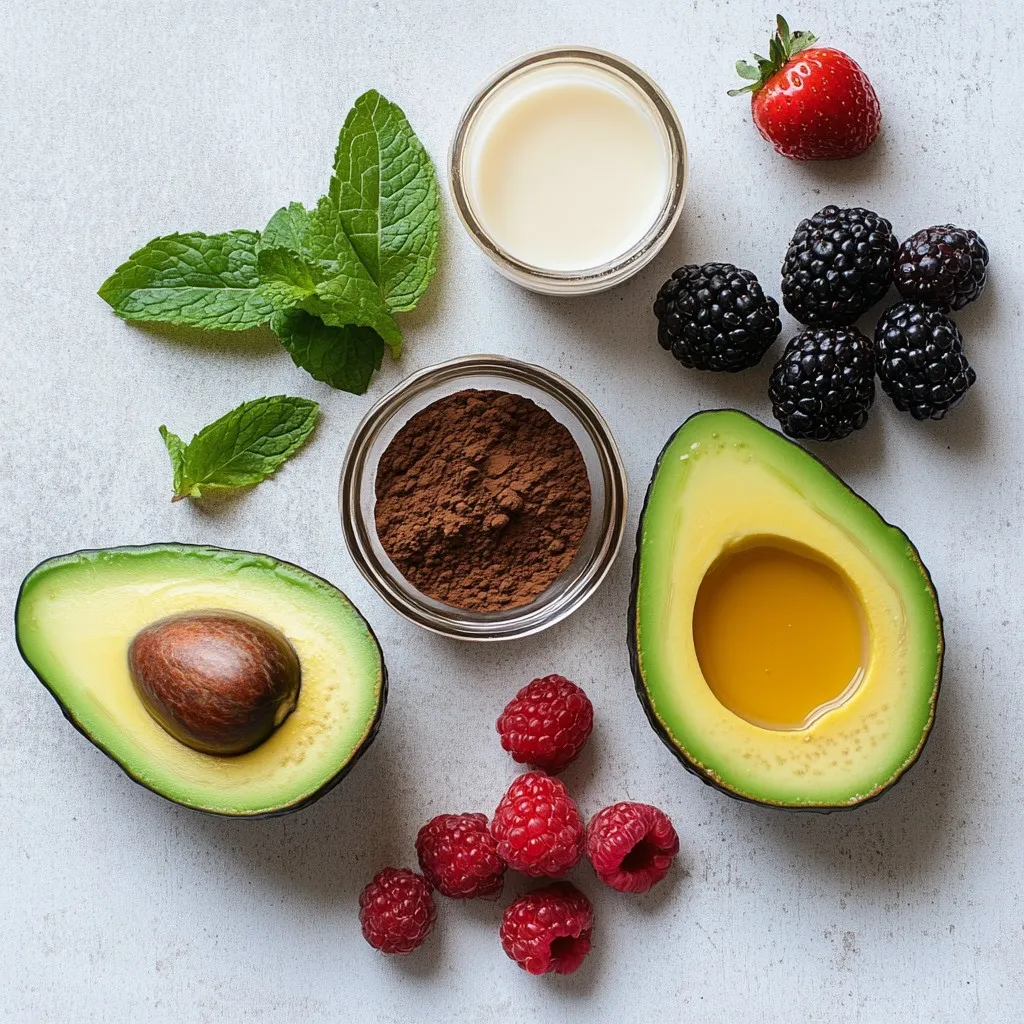
To make dark chocolate avocado mousse, gather these main ingredients:
– 2 ripe avocados
– 1/2 cup unsweetened dark cocoa powder
– 1/3 cup maple syrup (adjust to taste)
– 1/4 cup almond milk (or any plant-based milk)
– 1 teaspoon vanilla extract
– A pinch of sea salt
Optional Garnishes
You can add lovely garnishes to make your mousse shine:
– Fresh berries
– Mint leaves
Substitutions for Dietary Preferences
If you have specific dietary needs, here are some great swaps:
– For nut allergies, use oat milk instead of almond milk.
– If you want a sugar-free option, try using a sugar substitute like stevia.
– Swap maple syrup for agave syrup for a different flavor.
These swaps make the mousse enjoyable for everyone!
Step-by-Step Instructions
Preparing the Avocados
Start by picking two ripe avocados. A ripe avocado feels slightly soft when you press it. Next, cut the avocados in half and carefully remove the pit. Scoop the creamy flesh into a food processor. Make sure you get every bit to keep the mousse smooth.
Blending the Mousse
Now it’s time to blend! Add the following ingredients to the food processor:
– 1/2 cup unsweetened dark cocoa powder
– 1/3 cup maple syrup
– 1/4 cup almond milk
– 1 teaspoon vanilla extract
– A pinch of sea salt
Blend until you have a rich and creamy texture. Stop to scrape down the sides of the bowl. This helps everything mix well. Taste your mousse. If you want it sweeter, add more maple syrup and blend again.
Chilling and Serving
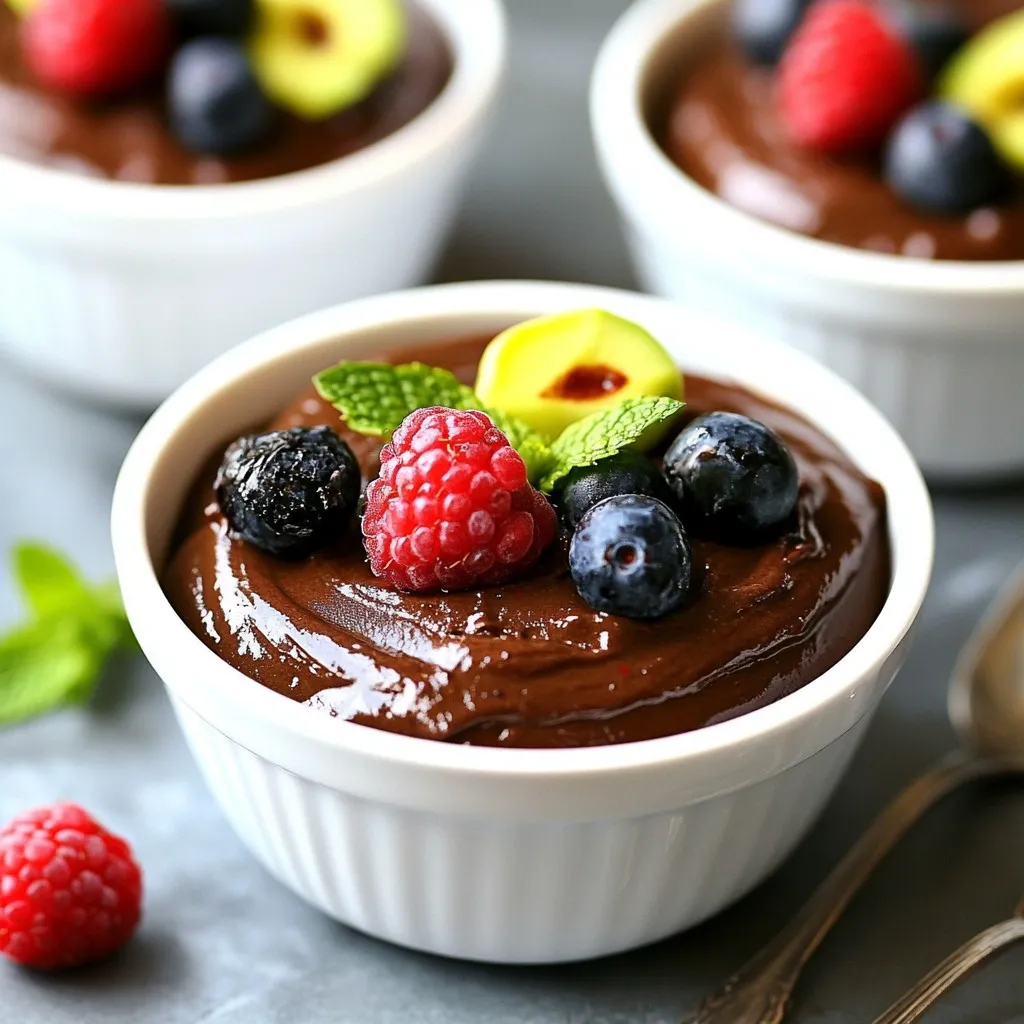
Once blended, spoon the mousse into serving bowls or dessert glasses. Cover them with plastic wrap or lids. Place the bowls in the fridge for at least 30 minutes. This chilling time helps the flavors meld and the mousse firm up.
Just before serving, add a fun touch with fresh berries and mint leaves. This makes your dessert even more tempting!
Tips & Tricks
Achieving the Perfect Consistency
To get that rich and creamy texture, use ripe avocados. The avocados should be soft but not mushy. When blending, stop to scrape down the sides. This ensures everything mixes well. Blend until it’s smooth, with no lumps. If it feels too thick, add a bit more almond milk. This helps reach the perfect consistency for your mousse.
Adjusting Sweetness Levels
Taste your mousse before serving. If you want it sweeter, add more maple syrup. Blend again to mix it well. Start with a little, then add more if needed. Remember, the dark cocoa has a strong flavor. So, balance is key! Adjusting the sweetness can make it just right for your taste.
Presentation and Serving Ideas
Presentation can make your mousse shine. Use clear glass bowls to show off its creamy texture. Top with fresh berries for color and flavor. A sprig of mint adds a fresh touch. You can also dust cocoa powder on top for a fancy look. These small details make your dessert even more enjoyable!
Pro Tips
- Choose Ripe Avocados: Make sure your avocados are perfectly ripe for the creamiest texture. They should yield slightly to gentle pressure when squeezed.
- Adjust Sweetness: Taste the mousse before chilling and feel free to adjust the sweetness with more maple syrup according to your preference.
- Chill Time Matters: Allowing the mousse to chill for at least 30 minutes helps the flavors meld and enhances the overall taste and texture.
- Garnish Creatively: Elevate the presentation by using fresh berries and mint leaves. A sprinkle of cocoa powder can also add a chic finish.
Variations
Ingredient Swaps for Different Flavors
You can change flavors by swapping some ingredients. Instead of cocoa powder, try carob powder for a sweeter taste. You can also use dark chocolate chips. Melt them and mix them into the mousse for a richer flavor. If you want a fruity twist, add a tablespoon of peanut butter or almond butter. This gives the mousse a nutty taste that pairs well with chocolate.
Adding Additional Texture
To add some crunch, mix in chopped nuts like walnuts or pecans. You can also fold in crushed graham crackers for a fun texture. If you want a lighter mousse, try folding in whipped coconut cream. This makes the mousse fluffy and airy. Fresh berries mixed in right before serving can add a burst of flavor and color.
Vegan or Sugar-Free Options
This mousse is easy to make vegan. Just use maple syrup as your sweetener, which is already in the recipe. For a sugar-free option, try monk fruit sweetener or stevia. These sweeteners work well and keep the mousse creamy. Always taste the mousse after you mix in the sweetener. This way, you can adjust it to your liking.
Storage Info
How to Store Leftover Mousse
To keep your dark chocolate avocado mousse fresh, start by covering it. Use plastic wrap or a tight lid. This helps avoid any strange odors from the fridge. Make sure the mousse is in the fridge within two hours of making it. This keeps it safe and tasty.
Best Containers for Storage
The best containers for storing mousse are glass or BPA-free plastic. Glass containers are great because they do not absorb smells. They also let you see the mousse inside. If you use plastic, pick ones that are labeled as food-safe. Avoid using regular bowls without lids. They can let air in, which can spoil the mousse.
Shelf Life and Freezing Tips
Your mousse will stay fresh in the fridge for up to three days. After that, the texture may change. If you want to keep it longer, you can freeze the mousse. Pour it into an airtight container. It can last up to a month in the freezer. When you want to eat it, let it thaw in the fridge overnight. Avoid microwaving, as this can change its texture.
FAQs
Can I use different types of cocoa powder?
Yes, you can use different types of cocoa powder. Dark cocoa powder gives a rich taste. You can also use regular cocoa powder if you want a milder flavor. Just keep in mind that the sweetness might change. Test it after blending to find your perfect mix.
Is this mousse suitable for a vegan diet?
Yes, this mousse is vegan! It uses ripe avocados and plant-based milk. The maple syrup adds sweetness without any animal products. You can enjoy this dessert without worrying about dairy or eggs.
How can I make this recipe lower in calories?
To lower the calories, use less maple syrup. You can also swap almond milk for a lower-calorie option. Using less avocado can help too, but it may change the texture. Taste it as you go to find what works for you.
This blog post guided you through making a delicious avocado mousse. We covered the main ingredients and tasty garnishes. You learned how to prepare, blend, chill, and serve the mousse. Tips helped you get the right texture and sweetness. You explored fun variations and learned how to store leftovers effectively.
In closing, this simple yet versatile recipe will impress everyone. Enjoy experimenting with flavors and sharing with friend


