Cucumber Apple Salad Fresh and Flavorful Delight

If you’re looking for a refreshing dish that bursts with flavor, look no further! My Cucumber Apple Salad combines crunchy cucumbers and sweet apples for a delightful mix. In this post, I’ll share easy steps, tasty tips, and fun variations to create your perfect salad. Whether you want a light lunch or a side dish, this recipe will impress. Let’s dive in and make something delicious together!
Ingredients
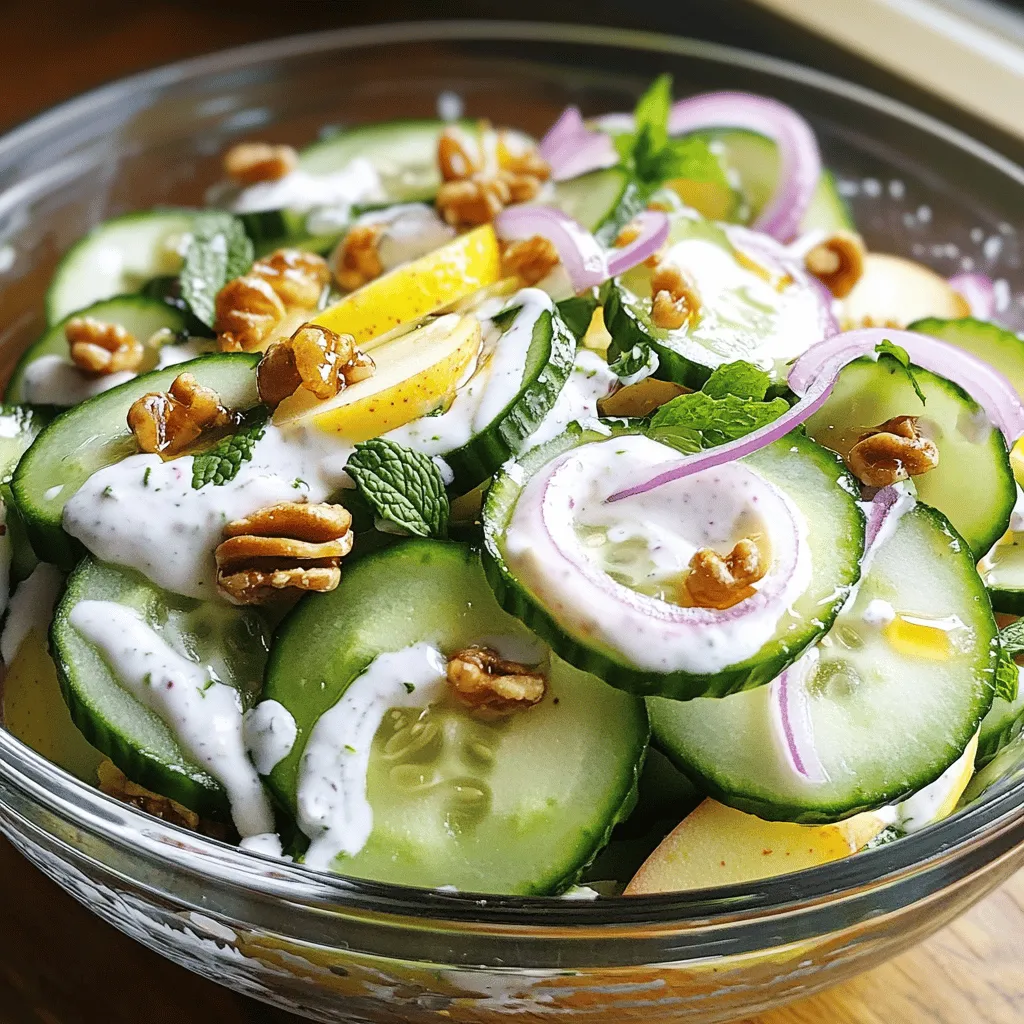
Main Ingredients for Cucumber Apple Salad
The main ingredients make this salad fresh and tasty. Here’s what you need:
– 2 cups cucumbers, thinly sliced
– 1 large tart apple (like Granny Smith), cored and diced
– 1/2 cup red onion, thinly sliced
– 1/4 cup fresh mint leaves, finely chopped
– 1/4 cup plain Greek yogurt
– 2 tablespoons honey
– 1 tablespoon fresh lemon juice
– Salt and black pepper, to taste
Optional Add-ins for Extra Flavor
Want to make your salad even better? You can add these extra ingredients:
– 2 tablespoons toasted walnuts or pecans, chopped for crunch
These add-ins give a nice texture and flavor boost. You can mix and match based on what you like.
Substitutions for Dietary Needs
If you have specific dietary needs, don’t worry. Here are some easy swaps:
– Use dairy-free yogurt instead of Greek yogurt.
– Replace honey with maple syrup for a vegan option.
– Try a different nut or seed if you’re allergic to nuts.
These substitutions help you enjoy this salad no matter your diet.
Step-by-Step Instructions
Preparation of Ingredients
Start by washing the cucumbers well. Use a sharp knife or a mandoline to slice them thinly. Place the slices in a large mixing bowl. Next, take a large tart apple, like a Granny Smith. Remove the core and cut it into small pieces. Add these apple pieces to the bowl with the cucumbers. Now, thinly slice the red onion and chop the fresh mint leaves. Toss the onion and mint into the bowl. Gently mix everything to combine the flavors.
Making the Dressing
In a small bowl, whisk together the plain Greek yogurt, honey, and fresh lemon juice. Keep whisking until the mix is smooth and creamy. Add salt and black pepper to taste. This dressing will bring a nice tangy flavor to the salad.
Combining and Serving the Salad
Drizzle the creamy dressing over the cucumber and apple mixture. Carefully toss everything together to coat the ingredients well. If you want extra crunch, fold in the toasted walnuts or pecans. This step adds a great texture to the salad. For the best flavor, cover the bowl and chill the salad in the fridge for 15-20 minutes. This allows the tastes to mix well. Serve it in a clear glass bowl to show off the colorful ingredients. Enjoy your fresh creation!
Tips & Tricks
How to Choose the Best Cucumbers and Apples
When picking cucumbers, look for firm ones with smooth skin. They should feel heavy for their size. Avoid any that have soft spots or wrinkles. For apples, select ones that are bright and firm. Granny Smith apples work well as they add a tart taste. Check for any bruises or signs of spoilage. Fresh produce makes a big difference in taste.
Best Practices for Meal Prep
To save time, wash and slice your cucumbers and apples ahead of time. Store them in an airtight container in the fridge. This keeps them crisp and fresh. You can also make the dressing in advance. Store the yogurt mixture separately until you’re ready to serve. This way, the salad stays crunchy and tasty.
Ideal Serving Suggestions
Serve your Cucumber Apple Salad in a clear bowl. This showcases the colorful layers of green and red. Garnish with extra mint leaves or a sprinkle of nuts for flair. Pair it with grilled chicken for a light lunch or serve it as a side at dinner. For a twist, try adding some feta cheese before serving. Enjoy your crisp and refreshing dish!

Variations
Alternative Dressings to Try
You can change the taste of your cucumber apple salad with different dressings. Try a balsamic vinaigrette for a tangy twist. A lemon-tahini dressing adds a nutty flavor. For a spicy kick, mix in some sriracha with yogurt. These dressings will keep things fresh and fun.
Additional Ingredients for a Heartier Salad
To make your salad more filling, consider adding proteins. Grilled chicken or shrimp works well. You can also add chickpeas or black beans for a plant-based option. These additions will turn your salad into a complete meal. Feel free to mix in some quinoa for extra texture.
Seasonal Ingredient Swaps
Using seasonal ingredients can elevate your salad. In spring, add fresh peas or radishes. In summer, try ripe tomatoes or bell peppers for a colorful touch. Fall is perfect for diced pears or pomegranate seeds. In winter, use citrus fruits like oranges or grapefruits for a zesty flavor. Seasonal swaps keep your salad exciting all year round.
Storage Info
How to Store Leftover Salad
After making the Cucumber Apple Salad, you might have some leftovers. To store it, place the salad in an airtight container. Make sure to keep it in the fridge. The cold will help keep it fresh for up to 2 days. If you notice any wilting, just toss those bits before eating.
Tips for Keeping Salad Fresh
To keep your salad fresh, avoid mixing the dressing in until you are ready to eat. If you want to store the dressing separately, it will last longer. You can keep the yogurt dressing in a jar in the fridge for about a week. Also, store any leftover cucumbers and apples in their own containers to keep them crisp.
Reheating or Serving Chilled
This salad is best served cold. You do not need to reheat it. Simply take it out of the fridge and serve it as is. For a fun twist, you can add a few ice cubes to the salad bowl. This keeps it extra cool and refreshing, especially on warm days. Enjoy your Crisp Cucumber Apple Delight!
FAQs
Can I make Cucumber Apple Salad in advance?
Yes, you can make this salad ahead of time. I often prepare it a few hours before serving. Just remember to keep it in the fridge. The flavors blend nicely when it sits. However, avoid adding nuts until just before serving. This keeps them crispy.
What are the health benefits of this salad?
Cucumber Apple Salad offers many health benefits. Cucumbers are low in calories and high in water. They keep you hydrated. Apples add fiber and vitamins. The mint gives fresh taste and aids digestion. Greek yogurt provides protein and probiotics. This salad is a light and nutritious choice.
How do I customize the salad for dietary restrictions?
You can easily adapt this salad for dietary needs. For a vegan option, swap Greek yogurt for a plant-based yogurt. If you are nut-free, skip the walnuts or pecans. You can also add protein like chickpeas or grilled chicken for a heartier meal. This salad is versatile and fits many diets.
We explored the main ingredients and steps to make a refreshing Cucumber Apple Salad. You learned how to prepare, dress, and serve this dish along with helpful tips. Variations and storage advice ensure you can enjoy it fresh or later. Remember, you can customize it to fit any taste or diet. This salad is not just tasty; it’s also packed with nutrients. Try it out today and make it your own!


![- 1 pound fresh green beans, trimmed - 4 tablespoons unsalted butter - 4 cloves garlic, minced - 1/2 teaspoon red pepper flakes (optional) - Salt and freshly ground black pepper - Juice of 1/2 lemon - 1/4 cup toasted pine nuts - Fresh parsley, finely chopped Garlic butter green beans shine with fresh flavors. The fresh green beans add crunch, while garlic brings warmth. I love using unsalted butter for its rich taste. The red pepper flakes are optional. They give a nice kick if you want some heat. Salt and pepper elevate the dish, enhancing its natural flavors. The lemon juice adds brightness to the beans. It balances the richness of the butter. Finally, toasted pine nuts bring a nutty crunch that you will enjoy. Garnishing with fresh parsley makes the dish pop with color. All these ingredients work together to create a simple, tasty side. For the full recipe, check out the details above. Start by boiling a large pot of salted water. The water should bubble hard. Add 1 pound of fresh green beans to the pot. Cook them for 3 to 4 minutes. You want them bright green and tender-crisp. This step keeps the beans fresh and crunchy. Once the beans are done, drain them quickly. Move them to a large bowl filled with ice water. This ice bath stops the cooking right away. It also helps keep their color. Leave them in the ice water for a few minutes. Then, drain the beans well and set them aside. In a large skillet, melt 4 tablespoons of unsalted butter over medium heat. When the butter is melted, add 4 cloves of minced garlic. If you want a kick, add 1/2 teaspoon of red pepper flakes. Stir this mix for 1 to 2 minutes. You want it fragrant, but not brown. Brown garlic can taste bitter. Add the blanched green beans to the skillet. Gently toss them in the garlic butter. Make sure they are well-coated. Cook for another 2 to 3 minutes. This lets the green beans soak up those tasty flavors. Squeeze the juice of half a lemon over the green beans. Season them with salt and freshly ground black pepper. Toss everything together again. You want the flavors to blend nicely. Transfer the garlic butter green beans to a serving dish. Top them with 1/4 cup of toasted pine nuts and some finely chopped fresh parsley. This adds a nice crunch and a pop of color. Enjoy your tangy and flavorful side! For the complete recipe, check the Full Recipe section. To get the best green beans, start with fresh ones. Trim the ends for a clean look. Bring a large pot of salted water to a rolling boil. Once boiling, add the beans. Blanch them for 3-4 minutes. You want them bright green and tender-crisp. After blanching, quickly drain the beans. Transfer them to a bowl of ice water. This stops the cooking process and keeps their color. Leave them in the ice bath for a few minutes. Then, drain them well before using. Garlic adds great taste, but it can burn fast. To sauté garlic, melt unsalted butter in a skillet over medium heat. Once melted, add minced garlic. Stir it for 1-2 minutes. Watch closely; you want it fragrant, not brown. If it turns brown, it will taste bitter. For an extra kick, add red pepper flakes during this step. This will bring a nice warmth to the dish. Feel free to get creative with your garlic butter green beans! Try adding toasted almonds or sesame seeds for extra crunch. You can also sprinkle some grated Parmesan cheese for a cheesy flavor. If you love herbs, toss in some thyme or dill. These add fresh notes to the dish. For a touch of sweetness, consider adding a drizzle of honey or maple syrup. Each of these options can make the dish your own. For the full recipe, check out the [Full Recipe]. {{image_4}} You can jazz up garlic butter green beans in many ways. Here are a few ideas: - Toasted almonds add a nice crunch and nutty taste. - Sesame seeds bring an Asian flair and a bit of texture. - Bacon bits offer a savory, smoky flavor that pairs well. - Parmesan cheese adds richness and depth to the dish. These simple tweaks can really boost your green beans. Feel free to mix and match! If you want a vegan version, you can swap out the butter. Here are some great options: - Olive oil works well and adds healthy fats. - Vegan butter is a direct substitute that keeps the flavor. - Coconut oil gives a unique twist with a slight sweetness. Using these substitutes lets everyone enjoy this side dish. You can prepare garlic butter green beans in various ways. Each method offers a different taste: - Grilling gives a smoky flavor and nice char marks. - Oven-roasting caramelizes the beans, making them sweet and tender. - Steaming keeps them crisp and vibrant in color. No matter how you cook them, the garlic butter flavor shines through. This flexibility makes it easy to fit your style! To store leftover garlic butter green beans, first let them cool. Place the beans in an airtight container. Make sure to cover them tightly. They will stay fresh in the fridge for up to three days. If you want to keep them longer, consider freezing. To reheat, you can use a skillet or microwave. For the skillet, heat a bit of butter over medium heat. Add the green beans and stir until warmed through. If using a microwave, place them in a bowl and cover it with a lid. Heat in short bursts of 30 seconds, stirring in between, until hot. If you want to freeze garlic butter green beans, cool them completely first. Pack the beans into freezer bags, removing as much air as possible. Label the bags with the date. You can freeze them for up to three months. To use, thaw in the fridge overnight before reheating. Enjoy the fresh taste even after freezing! Garlic butter green beans last about 3 to 4 days in the fridge. Store them in an airtight container. This keeps them fresh and tasty for your next meal. Yes, you can use frozen green beans. Just cook them according to the package instructions before adding them to the garlic butter. They may not have the same crispness as fresh beans, but they still taste great. Green beans are low in calories and high in nutrients. They are a good source of vitamins A, C, and K. Eating green beans can help support a healthy heart and improve digestion. They also provide fiber, which is important for gut health. Yes, you can prepare garlic butter green beans ahead of time. Cook them, then store them in the fridge. When you are ready to eat, just reheat them in a skillet for a few minutes. This keeps them tasty and quick to serve. Garlic butter green beans pair well with many dishes. They go great with roasted chicken, grilled fish, or steak. You can also serve them with pasta or rice for a complete meal. Consider them a versatile side that complements many flavors. Garlic butter green beans brighten any meal with their vibrant flavor. They are easy to make and add a touch of elegance. Garlic butter green beans are a side dish made with fresh green beans, garlic, and butter. The dish is quick to prepare and is perfect for any occasion. Blanching gives the green beans a bright color and crisp texture. This process makes them tender yet still crunchy. It also helps to lock in their nutrients. To create garlic butter, melt unsalted butter in a skillet. Then, add minced garlic and optional red pepper flakes. This mix brings rich flavor and a gentle heat to the dish. After tossing the green beans in the garlic butter, squeeze half a lemon over them. This adds a fresh, tangy taste. Then, season with salt and pepper to enhance the flavors. To finish, add toasted pine nuts for a nutty crunch. Sprinkle chopped fresh parsley on top for color and added freshness. You can find the full recipe above to try this tasty dish at home! In this post, we covered a simple and tasty recipe for garlic butter green beans. You learned about key ingredients, steps to prepare, and how to store the dish. I shared tips for cooking and adding your favorite flavors. Green beans are not only delicious but also healthy. You can enjoy them fresh or frozen. Now, you can make this dish with confidence and impress your family or friends. Try it out and have fun!](https://goldendishy.com/wp-content/uploads/2025/06/25c5d3d6-959d-413a-b3ac-306353b9d5bf-768x768.webp)