
Welcome to a world of flavor with my Crispy Garlic Butter Gnocchi! In just a few easy steps, you can whip up a dish that’s crunchy, buttery, and packed with garlic goodness. This recipe is perfect for busy weeknights or impressing your friends. Plus, I’m sharing tips and tricks to get the crispiest texture. Are you ready to elevate your dinner game? Let’s dive in!
Why I Love This Recipe
- Quick and Easy: This recipe takes only 20 minutes, making it perfect for a weeknight dinner.
- Flavor Packed: The combination of garlic, butter, and herbs creates a deliciously rich flavor.
- Crispy Texture: Pan-frying the gnocchi gives them a delightful crispy exterior that contrasts beautifully with their soft interior.
- Customizable: You can easily adjust the herbs and cheese to suit your taste preferences or dietary needs.
Ingredients
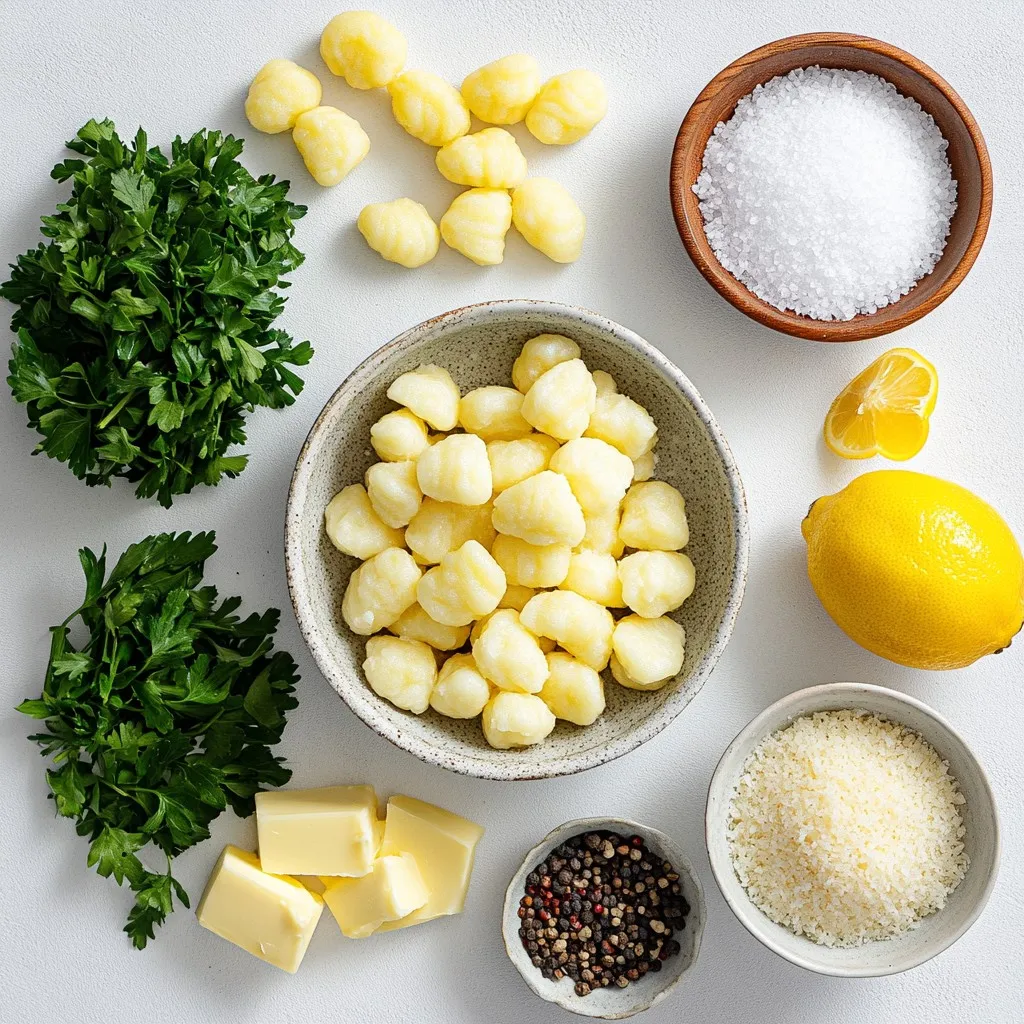
List of Ingredients
To make crispy garlic butter gnocchi, you will need:
– 1 pound potato gnocchi
– 3 tablespoons unsalted butter
– 4 cloves garlic, finely minced
– 1 tablespoon fresh parsley, finely chopped
– 1 teaspoon dried oregano
– Salt and freshly cracked black pepper, to taste
– 1/4 cup grated Parmesan cheese (optional but highly recommended)
– Lemon wedges, for serving
Optional Ingredients
You can add a few extras for more flavor:
– Crushed red pepper flakes for some heat
– Fresh basil for a sweet touch
– A splash of white wine for depth
Ingredient Substitutions
If you lack some items, here are some swaps:
– Use olive oil instead of butter for a lighter dish
– Any fresh herb can work instead of parsley
– Skip the cheese or use a dairy-free option for a vegan meal
Step-by-Step Instructions
Cooking the Gnocchi
To start, bring a large pot of water to a boil. Make sure the water is bubbling hard. Add a good amount of salt, which helps flavor the gnocchi. Now, gently place the potato gnocchi into the pot. Watch them closely; they will rise to the top when they are done. This usually takes about 2-3 minutes. Once they float, carefully drain them in a colander. Let them cool for a few minutes before moving on.
Sautéing the Garlic
Next, heat a large non-stick skillet over medium heat. Add 3 tablespoons of unsalted butter to the skillet and let it melt. Once melted, it’s time to add the finely minced garlic. Stir the garlic often for about 1-2 minutes. You want it fragrant but not brown. If garlic burns, it can taste bitter, and we don’t want that.
Crisping the Gnocchi
Now comes the fun part! Add the cooked gnocchi to the skillet. Make sure they get coated well with the garlic butter. Cook them for about 5-7 minutes. Toss them gently so they get golden brown and crispy on the outside. You want that nice crunch. Once they look perfect, add chopped parsley and dried oregano. Season with salt and freshly cracked black pepper to your taste. Toss everything again to mix well.
Tips & Tricks
Achieving the Perfect Crispy Texture
To get that great crispy texture, use a non-stick skillet. Heat it well before adding the butter. This helps the gnocchi fry instead of steam. Cook them in a single layer for best results. Avoid crowding the pan. If needed, cook in batches. Toss the gnocchi gently to turn them without breaking. Watch them closely. You want a golden-brown color, not burnt.
Best Practices for Cooking Gnocchi
Start with boiling water that is well-salted. This adds flavor from the very start. Cook the gnocchi until they float, usually 2-3 minutes. Then, drain them quickly to prevent sogginess. Let them cool for a minute before adding to the skillet. This helps them crisp up better. Always use fresh gnocchi for a soft center and a nice bite.
Flavor Enhancements and Add-Ins
You can make this dish even better with some fun extras. Try adding cooked spinach or sun-dried tomatoes for color and taste. A sprinkle of red pepper flakes gives a nice kick. For cheese lovers, use different types like feta or goat cheese. Lemon zest also adds a bright touch. Don’t be shy about playing with flavors!
Pro Tips
- Choose Quality Gnocchi: Opt for fresh or high-quality store-bought gnocchi for the best texture and flavor.
- Monitor Garlic Closely: Garlic can burn quickly; keep the heat moderate and stir constantly to achieve the perfect fragrant sauté.
- Use a Non-Stick Skillet: A non-stick skillet prevents the gnocchi from sticking and helps achieve that crispy exterior effortlessly.
- Experiment with Herbs: Feel free to add different herbs like thyme or basil to customize the flavor profile of your dish.
Variations
Vegetarian and Vegan Options
You can easily make this dish vegetarian by skipping the Parmesan cheese. Just keep the garlic butter and herbs. For a vegan version, swap the butter for olive oil or vegan butter. The flavor will still shine through, and you’ll keep the dish rich and tasty.
Different Herbs and Spices
Feel free to change the herbs to suit your taste. Basil, thyme, or rosemary work well in this dish. You can also add red pepper flakes for some heat. Each herb brings a new layer of flavor, making it exciting each time you cook.
Cheese Alternatives and Additions
If you’re not a fan of Parmesan, try feta or goat cheese. These cheeses add a creamy texture and nice tang. You can also mix in a bit of nutritional yeast for a cheesy flavor without dairy. Add cheese after cooking for a melty delight or use it as a garnish for extra flair.
Storage Info
Proper Storage Techniques
To keep your crispy garlic butter gnocchi fresh, store it in an airtight container. Let the gnocchi cool fully before packing. Place a layer of parchment paper between layers if you stack them. This helps prevent sticking. Store the container in the fridge if you plan to eat it within three days.
Reheating Instructions
To reheat, warm a skillet over medium heat. Add a bit of butter or oil to help crisp them up again. Toss the gnocchi in the skillet for about five minutes. Stir often to avoid burning. You can also reheat in the microwave, but they won’t be as crispy. Use a microwave-safe dish and cover it loosely. Heat for 1-2 minutes.
Freezing Gnocchi
You can freeze gnocchi for later use. First, spread the cooled gnocchi in a single layer on a baking sheet. Freeze them for about an hour until they are firm. Then transfer them to a freezer bag. This way, they won’t stick together. They can last up to three months in the freezer. When you’re ready to cook, boil them straight from the freezer. Add a minute or two to the cooking time.
FAQs
How long do I cook gnocchi?
Cook gnocchi for 2-3 minutes. They float to the top when ready. This means they are done. Make sure to keep an eye on them while they cook. Drain them right after cooking to avoid mushiness.
Can I use store-bought gnocchi?
Yes, you can use store-bought gnocchi. They are quick and easy to prepare. Just follow the cooking instructions on the package. This makes your meal even faster. Homemade gnocchi is great, but store-bought saves time.
What can I serve with crispy garlic butter gnocchi?
You can serve many tasty sides with gnocchi. A fresh salad pairs well and adds crunch. Roasted vegetables also make a great choice. If you like protein, grilled chicken or shrimp works well too. Don’t forget the lemon wedges for a fresh kick!
This article covered how to make crispy garlic butter gnocchi from scratch. We explored essential ingredients and variations to fit your taste. I shared step-by-step instructions for cooking and sautéing, plus tips for perfect texture. You learned about storage methods and answers to common questions. Enjoying this dish can be easy and fun! Experiment with flavors and make it your own. Cooking is about creativity, so have fun and savor each bit


