Crispy Baked Shrimp Tacos with Flavorful Toppings

Get ready for a flavor explosion with my Crispy Baked Shrimp Tacos! These easy-to-make tacos are packed with juicy, crispy shrimp and vibrant toppings. With just a handful of simple ingredients, you can create a dish that’s perfect for weeknight dinners or casual gatherings. I’ll walk you through every step, from seasoning the shrimp to assembling the tacos. Let’s dive into deliciousness together!
Ingredients
Main Ingredients
– 1 lb large shrimp, peeled and deveined
– 1 cup panko breadcrumbs
– 1/2 cup all-purpose flour
The main ingredients for these crispy baked shrimp tacos are simple yet crucial. Using large shrimp gives you a nice bite. Panko breadcrumbs add that delightful crunch. All-purpose flour helps the shrimp stick to the coating.
Seasonings
– 2 teaspoons garlic powder
– 1 teaspoon smoked paprika
– 1 teaspoon ground cumin
– 1/2 teaspoon cayenne pepper (optional for spice)
– Salt and freshly cracked black pepper to taste
Seasonings elevate the flavor of the shrimp. Garlic powder brings warmth, while smoked paprika adds depth. Ground cumin gives a hint of earthiness. If you like spice, add cayenne pepper for a kick. Don’t forget salt and pepper for balance.
Taco Assembly
– 8 small corn or flour tortillas
– 1 cup shredded green cabbage
– 1/2 cup diced ripe tomatoes
– 1/4 cup fresh cilantro, chopped
– 1 ripe avocado, sliced
– Lime wedges, for serving
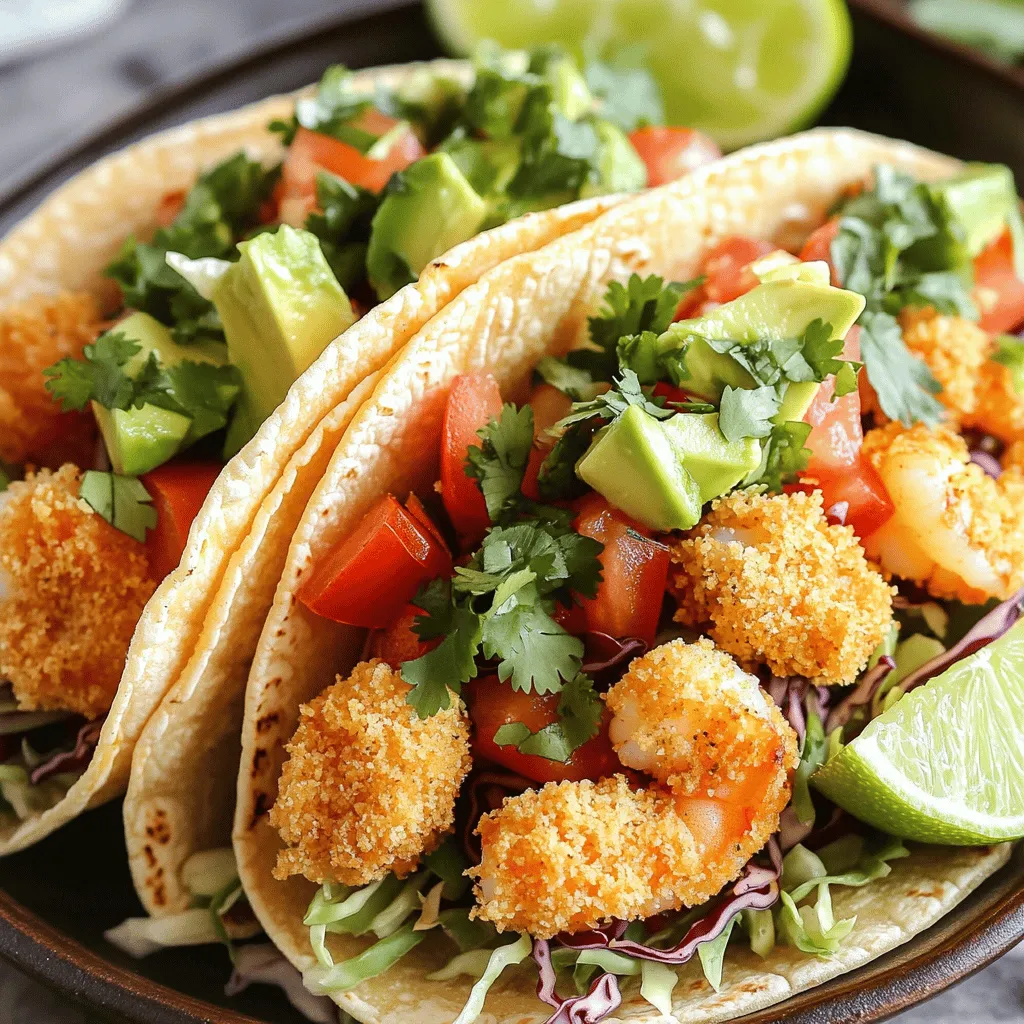
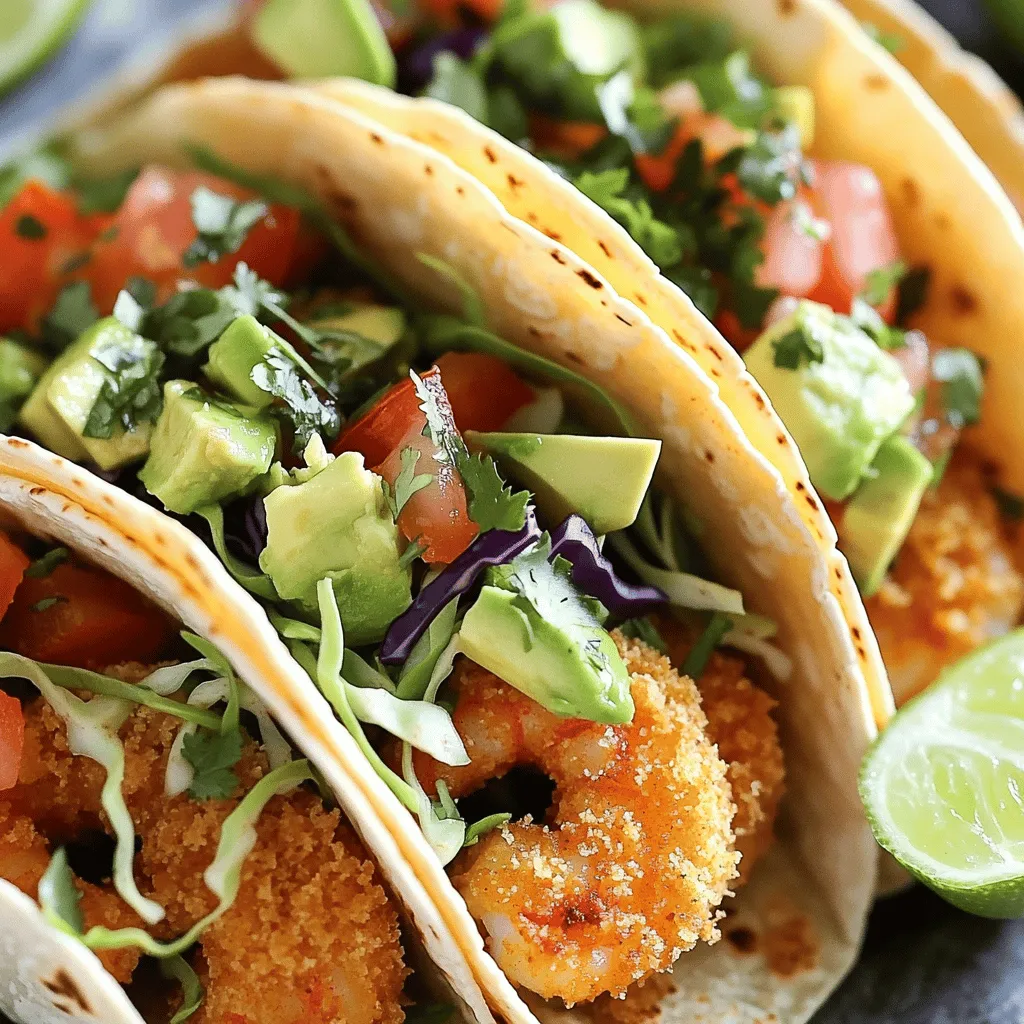
Taco assembly is all about layers. Start with tortillas as your base. Then, add a handful of shredded cabbage for crunch. Top with crispy shrimp and fresh diced tomatoes. Add avocado for creaminess and cilantro for freshness. Serve with lime wedges for a zesty squeeze.These tacos not only taste amazing; they look beautiful too!
Step-by-Step Instructions
Preheat Your Oven
– Preheat your oven to 425°F (220°C) and prepare a baking sheet. Line it with parchment paper for easy cleanup.
Prepare the Breading Station
– In one dish, combine the flour with garlic powder, smoked paprika, ground cumin, cayenne, salt, and pepper. Mix well.
– In a second dish, beat the eggs until frothy.
– In a third dish, pour in panko breadcrumbs and set it aside for the final coating.
Coat the Shrimp
– Take each shrimp and dredge it in the flour mixture. Shake off any extra flour.
– Next, dip it in the beaten eggs, letting excess drip off.
– Finally, coat the shrimp in panko breadcrumbs. Press gently for a good coating.
– Place the breaded shrimp onto the prepared baking sheet.
Bake and Assemble
– Bake the shrimp for 12-15 minutes. Flip each shrimp halfway for even cooking.
– While the shrimp bake, warm each tortilla in a dry skillet over medium heat for about 30 seconds on each side.
– To assemble, place a handful of shredded cabbage in each tortilla. Top with 2 to 3 crispy shrimp, diced tomatoes, and avocado slices.
– Finish with fresh cilantro and serve with lime wedges for a zesty touch.
Tips & Tricks
Achieving Optimal Crispiness
To make your shrimp crispy, use cooking spray wisely. After coating the shrimp in panko, spray them lightly. This helps the breadcrumbs brown and become crisp in the oven. The spray creates a nice crunch without adding extra fat. You want that golden color and texture for the best taco experience.
Preparing Ingredients Ahead
Prep your shrimp and toppings early for quick assembly. You can clean and devein the shrimp a day before. Store them in the fridge until you’re ready to cook. Chop your veggies and herbs ahead too. Keep them in separate containers. This makes it easy to grab what you need when you’re ready to make your tacos.
Serving Suggestions
Garnishes and sides can enhance your taco meal. Fresh lime wedges are a must for that zesty kick. You can also add spicy salsa or a dollop of sour cream on the side. For extra crunch, serve with tortilla chips. Consider a simple salad with lime dressing too. These ideas will make your tacos even more enjoyable.

Variations
Alternative Proteins
You can swap shrimp for other proteins. Chicken works well and is easy to cook. Tofu is a great choice for a vegetarian option. If you prefer fish, choose a firm white fish for best results. Each alternative offers a unique taste and texture, keeping your tacos exciting.
Flavor Variations
Adjust the spices to change the flavor profile. For a spicy kick, add more cayenne pepper or some chili powder. If you like citrus, try adding lime zest or some orange juice to the mix. These small changes can make a big difference in flavor. Experiment until you find your favorite combination.
Taco Style Changes
You can change the taco style easily. To make a burrito, use a larger tortilla and add rice and beans. For a salad, skip the tortillas and layer the shrimp on greens. Top with all your favorite toppings for a fresh, crunchy meal. This way, you can enjoy the same great flavors in a new format.
Storage Info
Proper Storage Techniques
To keep your leftover shrimp and tortillas fresh, store them separately. Place the shrimp in an airtight container. Make sure it cools before sealing. This helps maintain their crispy texture. For the tortillas, wrap them in foil or plastic wrap. Store them in the fridge. This prevents them from drying out.
Reheating Instructions
For the best texture, reheat shrimp in an oven. Preheat to 350°F (175°C). Place the shrimp on a baking sheet. Heat for about 10 minutes. Check them halfway through to avoid drying. You can also use an air fryer for crispiness. Heat at 350°F (175°C) for about 5 minutes.
Freezing Recommendations
You can freeze the shrimp and prepared tacos. For shrimp, place them in a freezer bag after cooling. Remove as much air as possible. For tacos, wrap them tightly in plastic wrap and then foil. This keeps them fresh for up to three months. When ready to eat, thaw shrimp in the fridge overnight. Reheat as mentioned above.
FAQs
Can I use frozen shrimp for this recipe?
Yes, but thaw thoroughly before preparation. Frozen shrimp can work well, just ensure you remove excess water after thawing. This helps the shrimp to crisp up nicely during baking.
What can I substitute for panko breadcrumbs?
Use crushed cornflakes or regular breadcrumbs as alternatives. Cornflakes give a nice crunch, while regular breadcrumbs can work too. Just remember, panko adds a lighter texture, so choose wisely!
How do I know when the shrimp are done baking?
Look for a golden-brown exterior and opaque flesh to determine doneness. This usually takes about 12 to 15 minutes at 425°F. If you want to be sure, you can use a fork to check the shrimp. They should be firm to the touch and not translucent.
The shrimp tacos recipe includes simple steps and fresh ingredients. We prepped the shrimp, seasoned well, and baked them to perfection. Remember to customize the toppings and spices to suit your taste. Storing leftovers properly keeps them fresh for later meals. Enjoy making these tacos for family or friends. It’s a fun and tasty dish everyone will love!


![- 2 cups cooked jasmine rice - 1 cup cooked chicken breast, diced - 1 cup mixed vegetables - 3 tablespoons soy sauce - 2 tablespoons sesame oil - Salt and freshly ground black pepper - 2 large beaten eggs - 3 green onions, finely chopped - Garlic Gathering the right ingredients is key to making easy chicken fried rice. Start with 2 cups of cooked jasmine rice; leftover rice works best. It helps keep the grains from sticking together. Next, you need 1 cup of cooked chicken breast, diced into small pieces. You can use rotisserie chicken for speed. Add 1 cup of mixed vegetables. Frozen peas and carrots work great. They heat up quickly and add color. For flavor, use 3 tablespoons of soy sauce. This gives the rice a savory kick. 2 tablespoons of sesame oil will add a nutty taste. Don't forget to season with salt and freshly ground black pepper to your liking. If you want to enhance the dish, consider adding 2 large beaten eggs. They add richness and protein. 3 green onions, finely chopped, add a fresh taste. Lastly, garlic can bring an aromatic depth to your fried rice. These ingredients create a simple yet tasty meal. For the full recipe, check out the link above. How to pre-cook jasmine rice To cook jasmine rice, use a 1:1.5 rice-to-water ratio. Rinse the rice first. Then, add it to boiling water. Cover and simmer for 15 minutes. Let it cool afterward. Using day-old rice gives the best texture in fried rice. How to dice chicken breast Start with a cooked chicken breast. Place it on a cutting board. Cut it in half lengthwise, then slice it into small, bite-sized pieces. Aim for even sizes to ensure even cooking. Tips for measuring vegetables When measuring mixed vegetables, use a cup. Fill it with your choice of peas, carrots, and corn. Make sure to level it off with a knife for accuracy. Fresh or frozen veggies work well, but thaw frozen ones first. Heating the skillet and oils Grab a large skillet or wok. Heat it on medium-high. Add vegetable oil until it shimmers but does not smoke. This oil helps fry the ingredients evenly. Sautéing garlic and eggs Add minced garlic to the hot oil. Stir for about 30 seconds until fragrant. Push the garlic aside. Pour in beaten eggs next. Scramble the eggs gently until fully cooked. Then, mix them with the garlic. Combining ingredients systematically Next, add the diced chicken to the skillet. Stir for about 2 minutes until heated through. Now, toss in the mixed vegetables. Stir-fry for another 2-3 minutes until tender yet crisp. Add the jasmine rice next. Break apart any clumps gently as you stir. Incorporating soy sauce and sesame oil Drizzle soy sauce and sesame oil over the rice mix. Stir well to evenly coat all ingredients. This step adds flavor and richness to the dish. Garnishing and presentation tips Add chopped green onions last. Season with salt and black pepper to taste. For a nice touch, serve in a large bowl or on plates. Garnish with more green onions and sesame seeds. Serving size and suggestions This recipe serves about four people. Pair it with lime wedges for a zesty kick. Enjoy your savory chicken fried rice! For the complete recipe, check out the [Full Recipe]. - Importance of using day-old rice: Day-old rice is drier and firmer. This helps prevent clumping when cooking. Fresh rice can be too sticky and mushy. It’s best to cook the rice a day before and store it in the fridge. - Tips for achieving perfect egg texture: Beat the eggs well before cooking. Pour them into the pan and let them sit for a second. Stir gently to form soft curds. Don’t overcook the eggs; they should be fluffy and tender. - Stir-fry techniques for even cooking: Keep the heat high and work quickly. Use a large skillet or wok to ensure space for all ingredients. Stir constantly to avoid burning. This helps everything cook evenly and stay crisp. - Adding spice: How to adjust heat levels: Start with a small amount of red pepper flakes or chili sauce. You can always add more, but you can’t take it away. Taste as you go to find your perfect heat level. - Incorporating fresh herbs: Fresh herbs like cilantro or basil can brighten the dish. Add them at the end for the best flavor. Chopped green onions also add a fresh taste and a nice crunch. - Using alternative sauces or marinades: Try adding oyster sauce or hoisin sauce for a twist. These can add a deeper flavor to your fried rice. Experiment to find what you enjoy most. - Best frying pan or wok for this recipe: A non-stick skillet or a wok works best. This helps prevent sticking and makes stirring easier. Look for one that is large enough to hold all your ingredients. - Recommended utensils for mixing: Use a sturdy spatula or wooden spoon. This will help you mix everything without damaging your pan. A thin spatula is great for scraping the sides. - Importance of a good spatula: A good spatula helps in flipping and mixing your ingredients. It should have a flat edge for easy scooping and stirring. This simple tool can make a big difference in your cooking process. Enjoy crafting your Easy Chicken Fried Rice with these tips and tricks! For the complete recipe, check out the Full Recipe section above. {{image_4}} You can easily adapt this chicken fried rice recipe to fit different diets. For a gluten-free option, replace soy sauce with tamari. This keeps the flavor but removes gluten. If you want a vegetarian version, swap chicken for tofu. Tofu absorbs flavors well, making it tasty and filling. For a low-carb choice, use cauliflower rice instead of jasmine rice. It offers a light texture while still giving you that satisfying fried rice feel. You can also change the flavor of your fried rice with simple tweaks. For an Asian twist, add hoisin sauce. This adds a sweet and savory taste that will excite your palate. If you want a Mexican flair, sprinkle in some taco seasonings. This gives the rice a spicy kick that is fun to try. For a Mediterranean touch, toss in olives and feta cheese. These ingredients bring a whole new level of taste to your dish. There are many ways to boost your chicken fried rice. You can add extra protein, like shrimp, pork, or beef. This makes the meal heartier and more satisfying. Another option is to enhance nutrition by adding more vegetables. You can include bell peppers, broccoli, or snap peas for extra crunch and color. Lastly, think about creative add-ins. Nuts, spices, or a splash of dressing can elevate the dish and make it your own. For the full recipe, check out the earlier section. To keep your chicken fried rice fresh, place it in a container with a tight lid. This helps prevent moisture loss and keeps flavors intact. Make sure the rice cools down to room temperature before sealing the container. Store it in the fridge for up to four days. Use glass or plastic containers that are microwave safe. These options make reheating easy. Avoid using metal containers as they can get too hot in the microwave. You can reheat chicken fried rice on the stovetop or in the microwave. For stovetop reheating, add a splash of water or oil in a skillet. Heat it over medium heat while stirring. This method keeps the rice from drying out. If using the microwave, place the rice in a bowl and cover it with a damp paper towel. This helps steam the rice and keeps it moist. Heat in short bursts, stirring in between, until warmed through. To freeze chicken fried rice, allow it to cool completely. Then, divide it into portions and place each in a freezer-safe bag. Remove as much air as possible before sealing. Label the bags with the date and use them within three months for best taste. For thawing, you can leave the rice in the fridge overnight. If you’re in a hurry, you can use the microwave. Just set it to defrost mode and stir frequently until thawed. How long can I store leftover fried rice? You can store fried rice in an airtight container for up to four days in the fridge. Make sure it cools down before sealing. Reheat over medium heat for best results. Can I use uncooked rice for this recipe? No, you should not use uncooked rice. Cooked rice absorbs flavors and keeps the dish from being too hard. Use day-old rice for the best texture. What if I don’t have sesame oil? If you lack sesame oil, you can use olive oil or any neutral oil instead. It won't have the same nutty taste, but it will still be good. How to make this dish vegan? To make vegan fried rice, replace chicken with tofu and skip the eggs. Use extra veggies for texture and flavor. Adjust soy sauce to taste. What vegetables work best in fried rice? Mixed vegetables like peas, carrots, and corn are great. You can also add bell peppers, broccoli, or snap peas for variety. Choose what you like best! Can I make this recipe ahead of time? Yes, you can prep the veggies and chicken ahead of time. Just store them separately in the fridge. Cook the rice fresh for the best taste. What is the best way to cook chicken for fried rice? Cook chicken breast in a skillet until golden brown. Dice it into small pieces for even cooking. Use cooked chicken for easier preparation. How do I prevent the rice from becoming mushy? To avoid mushy rice, make sure to use day-old rice. Fresh rice holds too much water. If using fresh, spread it out to cool. Why use day-old rice? Day-old rice dries out slightly, making it perfect for frying. It also helps to keep the grains separate. This ensures a better texture for your fried rice. This blog post covered how to make chicken fried rice. We looked at key ingredients, cooking steps, and helpful tips. You learned about variations to suit different diets and flavor profiles. Storing and reheating options were also explained for your convenience. In closing, chicken fried rice is simple and customizable. You can create a dish that fits your taste and needs. Enjoy making this tasty meal!](https://goldendishy.com/wp-content/uploads/2025/06/daf8b8b3-55d6-4d68-b799-ba1a17e73868-768x768.webp)


![- 1 pound boneless, skinless chicken breasts, cut into 1-inch cubes - 1/4 cup fresh basil leaves, finely chopped - Zest from 2 lemons (about 2 tablespoons) - 3 tablespoons freshly squeezed lemon juice The chicken breast serves as a great base. It’s lean, tender, and perfect for grilling. Fresh basil adds a bright, herbal note. The lemon zest and juice provide a refreshing tang that makes this dish stand out. - 2 tablespoons extra virgin olive oil - 2 cloves garlic, finely minced - 1 teaspoon honey (optional, for a touch of sweetness) Olive oil keeps the chicken moist and helps the flavors blend. Garlic adds depth and aroma, while honey can balance the tart lemon if you want a hint of sweetness. - Salt and freshly ground black pepper to taste - Wooden or metal skewers Salt and pepper are essential for enhancing flavors. If you use wooden skewers, soak them in water for 30 minutes. This prevents burning during grilling. For the Full Recipe, check the detailed instructions along with cooking tips. You’ll need these ingredients to create a fantastic summer delight. To start, mix the marinade ingredients in a bowl. Combine: - 1/4 cup fresh basil leaves, finely chopped - Zest from 2 lemons (about 2 tablespoons) - 3 tablespoons freshly squeezed lemon juice - 2 tablespoons extra virgin olive oil - 2 cloves garlic, finely minced - 1 teaspoon honey (optional) - Salt and pepper to taste Whisk these together until they blend well. This step builds flavor. The lemon and basil create a bright, fresh taste that makes the chicken sing. Marination is key for juicy chicken. It helps the meat soak up the marinade's flavors. Once you prepare the marinade, add the cubed chicken to the bowl. Make sure each piece is coated. Cover the bowl tightly with plastic wrap. Let the chicken marinate in the fridge for at least 30 minutes. For best results, aim for 1-2 hours. This allows the chicken to become tender and flavorful. While the chicken marinates, preheat your grill or grill pan over medium-high heat. A hot grill helps create a nice sear on the chicken. Once the chicken is ready, thread the cubes onto skewers. Leave small gaps between pieces for even cooking. Place the skewers on the grill. Cook them for about 10-12 minutes, turning them often. To ensure the chicken is done, use a meat thermometer. The internal temperature should reach 165°F. After grilling, let the skewers rest for a few minutes. This helps keep the chicken moist. For the full recipe, check the section above. Enjoy making your lemon basil chicken skewers! To get juicy chicken, monitor the grill's temperature. Aim for medium-high heat. This helps cook the chicken quickly while keeping it tender. Use a meat thermometer to check the inside. The chicken should reach 165°F. Avoid over-charring by turning the skewers. Rotate them every few minutes for even cooking. If you see dark spots, move the skewers to a cooler part of the grill. This way, the chicken cooks well without burning. You can add more spices and herbs to the marinade. Consider using oregano or thyme for extra zest. A pinch of red pepper flakes can give it a nice kick. Just be careful not to overpower the lemon and basil. For marinating, let the chicken soak for at least 30 minutes. If you have time, marinate it for a few hours. The longer it sits, the more flavor it absorbs. This step makes a big difference in taste. For plating, arrange the skewers on a wooden board or a nice platter. Adding fresh basil leaves and lemon wedges makes it look vibrant. This adds a pop of color and gives a hint of what’s inside. Pair the skewers with side dishes like grilled vegetables or a fresh salad. You can also serve them with rice or quinoa for a filling meal. These sides enhance the overall experience of your lemon basil chicken skewers. Check the Full Recipe for more ideas! {{image_4}} You can change things up with lemon basil chicken skewers. Try adding vegetable skewers. Bell peppers, zucchini, and cherry tomatoes make great choices. They add color and crunch. If you want to swap proteins, shrimp is a tasty option. Shrimp cooks fast and absorbs flavors well. Just marinate them the same way as chicken. Dipping sauces can take your skewers to new heights. A simple garlic aioli pairs well with the fresh flavors. You can also try tzatziki for a cool and creamy contrast. For a spicy kick, sriracha or a sweet chili sauce is perfect. These sauces work with the lemon and basil, enhancing each bite. If you need gluten-free options, check your sauces and marinades. Most of the ingredients are safe, but read labels. For vegan alternatives, use tofu or tempeh instead of chicken. Marinate them just like the chicken for the best taste. You can still enjoy the bright lemon and basil flavors in a plant-based version. For the full recipe, check the [Full Recipe]. Refrigeration Guidelines After cooking, allow the chicken skewers to cool. Place them in an airtight container. Refrigerate within two hours. The chicken can stay fresh for up to four days. Always check for any signs of spoilage before eating. Freezing Tips If you want to keep them longer, freezing is a great option. Wrap the skewers tightly in plastic wrap. Then, place them in a freezer bag. They can last for up to three months in the freezer. When ready to use, thaw them in the fridge overnight before reheating. Best Methods The best way to reheat your skewers is in the oven. Preheat it to 350°F (175°C). Place the skewers on a baking tray for about 10 to 15 minutes. This method helps keep the chicken juicy. You can also reheat them on the grill for a nice char. Maintaining Flavor and Texture To maintain the flavor, add a splash of water or broth while reheating. Cover the skewers with foil to keep moisture in. This prevents the chicken from drying out and keeps it tasty. How Long Can They Last? When stored properly, cooked lemon basil chicken skewers can last for about four days in the fridge. If frozen, they can last up to three months without losing quality. Signs of Spoilage Always check for signs of spoilage. If the chicken smells off or has a slimy texture, it's best to toss it. Color change can also indicate spoilage. Trust your senses; when in doubt, throw it out. If you want to swap chicken, many tasty options exist. You can use: - Turkey breast: It has a mild flavor like chicken. - Tofu: Great for a plant-based option. - Shrimp: Cooks fast and absorbs flavors well. - Pork tenderloin: Offers a different texture and taste. Each of these options works well with the lemon and basil marinade. Adjust cooking times based on the protein you choose. Yes! Preparing the marinade ahead saves time. Here are some tips: - Mix all marinade ingredients in a bowl. - Store it in a sealed container in the fridge for up to 2 days. - When ready, add your chicken and let it soak up those flavors. Make sure to mix well before using. This keeps the flavors fresh and vibrant. To make sure your chicken is safe to eat, use a meat thermometer. Here’s how: - Insert the thermometer into the thickest part of the chicken. - Look for a temperature of 165°F. This means it’s fully cooked. - If you don't have a thermometer, cut a piece open. The meat should be white, not pink. Using a thermometer helps you avoid undercooked chicken, keeping your meal safe and tasty. You now know how to make delicious grilled chicken skewers. Start with fresh chicken, herbs, and a tasty marinade. Marinade time is key for flavor. Grilling tips help you serve juicy chicken every time. You can try different add-ins or sauces for variety. Store leftovers properly to keep them fresh. This recipe is simple yet satisfying, perfect for meals anytime. Enjoy creating your perfect skewers!](https://goldendishy.com/wp-content/uploads/2025/06/c554147d-c949-48f7-8e40-7e32e563b89e-768x768.webp)
