Crispy Air Fryer French Fries Easy and Flavorful Recipe

Are you ready to make crispy air fryer French fries that will wow your taste buds? With just a few easy ingredients and steps, you can create a delicious and healthy snack right at home. Say goodbye to soggy fries and hello to golden perfection! In this guide, I’ll share my favorite recipe and tips for achieving that ideal crunch while keeping it flavorful. Let’s get started on your air-fried journey to fry bliss!
Ingredients
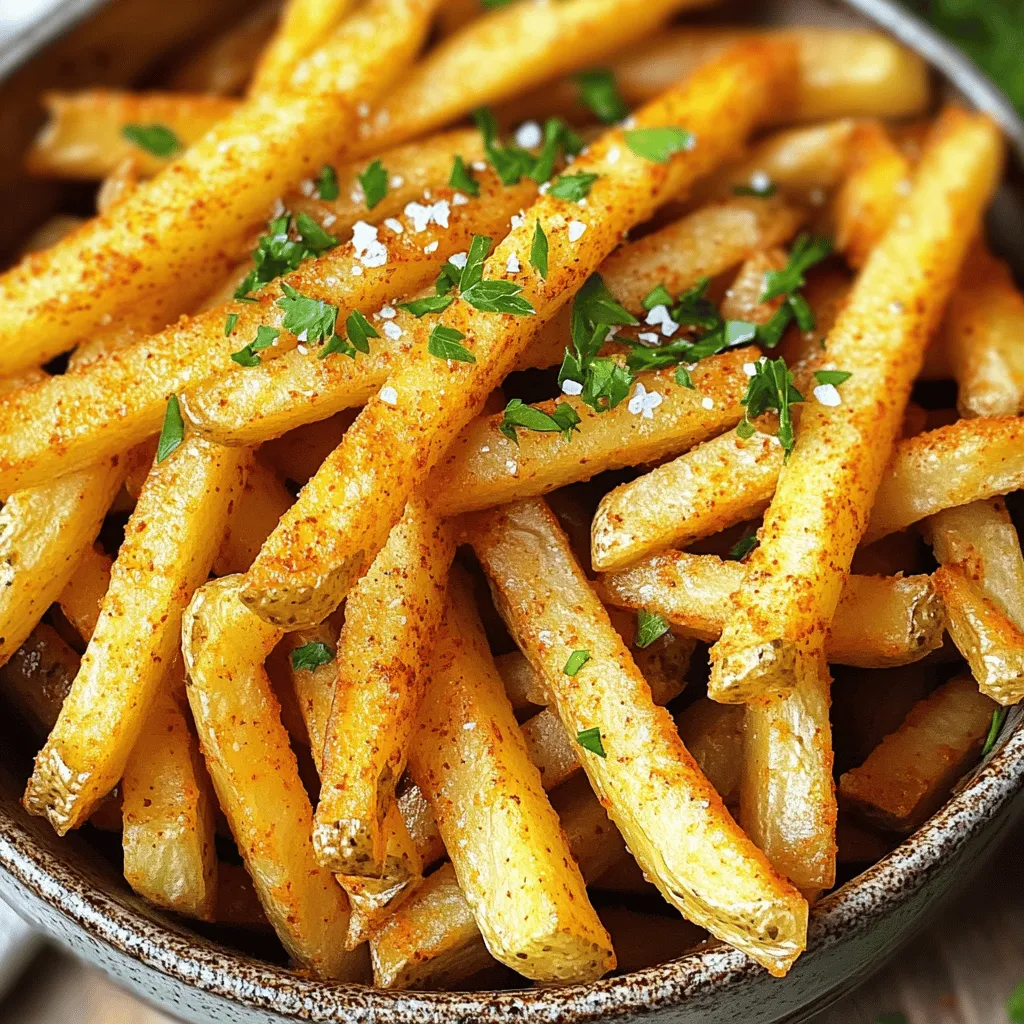
Essential Ingredients for Crispy Air Fryer French Fries
– 4 large russet potatoes
– 2 tablespoons olive oil
– 1 teaspoon garlic powder
– 1 teaspoon smoked paprika
– 1 teaspoon sea salt
– 1/2 teaspoon freshly cracked black pepper
– 1 tablespoon fresh parsley (for garnish)
Recommended Tools and Equipment
– Air fryer
– Large mixing bowl
– Kitchen towel or paper towels
When it comes to making crispy air fryer French fries, the right ingredients are key. I always choose russet potatoes. They have a high starch content, which helps create that perfect crunch. You will need four large ones for this recipe.
Next, we have olive oil. This helps the fries crisp up nicely in the air fryer. I use two tablespoons. Garlic powder and smoked paprika add great flavor. Each spice gets one teaspoon, packed with taste! Sea salt enhances everything, while half a teaspoon of black pepper adds a nice kick. Finally, a tablespoon of fresh parsley makes for an appealing garnish.
For tools, you’ll need an air fryer, of course. This gadget is a game changer. A large mixing bowl helps you mix the fries and oil. Keep a kitchen towel or paper towels handy to dry the potatoes after soaking. This step is crucial for crispy fries.
By gathering these ingredients and tools, you’re one step closer to making delicious crispy air fryer French fries.
Step-by-Step Instructions
Preparing the Potatoes
– Soak the cut potato strips in cold water. This step helps remove excess starch.
– Pat the potatoes dry for maximum crispiness. Use a clean towel to absorb all moisture.
Seasoning the Fries
– Combine potatoes with olive oil and seasonings. The oil helps the fries crisp up.
– Ensure an even coating of flavors. Toss them gently so every strip gets flavor.
Cooking in the Air Fryer
– Preheat the air fryer to the correct temperature. Set it to 375°F (190°C) for best results.
– Cook the fries and shake the basket for even cooking. Shake halfway through to brown them nicely.
Tips & Tricks
Achieving Maximum Crispiness
To get the best crispiness, soak your potatoes. Soaking removes excess starch. This step makes a big difference. I recommend soaking for at least 30 minutes. After soaking, dry the potatoes well. Use a clean towel for this. Moisture will make fries soft, not crispy.
Cooking Tips
When you cook fries, arrange them in a single layer in the air fryer basket. This helps them cook evenly. Crowding the basket leads to soggy fries. If you have a small air fryer, cook in batches. Each batch will be just as crispy. Adjust cook times depending on your air fryer model. Some models cook faster than others, so check your fries often.
Presentation Ideas
Serve your fries in fun ways. Try using paper cones or small baskets. It looks great and adds a special touch. Pair your fries with tasty dipping sauces. Ketchup is classic, but try aioli or sriracha mayo for a twist. This makes for a fun snack or side dish!

Variations
Seasoning Alternatives
You can change the flavor of your crispy air fryer French fries easily. Try adding some fun herbs and spices. Here are a few ideas:
– Italian herbs: Mix in dried oregano, basil, and thyme for an Italian twist.
– Cajun spice blend: Use paprika, cayenne, and garlic powder for a spicy kick.
– Chipotle seasoning: Add smoked chipotle powder for a smoky flavor.
– Cheesy seasoning: Sprinkle nutritional yeast or cheese powder for a cheesy taste.
Mix and match these seasonings to find your favorite blend.
Healthier Alternatives
If you don’t have an air fryer, you can still enjoy crispy fries. Here’s how:
– Oven-baked version: Preheat your oven to 425°F (220°C). Spread the seasoned fries on a baking sheet. Bake them for about 25-30 minutes, flipping halfway through. They will be crispy and delicious!
– Alternative oils: Use avocado oil for a light flavor and high smoke point. Coconut oil gives a subtle sweetness. Both will keep your fries tasty and healthier.
Serving Variations
Make your French fries part of a fun meal! Here are some tasty ideas:
– Loaded fries: Top your fries with cheese, sour cream, jalapeños, and green onions. It’s a crowd-pleaser!
– Protein pairings: Serve fries alongside grilled chicken, burgers, or fish. This makes for a complete and satisfying meal.
Feel free to get creative! Your crispy air fryer French fries can be the star of any dish.
Storage Info
Storing Leftover Fries
To keep your leftover fries fresh, follow these tips:
– Refrigeration: Let the fries cool down first. Place them in an airtight container. Store them in the fridge for up to three days. This keeps their taste and prevents sogginess.
– Reheating: To reheat, use an air fryer for best results. Set it to 375°F (190°C) for about 5-7 minutes. This method helps restore their crispiness. Avoid using the microwave, as it can make fries soft.
Freezing Guidelines
You can freeze fries for later use. Here’s how to do it right:
– Freezing uncooked fries: Before cooking, lay the seasoned fries on a baking sheet. Freeze them for about 1-2 hours until firm. Then transfer them to a freezer bag or container. This helps keep them from sticking together.
– Freezing cooked fries: If you have cooked fries, let them cool completely first. Place them in a single layer on a baking sheet to freeze. Once frozen, move them to a freezer-safe bag or container. They can stay fresh for up to two months.
Using proper storage methods keeps your crispy air fryer French fries tasty and ready for whenever you crave them.
FAQs
How do I make my air fryer fries crispy?
To make your air fryer fries crispy, start by soaking the cut potato strips in cold water. This step removes excess starch, which helps fries get that perfect crunch. After soaking, dry the potatoes well using a kitchen towel. Moisture makes fries soggy, so pat them dry. Coat the fries with olive oil and seasonings, then air fry at 375°F for 15-20 minutes. Shake the basket halfway through cooking to ensure even crispiness.
Can I use sweet potatoes instead of russet potatoes?
Yes, you can use sweet potatoes instead of russet potatoes. Sweet potatoes add a different flavor and color. You may need to adjust cooking time since sweet potatoes can cook faster. Slice them into equal strips, just like russets, to keep cooking even. The soaking process still applies, so soak and dry them well for the best texture.
What are the best dipping sauces for French fries?
Here are some popular dipping sauce options for your fries:
– Ketchup
– Mayonnaise
– Aioli
– Spicy sriracha mayo
– Ranch dressing
– Barbecue sauce
– Mustard
These sauces can elevate your fries and add more flavor to your meal. Enjoy experimenting with different combinations!
Crispy air fryer French fries need simple ingredients and techniques. You learned about key items like russet potatoes, olive oil, and seasonings. We discussed tips for maximum crispiness and even cooking. You can also get creative with variations and serving ideas.
Try these fries as a tasty snack or side dish. With practice, you’ll master this easy recipe! Enjoy your crispy fries with fun dips or as part of a larger meal. The possibilities are endless!


![- 2 medium zucchinis - 1 cup cherry tomatoes - 1/4 cup fresh basil leaves The fresh produce makes this dish feel bright and lively. Zucchini adds a crunchy texture, while cherry tomatoes bring a sweet burst. Basil gives a fragrant touch that brightens every bite. When you use fresh ingredients, you elevate the salad. - 1 cup fresh mozzarella balls Fresh mozzarella balls, or bocconcini, are creamy and soft. They add richness to the salad that balances the fresh flavors. Their bite-sized shape makes them easy to enjoy. I recommend using high-quality mozzarella for the best taste. - 2 tablespoons balsamic glaze - 2 tablespoons extra-virgin olive oil - Salt and black pepper - 1 clove garlic (optional) The dressing ties all the ingredients together. Balsamic glaze provides sweetness and depth, while olive oil adds richness. Salt and pepper enhance the natural flavors. If you want an extra kick, add minced garlic. It brings a wonderful aroma and taste to the dish. For the full recipe, check out the detailed instructions on how to make this fresh and flavorful dish. To start, you need to spiralize the zucchinis. This will make long, noodle-like strands. A spiralizer works best for this task. If you do not have one, you can use a vegetable peeler. Just slice thin ribbons of zucchini instead. Next, combine all salad components in a large bowl. Add the spiralized zucchini, cherry tomatoes, and fresh mozzarella balls. This colorful mix creates a vibrant base for your salad. In a small bowl, whisk together balsamic glaze and olive oil. This will help blend the flavors nicely. If you want a bolder taste, add minced garlic to the dressing. The garlic gives it a nice kick. Now, pour the dressing over the zucchini noodle mixture. Sprinkle salt and black pepper to taste. These simple seasonings enhance the dish's flavors. Use your hands or tongs to toss the salad gently. Make sure all the ingredients are well coated. To finish, add the torn basil leaves on top of the salad. This adds a fresh aroma and flavor. Gently toss the salad again to mix the basil throughout. For serving, you can put it in a big bowl. A light drizzle of balsamic glaze on top makes it look even better. For the full details, check out the [Full Recipe]. If you want to switch things up, there are great options. For mozzarella, try using burrata. Burrata is creamier and adds a rich twist. You can also use vegan cheese if you prefer a plant-based option. For the dressing, consider a light vinaigrette. A mix of lemon juice, olive oil, and a dash of mustard works well. This gives a fresh flavor while cutting calories. To keep the salad fresh, store it properly. Use an airtight container to keep the salad from getting soggy. If you layer the ingredients, place the zucchini at the bottom. This helps keep moisture away from the tomatoes and cheese. On busy days, you can prep the salad in advance. Spiralize the zucchini and chop the tomatoes ahead of time. Just add the dressing and basil when you're ready to eat. This saves you time without losing flavor. To boost the taste, consider adding fresh herbs like oregano or parsley. They add depth and freshness. You can also sprinkle in some crushed red pepper for a bit of heat. For extra crunch, serve the salad with toasted pine nuts or sunflower seeds. These add a nice texture contrast and make the dish even more enjoyable. You can find the full recipe [here](#). {{image_4}} You can add protein to your Zucchini Noodle Caprese Salad for a fuller meal. Here are two great options: - Grilled chicken or shrimp: Both add a tasty twist and extra nutrients. Cook them simply with salt, pepper, and olive oil. Slice and mix them in. - Chickpeas for a vegetarian option: These add a nice crunch and plant-based protein. Just rinse and toss them in for a hearty touch. Mixing up flavors can keep this salad exciting. Here are some ideas: - Adding different dressing styles: Try pesto, ranch, or lemon vinaigrette for a fresh taste. Each will give your salad a unique flair. - Incorporating seasonal vegetables: Add bell peppers, corn, or avocado. These can enhance the texture and flavor while keeping it fresh and vibrant. How you serve this salad can change its vibe. Consider these styles: - Zucchini noodle bowls: Serve it in deep bowls for a casual gathering. It makes it easy for guests to dig in. - Plated salads for special occasions: For a fancy dinner, plate it neatly. This elevates the look and makes it feel more special. These variations can help you customize your Zucchini Noodle Caprese Salad. Choose your favorites to make it truly yours! For the full recipe, check out the details above. To store leftovers, place your Zucchini Noodle Caprese Salad in an airtight container. This keeps the salad fresh and prevents odors from mixing. Use a container that fits the salad snugly to minimize air exposure. Ideal storage containers: - Glass containers with tight lids - BPA-free plastic containers - Silicone food bags Zucchini noodles can stay fresh in the fridge for about 2 to 3 days. Cherry tomatoes and mozzarella also last up to this time frame. Always check for signs of spoilage. Signs of spoilage: - Slimy texture on zucchini - Mold growth on tomatoes - Sour smell from mozzarella Freezing zucchini noodles is a great way to keep them longer. However, fresh zucchini noodles can lose their texture when thawed. To freeze, spiralize the zucchini and place it in a freezer-safe bag. Remove as much air as possible before sealing. Best practices for freezing prepared salad: - Avoid freezing with the dressing; add it later. - Store without fresh basil, as it does not freeze well. - Use within 1 to 2 months for the best flavor. For the full recipe, refer back to the Zucchini Noodle Caprese Salad section. Zucchini noodles last about 3 to 5 days in the fridge. Store them in an airtight container. They will keep fresh and crisp during this time. If they start to look slimy, it’s best to toss them out. Yes, you can use other vegetables. Some great alternatives are carrots, cucumbers, and sweet potatoes. Each offers a unique taste and texture, making your salad fun and versatile. Yes, this salad is gluten-free. The main ingredients contain no gluten. Zucchini, tomatoes, and cheese all fit into a gluten-free diet. Enjoy this dish without worry! You can prep some parts ahead. Spiralize the zucchini and cut the tomatoes a day before. However, add the dressing just before serving. This keeps the salad fresh and crunchy. This salad pairs well with grilled chicken or shrimp. It also goes great with crusty bread or a light soup. For drinks, try a crisp white wine or sparkling water. Enjoy the mix of flavors! For the full recipe, check out the details above! This blog explored a delicious and fresh Zucchini Noodle Caprese Salad. You learned about key ingredients like zucchini, cherry tomatoes, and mozzarella. The instructions simplified making this dish with easy steps. Tips offered ways to customize and store your salad. Variations let you add protein or seasonal flavors. This salad is perfect for any meal. With its bright flavors, it suits busy days or special occasions. Enjoy your cooking adventure and make this salad often!](https://goldendishy.com/wp-content/uploads/2025/07/4c5bc4a7-43a5-40d0-aa85-49819cbbae48-768x768.webp)
![For the best peach avocado salsa, gather these fresh ingredients: - 2 ripe peaches, diced - 2 ripe avocados, peeled and diced - 1/2 medium red onion, finely chopped - 1 small jalapeño pepper, minced - 1/4 cup fresh cilantro leaves - Juice from 2 fresh limes - 1 tablespoon honey (optional) - Salt and freshly cracked black pepper Each ingredient brings its own flavor. Ripe peaches add sweetness, while avocados give creaminess. Red onion adds a sharp bite, and jalapeño provides heat. Cilantro brightens everything up, and lime juice gives freshness. Honey is optional, but it can enhance the sweetness if desired. This mix creates a vibrant salsa perfect for any occasion. When selecting your peaches, choose ones that yield slightly to pressure. They should be fragrant and free from bruises. For avocados, look for ones that are dark and firm but not rock hard. Freshness in these ingredients is key to a tasty dip. You can find the full recipe at the end of this section. Enjoy making this salsa! To make this peach avocado salsa, follow these simple steps. Each step brings you closer to a fresh and tasty dip. - Combine diced peaches and avocados Start by adding the diced peaches and avocados to a medium bowl. Use a spatula to mix them gently. Be careful not to mash the avocados. You want nice chunks for the perfect texture. - Add red onion and jalapeño Next, sprinkle in the finely chopped red onion and minced jalapeño. Mix them in lightly. This adds crunch and a little heat to the salsa. - Fold in cilantro gently Now, add the freshly chopped cilantro. Fold it into the mixture carefully. This keeps the avocados and peaches intact while adding a fresh flavor. - Squeeze lime juice and add honey Squeeze the juice from the limes over the salsa. This brightens the flavors. If you'd like a touch of sweetness, drizzle in the honey. Mix gently to coat everything evenly. - Season with salt and pepper Taste your salsa and season with salt and freshly cracked black pepper. Adjust according to your preference. Toss everything gently to combine the seasonings. - Let sit for flavor development For the best taste, let your salsa sit at room temperature for about 10 minutes. This allows the flavors to blend well together. If you want to see the full recipe, check out the [Full Recipe]. Enjoy making this vibrant, fresh dip! Choosing ripe peaches and avocados is key to a great salsa. Look for peaches that yield slightly to pressure. They should smell sweet and juicy. For avocados, pick ones that feel soft but not mushy. This ensures a creamy texture in your dip. Adjusting heat levels with jalapeño is easy. For less heat, remove the seeds and inner ribs. This part holds most of the spice. If you like it spicy, leave some seeds in. Start with a small amount and add more as needed. Enhancing sweetness with honey can balance the flavors. If your peaches aren't as sweet as you'd like, a tablespoon of honey works wonders. Mix it in gently so you don’t mash the fruit. This extra touch can make your salsa shine. Best pairings for your salsa include chips, grilled chicken, or fish. Tortilla chips add a nice crunch. For a healthy twist, serve it with grilled chicken or fish. The mild flavors of the salsa complement these dishes well. Presentation tips can help impress your guests. Serve the salsa in a rustic bowl. Top it with extra cilantro leaves for a fresh look. A colorful spread makes your table inviting and fun. You can even add lime wedges on the side for a pop of color. For the full recipe, check out the Peach Avocado Salsa section above. {{image_4}} You can get creative with your salsa by switching up ingredients. - Using mango instead of peaches: Mango adds a sweet twist. It gives a tropical flair to your salsa. Simply replace diced peaches with diced mango in equal amounts. - Adding diced bell peppers for crunch: For extra texture, you can add bell peppers. Diced red, yellow, or green peppers work well. They will add a nice crunch and color to your dish. - Incorporating garlic for additional flavor: If you love garlic, try adding a clove of minced garlic. It enhances the flavor profile and gives your salsa a savory kick. Making simple changes can fit different diets. - Making it vegan-friendly: This salsa is already vegan! Use natural sweeteners like agave instead of honey for a completely plant-based option. - Gluten-free serving options: All ingredients are gluten-free. Serve with gluten-free tortilla chips or fresh veggies. This makes it a great snack for everyone. For more details on making this delicious dip, check out the Full Recipe. To keep your peach avocado salsa fresh, place it in an airtight container. This helps prevent air exposure. It is best to refrigerate it right away. The cool temperature slows down spoilage. You can store it in the fridge for 2 to 3 days. After that, the avocados may brown and change in texture. If you notice browning, you can mix in a bit of lime juice to refresh it. Freezing salsa can be a great way to save extra. To freeze it effectively, put the salsa in a freezer-safe bag. Make sure to remove as much air as possible. This helps prevent freezer burn. You can freeze it for up to 3 months. When you want to use it, take it out and thaw in the fridge overnight. Once thawed, the texture may change slightly. It's still safe to eat and can be used in cooked dishes, like tacos or soups. For the best taste, try to use thawed salsa within a week. Peach avocado salsa shines with many dishes. It pairs wonderfully with tortilla chips, making it a great snack. You can also use it to top grilled chicken or fish for a fresh twist. It adds a burst of flavor to tacos or quesadillas too. This salsa can elevate any summer barbecue or picnic, making your meal feel bright and fun. Homemade peach avocado salsa stays fresh in the fridge for about three days. Store it in an airtight container to keep it from browning. After this time, the flavors may fade, and the texture can change. Always check for any off smells before eating. If it looks or smells funny, it’s best to toss it. Yes, you can easily adjust the spice in your salsa. If you want it milder, remove the seeds from the jalapeño. You can also skip the jalapeño entirely for a sweet salsa. For more heat, add extra minced jalapeño or even some crushed red pepper. Taste as you go to find your perfect balance. Making Peach Avocado Salsa is simple and fun. We covered fresh ingredients, step-by-step prep, and useful tips. Plus, we explored tasty variations and smart storage options. This salsa enhances any dish, from chips to seafood. Remember, you can change ingredients to match your taste. Enjoy sharing this bright, flavorful mix at your next meal. With a few tweaks, your salsa can shine every time.](https://goldendishy.com/wp-content/uploads/2025/06/096320e8-25bc-4efd-9183-2f1d952cbb9e-768x768.webp)
![- 2 cans (15 oz each) chickpeas, thoroughly drained and rinsed - 2 tablespoons extra virgin olive oil - 1 tablespoon smoked paprika - 1 teaspoon cayenne pepper - 1 teaspoon garlic powder - 1 teaspoon onion powder - 1 teaspoon ground cumin - Salt, to taste - Fresh cilantro for garnish (optional) Chickpeas are the star of this recipe. They are high in protein and fiber, making them a healthy choice. Each can of chickpeas gives you a great base for a crispy snack. Now, let's break down the other ingredients. Extra virgin olive oil adds healthy fats, helping the spices stick. Smoked paprika gives a deep flavor, while cayenne pepper adds heat. Garlic and onion powders give a nice aroma and a touch of sweetness. Ground cumin brings an earthy taste that balances the spices. You can adjust the salt to your liking. Fresh cilantro is optional but adds a fresh touch. Chickpeas are packed with nutrients. One serving has about 120 calories. They provide around 6 grams of protein and 2 grams of fat. You also get about 20 grams of carbs and 5 grams of fiber. Chickpeas support heart health, help with digestion, and can aid in weight management. They are a smart choice for a snack or a meal. They fit well into many diets, too! For the full recipe, check out [Full Recipe]. Start by preheating your oven to 400°F (200°C). This step is key for making the chickpeas crispy. Use a baking sheet lined with parchment paper. This helps with easy cleanup and ensures the chickpeas do not stick. Next, rinse the chickpeas under cold water. Drain them well, then pat them dry with a clean paper towel. This step is very important. Removing moisture makes the chickpeas crispier when roasting. In a large bowl, mix the drained chickpeas with olive oil and spices. Use smoked paprika, cayenne pepper, garlic powder, onion powder, ground cumin, and a pinch of salt. Toss gently so every chickpea gets coated in the spice mix. Even coverage is vital for that great flavor. Spread the seasoned chickpeas on the baking sheet in a single layer. This helps them roast evenly. Place the sheet in the oven and roast for about 25-30 minutes. Shake the pan halfway through to promote even cooking. Watch them closely near the end to avoid burning. Once they are golden and crispy, take the chickpeas out. Let them cool on the baking sheet for a few minutes. They will continue to crisp up as they cool. For a fresh touch, sprinkle chopped cilantro on top before serving. Enjoy them as a snack or use them as a topping on salads. For the full recipe, check the ingredient list above. To make your spicy roasted chickpeas super crispy, dry them well. After draining, rinse them under cold water. Then, pat them dry with a paper towel. This step is vital! Any leftover moisture will make them soggy. Spread the chickpeas in a single layer on your baking sheet. This helps them cook evenly. If they overlap, they won’t get as crisp. Adjusting the spice levels is easy. If you want more heat, add more cayenne pepper. For less spice, reduce the amount or skip it. You can also experiment with other spices! Try adding chili powder or even a dash of curry powder for a fun twist. Taste the mix before roasting to find your perfect balance. Store any leftover roasted chickpeas in an airtight container. Keep them at room temperature for up to three days. If they get soft, re-crisp them in the oven for a few minutes. This restores their crunch. Enjoy them as a snack or toss them on salads. For the full recipe, check out the original source. {{image_4}} You can change the flavor of spicy roasted chickpeas easily. Try adding different spices or herbs. Here are some great ideas: - Cumin: Boost the earthy flavor. - Chili powder: Add more heat. - Turmeric: For a warm, golden color. - Herbs: Experiment with thyme or rosemary for fresh notes. For a sweet twist, mix in a little cinnamon and honey. Toss your roasted chickpeas with a bit of honey after cooking. The sweetness pairs well with spice. It creates a tasty snack that balances flavors. Spicy roasted chickpeas work well with many dishes. They are great as a snack on their own. You can also add them to salads or grain bowls for extra crunch. - Salads: Sprinkle them over leafy greens. They add texture and flavor. - Bowls: Use them in grain bowls for a hearty meal. - Snacking: Serve them in a bowl at parties for a fun treat. Feel free to mix them into soups for added richness. The crispy texture enhances warm dishes too. Get creative and enjoy these versatile little gems! For the full recipe, check the earlier section. To keep your spicy roasted chickpeas fresh, place them in an airtight container. This helps lock in their crunch. You can store them on the counter for up to three days. For longer storage, try the fridge, where they can last up to a week. However, they might lose some crispness in the fridge. If you want to save them for later, consider freezing them. In the freezer, they can last for about three months. Just remember to let them cool completely before storing. When you’re ready to enjoy leftovers, the best way to reheat them is in the oven. Preheat your oven to 375°F (190°C). Spread the chickpeas on a baking sheet in a single layer. Heat them for about 10 minutes. This method helps restore their crunch and flavor. You can also use an air fryer for quick reheating. Set it to 350°F (175°C) and heat for five to seven minutes. Both methods keep your chickpeas crispy and tasty! If you can't use chickpeas, try these options: - Canned white beans: They are creamy and mild in taste. - Edamame: These young soybeans add a nice crunch. - Lentils: Cooked lentils can work, but they won’t be as crunchy. - Roasted pumpkin seeds: They give a great crunch and are nutty. These alternatives are great for those with dietary restrictions or different tastes. Yes, you can easily adapt this recipe for an air fryer. Here’s how: - Preheat your air fryer to 400°F (200°C). - Follow the same steps to season your chickpeas. - Place them in the air fryer basket in a single layer. - Cook for about 15 to 20 minutes, shaking the basket halfway. This method gives you extra crispiness while saving time. The spice level of spicy roasted chickpeas is adjustable. The cayenne pepper in the recipe gives a kick, but you can change it. - For mild: Use less or skip the cayenne. - For extra spicy: Add more cayenne or include chili powder. Taste as you go to find your perfect heat! Yes, spicy roasted chickpeas are naturally gluten-free. Chickpeas do not contain gluten, making them a safe choice for those with gluten sensitivities. Always check your spice labels to ensure no gluten-containing ingredients are added. Enjoy these snacks worry-free! For the full recipe, visit the Spicy Roasted Chickpeas section. This blog post covered how to make spicy roasted chickpeas. We went through the ingredients, detailed the steps, and shared tips for perfecting your snack. Chickpeas are healthy, tasty, and easy to customize. You can adjust spices or enjoy them sweet. Whether you serve them in salads or as a snack, there are many ways to enjoy them. With proper storage, your leftovers will stay fresh. Get ready to impress with this simple recipe!](https://goldendishy.com/wp-content/uploads/2025/07/52a5824a-88a4-4b76-bbe8-61087731f54f-768x768.webp)
