Crispy Air Fryer Brussels Sprouts Simple and Flavorful Dish

Looking for a simple yet flavorful dish that impresses? Try my Crispy Air Fryer Brussels Sprouts! These little green gems are tasty, healthy, and fast to make. With just a few ingredients, you’ll have a crunchy side that pairs perfectly with any meal. Plus, I’ll share tips to get them just right! Ready to transform this humble vegetable into a delightful treat? Let’s dive in!
Ingredients
List of Required Ingredients
– 1 lb Brussels sprouts, trimmed and halved
– 2 tablespoons extra virgin olive oil
– 1 teaspoon garlic powder
– 1 teaspoon onion powder
– 1 teaspoon smoked paprika
– ½ teaspoon sea salt
– ¼ teaspoon freshly ground black pepper
– 2 tablespoons balsamic glaze (for drizzling)
– Fresh parsley, finely chopped (for garnish)
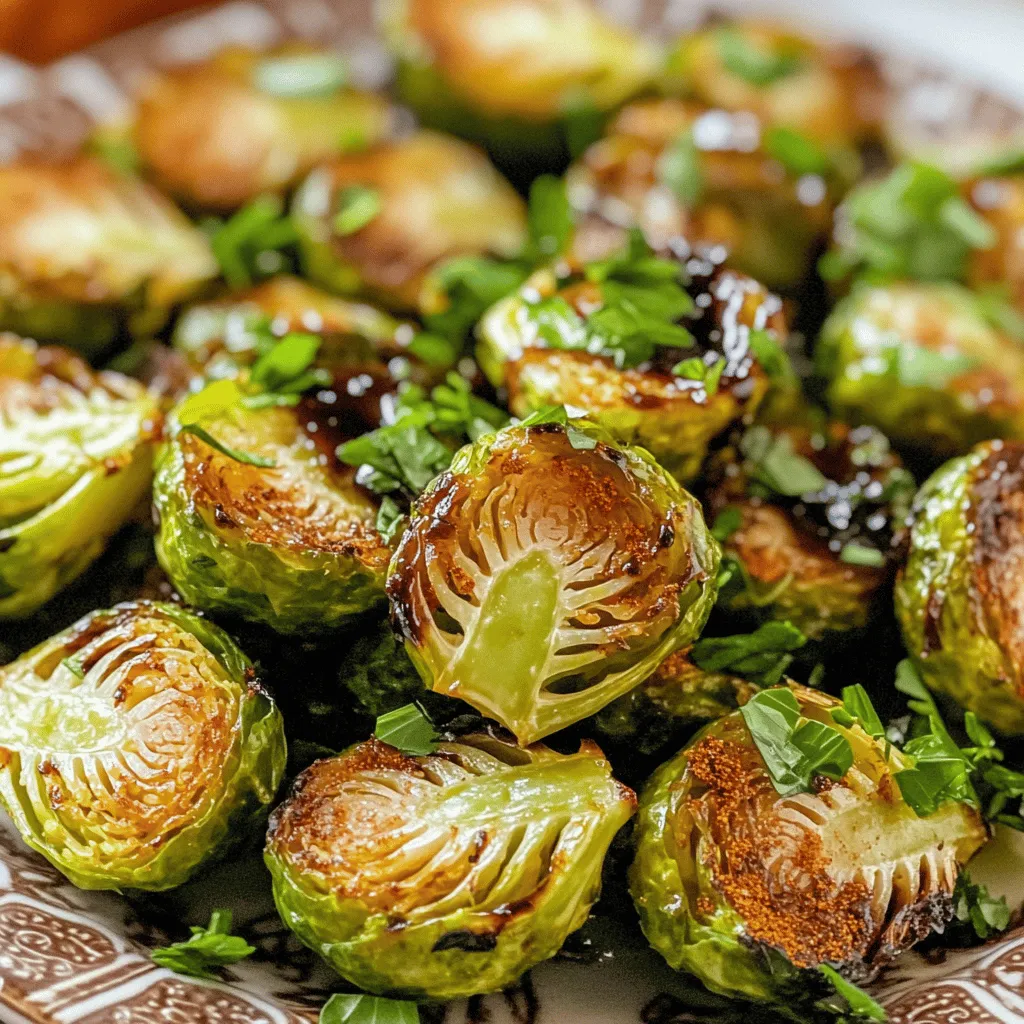
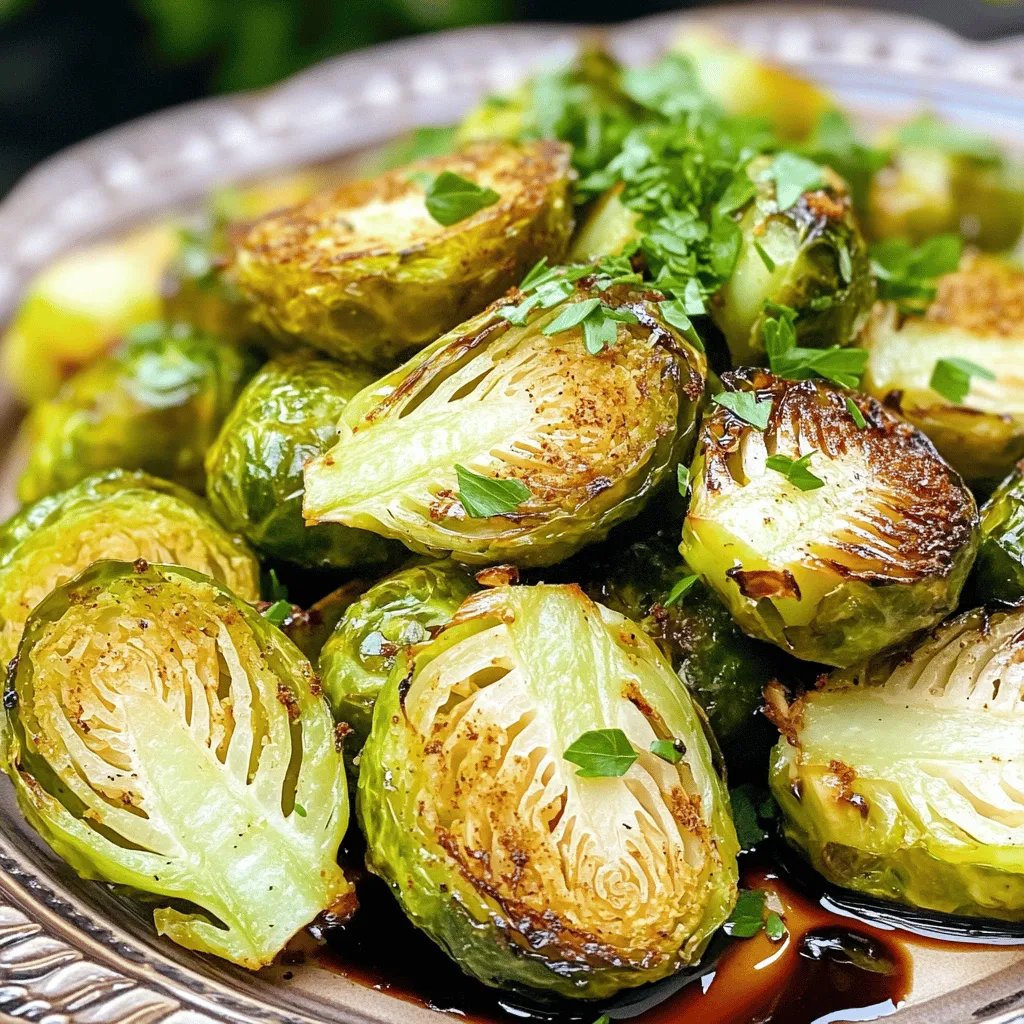
To make crispy air fryer Brussels sprouts, you need fresh Brussels sprouts. Choose bright green ones without blemishes. Halve them for even cooking. The olive oil helps them crisp up nicely. Garlic powder and onion powder add great flavor. Smoked paprika gives a warm, smoky taste. Sea salt and black pepper balance the dish perfectly. Balsamic glaze adds a sweet finish, while parsley brightens the look.
This list creates a simple, tasty dish that anyone can enjoy.
Step-by-Step Instructions
Preheat the Air Fryer
Set the air fryer to 375°F (190°C). Preheat it for 5 minutes. This step ensures your Brussels sprouts cook evenly and get that perfect crisp.
Prepare the Brussels Sprouts
Take 1 pound of trimmed and halved Brussels sprouts. In a large bowl, add 2 tablespoons of extra virgin olive oil. Then, sprinkle in 1 teaspoon of garlic powder, 1 teaspoon of onion powder, 1 teaspoon of smoked paprika, ½ teaspoon of sea salt, and ¼ teaspoon of freshly ground black pepper. Toss everything together until the Brussels sprouts are well coated. This mix brings out their natural flavor and adds a nice kick.
Air Frying the Brussels Sprouts
Place the seasoned Brussels sprouts in the air fryer basket. Make sure they sit in a single layer. This step is key to getting them crispy. Cook for 15 to 18 minutes. Halfway through, shake the basket to ensure all sides get crispy. When they turn golden brown, they’re ready to enjoy!
For a finishing touch, drizzle with balsamic glaze and sprinkle fresh parsley on top.
Tips & Tricks
Achieving Perfect Crispiness
To get your Brussels sprouts crispy, keep a few tips in mind. First, do not overcrowd the air fryer basket. This step is key for even cooking and crispiness. If you pack too many in, they will steam instead of fry. Spread them out in a single layer for the best results.
Next, I recommend cooking them for 15 to 18 minutes. Check them halfway through and shake the basket. This action helps them brown evenly on all sides. If you want them extra crispy, add a few more minutes, but watch closely!
Serving Suggestions
Presentation matters! When serving, place your crispy Brussels sprouts on a nice platter. Drizzle extra balsamic glaze over them for a beautiful finish. Sprinkle chopped parsley on top for color and freshness.
If you want to add a zesty kick, serve lemon wedges on the side. A squeeze of fresh lemon juice can brighten the dish and enhance the flavors. Pair these crispy sprouts with your favorite protein for a complete meal. Enjoy!

Variations
Flavor Variations
You can easily change the flavor of crispy air fryer Brussels sprouts. Here are some ideas:
– Add spices: Try chili powder for heat or cumin for a warm, earthy taste.
– Use fresh herbs: Toss in rosemary or thyme before cooking for a fragrant aroma.
– Alternate cooking methods: If you prefer, roast the Brussels sprouts in the oven. Just heat it to 400°F (200°C) and follow the same steps. The flavors will be rich and the texture nice.
These small changes can take your dish to the next level.
Dietary Adjustments
Adjusting the recipe for dietary needs is simple:
– Vegan option: The recipe is already vegan! Just make sure your balsamic glaze has no added sugars or animal products.
– Gluten-free: This dish is naturally gluten-free. Just check your seasonings to ensure they are gluten-free.
– Low-sodium: Use herbs like garlic powder and lemon juice instead of salt. This keeps flavor high while sodium stays low.
These adjustments make the dish suitable for everyone. Enjoy experimenting with flavors and dietary needs!
Storage Info
Storing Leftovers
To keep your crispy Brussels sprouts fresh, store them in an airtight container. Place them in the fridge within two hours of cooking. They will stay good for about three days. After that, the flavor and texture may decline. Avoid stacking them too high. This helps keep them crispy for longer.
Reheating Tips
When it’s time to enjoy your leftovers, reheating is key. I recommend using the air fryer again. Set it to 350°F (175°C) and heat for about 5 to 7 minutes. This method helps to restore their crispiness. You can also use the oven. Place them on a baking sheet at 375°F (190°C) for about 10 minutes. Either way, enjoy the great taste of your leftover crispy air fryer Brussels sprouts!
FAQs
How can I make Brussels sprouts less bitter?
To reduce bitterness, choose fresh Brussels sprouts. Look for bright green, firm sprouts. When preparing, trim the ends and remove any yellow leaves. You can also soak them in cold water for 10 minutes before cooking. This simple step can help draw out some of the bitter flavors. Roasting or air frying with seasonings like garlic or smoked paprika will add flavor and balance the bitterness.
Can I use frozen Brussels sprouts in this recipe?
Yes, you can use frozen Brussels sprouts! Just remember they may not get as crispy as fresh ones. For frozen sprouts, increase the cooking time by 3 to 5 minutes. Make sure to thaw and drain them first. Pat them dry with a towel to remove excess moisture. This will help achieve better crispiness.
What can I pair with crispy Brussels sprouts for a meal?
Crispy Brussels sprouts are great with many dishes. Pair them with grilled chicken or baked salmon for protein. They also go well with quinoa or mashed potatoes for starch. Add a fresh salad on the side for a colorful touch. Drizzle more balsamic glaze over your meal for extra flavor. Enjoy the balance of textures and tastes!
In this post, we covered how to make crispy Brussels sprouts in an air fryer. You learned essential ingredients, step-by-step cooking instructions, and tips for the perfect crunch. We explored flavor variations and dietary adjustments, plus storage and reheating methods. Enjoy these tasty sprouts as a side or snack! With some practice, you’ll impress with your crispy creations. Keep experimenting, and you’ll find your favorite way to enjoy Brussels sprouts.


![- 2 ripe peaches, halved and pitted - 1 tablespoon extra virgin olive oil - Kosher salt and freshly cracked black pepper, to taste - 4 cups fresh arugula or a mix of leafy greens - 8 oz creamy burrata cheese - ¼ cup toasted almonds, roughly chopped - ¼ cup balsamic glaze - Fresh basil leaves, for garnish When you make this Grilled Peach Burrata Salad, you need just a few key ingredients. Each one plays a big role in the flavor and texture. The peaches bring sweetness, while the burrata adds creaminess. The arugula gives a nice peppery bite. The toasted almonds add crunch, and the balsamic glaze ties everything together with a sweet tang. You can even add fresh basil leaves for a pop of color and taste. I love how simple ingredients can create such a beautiful dish. - Calories: Approximately 300 per serving - Fats: 22g - Protein: 8g - Carbohydrates: 20g This salad is not just tasty; it also offers health benefits. Peaches are low in calories and high in vitamins A and C. They support eye health and boost your immune system. Arugula is rich in vitamins and minerals. It helps with digestion and adds fiber. Burrata is creamy and delicious, providing protein and healthy fats. Almonds are good for your heart and give you energy. Overall, this dish is a great choice for a healthy meal or snack. You can enjoy this salad while knowing it’s good for you! For the complete recipe, check out the [Full Recipe]. - Preheat grill or grill pan to medium-high heat. - Brush peach halves with olive oil, salt, and pepper. To start, I heat my grill or grill pan to medium-high heat. This helps the peaches caramelize nicely. While my grill heats up, I prepare the peaches. I cut them in half and remove the pit. Then, I brush the cut sides with olive oil. A sprinkle of salt and pepper adds a touch of flavor and enhances the natural sweetness of the peaches. - Grill peaches cut side down for 4-5 minutes. - Remove and set aside to cool. Next, I place the peaches cut side down on the grill. I let them cook for 4 to 5 minutes. I look for those beautiful grill marks, which mean they are ready. Once grilled, I carefully remove them and set them aside to cool. The grilling process brings out the peaches' natural sugars, making them even sweeter. - Create a base of arugula in the serving bowl. - Tear and place burrata on greens. - Slice and arrange peaches around burrata. - Add almonds and drizzle with balsamic glaze. - Garnish with basil leaves. Now for the fun part—assembly! I take a large serving bowl and create a bright base of arugula. The fresh greens add a peppery bite. I then gently tear the burrata cheese into pieces, placing them on top of the greens. The creamy texture of burrata pairs perfectly with the grilled peaches. Next, I slice the peaches into wedges and artfully arrange them around the burrata. I love the contrast of the warm peaches and the cool cheese. I then scatter toasted almonds over the salad. They add a nice crunch to each bite. Finally, I drizzle balsamic glaze all over the salad. This adds a sweet and tangy touch that ties all the flavors together. I finish with fresh basil leaves for color and aroma. This salad is a true delight, and you can find the Full Recipe for all the details above! To achieve perfect grill marks on your peaches, start with a clean grill. Preheat it to medium-high heat. Brush your peach halves with olive oil. This helps them avoid sticking and gives them a nice sear. Place the peaches cut side down. Let them cook for about 4-5 minutes without moving them. This ensures nice grill lines and caramelization. If you don’t have a grill, you can use a griddle or stovetop pan. Heat it well and follow the same oiling and cooking steps. You can still get great flavor without a grill! To boost the flavor of your grilled peaches, try adding some spices. A pinch of cinnamon can add warmth. Fresh thyme or rosemary adds a nice herbal touch. You can sprinkle these on before grilling. If you need an alternative to balsamic glaze, try honey or maple syrup. Drizzle these over the salad for a sweet touch. A splash of lemon juice can also add brightness to the dish. For a beautiful display, serve the salad on a large, shallow platter. This lets the colors pop. You can also use individual bowls for a personal touch. Drizzle extra balsamic glaze on the plate for added flair. Garnishing is key! Use fresh basil leaves to add color and aroma. Consider adding edible flowers for an extra visual boost. These small touches make your salad stand out and look professional. {{image_4}} You can change the salad by adding protein. Grilled chicken adds a nice, savory touch. Shrimp also works well, bringing a sweet flavor. If you want a plant-based option, try tofu. For cheese, you can swap burrata for feta. Feta gives a nice salty kick. Goat cheese is another great choice. It brings creaminess and a tangy flavor. You can also switch up the dressing. A honey vinaigrette adds sweetness and pairs well with peaches. A citrus dressing, made with lemon or lime, brightens the dish and adds zest. If you want to make this salad vegan, skip the cheese. You can use a vegan cheese option or leave it out. A simple olive oil and vinegar mix works well too. In the summer, use fresh peaches. But when peaches are out of season, try nectarines. They have a similar taste and texture. Plums are another great choice, adding a sweet and juicy bite. As the seasons change, adapt your salad to use what’s fresh. In fall, add roasted squash for warmth. In winter, try pomegranate seeds for a burst of color and flavor. Each season offers new ways to enjoy this salad. To keep your grilled peach burrata salad fresh, store leftovers in a sealed container. This helps prevent drying and keeps flavors strong. You can store it in the fridge for up to three days. The peaches will soften, but they still taste great. The burrata may lose some creaminess but remains delicious. I do not recommend freezing the salad. The texture of peaches and burrata changes when frozen. If you must freeze, store only the grilled peaches. Wrap them in plastic and place in an airtight bag. When ready to use, thaw them in the fridge overnight. To refresh your salad, take it out of the fridge and let it sit for a few minutes. This helps bring back the flavors. If the greens look wilted, consider adding fresh arugula. You can also drizzle a bit more balsamic glaze for added flavor. Gently mix the salad to combine the ingredients, then serve. This will make it look and taste great again. You can prep the salad in parts. Grill the peaches and store them in the fridge. You can also wash and dry the greens. Keep the burrata cheese wrapped until you're ready to serve. Assemble everything just before you eat. This keeps the salad fresh and tasty. If you do not have burrata, try using fresh mozzarella. It has a similar creamy texture. Goat cheese is another good choice. It adds a tangy flavor that pairs well with peaches. Yes, this salad is naturally gluten-free. All the ingredients listed are free from gluten. Just make sure any balsamic glaze you use is gluten-free. Some brands may add gluten, so check the label. Fresh basil is a great choice for this salad. It adds a sweet and aromatic touch. Mint is another option that gives a refreshing flavor. You can also try arugula for a spicy kick. Use these herbs to boost the taste of your dish. This blog post detailed a delicious grilled peach and burrata salad. We covered the ingredients, from juicy peaches to creamy burrata and flavorful arugula. You learned how to prepare, grill, and assemble this fresh dish easily. We also shared tips for grilling and creative variations. Remember, you can adapt this salad for every season, and it stores well for later use. Enjoy experimenting with flavors and presentations to make it your own. This salad is sure to impress at any meal!](https://goldendishy.com/wp-content/uploads/2025/06/bc92e29d-8312-48fc-8428-fe4367025cca-768x768.webp)

