Creamy Tuscan Shrimp Linguine Delightful and Easy Meal

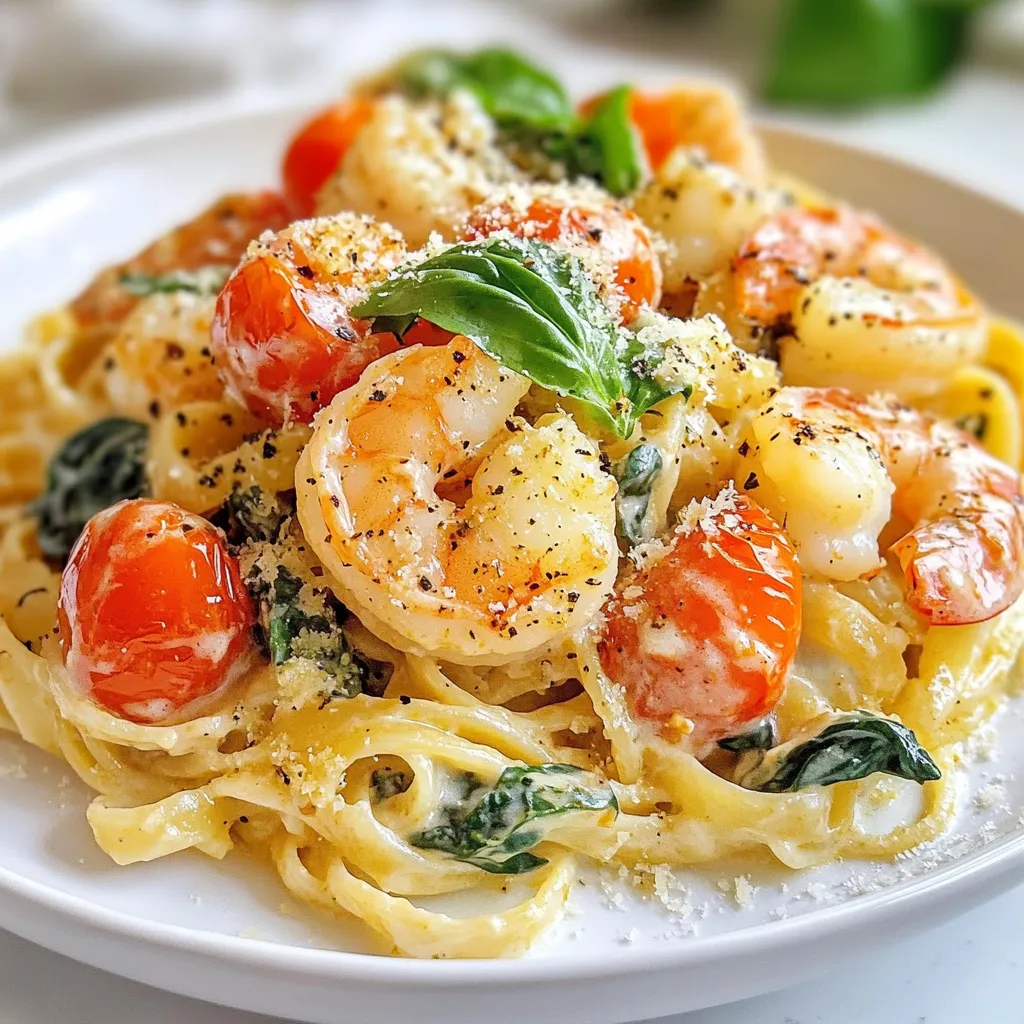
Indulge in a bowl of Creamy Tuscan Shrimp Linguine, where rich flavors meet simplicity. This delightful meal is perfect for busy weeknights or impressing guests. With just a few key ingredients, you’ll create a dish that’s both creamy and satisfying. Whether you’re a novice cook or a seasoned pro, my step-by-step instructions will guide you through. Get ready to elevate your dinner game and enjoy this easy recipe!
Why I Love This Recipe
- Deliciously Creamy: The combination of heavy cream and Parmesan cheese creates a rich and indulgent sauce that perfectly coats the linguine.
- Quick and Easy: This recipe comes together in just 30 minutes, making it perfect for a weeknight dinner or an impressive meal for guests.
- Fresh Ingredients: With vibrant cherry tomatoes and nutritious spinach, this dish is not only tasty but also packed with vegetables.
- Customizable: You can easily adjust the ingredients, swapping shrimp for chicken or adding your favorite vegetables for a personal touch.
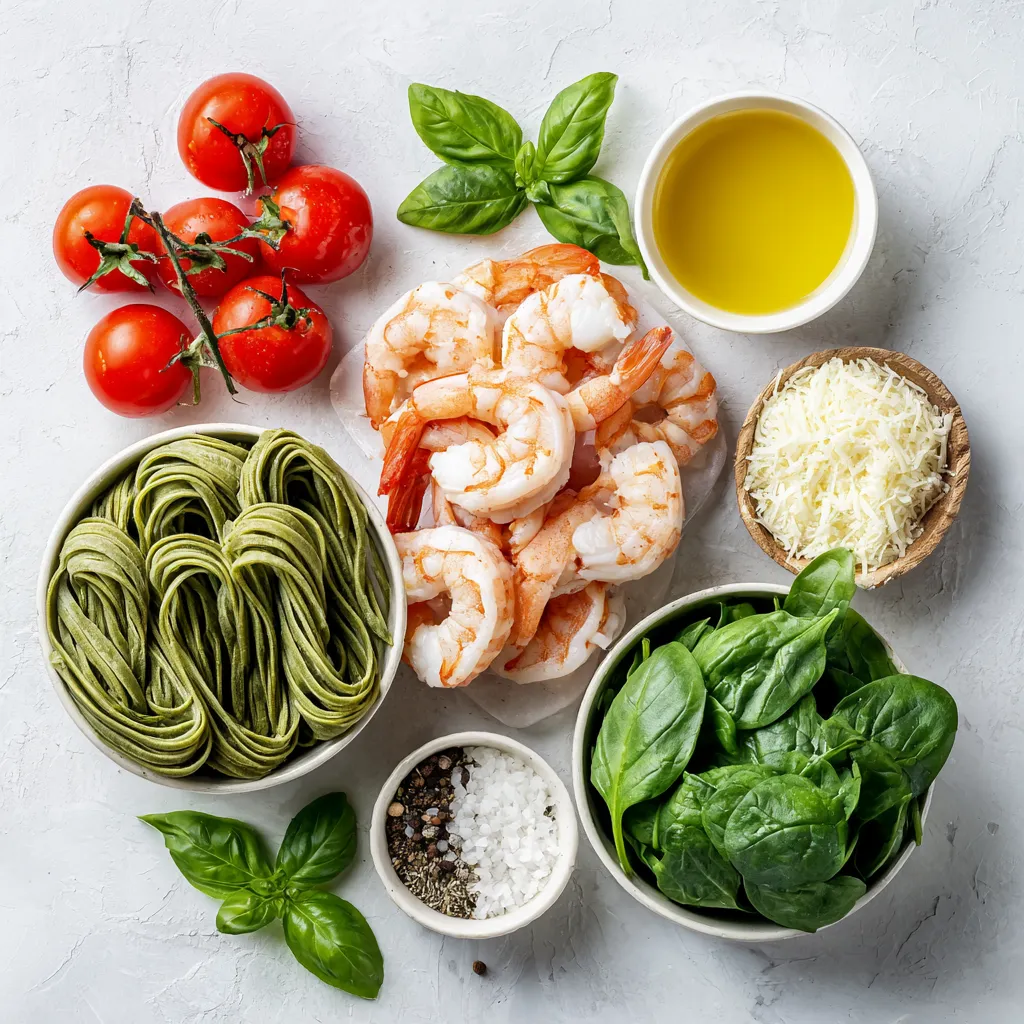
Ingredients
List of ingredients for Creamy Tuscan Shrimp Linguine
– 8 oz linguine pasta
– 1 lb large shrimp, peeled and deveined
– 2 tablespoons olive oil
– 3 cloves garlic, minced
– 1 cup cherry tomatoes, halved
– 3 cups fresh spinach
– 1 cup heavy cream
– ½ cup grated Parmesan cheese
– 1 teaspoon Italian seasoning
– Salt and pepper to taste
– Fresh basil leaves for garnish
Optional ingredients for variations
You can add a splash of lemon juice for a fresh zing. Consider including sun-dried tomatoes for extra flavor. You might also try adding mushrooms for added texture. For some heat, red pepper flakes work well in this dish.
Suggested substitutions for dietary preferences
For a lighter version, swap heavy cream for half-and-half or coconut cream. If you are gluten-free, you can use gluten-free pasta instead of linguine. For a dairy-free option, try vegan cream cheese or cashew cream in place of heavy cream and Parmesan cheese. If you prefer a plant-based meal, replace shrimp with sautéed tofu or chickpeas.

Step-by-Step Instructions
Preparing the linguine
Start by boiling water in a large pot. Add salt to the water. When it boils, add 8 oz of linguine pasta. Cook the pasta until it is al dente, following the package guide. After cooking, drain the pasta. Be sure to keep ½ cup of the pasta water for later.
Cooking the shrimp
Next, grab a large skillet. Heat 2 tablespoons of olive oil over medium heat. Once the oil is hot, add 1 lb of peeled and deveined shrimp. Season with salt and pepper. Sauté the shrimp for 2 to 3 minutes. They should turn pink and opaque. Remove the shrimp from the skillet and place them on a plate.
Sautéing garlic and vegetables
In the same skillet, add 3 cloves of minced garlic. Sauté for about 30 seconds until you smell the garlic. Be careful not to burn it. Then, add 1 cup of halved cherry tomatoes. Cook these for 3 to 4 minutes until they soften. Next, toss in 3 cups of fresh spinach. Cook until the spinach wilts.
Making the creamy sauce
Lower the heat to a gentle simmer. Pour in 1 cup of heavy cream. Stir well with the sautéed veggies. Add ½ cup of grated Parmesan cheese and 1 teaspoon of Italian seasoning. Stir until the cheese melts and the sauce becomes creamy.
Incorporating shrimp and pasta
Return the cooked shrimp to the pan. Mix well to coat the shrimp in the creamy sauce. If the sauce is too thick, add the reserved pasta water a little at a time until it reaches the right creaminess.
Plating and garnishing tips
Gently toss the cooked linguine into the skillet. Make sure every strand is coated in the sauce. Taste and adjust salt and pepper if needed. Serve the pasta on plates. Garnish with fresh basil leaves and extra Parmesan cheese if you like. Enjoy your meal!
Tips & Tricks
Best practices for perfectly cooked shrimp
To cook shrimp just right, know a few things. First, use large shrimp for a better bite. Pat them dry before cooking to avoid steaming. Heat your oil until it’s hot, then add the shrimp. Cook for 2 to 3 minutes. They should turn pink and opaque. Don’t overcook them; they can become tough.
Adjusting creaminess levels
If you want more creaminess, add more heavy cream. For a lighter dish, use less cream. You can also mix in some of the reserved pasta water to adjust texture. This keeps the sauce silky without adding more cream. Taste as you go to find the right balance for you.
How to enhance flavors with herbs and spices
Fresh herbs make a big difference here. Try adding chopped basil or parsley for brightness. You can also use a pinch of red pepper flakes for heat. A dash of lemon juice adds a nice zing. Experiment with flavors to make it your own and enjoy the taste of Italy!
Pro Tips
- Perfectly Cooked Pasta: Always cook your pasta al dente. It will continue to cook slightly when mixed with the sauce, preventing it from becoming mushy.
- Fresh Ingredients: Use fresh spinach and ripe cherry tomatoes for the best flavor. Fresh ingredients make a significant difference in this dish.
- Adjusting Consistency: If your sauce is too thick, add the reserved pasta water gradually. This will help to create the perfect creamy texture.
- Garnish for Flavor: Don’t skip the fresh basil garnish! It adds a burst of flavor and a beautiful presentation to your dish.

Variations
Adding different vegetables
You can make Creamy Tuscan Shrimp Linguine even better by adding more veggies. Consider bell peppers for crunch or zucchini for a fresh taste. Peas and asparagus also work well. Just remember to cook them until they are tender but still bright. Adding different veggies not only boosts flavor but also adds color to your dish.
Alternative proteins for the recipe
If you want to switch things up, try using chicken or scallops instead of shrimp. Chicken should be cooked until golden brown before adding veggies. Scallops need only a few minutes on each side until they turn opaque. Both options give a different taste while keeping the creamy sauce intact.
Gluten-free and dairy-free options
You can easily make this dish gluten-free by using rice pasta or zucchini noodles. For a dairy-free version, swap heavy cream with coconut cream or cashew cream. Nutritional yeast can replace Parmesan for a cheesy taste without dairy. These options help everyone enjoy this tasty dish without worry.
Storage Info
How to refrigerate leftovers
To refrigerate leftovers, let the dish cool down first. Place the creamy Tuscan shrimp linguine in an airtight container. It can stay fresh in the fridge for up to three days. Make sure to store it right away. This keeps the flavors intact and safe to eat later.
Tips for reheating Creamy Tuscan Shrimp Linguine
When reheating, use a skillet over medium heat. Add a splash of water or cream to avoid dryness. Stir often to warm it evenly. You can also use a microwave. Cover it with a damp paper towel to keep moisture in. Heat it in short bursts, stirring in between. This way, you keep the creamy texture.
Freezing options and best practices
Freezing is a great way to save leftovers. Place the cooled linguine in a freezer-safe bag or container. Remove as much air as possible to avoid freezer burn. It can last up to three months in the freezer. When you’re ready to eat, thaw it overnight in the fridge. Reheat as mentioned above for the best results.
FAQs
What can I substitute for heavy cream?
You can use whole milk or half-and-half. These options will make a lighter sauce. If you want a vegan option, try coconut milk or cashew cream. Each choice will change the flavor slightly, but they keep it creamy.
Can I use frozen shrimp?
Yes, you can use frozen shrimp. Just make sure to thaw them before cooking. Place them in cold water for about 15 minutes. This way, they will cook evenly and stay juicy.
How can I make this dish spicier?
To add heat, try red pepper flakes or diced jalapeños. You can also add hot sauce to the creamy sauce for an extra kick. Start with a small amount and taste as you go.
Is this recipe suitable for meal prep?
Yes, this dish is great for meal prep. You can cook it ahead and store it in the fridge for up to three days. Just reheat gently on the stove, adding a bit of water if needed to bring back creaminess.
You’ve learned how to make Creamy Tuscan Shrimp Linguine. I covered the ingredients, step-by-step cooking, and tips for great results. You can also explore variations and storage tips to make this dish your own.
Remember, cooking is about fun and creativity. Try adding your favorite veggies or spices. Enjoy this dish, share it, and make it a go-to meal. Happy cookin

Creamy Tuscan Shrimp Linguine
Ingredients
- 8 oz linguine pasta
- 1 lb large shrimp, peeled and deveined
- 2 tablespoons olive oil
- 3 cloves garlic, minced
- 1 cup cherry tomatoes, halved
- 3 cups fresh spinach
- 1 cup heavy cream
- ½ cup grated Parmesan cheese
- 1 teaspoon Italian seasoning
- to taste salt and pepper
- for garnish fresh basil leaves
Instructions
- In a large pot, bring salted water to a boil. Add the linguine pasta and cook according to the package instructions until al dente. Once cooked, drain the pasta and set aside, remembering to reserve ½ cup of the pasta water for later use.
- In a large skillet, heat 2 tablespoons of olive oil over medium heat. When the oil is hot, add the peeled and deveined shrimp. Season generously with salt and pepper. Sauté the shrimp for 2 to 3 minutes or until they turn pink and opaque. Carefully remove the shrimp from the skillet and set them aside on a plate.
- Using the same skillet (add a bit more oil if necessary), add the minced garlic. Sauté for approximately 30 seconds or until fragrant, taking care not to burn it.
- Toss in the halved cherry tomatoes and cook for about 3 to 4 minutes, or until they start to soften. Fold in the fresh spinach and continue cooking until it's wilted, stirring occasionally to promote even cooking.
- Lower the heat to a gentle simmer. Pour in the heavy cream and stir together with the sautéed vegetables. Next, add the grated Parmesan cheese and Italian seasoning, stirring until the cheese is completely melted and the sauce becomes luscious and creamy.
- Return the sautéed shrimp to the pan, mixing well to coat them in the sauce. If the sauce appears too thick, gradually add the reserved pasta water a little at a time until you achieve your desired creamy consistency.
- Gently toss the cooked linguine into the skillet with the creamy shrimp sauce. Ensure that every strand of pasta is well coated with the rich mixture. Taste and adjust salt and pepper as needed.
- Plate the pasta immediately, garnishing with fresh basil leaves and an extra sprinkle of Parmesan cheese, if desired.


![- 1 pound fresh shrimp, peeled and deveined - 3 tablespoons unsalted butter, divided - 4 cloves garlic, finely minced - 1 teaspoon smoked paprika - 1 teaspoon ground cumin - Salt and freshly ground black pepper, to taste - 8 small corn tortillas - 1 cup red cabbage, finely shredded - 1 ripe avocado, sliced into thin wedges - Fresh cilantro leaves, roughly chopped, for garnish - Lime wedges, cut into quarters, for serving To make these garlic butter grilled shrimp tacos, you need fresh shrimp. I recommend getting shrimp that are firm and have a nice sheen. Make sure they are peeled and deveined for easy eating. Butter is key for adding richness. Use unsalted butter so you can control the saltiness. Garlic adds a wonderful aroma and flavor. Mince it finely for the best taste. For spices, smoked paprika brings a deep, smoky flavor. Ground cumin adds warmth. Be sure to season with salt and black pepper to taste. Corn tortillas are the perfect wrap. They are soft and add a nice corn flavor. Red cabbage gives a crunchy texture and a pop of color. Sliced avocado adds creaminess. Fresh cilantro gives a burst of freshness. Finally, lime wedges add a zesty kick. To see the full recipe, check out the [Full Recipe]. To start, melt 2 tablespoons of unsalted butter in a large skillet. Use medium heat. Once the butter is melted, add 4 cloves of minced garlic. Sauté the garlic for 1-2 minutes. It should smell great and turn a light golden color. Be careful not to burn the garlic! Next, stir in 1 teaspoon of smoked paprika and 1 teaspoon of ground cumin. Add a pinch of salt and fresh black pepper to taste. Mix well. This creates a tasty marinade for the shrimp. Now, add 1 pound of peeled and deveined shrimp to the skillet. Cook the shrimp for 3-4 minutes. Stir occasionally to make sure they cook evenly. You will know they are done when they turn opaque and pink. This buttery garlic mixture makes them extra delicious! While the shrimp cooks, take another skillet and heat it over medium-high heat. Warm each of the 8 small corn tortillas for about 30 seconds on each side. You want them to be soft and flexible. Look for slight char marks on the tortillas. This adds great flavor! To build your tacos, take a warm tortilla and layer some cooked shrimp in the center. Then, top it with shredded red cabbage and avocado slices. The cabbage adds crunch, while the avocado gives creaminess. Finish off your tacos by adding fresh cilantro on top. Serve them with lime wedges on the side for a zesty touch. For a nice presentation, arrange the tacos on a colorful platter. You can add extra cilantro and lime wedges to make it look even better. Enjoy every bite with a squeeze of lime! When picking shrimp, you have two main choices: fresh or frozen. Fresh shrimp can taste better, but frozen shrimp is often just as good. If you choose frozen shrimp, look for those that are flash-frozen right after harvest. This keeps them fresh and tasty. Size matters too! For tacos, I suggest using medium to large shrimp. They hold up well in the taco and give you a satisfying bite. Aim for shrimp that are about 21 to 30 per pound. To boost the flavor, you can swap the spices. Try adding chili powder or even a pinch of cayenne for heat. If you want a smoky taste, smoked paprika works wonders. You can also mix in some lime zest for a bright kick. To elevate your tacos, think about toppings. Mango salsa adds sweetness, while jalapeños bring heat. A drizzle of sour cream or a splash of hot sauce can make your tacos sing. Do not overcook your shrimp. They cook quickly and should only take 3-4 minutes. When they turn pink and opaque, they are done. Overcooking makes them tough and rubbery. For the tortillas, warmth is key. Heat them in a hot skillet for about 30 seconds on each side. This gives them a nice char and keeps them soft. You can also wrap them in a clean towel to keep them warm while you assemble your tacos. {{image_4}} You can switch the shrimp for other proteins. Chicken is a great option. Use boneless chicken breasts cut into bite-sized pieces. Season them like the shrimp. Cook until golden brown and juicy. Fish also works well. Choose firm fish like mahi-mahi or cod. Grill or pan-fry the fish until flaky. For a vegetarian twist, try veggies or tofu. Grilled bell peppers, onions, and zucchini make a colorful filling. Tofu absorbs flavors well, so marinate it before grilling. Want to spice things up? Add jalapeños or your favorite hot sauce. Slice jalapeños and mix them in with the shrimp. This adds a nice kick. You can change the toppings too. Mango salsa adds sweetness and freshness. Just mix diced mango, red onion, and lime juice. Another tasty option is crema. This creamy sauce balances the spices. Mix sour cream with lime juice and a pinch of salt. Serve your tacos with tasty sides. A fresh salad pairs well. Try a simple cucumber and tomato salad. Rice and beans are classic choices too. Cilantro lime rice adds bright flavor. For drinks, grab a cold beer or a zesty margarita. A light, fruity drink will complement the meal. Explore the full recipe for more ideas. To keep your garlic butter grilled shrimp tacos fresh, store them in an airtight container. Place the shrimp and toppings in separate containers. This helps maintain the flavors and textures. For the tortillas, wrap them in foil or plastic wrap. This keeps them soft and prevents them from drying out. Use them within three days for the best taste. To reheat the shrimp, place them in a skillet over low heat. Add a splash of water or a bit of butter to keep them moist. Heat for about five minutes, stirring gently. For the tortillas, warm them in a dry skillet for about 30 seconds each side. This method helps keep them soft and adds a nice char. Avoid using the microwave, as it may make them chewy. Yes, you can freeze grilled shrimp! Cool the shrimp completely before placing them in a freezer-safe bag. Squeeze out as much air as possible to prevent freezer burn. They can last up to three months in the freezer. When you're ready to use them, thaw overnight in the fridge. For meal prep, consider freezing the shrimp without the seasonings. This way, you can add fresh spices when you cook them later. You can tell when shrimp are cooked by looking for a few signs. First, they change color from grey to bright pink. Second, they curl into a C shape. Finally, perfectly cooked shrimp feel firm to the touch. If they are tough or rubbery, they may be overcooked. The cooking time is usually 3-4 minutes, but this can vary with size. Yes, you can prepare some parts of the tacos in advance. Cook the shrimp and store them in the fridge for up to two days. You can also warm the tortillas just before serving. If you want to save time, chop the cabbage and avocado ahead of time. Just remember to squeeze lime juice on the avocado to keep it fresh and green. Some great sides to serve with shrimp tacos include: - Cilantro lime rice - Black beans - Corn salad - Chips with salsa - Grilled vegetables These sides balance the flavors of the shrimp tacos and make the meal more complete. You can also serve a light salad to add freshness. You learned how to make delicious shrimp tacos from scratch. We covered fresh ingredients, step-by-step cooking, and tasty toppings. Remember, fresh shrimp and warm tortillas make a big difference. You can customize flavors with spices or different proteins. Enjoy serving them with a refreshing drink on the side. Proper storage will keep your leftovers tasty too. Whether you’re cooking for one or many, these tacos are a hit. Enjoy your cooking and get ready for a yummy meal.](https://goldendishy.com/wp-content/uploads/2025/06/f6806160-83d3-4aa8-a207-34a87a11273f-768x768.webp)
![For this vegan creamy pesto pasta, you will need: - 8 oz whole wheat pasta (spaghetti or fusilli) - 2 cups fresh basil leaves, packed - 1/4 cup pine nuts (or walnuts) - 2 tablespoons nutritional yeast - 3 cloves of garlic, minced - 1/2 cup raw cashews, soaked for 2 hours - 1/4 cup extra virgin olive oil - Juice of 1 fresh lemon - Salt and pepper, to taste - 1 cup cherry tomatoes, halved (for garnish) - Extra fresh basil leaves (for garnish) You can adjust the recipe to your taste. Here are some ideas: - Swap pine nuts for sunflower seeds for a nut-free option. - Add spinach or arugula for more greens. - Include red pepper flakes for spice. - Mix in cooked chickpeas for added protein. To get the best flavor, choose fresh basil that is vibrant and fragrant. Look for basil leaves without any yellow or brown spots. For nuts, check that they are fresh and not stale. Store nuts in an airtight container to keep them crunchy. If you can, buy from local sources to get the best quality. For a great flavor, toast the nuts lightly before using them in the pesto. This will bring out their natural oils and enhance the taste. You can find the full recipe in the earlier section. Enjoy your cooking! To start, fill a large pot with water. Add a good amount of salt to the water. Bring the water to a rolling boil over high heat. Once it boils, add 8 oz of whole wheat pasta. Cook the pasta according to the package instructions. It usually takes 8-10 minutes to become al dente. Before draining, reserve 1/2 cup of the starchy pasta water. Drain the pasta in a colander and set it aside. Next, grab a high-speed blender or food processor. Add 2 cups of fresh basil leaves, packed. Then, add 1/4 cup of pine nuts, or walnuts if you prefer. Toss in 2 tablespoons of nutritional yeast for a cheesy flavor. Add 3 cloves of minced garlic and 1/2 cup of soaked raw cashews. Pour in 1/4 cup of extra virgin olive oil and the juice of 1 lemon. Season with salt and pepper. Blend on high until smooth and creamy. If the pesto is too thick, add the reserved pasta water slowly until you reach the right texture. Now, return the drained pasta to the pot over low heat. Pour the creamy pesto sauce over the pasta. Gently toss the pasta in the sauce until all the strands are coated. If the pesto is still thick, stir in more reserved pasta water, 1 tablespoon at a time. Taste the pasta and adjust the seasoning as you like. You can add more salt, pepper, or lemon juice for a brighter flavor. To serve, divide the creamy pesto pasta into bowls. Top with halved cherry tomatoes for color and extra fresh basil leaves for garnish. Enjoy your delicious vegan creamy pesto pasta! For the full recipe, check back to the ingredients section. To make your vegan creamy pesto pasta smooth, you need the right balance. Soak the cashews for at least two hours. This softens them, making it easy to blend. When you blend, start with only a little water. You can add more later if needed. This helps you control the creaminess. If your pesto feels thick, just add the reserved pasta water slowly. This way, you can keep the right texture without losing flavor. One mistake is not seasoning enough. Always taste your pesto before serving. If it lacks flavor, add more salt, pepper, or lemon juice. Another common error is overcooking the pasta. Make sure to check the package time and cook until al dente. This way, the pasta stays firm and absorbs the sauce better. Lastly, don’t skip the nutritional yeast. It gives the dish a cheesy flavor that enhances the whole meal. To boost the taste of your vegan creamy pesto pasta, try adding fresh lemon zest. It brightens the dish and adds freshness. You can also mix in roasted cherry tomatoes or sautéed veggies. They add texture and extra flavor. If you want some heat, sprinkle in red pepper flakes for a spicy kick. Experiment with herbs too! Fresh parsley or arugula can create new flavor layers. For the full recipe, check out the detailed instructions above. {{image_4}} You can easily swap different pasta types in this recipe. Whole wheat pasta gives a nutty taste. However, you can use any pasta you like. Spaghetti and fusilli are great choices for this vegan creamy pesto. You may also try penne, farfalle, or even zoodles (zucchini noodles) for a fun twist. For a protein boost, add chickpeas or tofu. Chickpeas add a lovely texture and flavor. Just rinse and drain a can of chickpeas, then toss them in with the pasta and pesto. Tofu is another great option. Use firm tofu, cut it into cubes, and pan-fry until golden. Stir it into the pasta for a filling meal. If gluten-free is your goal, choose gluten-free pasta. Many brands offer options made from rice or quinoa. These pastas cook well and taste great in this dish. You can also use lentil pasta for an extra protein kick. Just follow the cooking instructions on the package for the best results. For the complete recipe, check out the [Full Recipe]. After enjoying your vegan creamy pesto pasta, store leftovers in an airtight container. Let the pasta cool down before sealing. This keeps the flavor fresh. In the fridge, it lasts up to three days. If you want to keep it longer, consider freezing. When reheating, use a skillet over low heat. Add a splash of water or vegetable broth to keep it moist. Stir gently until warm. You can also use the microwave, but cover the dish to avoid drying out the pasta. Heat in short bursts and stir in between. To freeze homemade pesto, scoop the sauce into ice cube trays. This way, you can take out just what you need later. Once frozen, pop the cubes into a zip-top bag and store in the freezer for up to three months. When ready to use, thaw in the fridge or add directly to hot pasta. This method keeps the flavor vibrant and fresh. Yes, you can make this recipe nut-free. Instead of cashews, use silken tofu. It gives a creamy texture without nuts. You can also skip the pine nuts or use seeds like sunflower seeds. They add a nice crunch and flavor. I recommend whole wheat pasta for this dish. Spaghetti and fusilli are great choices. They hold the creamy pesto well. You can also try gluten-free pasta if needed. Just cook it according to the package instructions for the best results. The creamy pesto sauce lasts 3 to 5 days in the fridge. Store it in an airtight container. If you see any browning, just stir it before using. You can also freeze it for up to 3 months. Just thaw it in the fridge before using. For the full recipe, check the earlier section. This blog post covered how to create a creamy pesto dish. We discussed key ingredients, cooking pasta, and making the sauce. I shared tips for texture and flavor, and we explored variations like using different pasta or adding protein. Finally, I offered advice on storing your leftovers. Keep these ideas in mind for a tasty meal any day. Enjoy your cooking and have fun with your flavors!](https://goldendishy.com/wp-content/uploads/2025/07/fd183fbf-2652-43f5-b73c-64ca9eb8edeb-768x768.webp)


