
Are you ready to impress your family or friends with a delicious meal? In this post, I’ll guide you through making creamy garlic pasta—a dish that’s both rich and simple. You’ll learn about the essential ingredients you need, step-by-step instructions to achieve the perfect sauce, and tips on how to make it your own. Get ready to savor a new favorite!
Ingredients
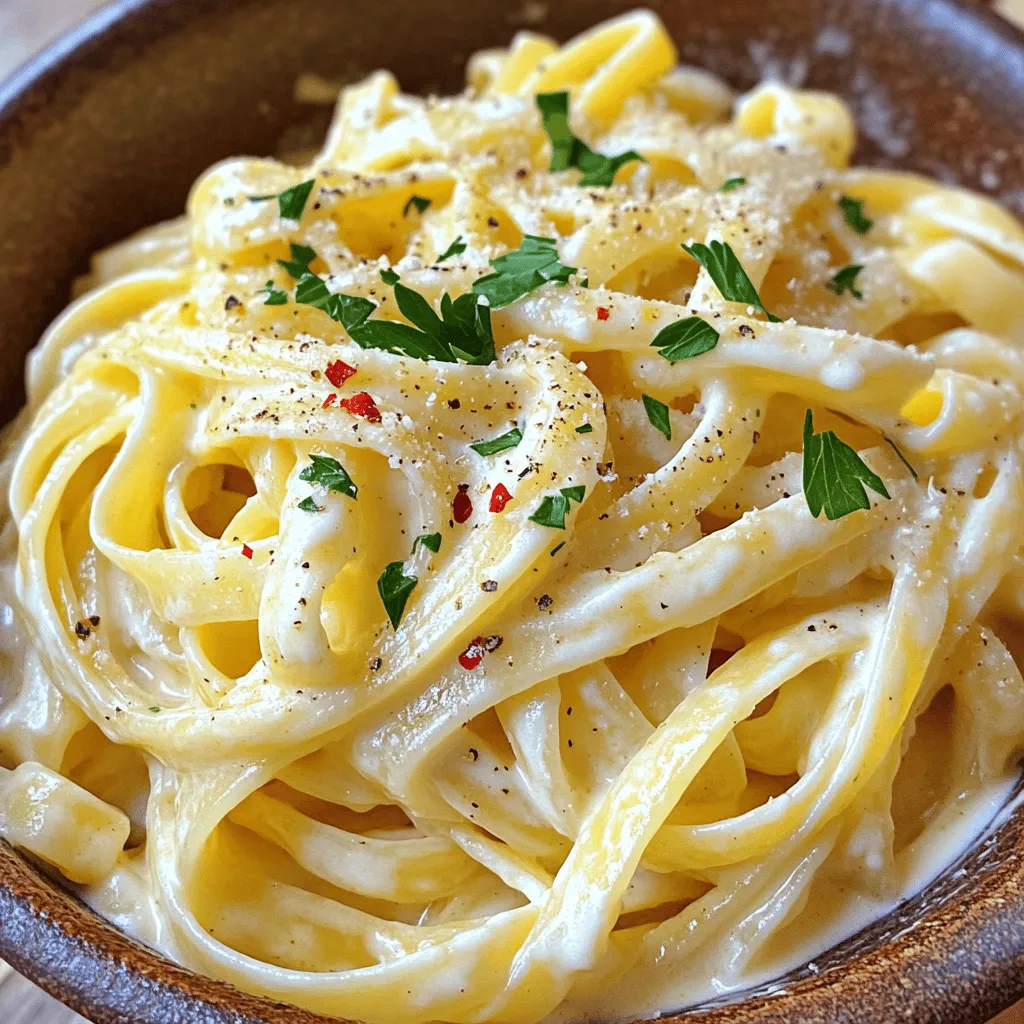
Essential Ingredients for Creamy Garlic Pasta
To make creamy garlic pasta, you need these key ingredients:
– 300g fettuccine pasta
– 4 tablespoons extra virgin olive oil
– 6 cloves of garlic, finely minced
– 1 cup heavy cream
– 1/2 cup freshly grated Parmesan cheese
– 1/2 teaspoon red pepper flakes (optional, for spice)
– Salt and freshly cracked black pepper, to taste
– Fresh parsley, finely chopped (for garnish)
Each ingredient adds its own magic to the dish. The fettuccine provides a hearty base. Garlic gives it a rich and sharp flavor. The heavy cream brings creaminess, while the Parmesan adds a savory depth.
Optional Ingredients
You can spice things up with optional ingredients. Adding red pepper flakes gives the dish a nice kick. If you like more heat, you can adjust the amount to your taste. You might also consider adding a squeeze of lemon. It brightens the flavors and adds a fresh twist.
Ingredient Substitutions
Sometimes, you may need to swap ingredients. If you have gluten allergies, use gluten-free pasta. You can also replace heavy cream with coconut cream for a dairy-free version. For a lighter option, try using half-and-half instead of heavy cream. This keeps the dish creamy but cuts some calories.
Step-by-Step Instructions
Cooking the Pasta
To cook the fettuccine, start with a large pot. Fill it with water and bring it to a boil. Add a good amount of salt to the water. This helps flavor the pasta. Once boiling, add 300g of fettuccine. Cook it according to the package instructions until it is al dente. This means it should be tender but still firm to the bite. Remember to save about 1/2 cup of the pasta water before draining the pasta in a colander. This water will help thicken your sauce later.
Preparing the Creamy Garlic Sauce
For the sauce, grab a large skillet and heat 4 tablespoons of extra virgin olive oil over medium heat. Once the oil is hot, add 6 finely minced garlic cloves. Sauté the garlic for 1-2 minutes. You want it fragrant and light golden, so stir it constantly. Be careful not to burn the garlic. Then, reduce the heat to medium-low. Carefully pour in 1 cup of heavy cream. Stir well to mix it with the oil and garlic. Let the sauce simmer for about 2-3 minutes to thicken slightly. Next, gradually add 1/2 cup of freshly grated Parmesan cheese. Keep stirring until it melts and the sauce is creamy. If it feels too thick, add a bit of the reserved pasta water.
Combining Pasta and Sauce
Once your sauce is ready, add the drained fettuccine into the skillet. Toss the pasta with the creamy garlic sauce. Make sure every strand is well-coated. This step is key for flavor. Heat the pasta through, then it is ready to serve. For a finishing touch, sprinkle freshly chopped parsley on top. You can also add more Parmesan cheese if you love that cheesy goodness. Enjoy your beautiful dish!
Tips & Tricks
Common Mistakes to Avoid
To make creamy garlic pasta, avoid overcooking the fettuccine. Cook it al dente, so it stays firm. If you skip saving pasta water, your sauce might turn thick. This water helps adjust the sauce’s texture. Keep an eye on the garlic while cooking. It can burn quickly and turn bitter. Lastly, do not rush when mixing the pasta with the sauce. Toss it gently to coat every strand.
Enhancing Flavor
To boost the flavor, think about adding fresh herbs. Basil or thyme can make a big difference. A sprinkle of lemon zest brightens up the dish, too. You might also try a pinch of nutmeg for warmth. If you like heat, extra red pepper flakes work wonders. These small changes elevate your creamy garlic pasta to new heights.
Serving Suggestions
Pair this dish with a simple green salad for freshness. A side of garlic bread complements the flavors well. For wine, choose a crisp white, like Pinot Grigio. This wine balances the creaminess of the pasta. If you want to impress, serve your pasta in big, shallow bowls. Add a touch of parsley on top for color. Enjoy your creamy garlic pasta with these delightful sides!
Variations
Protein Additions
You can boost your creamy garlic pasta with protein. Chicken, shrimp, or tofu work great. For chicken, use grilled or sautéed pieces. Cook them separately and mix them in at the end. For shrimp, sauté them in the garlic oil before adding the cream. They cook fast and add a nice flavor. Tofu is a great plant-based option. Cube it and sauté until crispy. Then, add it to the sauce for a satisfying meal.
Vegetable Options
Adding vegetables can make your dish even better. Spinach is a great choice. It wilts quickly and adds color. Just toss it in when you mix the pasta and sauce. Mushrooms add a nice earthy flavor. Sauté sliced mushrooms in the oil before the garlic. Zucchini or broccoli can also work well. Just ensure they are cooked to your liking before mixing them in.
Dietary Adaptations
You can easily make this dish vegan or dairy-free. For a vegan version, swap heavy cream for coconut milk or cashew cream. Nutritional yeast can replace Parmesan cheese for that cheesy flavor. If you want to keep it dairy-free but still creamy, use almond milk mixed with a thickener like cornstarch. These changes keep the dish rich and delicious while meeting your dietary needs.
Storage Info
Storing Leftovers
To keep your creamy garlic pasta fresh, store it in an airtight container. Let it cool to room temperature first. Then, place it in the fridge. It should last for about three days. Avoid adding extra sauce when storing. This helps keep the pasta from getting too soggy.
Reheating Tips
When you’re ready to enjoy your leftovers, reheat them gently. You can use a skillet on low heat. Add a splash of water or extra cream to help it warm up. Stir often to keep the pasta from sticking. This way, you maintain the creamy texture and flavor.
Freezing Instructions
If you want to freeze portions, it’s easy. First, let the pasta cool completely. Then, divide it into smaller portions in freezer-safe bags or containers. Remember to remove as much air as possible. This prevents freezer burn. To thaw, place it in the fridge overnight. When ready, reheat it in a skillet with a bit of liquid to bring it back to life.
FAQs
How can I make creamy garlic pasta ahead of time?
You can easily prepare creamy garlic pasta in advance. Cook the pasta and make the sauce separately. Store each in airtight containers in the fridge. When ready to serve, just reheat them. Heat the sauce gently in a pan and add the pasta. If it seems dry, add a bit of reserved pasta water to get the right texture. This method keeps your dish fresh and tasty.
Can I use a different type of pasta?
Yes, you can use many types of pasta. While fettuccine is classic, you can try penne, spaghetti, or even gluten-free options. Each type offers a unique bite. Just make sure to adjust the cooking time according to the pasta you choose. This recipe adapts well, so feel free to experiment with your favorite shapes.
What can I serve with creamy garlic pasta?
Creamy garlic pasta pairs well with various sides. A fresh green salad adds a nice crunch. Garlic bread is also a great choice, soaking up the creamy sauce. For a heartier meal, roasted vegetables or grilled chicken can complement the dish. You can mix and match based on your taste and mood.
This blog post covered everything you need for creamy garlic pasta. We looked at key ingredients like fettuccine and garlic. You learned how to cook pasta, make the sauce, and combine them. We shared tips to avoid common mistakes and enhance flavors. Variations let you add protein or veggies.
Finally, we discussed food storage and reheating methods. With all this info, you can cook a delicious creamy garlic pasta dish. Enjoy your meal and impress your friends!


