Creamy Cauliflower Alfredo Simple and Tasty Recipe

Are you craving a creamy, rich pasta dish that won’t weigh you down? My Creamy Cauliflower Alfredo recipe is not just tasty; it’s a healthier twist on a classic favorite. With wholesome ingredients, you can whip up this dish quickly. Whether you’re cooking for family or impressing friends, this recipe will satisfy your hunger and your taste buds. Let’s dive into the delightful world of cauliflower alfredo!
Why I Love This Recipe
- Healthy Alternative: This recipe offers a nutritious twist on traditional Alfredo sauce by using cauliflower, making it lower in calories and rich in vitamins.
- Dairy-Free Delight: Perfect for those avoiding dairy, this creamy sauce delivers a satisfying texture without any dairy ingredients.
- Quick and Easy: With a total prep time of just 30 minutes, this dish is ideal for busy weeknights while still being gourmet enough for special occasions.
- Customizable Flavor: You can easily adjust the seasonings and add extras like vegetables or proteins, making it versatile for your taste preferences.
Ingredients
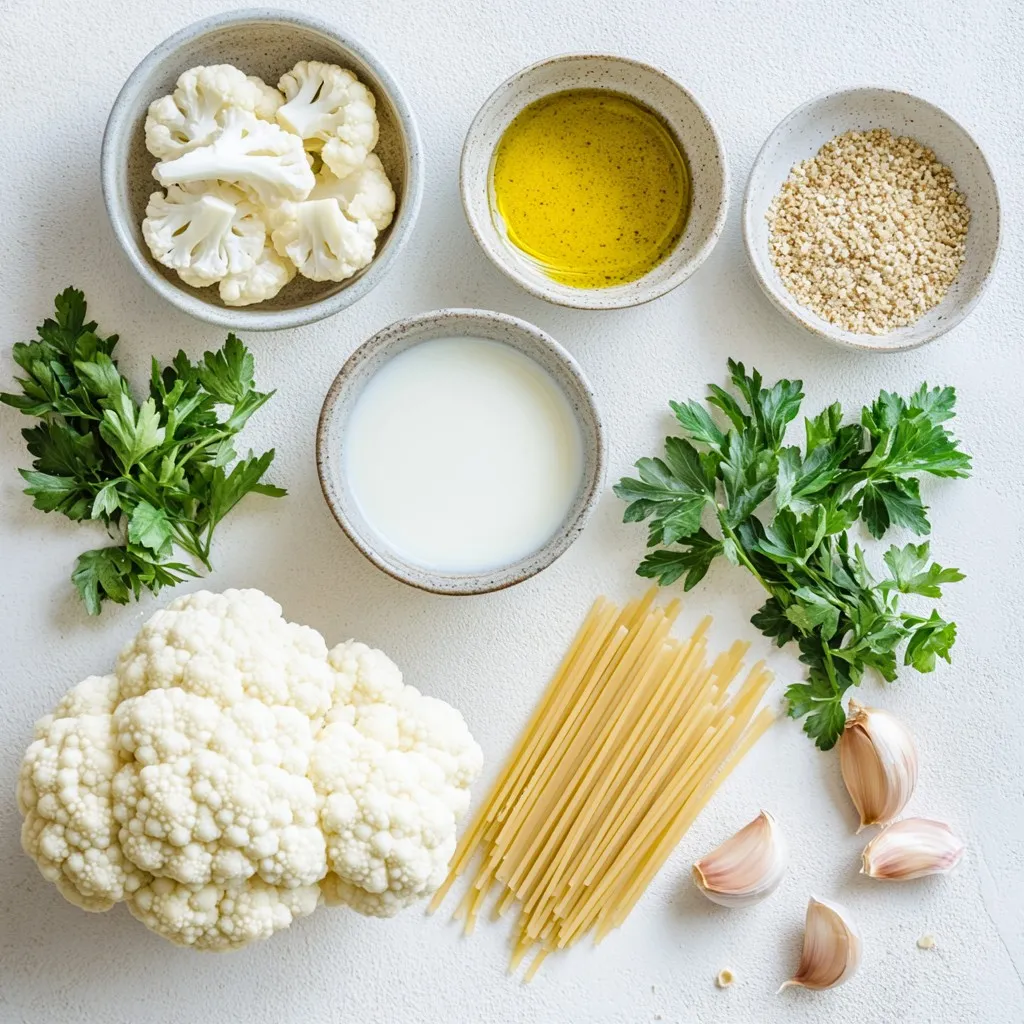
Main Ingredients for Creamy Cauliflower Alfredo
– 1 medium head of cauliflower, chopped into bite-sized florets
– 2 cups vegetable broth
– 1 cup unsweetened almond milk (or any preferred plant-based milk)
– 2 tablespoons nutritional yeast (adds a cheesy flavor)
– 3 cloves garlic, minced
– 1 tablespoon extra virgin olive oil
– Salt and freshly ground black pepper to taste
– 1/4 teaspoon ground nutmeg (optional, but recommended for warmth)
– 3/4 cup whole wheat pasta (or your favorite pasta type)
– Fresh parsley, finely chopped, for garnish
Optional Ingredients to Enhance Flavor
You can add more depth to your dish with these options:
– Red pepper flakes for heat
– Lemon juice for brightness
– Fresh basil for a herby touch
– Grated vegan parmesan for extra creaminess
Nutritional Information
Each serving of Creamy Cauliflower Alfredo provides:
– Calories: About 350
– Protein: 10 grams
– Carbohydrates: 50 grams
– Fat: 12 grams
– Fiber: 8 grams
This dish is low in calories and high in fiber. It’s a great choice for a healthy meal!

Step-by-Step Instructions
Preparation of Cauliflower
Start by bringing vegetable broth to a boil in a large pot. Add the chopped cauliflower florets. Cook them for about 10 minutes. They should be tender and easy to pierce with a fork. Once done, drain the cauliflower but keep some broth for later.
Cooking the Pasta
While the cauliflower cooks, fill another pot with salted water. Bring it to a boil, then add your pasta. Cook it according to the package directions until it’s al dente. When finished, drain the pasta and set it aside in a large mixing bowl.
Making the Alfredo Sauce
In a sauté pan, heat extra virgin olive oil over medium heat. Once hot, add minced garlic and cook for 1-2 minutes. You want it fragrant but not brown. Next, in a high-speed blender, combine the cooked cauliflower, sautéed garlic, almond milk, nutritional yeast, salt, pepper, and nutmeg. Blend until smooth and creamy. If the sauce is too thick, add a bit of the reserved broth. Pour the creamy sauce over the pasta and toss gently to coat. Serve immediately, garnished with chopped parsley for a fresh touch.
Tips & Tricks
How to Achieve the Perfect Creamy Texture
To get a smooth and creamy sauce, blend the cauliflower well. Use a high-speed blender for the best results. If the texture seems thick, add a bit of the reserved broth. This will help achieve the right consistency. The sauce should coat the pasta nicely, not be too runny.
Substitutions for Allergies or Dietary Preferences
You can easily change the recipe for different diets. If you need a nut-free option, use oat milk or soy milk instead of almond milk. For gluten-free pasta, choose a gluten-free variety. You can also substitute nutritional yeast with a dairy-free cheese alternative. Always check labels to avoid allergens.
Serving Suggestions and Pairings
This creamy cauliflower Alfredo pairs well with many sides. Serve it with a fresh green salad to add crunch. You can also add roasted vegetables for extra flavor and color. For a protein boost, sprinkle some grilled chicken or chickpeas on top. Finish with fresh parsley for a pop of color and taste.
Pro Tips
- Choose Fresh Cauliflower: For the best flavor and texture, select a cauliflower head that is firm and free of brown spots.
- Adjust Creaminess: If you prefer a thicker sauce, reduce the amount of almond milk or add more cauliflower to the blender.
- Enhance Flavor: Experiment with additional spices like garlic powder or Italian herbs to customize the flavor of your sauce.
- Perfect Pasta Cooking: Make sure to cook your pasta just al dente, as it will absorb some sauce and continue to soften after mixing.

Variations
Adding Protein to Your Dish
You can easily add protein to your creamy cauliflower Alfredo. Grilled chicken or shrimp work well. For a plant-based option, try chickpeas or lentils. Simply stir them in after mixing the sauce with pasta. This adds flavor and makes the dish more filling.
Flavor Variations
To change the flavor, try adding herbs or spices. Fresh basil or thyme adds a nice touch. You can also add a pinch of red pepper flakes for heat. If you want a smoky flavor, try adding smoked paprika. These small changes can make your dish unique and exciting.
Creamy Alfredo with Other Vegetables
You can mix in other veggies too. Spinach, broccoli, or peas blend well with the sauce. Just steam or sauté them before adding. This boosts nutrition and adds color to your plate. You can even try roasted red peppers for sweetness. These variations keep your meals fresh and fun.
Storage Info
Best Ways to Store Leftovers
To keep your Creamy Cauliflower Alfredo fresh, store it in an airtight container. Place it in the fridge. Enjoy your leftovers within three days for the best taste and quality. If you want to save time, you can portion it out. This way, you grab a serving anytime you want.
Reheating Tips for Maintaining Texture
When reheating, use a skillet over low heat. Add a splash of almond milk or water. This helps keep the sauce creamy. Stir gently to combine. Avoid using high heat, as it can dry out the sauce. You can also microwave it in short bursts. Stir in between to heat evenly.
Freezing Instructions and Duration
You can freeze Creamy Cauliflower Alfredo for up to two months. Use a freezer-safe container. Leave some space at the top, as the sauce may expand. To thaw, place it in the fridge overnight. Reheat gently as mentioned above. The texture may change slightly, but it will still taste great.
FAQs
Can I use regular milk instead of almond milk?
Yes, you can use regular milk. It will change the flavor slightly. Almond milk keeps it dairy-free. If you are okay with dairy, whole milk or cream work too.
How can I make the sauce thicker?
To thicken the sauce, add more cauliflower. Blend in extra cooked cauliflower for a creamy texture. You can also add a little cornstarch mixed with water. This will help to thicken the sauce quickly.
What’s a good pasta alternative?
Good alternatives include zucchini noodles or spaghetti squash. They add flavor and reduce carbs. Whole wheat pasta is great for more fiber. Gluten-free pasta is also an option if needed.
This blog post explored making a creamy cauliflower Alfredo. We discussed main and optional ingredients to enhance flavor. I shared step-by-step instructions for preparation, cooking, and sauce-making. Tips helped achieve the perfect creaminess, with ideas for substitutions and pairings. Variations can boost protein and flavor. I also provided storage info and answers to common FAQs.
Embrace these methods to enjoy a healthier twist on a classic dis

Creamy Cauliflower Alfredo
Ingredients
- 1 medium head cauliflower, chopped into bite-sized florets
- 2 cups vegetable broth
- 1 cup unsweetened almond milk
- 2 tablespoons nutritional yeast
- 3 cloves garlic, minced
- 1 tablespoon extra virgin olive oil
- to taste Salt and freshly ground black pepper
- 1/4 teaspoon ground nutmeg
- 3.4 cups whole wheat pasta
- for garnish Fresh parsley, finely chopped
Instructions
- In a large pot, bring the vegetable broth to a rolling boil over medium-high heat. Add the cauliflower florets and cook until they are tender and easily pierced with a fork, about 10 minutes.
- While the cauliflower is cooking, bring a separate pot of salted water to a boil. Add the whole wheat pasta and cook according to the package directions until al dente. Drain the pasta and set it aside in a large mixing bowl.
- In a sauté pan, heat the extra virgin olive oil over medium heat. Once hot, add the minced garlic and sauté for 1-2 minutes until it becomes fragrant but not browned.
- Once the cauliflower is tender, carefully drain it, reserving about 1/2 cup of the cooking broth. In a high-speed blender, combine the cooked cauliflower, sautéed garlic, almond milk, nutritional yeast, salt, pepper, and nutmeg. Blend on high until the mixture is completely smooth and creamy, adjusting the consistency with a little of the reserved broth if necessary.
- Pour the creamy cauliflower sauce over the cooked pasta in the large mixing bowl. Toss gently to ensure every strand of pasta is coated in the luscious sauce, adjusting seasoning as needed.
- Serve the creamy pasta immediately, garnished with a generous sprinkle of fresh chopped parsley for color and flavor.


![To make your Fajita Veggie Sheet Pan, gather these simple and fresh ingredients: - Bell peppers (red, yellow, or green) - Zucchini - Red onion - Cherry tomatoes - Black beans - Olive oil - Spices and seasonings (chili powder, cumin, garlic powder, salt, pepper) - Fresh cilantro for garnish - Lime wedges for serving - Tortillas (corn or flour) These ingredients create a colorful and tasty dish. Using fresh veggies adds great flavor and texture. The spices make everything pop! You can adjust the veggies based on what you have or prefer. For example, you might try adding corn or mushrooms. Each change can lead to a new twist on this tasty recipe. This Fajita Veggie Sheet Pan really shows how simple ingredients can shine together. When you gather these items, you set the stage for a fun cooking adventure. Check out the Full Recipe for complete details on how to bring this delicious dish to life. 1. First, preheat your oven to 425°F (220°C). This helps the veggies cook just right. 2. Next, line a large sheet pan with parchment paper. This makes cleanup easy. 3. In a big mixing bowl, combine the sliced bell pepper, zucchini rounds, red onion wedges, halved cherry tomatoes, and rinsed black beans. 4. Drizzle 3 tablespoons of olive oil over the mixture. It helps the flavors blend. 5. Now, add 2 teaspoons of chili powder, 1 teaspoon of ground cumin, and 1 teaspoon of garlic powder. Don't forget a pinch of salt and black pepper. 6. Toss everything gently until each piece is well-coated with oil and spices. 1. Spread the veggie and bean mixture evenly on the prepared sheet pan. Make sure they are not crowded. 2. Place the pan in the preheated oven and roast for 20-25 minutes. Stir halfway through for even cooking. 3. The veggies should be tender and have slightly caramelized edges when done. 1. To warm the tortillas, you can use a skillet or microwave. Just a minute or two will do. 2. Fill each warm tortilla with the roasted fajita veggies. 3. Top with fresh cilantro and a drizzle of lime juice for extra flavor. 4. Serve the filled tortillas on a platter, garnished with lime wedges and extra cilantro for a beautiful display. For the complete recipe, check out the [Full Recipe]. To get the best from your fajita veggies, even cooking is key. Spread the veggies in a single layer on the sheet pan. This helps them roast well. Stir them halfway through cooking. This way, they brown nicely on all sides. Each oven runs a bit differently. You may need to adjust the cooking time. Keep an eye on the veggies. They should be tender and slightly charred. Want to kick up the flavor? Add more spices! A pinch of smoked paprika or cayenne pepper can work wonders. Fresh herbs like oregano or thyme also add depth. Don’t forget lime juice! A squeeze right before serving makes the dish pop. It gives a fresh, zesty flavor that brightens everything up. When serving, arrange the filled tortillas on a pretty platter. It makes the meal more inviting. Garnish with lime wedges and extra cilantro for color. You can also sprinkle some crumbled cheese on top. This adds a nice touch and looks great. A vibrant display makes your Fajita Veggie Sheet Pan Delight even more appetizing. {{image_4}} You can swap out veggies to suit your taste. Try adding mushrooms or sweet potatoes. Seasonal choices like asparagus or butternut squash work well, too. Think of what’s fresh at your local market. Broccoli and cauliflower also add great texture. Mix and match for a colorful plate. Want to make this dish heartier? Tofu or tempeh are great choices. Cube them and toss with your veggies. You can also add chickpeas for extra protein. They blend well with the spices. If you eat meat, grilled chicken or shrimp can elevate this dish. Just season them like your veggies for a tasty mix. Experimenting with spices can change your dish. For a mild flavor, stick with cumin and garlic. If you like heat, add cayenne or smoked paprika. Try a taco seasoning mix for a new twist. You could even toss in fresh herbs like cilantro or oregano. This will keep your fajita veggie sheet pan exciting each time! To keep your fajita veggies fresh, store them in an airtight container. Place the container in the fridge. This way, your flavors stay bright. Use leftover veggies within three to four days for best taste. For reheating, the oven is your best friend. Preheat it to 350°F (175°C). Spread the veggies on a baking sheet and heat for about 10 minutes. This restores texture and taste. You can also use the microwave, but the oven keeps them crisp. If you have extras, try adding them to a salad or a quesadilla for a tasty twist. To freeze the fajita veggie mix, let it cool first. Then, transfer it to a freezer-safe bag. Remove as much air as you can before sealing. This helps prevent freezer burn. When ready to use, move it to the fridge overnight to thaw. Reheat as mentioned above, and enjoy! It takes about 10 minutes to prep. Roasting in the oven takes 20-25 minutes. Altogether, you can enjoy this dish in about 30-35 minutes. Yes, you can easily swap veggies. Try adding mushrooms, asparagus, or even corn. Just make sure they cut evenly for even cooking. Absolutely! This dish is great for meal prep. You can store it in the fridge for up to four days. Just reheat portions as needed. Corn or flour tortillas are both great options. Corn tortillas give a nice crunch, while flour tortillas are soft and chewy. To spice things up, add more chili powder. You can also include fresh jalapeños or a splash of hot sauce. Experiment with heat to find your perfect level. You can prepare the veggies and seasoning ahead. Just store them in the fridge. When ready, roast them for a quick, fresh meal. For the full recipe, check out the details in the main article! This blog post covered how to make delicious fajita veggies on a sheet pan. We talked about the ingredients, preparation steps, and tips for perfect roasting. You learned about storing leftovers and customizing the recipe to fit your taste. In summary, this dish is both fun and easy to prepare. You can explore different veggies and spices, making it your own. Enjoy this tasty meal with friends or family, and remember, cooking should always bring joy!](https://goldendishy.com/wp-content/uploads/2025/07/261fee1c-f0d4-4ba8-a84d-53625610978f-768x768.webp)