
Looking for a tasty treat that’s easy to make? You’ve found it! These cranberry orange scones blend sweet and tart flavors in one delicious bite. They are perfect for breakfast, brunch, or a cozy afternoon snack. Follow my simple recipe to impress your family and friends, and enjoy a warm, fresh batch today. Let’s dive into the yummy world of baking scones!
Why I Love This Recipe
- Bright Flavor Combination: The tartness of fresh cranberries paired with the zesty orange creates a refreshing taste that is perfect for any occasion.
- Quick and Easy: This recipe comes together in just 35 minutes, making it a simple yet impressive treat to whip up for guests or a cozy breakfast at home.
- Perfect Texture: The scones are delightfully flaky on the outside and tender on the inside, providing a satisfying bite that is sure to please.
- Versatile Serving Options: These scones can be enjoyed warm with butter, or dressed up with whipped cream for a more indulgent experience.
Ingredients
Complete List of Ingredients
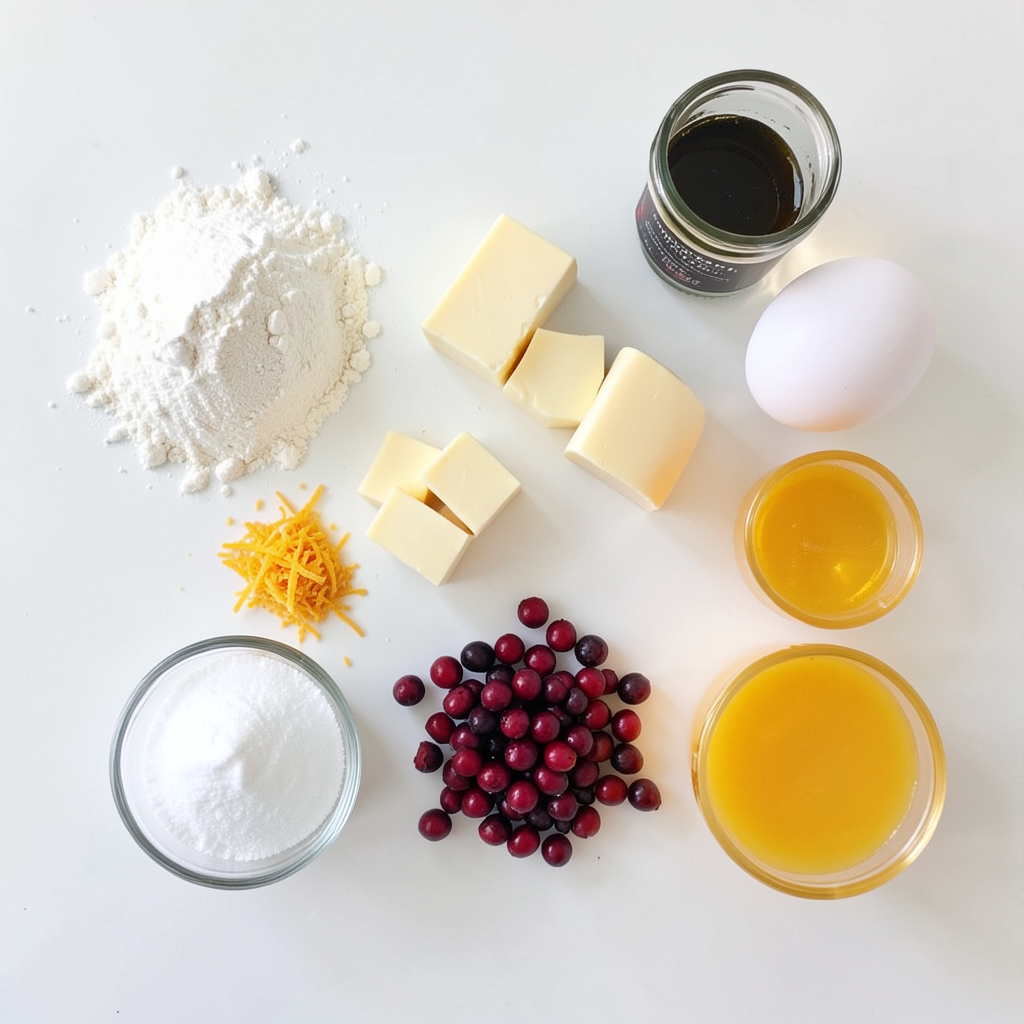
- 2 cups all-purpose flour
- 1/3 cup granulated sugar
- 1 tablespoon baking powder
- 1/2 teaspoon salt
- 1/2 cup unsalted butter, cold and cubed
- 3/4 cup fresh cranberries, chopped
- Zest of 1 orange
- 1/2 cup heavy cream
- 1 large egg
- 1 teaspoon vanilla extract
- 1 tablespoon fresh orange juice
- Optional: Additional granulated sugar for sprinkling on top
Special Ingredient Notes
Using fresh cranberries makes a big difference. They add a tart flavor that balances well with the sweet orange. Dried cranberries can work, but they do not give the same fresh taste. If you use dried cranberries, soak them in warm water for a few minutes to help them plump up.
The orange zest is key for flavor. It adds brightness and a fragrant aroma. Always choose an organic orange when possible. This ensures you are not adding any unwanted chemicals from the skin.
Recommended Brands for Best Results
For flour, I recommend King Arthur Flour. It has a great texture and quality. For butter, use Plugra or any high-fat butter for a rich taste. For heavy cream, organic brands like Horizon or Organic Valley work best. These brands help create a soft and tender scone.
Step-by-Step Instructions
Prepping Your Oven and Baking Sheet
Start by preheating your oven to 400°F (200°C). This helps the scones bake evenly. Next, take a baking sheet and line it with parchment paper. This prevents the scones from sticking.
Making the Dough: Mixing Dry and Wet Ingredients
In a large bowl, combine the following dry ingredients:
- 2 cups all-purpose flour
- 1/3 cup granulated sugar
- 1 tablespoon baking powder
- 1/2 teaspoon salt
Whisk these together until they are well mixed. Take cold, cubed unsalted butter (1/2 cup) and add it to the flour mix. Use your fingers or a pastry cutter to blend it until it looks like coarse crumbs. Now, fold in 3/4 cup of chopped fresh cranberries and the zest of 1 orange. This adds wonderful flavor.
In another bowl, mix:
- 1/2 cup heavy cream
- 1 large egg
- 1 teaspoon vanilla extract
- 1 tablespoon fresh orange juice
Whisk these wet ingredients until smooth. Pour this mixture into the dry ingredients. Stir gently with a spatula until just combined. Don’t worry about lumps; they are fine!
Shaping and Cutting the Scones
Lightly flour your work surface. Turn the dough out onto it. Divide the dough into two equal parts. Shape each part into a round disc about 1 inch thick. Use a sharp knife to cut each disc into six wedges. Place the wedges on your lined baking sheet. Make sure to leave space between them.
Baking Instructions and Timing
If you want a sweet touch, sprinkle a little granulated sugar on top of each scone. Bake in your preheated oven for 18 to 20 minutes. The scones should turn a light golden color on top. Once done, take them out and let them cool on a wire rack. Enjoy these warm or at room temperature.
Tips & Tricks
How to Achieve the Perfect Texture
To get scones that are soft and flaky, you must handle the dough gently. When mixing, stop as soon as the wet and dry ingredients combine. Overmixing can lead to tough scones. Use cold butter and cream to keep the texture light. Make sure your butter is in small cubes. This helps create those lovely flaky layers.
Common Mistakes to Avoid
A common mistake is using warm ingredients. Always use cold butter and cream. This keeps the scones from spreading too much. Another mistake is rolling the dough too thin. Aim for about 1 inch thick. Cutting the scones too small can also lead to dry edges. Keep the wedges larger for a moist center.
Enhancing Flavor
You can mix up the flavor with different citrus fruits. Try lemon or lime for a twist. You can also add zest from these fruits to boost the taste. For a richer flavor, consider adding a dash of almond extract. This gives a nice depth that pairs well with cranberries.
Pro Tips
- Chill Your Ingredients: For the best texture, ensure your butter and cream are cold. This helps create flaky layers in your scones.
- Mix Gently: When combining wet and dry ingredients, mix just until combined. Overmixing can lead to tough scones.
- Use Fresh Ingredients: Opt for fresh cranberries and organic oranges if possible. They enhance the flavor and brightness of the scones.
- Experiment with Add-Ins: Feel free to add nuts or chocolate chips for additional flavor variations. Just keep the total mix-ins to about 1 cup.
Variations
Substituting Ingredients (gluten-free, dairy-free)
You can make these scones gluten-free. Use a 1:1 gluten-free flour blend instead of all-purpose flour. For a dairy-free option, replace the unsalted butter with coconut oil or vegan butter. Use almond milk or oat milk in place of heavy cream. This keeps the scones soft and tasty.
Alternative Add-Ins (nuts, chocolate, other fruits)
Feel free to mix things up! You can add chopped nuts like walnuts or pecans for crunch. Chocolate chips add a sweet touch. You can also substitute the cranberries with dried cherries or blueberries. Each choice brings a fun twist to the classic recipe.
Seasonal Variations (adding spices for the winter, etc.)
In winter, add warm spices like cinnamon or nutmeg. Just a pinch can enhance the flavor. In spring, try fresh herbs like rosemary or thyme for a bright taste. Seasonal changes in fruit can also inspire you. Use peaches in summer or apples in fall for new flavors.
Storage Info
How to Store Leftover Scones
To keep your leftover scones fresh, place them in an airtight container. This helps keep them moist. If you have more than a day’s worth, they can dry out. You can store them at room temperature for up to two days. For longer storage, refrigeration is best, but it may change their texture a bit.
Freezing Instructions
Freezing scones is a great way to save them. To freeze, let the scones cool completely first. Then, wrap each scone in plastic wrap. Place the wrapped scones in a freezer bag or container. They can stay in the freezer for up to three months. When you want one, you can take it out and reheat it.
Best Ways to Reheat Scones
To reheat your scones, preheat your oven to 350°F (175°C). Place the scones on a baking sheet. Heat them for about 10 minutes. This will help restore their warmth and crispness. You can also use a microwave. Heat each scone for 15-20 seconds. However, the oven gives a better texture. Enjoy your scones warm!
FAQs
Can I use frozen cranberries for this recipe?
Yes, you can use frozen cranberries. They work well in scones. Just use them straight from the freezer. Do not thaw them first. This keeps the scones moist and fresh.
What can I do if my scones are too dry?
If your scones turn out too dry, try adding more cream. You can also add a bit of milk to the dough. Add just a tablespoon at a time. Mix gently until the dough feels right.
How do I make scones without baking powder?
You can replace baking powder with baking soda. Use 1/4 teaspoon of baking soda and add 1/2 teaspoon of vinegar. This mix helps the scones rise without baking powder.
Can I prepare the dough ahead of time?
Yes, you can prepare the dough ahead. Cover it tightly in plastic wrap and store it in the fridge. Use it within 24 hours for the best taste. When ready, shape and bake as usual.
This blog post guides you through making delicious scones. It covers the key ingredients, including notes on fresh versus dried options. You learned step-by-step instructions from prepping the oven to shaping the dough, along with tips to perfect your texture and flavor.
You can customize your scones with variations and store them to enjoy later. Follow the FAQs to address common questions. Now you can bake tasty scones with ease, impressing anyone who tries them! Enjoy your baking journey!


