Cozy Roasted Veggie Lasagna Roll-Ups Delightful Dish

If you’re craving comfort food that warms your heart, look no further! My Cozy Roasted Veggie Lasagna Roll-Ups are the perfect dish to enjoy on a chilly evening. Packed with vibrant, roasted vegetables and ooey-gooey cheese, this recipe is simple enough for any home cook. Let’s dive into a world of flavor and discover how to create this delightful meal that will leave everyone asking for seconds!
Ingredients
List of Ingredients
To make your cozy roasted veggie lasagna roll-ups, gather these ingredients:
– 9 lasagna noodles
– 1 medium zucchini, diced
– 1 red bell pepper, diced
– 1 cup mushrooms, sliced
– 1 cup fresh spinach, chopped
– 1 cup ricotta cheese
– 1 cup shredded mozzarella cheese
– 1/2 cup grated Parmesan cheese
– 1 tablespoon olive oil
– 2 cloves garlic, minced
– 1 teaspoon dried oregano
– 1 teaspoon dried basil
– Salt and pepper to taste
– 2 cups marinara sauce
Optional Ingredients for Variation
You can switch things up with these optional ingredients:
– Add eggplant for more flavor.
– Use kale instead of spinach for a different green.
– Try different cheeses like goat cheese or feta.
– Mix in some olives or sun-dried tomatoes for a twist.
Nutritional Information Breakdown
Here’s a quick look at the nutritional breakdown per serving:
– Calories: 400
– Protein: 20g
– Carbohydrates: 45g
– Fat: 18g
– Fiber: 4g
– Sugars: 6g
This dish is rich in vitamins from the veggies and protein from the cheese. Each serving provides a good balance of nutrients. Enjoying this meal also means savoring a tasty blend of flavors while caring for your body!
Step-by-Step Instructions
Preparation of Lasagna Noodles
Start by preheating your oven to 400°F (200°C). In a large pot, fill it with salted water and bring it to a rolling boil. Once boiling, carefully add 9 lasagna noodles. Cook them as per the package instructions until they are al dente. This usually takes about 8 to 10 minutes. After cooking, drain the noodles. Lay them flat on a clean kitchen towel to cool. This helps to prevent them from sticking together.
Roasting the Vegetables
In a big mixing bowl, combine the diced zucchini, red bell pepper, sliced mushrooms, and chopped spinach. Drizzle 1 tablespoon of olive oil over the veggies. Add 2 cloves of minced garlic, 1 teaspoon of dried oregano, 1 teaspoon of dried basil, and a pinch of salt and pepper. Toss everything well so the veggies get coated. Spread this mixture out in a single layer on a baking sheet. Roast in the oven for 20-25 minutes. You want them to be tender and slightly caramelized. Once done, take them out and let them cool for a few minutes.
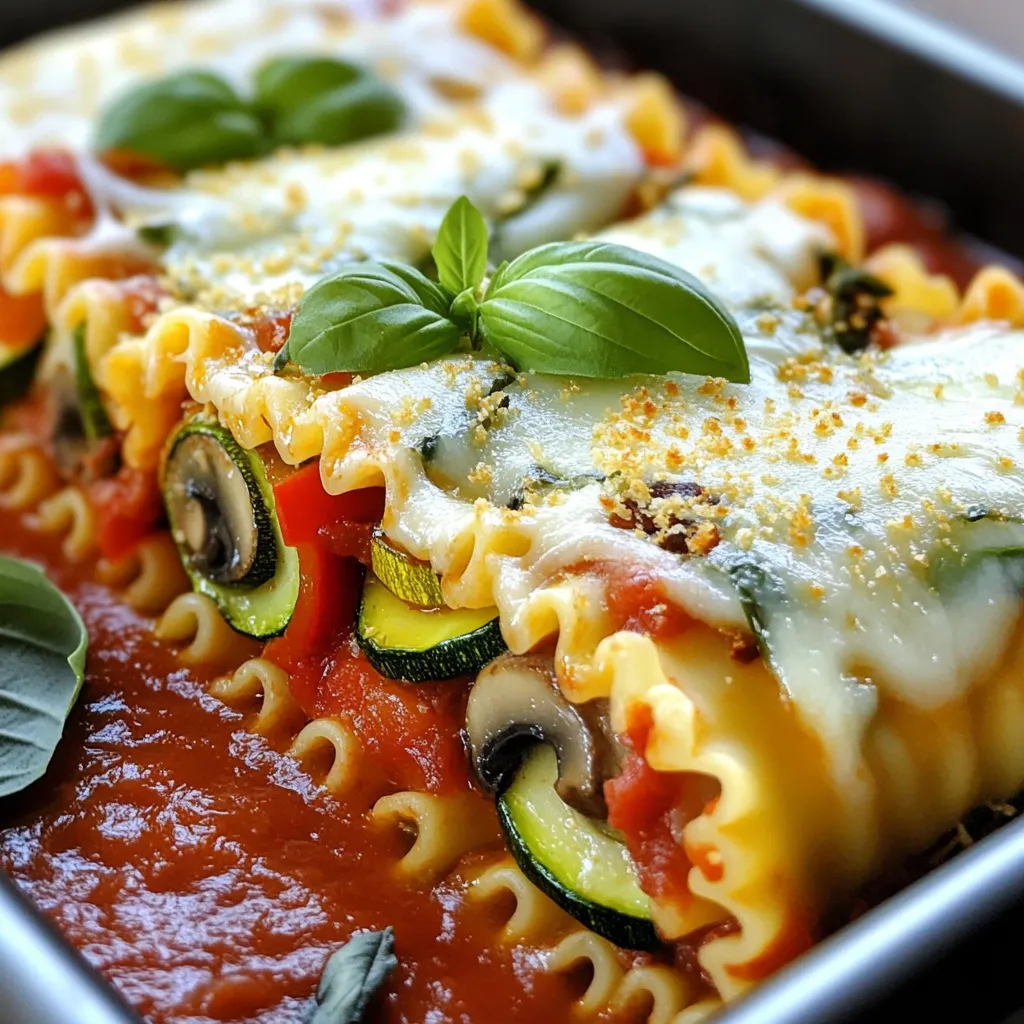
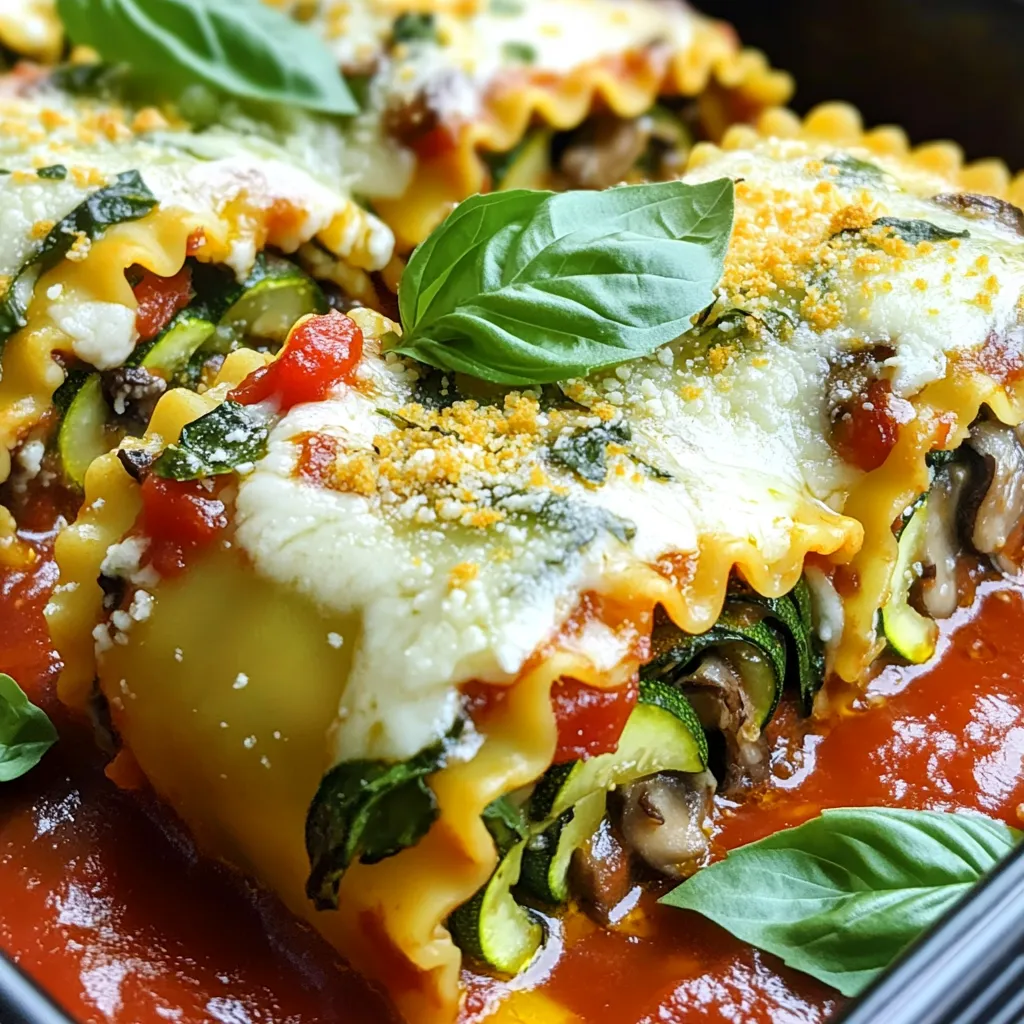
Assembling the Lasagna Roll-Ups
In another bowl, mix 1 cup of ricotta cheese with half of the shredded mozzarella and half of the grated Parmesan cheese. Stir well until they are combined. Now, take one lasagna noodle. Spread a generous layer of the ricotta mix along its length. Then, add a handful of the roasted veggies on top. Carefully roll the noodle from one end to the other. Make sure it’s tightly packed. Place it seam-side down in a baking dish. Repeat this for all the noodles until they are filled and rolled.
Baking Instructions
Once all the lasagna roll-ups are in the baking dish, pour 2 cups of marinara sauce over them. Make sure to cover each roll fully. Sprinkle the remaining mozzarella and Parmesan on top. Cover the dish tightly with aluminum foil and place it in the oven. Bake for 25 minutes, then remove the foil. Continue baking for another 10-15 minutes, or until the cheese is bubbly and golden brown. Let the roll-ups cool for a few minutes before serving. This helps the flavors to settle nicely.
Tips & Tricks
How to Perfectly Roast Vegetables
Roasting vegetables brings out their best flavors. Start by cutting your veggies into even pieces. This helps them cook at the same rate. Use a mix of olive oil, garlic, and dried herbs to coat the veggies. I love using oregano and basil for extra taste. Spread them on a baking sheet in a single layer. This step ensures they roast evenly. Bake at 400°F (200°C) for 20-25 minutes. Watch for a nice golden color and tenderness. Let them cool slightly before adding to your roll-ups.
Storage and Reheating Tips
Store any leftover lasagna roll-ups in an airtight container. They will keep in the fridge for about 3-4 days. For freezing, wrap each roll-up in plastic wrap and place them in a freezer bag. They last for up to three months. To reheat, thaw overnight in the fridge. Then, bake them in a preheated oven at 350°F (175°C) for about 15-20 minutes. Cover with foil to keep them moist.
Serving Suggestions for a Cozy Meal
Serve your lasagna roll-ups on a big, warm plate. Garnish with fresh basil leaves and a sprinkle of Parmesan cheese. This adds a nice touch. For a complete meal, pair them with warm garlic bread and a green salad. A light drizzle of balsamic glaze on the salad adds a tasty twist. Enjoy your cozy meal with family or friends!

Variations
Vegan Options for Roasted Veggie Lasagna Roll-Ups
You can easily make this dish vegan. Instead of ricotta cheese, use tofu. Blend firm tofu with a splash of lemon juice and nutritional yeast. This mix gives a creamy texture. For mozzarella, choose vegan cheese. Use your favorite brand to melt over the top.
Gluten-Free Alternatives
If you need a gluten-free option, use gluten-free lasagna noodles. Many brands now offer these noodles. Check the package for cooking times, as they might differ. You can also use zucchini slices instead of noodles. This adds a fresh twist and keeps it light.
Different Cheeses and Sauces
Experiment with different cheeses to suit your taste. Goat cheese or feta can add a tangy flavor. For a smoky taste, try smoked mozzarella. You can also swap marinara sauce for pesto. This adds a rich, herbal flavor that pairs well with the roasted veggies.
Storage Info
Storing Leftovers
After enjoying your roasted veggie lasagna roll-ups, let them cool. Place any leftovers in an airtight container. This keeps them fresh and tasty. Store the container in the fridge. They will stay good for up to three days. When you want to eat them, just reheat in the oven or microwave.
Freezing for Future Meals
If you want to save some roll-ups for later, freezing works great. Wrap each roll-up in plastic wrap tightly. Then, place them in a freezer-safe bag. This helps avoid freezer burn. You can freeze them for up to three months. When you’re ready to eat, thaw in the fridge overnight. Then, bake them at 350°F until heated through.
How Long Will They Last?
In the fridge, these roll-ups last about three days. If you freeze them, they last for up to three months. Just remember to check for signs of spoilage before eating. If they smell off or look strange, it’s best to toss them out. Enjoy your cozy meals without worry!
FAQs
Can I use fresh vegetables instead of roasted?
Yes, you can use fresh vegetables. Fresh veggies will not have the same sweet flavor. To boost flavor, sauté them with olive oil and seasonings. This will help them soften and bring out their taste. Roasting adds a nice caramelization that fresh veggies miss. If you like a crunch, use fresh without cooking.
How can I make this recipe spicier?
To add spice, mix in red pepper flakes. You can also use spicy marinara sauce. Adding diced jalapeños to the veggie mix works well too. Choose peppers that fit your heat level. Don’t forget to taste as you go to find your perfect balance.
What can I substitute for ricotta cheese?
If you want a substitute, try cottage cheese. It has a similar texture but a different taste. You can also blend tofu with a bit of lemon juice for a vegan option. Cream cheese works too, but it will change the flavor. Choose what fits your taste or dietary needs.
Can I prepare this dish ahead of time?
Absolutely! You can make the roll-ups and store them in the fridge. Just cover them tightly. You can also freeze them for later. If you freeze, be sure to bake them when ready. Just add extra time to the baking if frozen. Preparing ahead saves time on busy days.
This blog shared how to make delicious roasted veggie lasagna roll-ups. You learned about key ingredients, step-by-step instructions, and helpful tips. We also discussed tasty variations and ways to store your leftovers.
These roll-ups are great for cozy meals and can fit many diets. Enjoy making this dish your own, and share it with friends and family. Happy cooking!


![- 2 medium sweet potatoes, peeled and cut into ½-inch cubes - 1 can (15 oz) black beans, drained and thoroughly rinsed - 1 can (14 oz) diced tomatoes, including their juices - 1 medium onion, finely chopped - 2 cloves garlic, minced - 1 red bell pepper, diced - 2 tablespoons olive oil - 2 tablespoons chili powder - 1 teaspoon ground cumin - ½ teaspoon smoked paprika - 1 cup vegetable broth - Salt and pepper, to taste To make my sweet potato and black bean chili pop with flavor, I focus on fresh ingredients. The sweet potatoes provide a creamy texture and a hint of sweetness. I use black beans for protein and fiber, which makes this dish filling. The diced tomatoes add acidity and moisture, balancing the flavors. Aromatics like onion, garlic, and red bell pepper create a fragrant base. Olive oil helps to sauté these ingredients, unlocking their full taste. I season the chili with chili powder, cumin, and smoked paprika. These spices bring warmth and depth to the dish. Vegetable broth adds richness, making the chili hearty and satisfying. Don’t forget to season with salt and pepper to taste; this step enhances every bite. - Fresh cilantro - Avocado slices For extra flavor, I love to add fresh cilantro on top. It gives the chili a fresh kick. Avocado slices add a creamy touch, making each bowl even more delicious. The chili is packed with nutrients. One serving has about 300 calories. It offers a good mix of proteins, carbs, and healthy fats. Each ingredient brings its own health benefits: - Sweet Potatoes: High in vitamins A and C, they support your immune system. - Black Beans: Rich in fiber, they aid digestion and keep you full. - Diced Tomatoes: Loaded with antioxidants, they help fight inflammation. - Aromatics: Onions and garlic have heart health benefits. - Olive Oil: Contains healthy fats that support brain health. Enjoying this chili not only warms your belly but also fuels your body with great nutrition. For the full recipe, you can check out my Sweet Potato and Black Bean Chili. How to Prepare and Cut Sweet Potatoes To start, grab two medium sweet potatoes. Use a peeler to remove the skin. Cut them into ½-inch cubes. This size helps them cook evenly. Place the cubes in a bowl of water to prevent browning. Tips for Cooking Aromatics For the aromatics, chop one medium onion finely. Mince two cloves of garlic. Dice one red bell pepper. These add flavor and depth. Heat two tablespoons of olive oil in a large pot over medium heat. Once hot, add the onion. Sauté for about 3-4 minutes until soft. Detailed Instructions for Sautéing and Simmering Next, stir in the minced garlic and diced bell pepper. Cook for an additional two minutes until fragrant. Now, add the sweet potato cubes. Stir well and cook for about five minutes. This helps to soften them before the chili cooks. Sprinkle in two tablespoons of chili powder, one teaspoon of ground cumin, and ½ teaspoon of smoked paprika. Season with salt and pepper. Stir until the sweet potatoes are coated with the spices. Then, pour in a can of diced tomatoes and one cup of vegetable broth. Timing for Each Step Bring the mixture to a gentle boil. Then, lower the heat and cover the pot. Let it simmer for 25-30 minutes, or until the sweet potatoes are fork-tender. After this, add one can of drained and rinsed black beans. Simmer for another 5-10 minutes to warm them through. Adjusting Seasoning Before Serving Taste the chili and adjust seasoning as needed. Add more salt or pepper if you like. This helps enhance the flavors. Presentation Recommendations Ladle the hot chili into deep bowls. Drizzle a little olive oil over the top for richness. Garnish with freshly chopped cilantro. If you love creaminess, add slices of avocado on top. For the full recipe, check out the details above. To make the best sweet potato chili, start with the sweet potatoes. Cut them into small, even cubes. This helps them cook faster and evenly. I always peel them for a smoother taste. Cook them until they are soft but not mushy. This gives your chili the right texture. When cooking aromatics like onion and garlic, avoid burning them. Use medium heat and stir often. If they start to brown too fast, lower the heat. This way, you keep their sweet flavor. A little patience goes a long way. To make your chili even better, try adding more spices. A pinch of cayenne or a splash of hot sauce can add a kick. You can also add smoked paprika for a deeper flavor. Each spice brings something unique to the table. Experiment and find what you like best! If you want heat, add jalapeños or other fresh peppers. Dice them small to mix in well. Start with a small amount, then taste and adjust. You can always add more, but it’s hard to take it out! For a complete meal, serve your chili with bread or rice. I love cornbread with mine for a classic touch. It adds a nice crunch and sweetness. You can also serve it over rice for a filling option. Want to add a fresh touch? Serve with lime wedges and sour cream. They brighten the dish and cool the heat. If you want a healthy twist, add avocado slices on top. They give a creamy finish and pair well with the chili. For the full recipe, visit the link provided. Enjoy your cooking adventure! {{image_4}} You can easily switch up the beans in this chili. Try using pinto beans or kidney beans for a new twist. They offer a different taste but still pair well with sweet potatoes. If you prefer a meat option, ground turkey or beef can be added. Just brown the meat before adding other ingredients. For vegan or vegetarian choices, this recipe is perfect as is. It uses no animal products. You can add tofu or tempeh for extra protein if desired. Both options blend well with the flavors of the chili. You can make this chili in a slow cooker. Just add all your ingredients into the cooker. Set it on low and let it cook for 6-8 hours. If you want a quicker option, use an Instant Pot. Cook on high pressure for 10 minutes, then let it release naturally. Both methods create a rich flavor. Feel free to add seasonal vegetables to your chili. Zucchini, corn, or bell peppers can enhance the dish. They bring freshness and crunch to each bite. When the weather changes, you can adapt the chili. In colder months, add warming spices like cinnamon or nutmeg. On hot days, serve it chilled or over a salad for a refreshing twist. For the full recipe, click here: [Full Recipe]. To keep your chili fresh, store it in an airtight container. Place it in the fridge as soon as it cools down. This helps keep flavors strong. Sweet potato and black bean chili lasts about 3 to 5 days in the fridge. If you want to save some for later, freezing is a great option. Portion out your chili into smaller containers. Make sure to leave some space at the top, as it will expand when frozen. Sweet potato and black bean chili can last up to 3 months in the freezer. When you're ready to eat it, thaw it in the fridge overnight. For reheating, you can use the stove or microwave. If using the stove, heat on low until warm. Stir occasionally to prevent sticking. In the microwave, heat in short bursts, stirring in between. Always check the temperature. It should be hot all the way through. Chili is perfect for meal prep. You can make a big batch for the week. Serve it with rice or quinoa for a complete meal. You can also use the chili in other dishes. Try it in burritos, tacos, or even over a baked potato. This adds variety to your meal plan without much extra work. Check out the Full Recipe for more details on making this delicious dish! What can I serve with Sweet Potato and Black Bean Chili? You can enjoy this chili with warm cornbread, rice, or tortilla chips. A fresh salad also pairs well. For a complete meal, add avocado slices on top for creaminess. How spicy is this chili? This chili has a mild spice level. The chili powder adds flavor without too much heat. If you like it spicy, add some chopped jalapeños or hot sauce. Can I use fresh tomatoes instead of canned? Yes, you can use fresh tomatoes. Dice about four medium tomatoes. Just remember to adjust the liquid since fresh tomatoes have less juice than canned ones. How can I make this chili gluten-free? The ingredients in this chili are naturally gluten-free. Just check your chili powder and broth labels to ensure they are gluten-free. Is Sweet Potato and Black Bean Chili healthy? Yes, this chili is very healthy! Sweet potatoes are full of vitamins and fiber. Black beans offer protein and iron. Together, they make a nutritious meal. Can I eat it on a plant-based diet? Absolutely! This chili is plant-based and vegan-friendly. It’s a great choice for anyone looking to eat more plant-based meals. Enjoy it with confidence! This blog covered making a delicious Sweet Potato and Black Bean Chili. We discussed essential ingredients, health benefits, and cooking steps. You learned about tips for perfecting your chili and suggested variations to keep it fresh. Proper storage and meal prep ideas ensure you enjoy it later. Remember, this chili is flexible and healthy. Experiment with flavors and ingredients for your taste. Enjoy your cooking journey!](https://goldendishy.com/wp-content/uploads/2025/06/98b7eb11-b0dd-4c6d-9f71-53ea28c64add-768x768.webp)


