Coconut Lime Chicken Tacos Bold and Flavorful Meal

Ready to elevate your taco night? My Coconut Lime Chicken Tacos are bold and full of flavor! With juicy chicken marinated in zesty lime and creamy coconut, these tacos promise to be a hit. I’ll guide you step-by-step, sharing tips to keep your chicken tender and ways to customize your meal. Get ready to impress your family and friends with a dish that’s both easy and delicious!
Why I Love This Recipe
- Flavorful Marinade: The combination of coconut milk and lime creates a vibrant and tropical flavor that elevates the chicken to new heights.
- Quick and Easy: This recipe is simple to prepare, making it perfect for a weeknight dinner or casual gatherings with friends.
- Fresh Ingredients: With the addition of fresh cilantro, avocado, and crunchy cabbage, each bite is packed with texture and freshness.
- Customizable: You can easily adjust the spice level or add your favorite toppings, allowing for a personalized taco experience.
Ingredients
Main Ingredients for Coconut Lime Chicken Tacos
To make these tacos, you need a few key items:
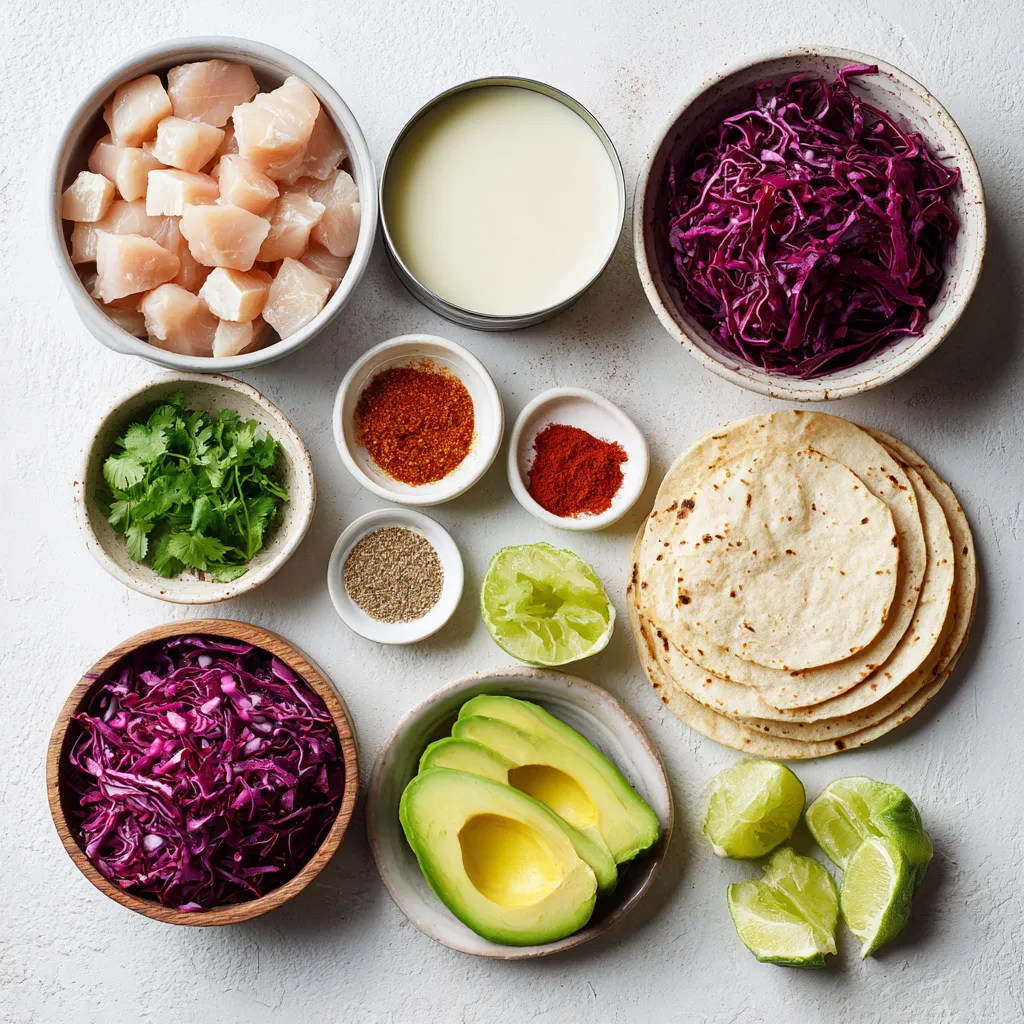
– 2 boneless, skinless chicken breasts, diced into bite-sized pieces
– 1 can (14 oz) of full-fat coconut milk
– 2 tablespoons fresh lime juice
– 1 tablespoon finely grated lime zest
– 8 small corn tortillas
These ingredients create a juicy and creamy base for your tacos. The chicken pairs perfectly with coconut milk and lime, giving it a tropical twist.
Spices and Seasonings
The right spices make your dish pop. Here are the ones you’ll use:
– 1 teaspoon ground cumin
– 1 teaspoon smoked paprika
– 1 teaspoon garlic powder
– ½ teaspoon cayenne pepper (or adjust to your taste)
– Salt and pepper, to taste
Cumin and smoked paprika add depth. Garlic powder brings out the flavor. The cayenne gives a nice kick if you like heat.
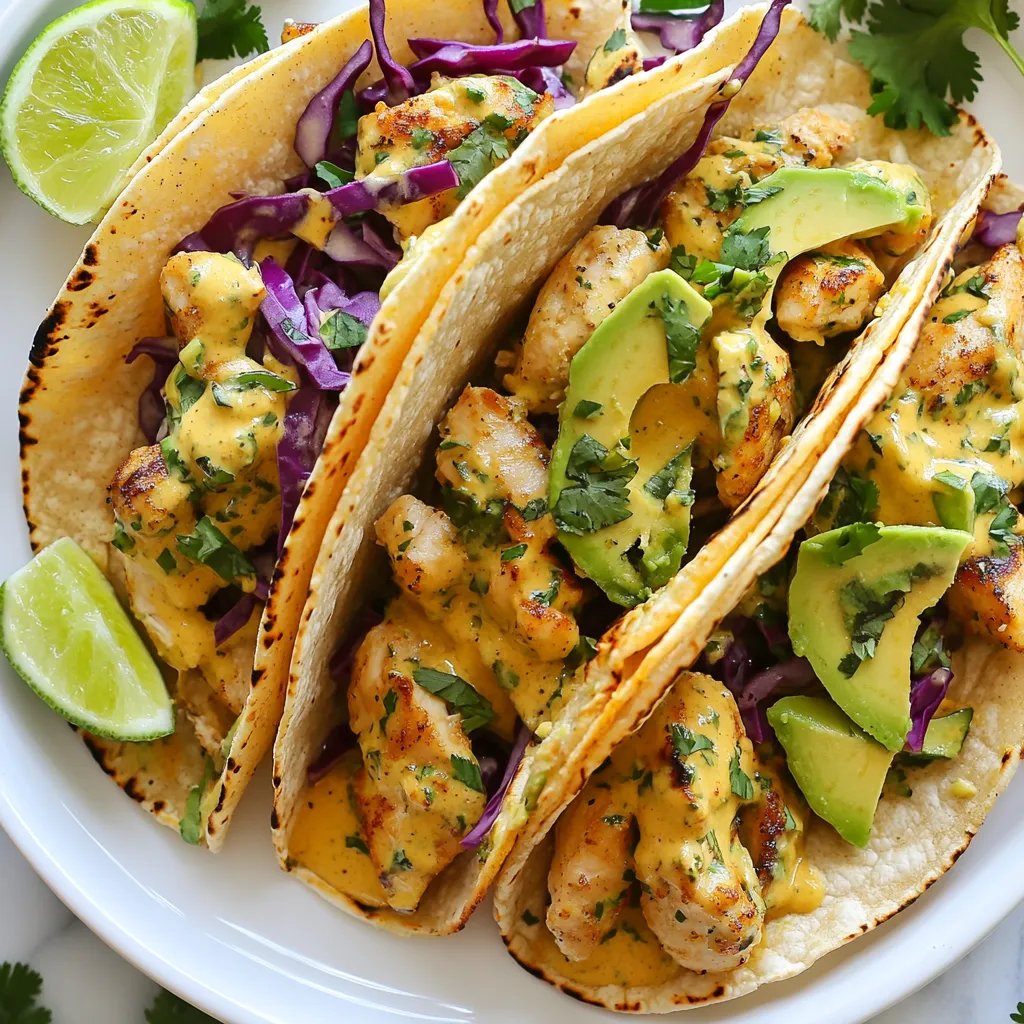
Suggested Toppings and Garnishes
Toppings bring color and crunch. Consider these:
– 1 cup red cabbage, finely shredded
– ½ cup fresh cilantro, chopped
– 1 ripe avocado, sliced into wedges
– Lime wedges, for serving
The red cabbage adds a crisp texture. Cilantro gives a fresh taste. Avocado adds creaminess, while lime wedges add zesty flavor when you squeeze them on top. These toppings complete your taco experience.

Step-by-Step Instructions
Marinating the Chicken
First, take your diced chicken breasts and place them in a large bowl. Add the can of coconut milk, fresh lime juice, and lime zest. Then, sprinkle in the ground cumin, smoked paprika, garlic powder, and cayenne pepper. Don’t forget to add salt and pepper to taste. Mix everything well so the chicken is fully coated. Cover the bowl with plastic wrap and let it sit in the fridge. I recommend marinating for at least 30 minutes. If you have time, let it marinate for up to 2 hours. This step is key for deep flavor.
Cooking the Chicken in Coconut Sauce
Next, heat a large skillet over medium heat. Once the skillet is hot, pour the marinated chicken and all the coconut sauce into the pan. Cook for about 10 to 12 minutes. Stir it occasionally to ensure even cooking. The chicken will change color and become firm. You want it to be no longer pink inside. The sauce will thicken as it cooks, creating a rich mix. Once done, remove it from the heat.
Preparing and Warming Corn Tortillas
While the chicken cooks, prepare your corn tortillas. Heat another skillet over low heat. Place one tortilla in the pan for about 30 seconds, then flip it. Warm each side until soft and pliable. It does not take long, so keep an eye on them. Once warm, stack the tortillas and wrap them in a clean kitchen towel. This keeps them warm and ready for filling.
Assembling the Tacos
Now it’s time to build your tacos! Take one warm tortilla and add a generous spoonful of the coconut-lime chicken mixture to the center. Next, top it with a handful of shredded red cabbage. Then, sprinkle some fresh chopped cilantro over it. Add a few slices of creamy avocado next. Finally, serve your tacos with lime wedges on the side. Squeeze fresh lime juice over the top for a burst of flavor. Enjoy your tropical meal!
Tips & Tricks
How to Ensure Chicken Stays Juicy
To keep the chicken juicy, marinate it well. Use full-fat coconut milk for richness. Let it soak in the fridge for at least 30 minutes. This allows the flavors to blend deeply. Cook it just until it’s no longer pink. Overcooking makes chicken dry. Stir it often for even cooking and to keep moisture in.
Best Techniques for Warming Tortillas
Warming tortillas is easy. Use a dry skillet on low heat. Heat each tortilla for about 30 seconds on each side. This makes them soft and pliable. If you have a clean kitchen towel, wrap the tortillas in it. This keeps them warm until you’re ready to serve. You can also use an oven set to low if you have many tortillas.
Flavor Enhancements and Adjustments
Want to add more flavor? Try these tips. Add more lime juice for a zesty kick. You can also mix in fresh herbs like mint or basil. For heat, increase the cayenne pepper. If you like sweetness, add a pinch of sugar or honey. Each tweak makes the dish your own. Enjoy experimenting with flavors that you love!
Pro Tips
- Marinate for Maximum Flavor: Allow the chicken to marinate for at least 30 minutes, but for best results, let it soak in the coconut milk mixture for up to 2 hours to fully absorb the flavors.
- Perfectly Cooked Chicken: Ensure the chicken is cooked through by checking that it reaches an internal temperature of 165°F (75°C) for safe consumption.
- Warm Tortillas Properly: Warm your corn tortillas in a dry skillet, as this helps to enhance their flavor and texture, making them more pliable for filling.
- Add Extra Crunch: For added texture, consider including toppings like diced radishes or crispy tortilla strips along with the cabbage and avocado.

Variations
Substitutions for Unique Flavors
You can change the chicken to shrimp or pork. Both options add new tastes. Use coconut milk as the base for any protein. Try adding a splash of pineapple juice for a sweet twist. You can also switch lime for lemon. This change gives a bright zing to the dish.
Vegetarian or Vegan Options
To make tacos vegan, use jackfruit or tofu instead of chicken. Jackfruit has a meaty texture and absorbs flavors well. Marinate it just like you would the chicken. For tofu, use firm tofu and cube it before cooking. Add fresh lime juice and spices for great taste.
Different Types of Tacos Using the Same Filling
You can make these tacos in different styles. Use lettuce wraps for a fresh, low-carb option. You can also use flour tortillas for a softer bite. Try serving the filling over rice for a taco bowl. This gives you a fun twist on the classic dish.
Storage Info
Best Practices for Storing Leftovers
To store leftover coconut lime chicken tacos, first let them cool down. Place the chicken mixture in an airtight container. You can keep it in the fridge for up to three days. Store the tortillas separately to avoid them getting soggy. Wrap them in foil or plastic wrap. This will help keep them fresh.
Reheating Instructions
When you’re ready to eat the leftovers, you have a few options. For the best taste, reheat the chicken in a skillet. Heat it over medium heat until warmed through. Stir occasionally to ensure even heating. If you prefer the microwave, place the chicken in a microwave-safe bowl. Cover it with a damp paper towel. Heat in 30-second bursts until hot. Warm the tortillas in a skillet or microwave before serving.
Freezing Coconut Lime Chicken Mixture
If you want to freeze the coconut lime chicken mixture, do it right after cooking. Let it cool first, then place it in a freezer-safe container. It can last in the freezer for up to three months. When you’re ready to eat, thaw it in the fridge overnight. Reheat it in a skillet, just like you would with leftovers. Then, enjoy your tasty meal!
FAQs
How do I make coconut lime chicken tacos spicy?
To add heat, use cayenne pepper. Start with half a teaspoon. If you want more spice, add another half teaspoon. You can also use fresh chopped jalapeños or a spicy salsa. These options give a nice kick and enhance the flavors of the dish.
Can I use other meats for this recipe?
Yes! You can use shrimp, pork, or beef. Just adjust the cooking time. Cook shrimp for about 5-7 minutes. For pork or beef, ensure they reach the right temperature. This keeps your tacos tasty and safe to eat.
What to serve with coconut lime chicken tacos?
Pair your tacos with rice or beans for a filling meal. A fresh salad with lime vinaigrette works well too. You can also serve some tortilla chips with salsa or guacamole. These sides add fun and flavor to your meal.
How can I make the dish gluten-free?
Use corn tortillas, which are naturally gluten-free. Check labels on any added sauces or toppings. Ensure they are gluten-free too. This way, you can enjoy your tacos without worry.
Coconut lime chicken tacos are both tasty and simple. We covered key ingredients like chicken and seasonings. I shared step-by-step cooking tips to keep the chicken juicy. Variations help everyone enjoy this dish, from vegan substitutes to spicy tweaks. Proper storage keeps leftovers fresh for later. Experiment and make it your own! Enjoy every bite and have fun creating your perfect tac

Coconut Lime Chicken Tacos
Ingredients
- 2 pieces boneless, skinless chicken breasts, diced into bite-sized pieces
- 1 can full-fat coconut milk (14 oz)
- 2 tablespoons fresh lime juice
- 1 tablespoon finely grated lime zest
- 1 teaspoon ground cumin
- 1 teaspoon smoked paprika
- 1 teaspoon garlic powder
- 0.5 teaspoon cayenne pepper (or adjust to preference)
- to taste Salt and pepper
- 8 small corn tortillas
- 1 cup red cabbage, finely shredded
- 0.5 cup fresh cilantro, chopped
- 1 ripe avocado, sliced into wedges
- as needed Lime wedges, for serving
Instructions
- In a mixing bowl, combine the diced chicken with coconut milk, fresh lime juice, lime zest, ground cumin, smoked paprika, garlic powder, cayenne pepper, and a generous pinch of salt and black pepper. Mix thoroughly to ensure all chicken pieces are well coated. Cover the bowl and let it marinate in the refrigerator for at least 30 minutes or up to 2 hours to enhance the flavors.
- Heat a large skillet over medium heat. Once hot, carefully pour the marinated chicken along with the coconut sauce into the skillet. Cook for approximately 10-12 minutes, stirring occasionally, until the chicken is thoroughly cooked and no longer pink inside. The sauce should begin to thicken slightly.
- While the chicken is cooking, warm the corn tortillas individually in a separate skillet over low heat for about 30 seconds on each side or until they become soft and pliable. Keep them warm by wrapping them in a clean kitchen towel.
- Once the chicken is ready, remove the skillet from heat. Begin to assemble your tacos by placing a generous spoonful of the coconut-lime chicken mixture onto the center of each warm tortilla.
- Top the chicken with a handful of shredded red cabbage, a sprinkle of fresh chopped cilantro, and a few slices of creamy avocado.
- Serve the tacos warm with lime wedges on the side for an extra burst of zesty flavor when squeezed over the top.


![To make your delicious crispy zucchini tacos, you'll need a few fresh ingredients. Here’s what you should gather: - 2 medium zucchinis, sliced into thin rounds - 1 cup cornmeal and seasonings: chili powder, garlic powder, onion powder, ground cumin - Fresh toppings: shredded lettuce, diced tomatoes, avocado slices, sour cream or Greek yogurt - Tortilla options: soft corn or flour These ingredients work together to create a tasty and fun meal. The zucchini brings a nice crunch, while the cornmeal adds flavor. Don’t forget the toppings! They add freshness and creaminess. If you want the full recipe, check out the Full Recipe for all the details. Set your oven to 425°F (220°C). This high heat will help make the zucchini crispy. Line a large baking sheet with parchment paper. This step prevents the zucchini from sticking and makes cleanup easy. In a medium mixing bowl, combine 1 cup of cornmeal with spices. Add 1 tablespoon of chili powder, 1 teaspoon of garlic powder, 1 teaspoon of onion powder, and 1/2 teaspoon of ground cumin. Season this mix with salt and freshly cracked black pepper. Mix well until everything is blended. This coating gives the zucchini great flavor and crunch. Take your zucchini rounds and dip them into the cornmeal mixture. Make sure both sides are coated evenly. Arrange the coated zucchini on the baking sheet in a single layer. Avoid overlapping the rounds to ensure they cook evenly. Place the baking sheet in the preheated oven and bake for 20-25 minutes. Halfway through, flip the zucchini rounds for an even golden brown color. Enjoy the crispy goodness as you prepare your tacos! For the complete recipe, see the [Full Recipe]. To get the best crispy texture, the coating needs to be even. Make sure you coat each zucchini round well. This way, every bite has flavor. Use a good amount of cornmeal mix on both sides. When you bake, flip the zucchini halfway. This helps them brown nicely and stay crisp. Warm tortillas before you fill them. You can heat them in a skillet over medium heat. Just a minute on each side makes them soft. You can also wrap them in foil and pop them in the oven. Give them a few minutes so they get warm and pliable. For a colorful dish, use a bright platter. Layer your crispy zucchini tacos with fresh toppings. Add shredded lettuce, diced tomatoes, and avocado slices. Finish with a dollop of sour cream or Greek yogurt. Serve with lime wedges for extra zest. A sprinkle of fresh cilantro adds a lovely touch. Use these tips to make your tacos not just tasty, but also beautiful! {{image_4}} You can easily make your crispy zucchini tacos vegan. For a creamy topping, replace sour cream with cashew cream or dairy-free yogurt. Both options give a rich flavor. You can also use mashed avocado as a spread. It adds creaminess and healthy fats. For toppings, use fresh veggies like radishes or sliced jalapeños for a spicy kick. These swaps keep your meal tasty and plant-based. To boost the flavor of your zucchini coating, try adding more spices. Smoked paprika can add a nice depth. You might also enjoy a pinch of cayenne for heat. Fresh herbs like cilantro or parsley can brighten the dish. Mix them into your cornmeal for an extra layer of flavor. Don't hesitate to experiment! The right spices can take your tacos to the next level. Zucchini is great, but many other veggies work well too. You can use sliced eggplant or summer squash for a similar texture. Carrots add a sweet crunch, while bell peppers bring color and flavor. For a different twist, try sweet potatoes. Just cut them into thin slices and bake. Each veggie offers a unique taste, so have fun mixing it up! You’ll find your favorite combinations. For the complete experience, check out the [Full Recipe]. To keep your crispy zucchini tacos fresh, use an airtight container. Place any leftover tacos in the container. You can store them in the fridge for up to three days. This method helps keep them from getting soggy. If you have extra zucchini rounds, store them separately. This way, they stay crispy longer. When you're ready to enjoy your leftovers, reheating correctly is key. The best way to revive that crunch is in the oven. Preheat your oven to 375°F (190°C). Place the tacos on a baking sheet. Heat them for about 10-15 minutes. This method ensures your tacos stay crispy. You can also use an air fryer for faster results. Just heat them for 5-7 minutes at 350°F (175°C). You can freeze crispy zucchini tacos, but it's best to freeze the zucchini rounds separately. After baking, let them cool completely. Then, place them in a single layer on a baking sheet and freeze for a few hours. Once frozen, transfer them to a freezer bag. This prevents sticking. You can store them in the freezer for up to three months. When ready to eat, bake them straight from the freezer. This keeps them crunchy and delicious. For the full recipe, check the detailed instructions above. To make crispy zucchini tacos, follow these steps: 1. Preheat your oven to 425°F (220°C). 2. Prepare a baking sheet with parchment paper. 3. Mix cornmeal and spices in a bowl. 4. Dip zucchini rounds in the cornmeal mix. 5. Arrange the coated zucchini on the baking sheet. 6. Bake for 20-25 minutes, flipping halfway. 7. Warm your tortillas in a skillet or oven. 8. Assemble tacos with zucchini, lettuce, tomatoes, avocado, and sour cream. This simple process makes crispy zucchini tacos that are full of flavor. The baking gives the zucchini a nice crunch while keeping the inside tender. You can find the full recipe above. You can use either corn or flour tortillas for zucchini tacos. - Corn Tortillas: - They are gluten-free. - They have a distinct flavor that pairs well with the zucchini. - Flour Tortillas: - They are soft and chewy. - They hold up well with toppings and fillings. Both options are great, so choose based on your taste! I often prefer corn tortillas for their authentic flavor. Yes, you can prepare some parts ahead of time. - Zucchini Rounds: You can coat and bake the zucchini earlier in the day. Store them in an airtight container. - Tortillas: Warm them just before serving to keep them soft. - Toppings: Dice your tomatoes and slice your avocado in advance, but keep them in the fridge. This way, you can quickly assemble the tacos when you're ready to eat. Enjoy your meal without the rush! This blog post covered how to make crispy zucchini tacos. You learned about the ingredients, instructions, and tips for perfecting texture. I also shared variations for dietary needs and options to store leftovers. Crispy zucchini tacos are fun, easy to make, and delicious. You can enjoy them during any meal. Experiment with the toppings to make each taco special. Enjoy your cooking!](https://goldendishy.com/wp-content/uploads/2025/06/dad710f9-4001-4f00-9608-4b60580076cc-768x768.webp)
. - Heat your skillet over medium heat. - Add the unsalted butter and let it melt. - Once melted, watch for it to bubble gently. - Next, add the minced garlic. - Sauté the garlic for about one minute. - Stir often until it smells great and turns lightly golden. - Now, add the peeled and deveined shrimp to the skillet. - Season the shrimp with salt and pepper. - If you like spice, sprinkle in some red pepper flakes. - Cook the shrimp for 2-3 minutes on one side. - Flip the shrimp to cook the other side evenly. - Add the lemon zest and juice as they cook. - Keep cooking until the shrimp are opaque. - Remove the skillet from the heat. - Stir in the chopped parsley for a fresh taste. - Serve the shrimp over warm pasta or fluffy rice. - Drizzle the leftover lemon-garlic butter sauce on top for extra flavor. - For a lovely presentation, you can garnish with lemon wedges. For more details, check the Full Recipe. - Achieving the perfect shrimp texture: To get tender shrimp, avoid overcooking. Cook them just until they turn pink. This usually takes about 2-3 minutes per side. - Best practices for sautéing garlic: Start with a hot skillet and melted butter. Add minced garlic and stir for about 1 minute. Keep an eye on it so it doesn’t burn; burnt garlic tastes bitter. - Presentation ideas for a beautiful dish: Serve the shrimp in shallow bowls to make it look elegant. Add a sprinkle of parsley on top for color. Include lemon wedges on the side for a fresh touch. - Pairing options with side dishes: Lemon garlic butter shrimp goes well with cooked pasta or fluffy rice. You can also serve it with a side salad for a light meal. - Additional herbs or spices to try: Consider adding fresh basil or thyme for extra flavor. These herbs pair well with lemon and shrimp. - Adjusting spice levels with red pepper flakes: If you like heat, add more red pepper flakes. Start with a teaspoon and adjust to your taste. This will make your dish more exciting! For more details, check the Full Recipe. {{image_4}} You can change the seafood in this recipe. Try scallops or even crab. These swaps add new tastes while keeping the dish simple. If you want a healthier fat, swap butter for olive oil. Olive oil works well and gives a light, fresh flavor. To mix things up, add other citrus flavors. Lime or orange juice can brighten the dish. You can also infuse the recipe with herbs. Try basil or thyme for a different twist. These herbs can make the dish feel more seasonal. If you need a gluten-free option, serve the shrimp over quinoa or zucchini noodles. Both are great gluten-free choices. For a low-calorie meal, cut back on the butter. You can use less or replace it with vegetable broth. This keeps the dish tasty but lighter. After enjoying your lemon garlic butter shrimp, store any leftovers in the fridge. Use an airtight container to keep them fresh. These shrimp will stay good for about 2-3 days. Always check for freshness before eating. To freeze lemon garlic butter shrimp, let them cool completely first. Place them in a freezer-safe bag, removing as much air as possible. They can last for about 2 months in the freezer. When you're ready to eat, thaw the shrimp in the fridge overnight. Reheat them gently in a skillet over low heat. This keeps them tender and tasty. Always ensure your shrimp is safe to eat after storage. Check for any off smells or changes in color. If the shrimp look slimy or smell bad, it’s best to discard them. Trust your senses to keep your meals safe and enjoyable. Cook shrimp for 4-6 minutes. They cook quickly. In a hot skillet, shrimp turn pink when done. Avoid overcooking; it makes them tough. Yes, you can use frozen shrimp. Thaw them first for best results. Place them in cold water for about 15 minutes. This way, they cook evenly and taste fresh. I love serving lemon garlic butter shrimp with: - Cooked pasta - Fluffy rice - Fresh salad - Garlic bread These sides balance the rich flavors well. Check for color and texture. Cooked shrimp turn pink and opaque. They should feel firm but not hard. When in doubt, cut one open. It should be white inside, not translucent. You’ve learned how to make lemon garlic butter shrimp. We covered essential ingredients, easy steps, tips for cooking, and variations to try. Remember to adjust flavors to your taste and pair with your favorite sides. Store leftovers safely for later enjoyment. Cooking shrimp can be simple and satisfying. Enjoy every bite, and don't hesitate to experiment. Whether for a cozy night in or impressing guests, this dish shines every time. Let your kitchen be a place of fun and flavor!](https://goldendishy.com/wp-content/uploads/2025/06/8ad1771e-7d26-4dd4-879b-9e464bbb0647-768x768.webp)
