Ready for a burst of tropical flavor? These Coconut Lime Chicken Skewers are a must-try! With juicy chicken, zesty lime, and creamy coconut milk, you can have a delicious meal on the table in no time. This easy recipe will impress your family and friends without the fuss. Let’s dive into the ingredients and get you grilling the perfect skewers!
Why I Love This Recipe
- Bright and Zesty Flavor: The combination of coconut and lime creates a refreshing taste that transports you to a tropical paradise with every bite.
- Easy to Prepare: With a simple marinade and straightforward grilling instructions, this recipe is perfect for both novice and experienced cooks.
- Perfect for Any Occasion: These skewers are great for casual barbecues, dinner parties, or even meal prep, making them versatile for any dining scenario.
- Healthier Option: Using chicken breast and coconut milk provides a lean protein source along with healthy fats, making this dish a nutritious choice.
Ingredients
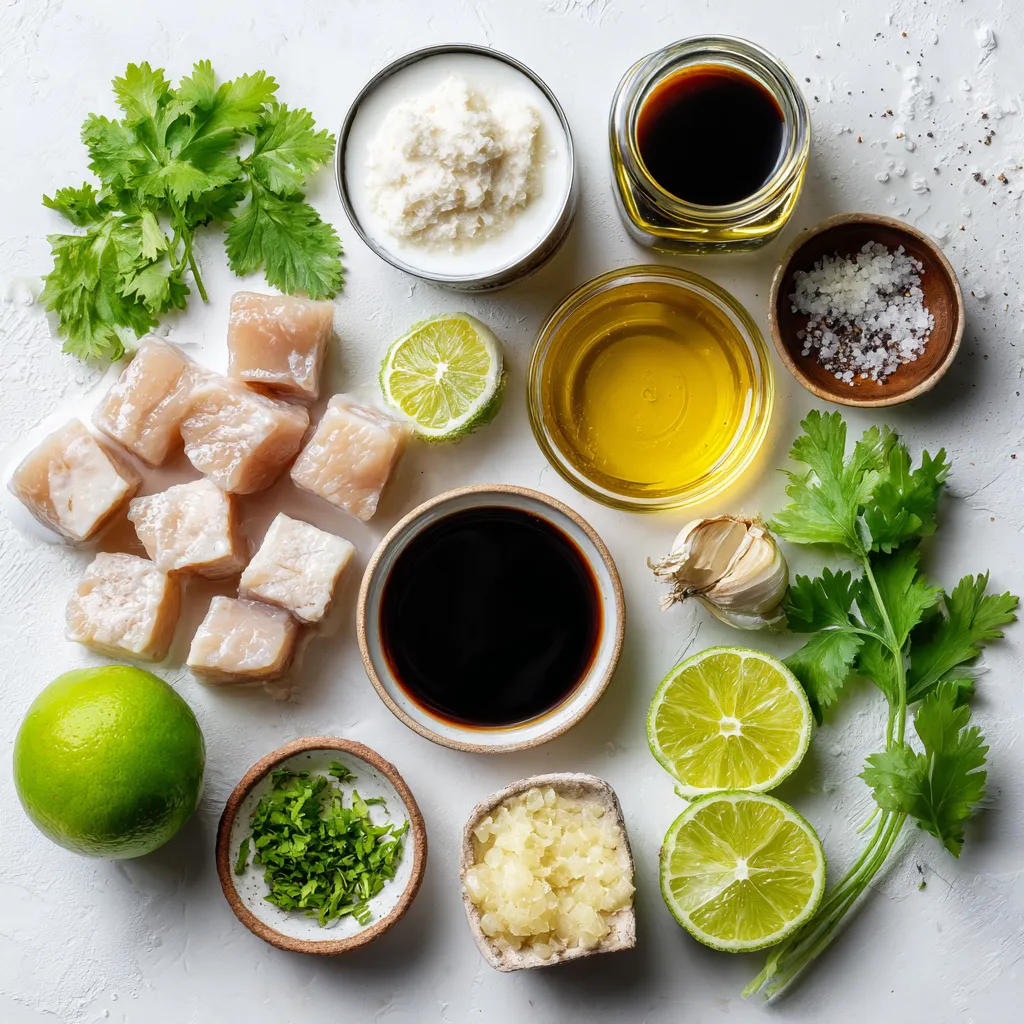
Main Ingredients
– 1 lb chicken breast
– 1 cup coconut milk
– Zest and juice of 2 limes
– 2 tablespoons honey
– 1 tablespoon soy sauce
– 2 cloves garlic, minced
– 1 teaspoon fresh ginger, grated
Seasoning and Garnish
– Salt and pepper
– 1/4 cup fresh cilantro, chopped
– Wooden or metal skewers
For this dish, you need chicken breast as the main protein. It cooks quickly and stays juicy. The coconut milk gives a rich, creamy flavor. Limes add brightness with their zest and juice. Honey balances the flavors with sweetness. Soy sauce adds saltiness and depth. Garlic and ginger bring warmth and aroma to the dish.
Don’t forget about the seasoning! Salt and pepper enhance all the flavors. Fresh cilantro adds a burst of color and freshness on top. Finally, you will need skewers to hold everything together. If you use wooden skewers, soak them in water to stop them from burning on the grill. This mix of ingredients makes a great meal that everyone will enjoy!
Step-by-Step Instructions
Marinating the Chicken
To make the marinade, start by mixing these ingredients in a bowl:
– 1 cup coconut milk
– Zest and juice of 2 limes
– 2 tablespoons honey
– 1 tablespoon soy sauce
– 2 cloves garlic, minced
– 1 teaspoon fresh ginger, grated
– Salt and pepper to taste
Whisk everything together until blended well. This mix is key. It flavors the chicken deeply. For the best taste, marinate the chicken for four hours. If you are short on time, one hour works too. The longer you let it sit, the better the flavor.
Preparing the Skewers
Next, soak wooden skewers in water for 30 minutes. This step stops them from burning on the grill. If you skip this, your skewers might catch fire. While soaking, preheat your grill to medium heat. A hot grill helps the chicken cook evenly and get those nice grill marks.
Cooking the Skewers
Once your grill is ready, it’s time to grill the skewers. Place them on the grill for 10 to 12 minutes. Turn them often to cook evenly. You want to see nice grill marks and for the chicken to be fully cooked. Use a meat thermometer to check the chicken. It needs to reach 165°F (75°C) inside. This step is crucial for food safety.
Tips & Tricks
Enhancing Flavor
For the best flavor, marinate the chicken for at least 1 hour. However, I recommend marinating for up to 4 hours. This longer time allows the flavors to soak in deeply. You can also add spices like cayenne pepper or smoked paprika. These spices give a nice kick and depth to the skewers.
Presentation Tips
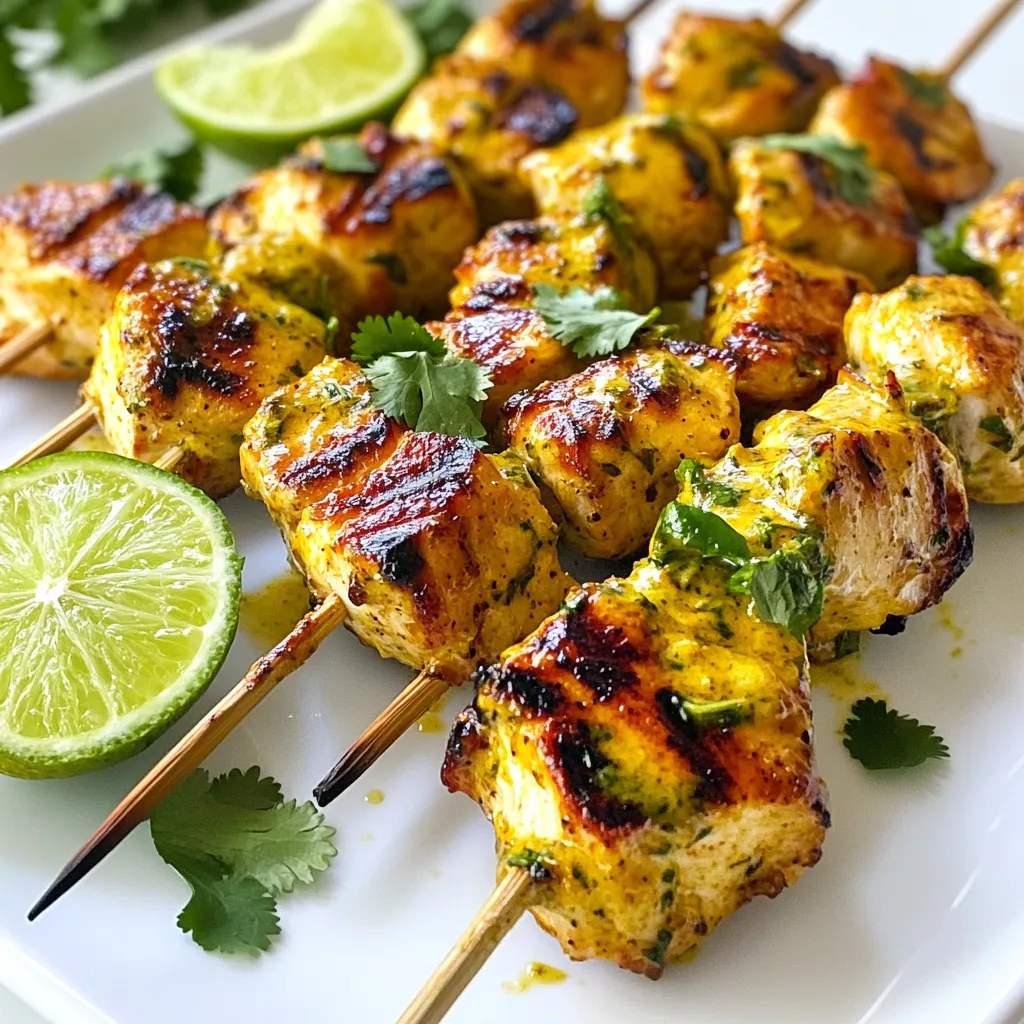
To make your dish look stunning, serve the skewers on a rustic wooden platter. This adds a natural touch that complements the dish. You can also drizzle a reduction of coconut milk around the skewers. It adds a creamy look and boosts the flavor. For extra flair, garnish with fresh cilantro and lime wedges. This brings vibrant color and a fresh aroma to your meal.
Pro Tips
- Marination Magic: The longer you marinate the chicken, the more flavor it absorbs. Aim for at least 4 hours for the best results.
- Grill Preheating: Always preheat your grill to medium heat before adding the skewers. This ensures even cooking and perfect grill marks.
- Use a Meat Thermometer: To avoid undercooking or overcooking, check the internal temperature of the chicken. It should reach 165°F (75°C).
- Presentation Perfection: For an eye-catching presentation, serve the skewers on a wooden platter and drizzle some coconut milk reduction around them.
Variations
Alternative Proteins
You can switch out chicken for shrimp or tofu. Shrimp cooks fast and absorbs flavors well. Tofu is great for a plant-based option. Both are tasty!
For cooking, you can oven-bake or broil your skewers. Baking takes about 15-20 minutes at 400°F (200°C). Broiling will take less time, around 8-10 minutes, so watch them closely.
Flavor Enhancements
To spice things up, consider adding cayenne pepper or paprika to your marinade. Both will give a nice kick! If you prefer a fresh twist, try adding herbs like parsley or mint. They bring brightness to your dish.
Experiment with these variations to find your favorite combo. Enjoy the process of creating something special!
Storage Info
Storing Leftovers
To keep your coconut lime chicken skewers fresh, follow these steps:
– Refrigeration: Place leftover skewers in an airtight container. Store them in the fridge for up to 3 days. This keeps the chicken moist and flavorful.
– Freezing: If you want to save them longer, freeze the skewers. Wrap each one in plastic wrap and place them in a freezer bag. They can last up to 3 months in the freezer. When you’re ready to eat, just thaw them in the fridge overnight before reheating.
Reheating Options
When it’s time to enjoy your leftovers, reheating is key. Here’s how to do it safely:
– Microwave Method: Place the skewers on a microwave-safe plate. Heat in 30-second intervals until warm. This keeps them juicy.
– Oven Method: Preheat your oven to 350°F (175°C). Place the skewers on a baking sheet and cover with foil. Heat for about 10 minutes. This method helps to maintain their texture.
– Grill Method: For the best flavor, reheat on the grill. Just a few minutes on each side will bring back that great grilled taste.
FAQs
How long should I marinate coconut lime chicken skewers?
You should marinate the chicken for at least 1 hour. This allows the flavors to soak in. For the best taste, aim for 4 hours. Longer marinating adds more depth to the flavor, making each bite delicious.
Can I use coconut cream instead of coconut milk?
Yes, you can use coconut cream if you want a richer taste. Coconut cream will give your skewers a thicker texture. Just keep in mind that this will make the marinade sweeter and creamier.
What can I serve with coconut lime chicken skewers?
You can serve various side dishes with your skewers. Here are some great options:
– Rice: Coconut rice pairs well for a tropical touch.
– Salad: A fresh green salad with lime vinaigrette works nicely.
– Vegetables: Grilled veggies like bell peppers and zucchini add color and flavor.
– Dipping Sauces: Try a spicy mango salsa or a tangy yogurt dip.
These sides will enhance the meal and impress your guests!
You’ve learned how to make tasty coconut lime chicken skewers. We covered the key ingredients, like chicken breast and coconut milk. You saw the importance of marinating and grilling tips to ensure juicy chicken. Variations let you use shrimp or tofu for your skewers, engaging your creativity. Storage and reheating advice helps keep your leftovers fresh.
Now, you can enjoy delicious meals with ease. Have fun experimenting with flavors and presentations! Your next gathering will be a hit with these skewers on the gril


