Coconut Curry Lentil Soup Hearty and Flavorful Delight

Looking for a warm, comforting dish? My Coconut Curry Lentil Soup is just what you need! Packed with vibrant flavors and healthy ingredients, this soup is quick to make and satisfying. With red lentils, coconut milk, and fresh veggies, each spoonful is a burst of goodness. Let’s dive into this hearty and flavorful delight that will warm your heart and nourish your body. Get ready to enjoy every bite!
Why I Love This Recipe
- Comforting and Nourishing: This soup is a warm hug in a bowl, perfect for chilly days or when you’re feeling under the weather.
- Easy to Make: With simple ingredients and straightforward steps, this recipe is great for both beginners and busy cooks.
- Vibrant Flavors: The combination of coconut milk and spices creates a rich, flavorful broth that is both satisfying and refreshing.
- Customizable: You can easily adapt this soup by adding your favorite vegetables or adjusting the spice level to suit your taste.
Ingredients
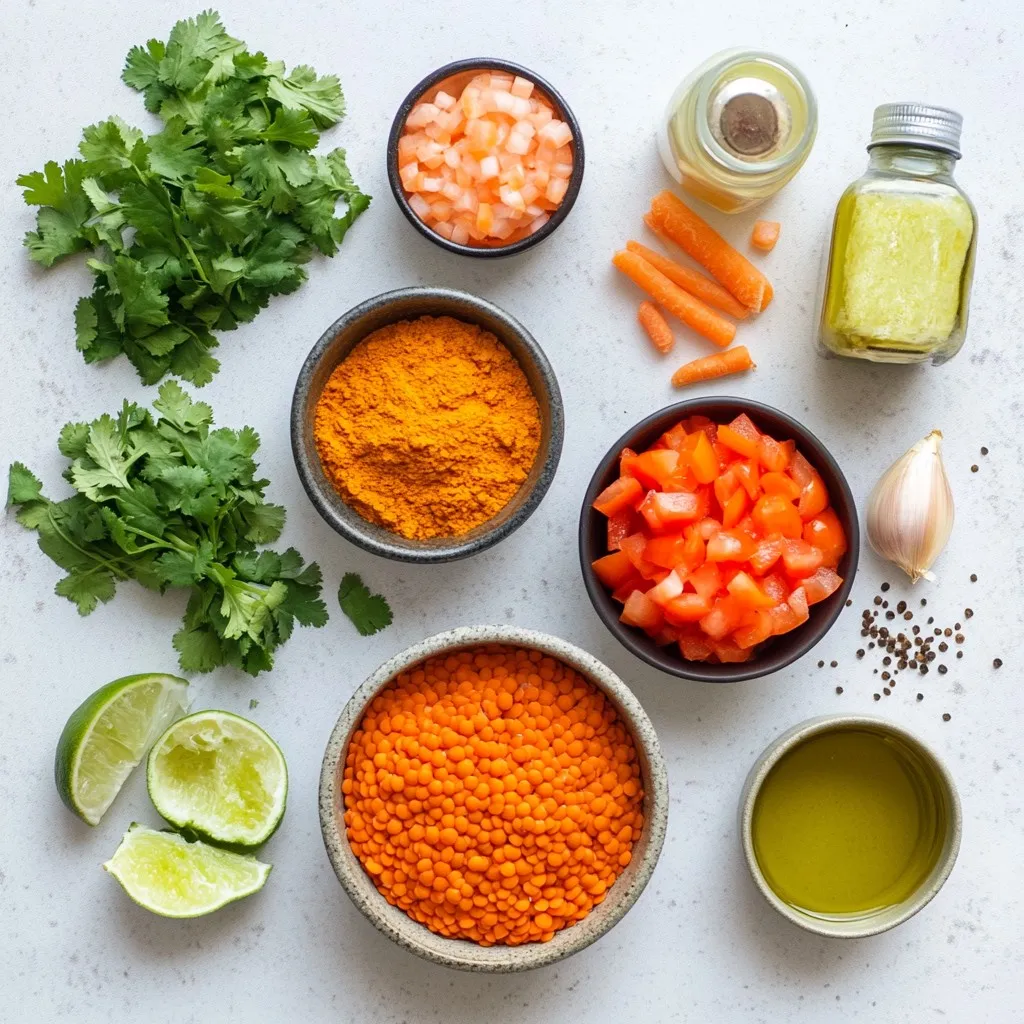
For a rich and tasty Coconut Curry Lentil Soup, gather the following ingredients:
– 1 cup red lentils, thoroughly rinsed and drained
– 1 can (14 oz) coconut milk, full-fat for creaminess
– 1 medium onion, finely chopped
– 2 cloves garlic, minced
– 1 tablespoon fresh ginger, grated
– 1 tablespoon yellow curry powder, adjust for spice preference
– 1 teaspoon ground cumin
– 1 teaspoon turmeric powder
– 1 medium carrot, peeled and diced
– 1 cup diced tomatoes, canned or fresh
– 4 cups vegetable broth, low-sodium preferred
– 1 tablespoon olive oil, can substitute with coconut oil for additional flavor
– Salt and freshly ground black pepper to taste
– Fresh cilantro leaves for garnish
– Lime wedges for serving
Each ingredient plays a key role in making the soup hearty and flavorful. The red lentils provide protein, while coconut milk adds creaminess. Fresh veggies like onion, garlic, ginger, carrot, and tomatoes bring depth and color. The spices, including yellow curry powder, ground cumin, and turmeric, create a warm and inviting flavor. The vegetable broth serves as the base, keeping the soup light yet satisfying. Don’t forget the oil for cooking and seasoning to taste. Finally, fresh cilantro and lime wedges brighten the dish when serving. Enjoy every bite!

Step-by-Step Instructions
Preparation
1. Cooking the aromatics: Start by heating the olive oil in a large pot over medium heat. Once hot, add the chopped onion. Sauté for 5-7 minutes. The onions should look soft and golden. Stir often to keep them from burning.
2. Adding spices and sautéing: After the onions are ready, add the minced garlic and grated ginger. Cook for 1-2 minutes. You want the mix to smell fragrant. Then, sprinkle in the yellow curry powder, ground cumin, and turmeric. Stir well. Cook for about 1 minute. This step wakes up the spices and fills your kitchen with amazing smells.
3. Incorporating lentils and vegetables: Now, add the diced carrot. Sauté for 3-4 minutes until it starts to soften. Next, toss in the rinsed red lentils and diced tomatoes. Mix everything well. This will create a beautiful base for your soup.
Simmering
1. Pouring in liquids: It’s time to add the vegetable broth and coconut milk. Pour them in and stir gently. This will make your soup creamy and rich.
2. Adjusting heat and cooking time: Increase the heat a bit to bring the soup to a gentle simmer. Once it starts bubbling, lower the heat to keep it simmering slowly. Cover the pot and let it cook for 20-25 minutes. Stir now and then to keep the lentils from sticking to the pot.
3. Checking for tenderness: After 20-25 minutes, check the lentils. They should be tender. If they need more time, let them simmer a bit longer. The soup will thicken as it cooks.
Final Touches
1. Seasoning the soup: Taste the soup. Add salt and black pepper to your liking. This is your chance to make it perfect.
2. Adjusting consistency: If the soup seems too thick, add more broth or water. Do this one ladle at a time until it’s just right for you.
3. Serving suggestions: Ladle the soup into deep bowls. Top with fresh cilantro and serve with lime wedges. The lime juice will add a nice zing. Enjoy your delicious Coconut Curry Lentil Soup!
Tips & Tricks
Cooking Tips
– Preventing sticking during cooking: Stir the soup often. This helps keep the lentils from sticking to the pot. Use a non-stick pot if you have one.
– Adjusting spice levels: Start with one tablespoon of yellow curry powder. Taste the soup as it cooks. If you want more heat, add more curry powder or some chili flakes.
– Enhancing creaminess: Use full-fat coconut milk. This gives the soup a rich texture. You can also blend a portion of the soup for a creamier finish.
Serving Suggestions
– Presentation ideas: Serve the soup in deep bowls. The bright orange color looks great! Top with fresh cilantro and lime wedges for a pop of color.
– Accompaniments: Pair the soup with warm naan bread or fluffy rice. This makes the meal more filling and satisfying.
Nutritional Additions
– Boosting nutrient profile: Add a handful of fresh spinach or kale. Stir them in during the last few minutes of cooking. This adds vitamins and minerals without changing the flavor much.
– Making it a complete meal: Serve the soup with a side salad or some roasted vegetables. This adds more fiber and nutrients, making your meal balanced and healthy.
Pro Tips
- Choose the Right Lentils: While red lentils are perfect for this soup, you can experiment with green or brown lentils for a different texture and flavor profile. Just note that cooking times may vary.
- Enhance the Creaminess: For an even creamier texture, add an extra half can of coconut milk or a dollop of almond or cashew cream before serving.
- Customize the Spice Level: Adjust the amount of yellow curry powder according to your spice preference. For more heat, consider adding a pinch of cayenne pepper or a small diced chili.
- Store and Reheat: This soup stores well in the fridge for up to 5 days. When reheating, add a splash of broth or water to maintain the desired consistency.

Variations
Ingredient Substitutions
You can mix up the lentils in this soup. Try using green or brown lentils. You might also switch to beans like chickpeas or black beans for a different taste. For veggies, think outside the box. Spinach or bell peppers add color and nutrients. Feel free to toss in what you have on hand!
Flavor Enhancements
Want a kick? Add chili flakes or fresh peppers for heat. You can also balance flavors. Coconut sugar or diced carrots add a sweet touch. This will make the soup even more tasty and fun!
Dietary Modifications
Making this soup vegan is easy. Just ensure your vegetable broth is plant-based. You can also use coconut oil instead of olive oil. For gluten-free options, check your broth and spices. Most are safe, but it’s good to double-check. Enjoy your coconut curry lentil soup without worry!
Storage Info
Refrigeration
Store any leftover soup in a sealed container. Make sure it cools down first. The soup stays fresh in the fridge for about three to four days. If you see any signs of spoilage, like off smells or mold, throw it away.
Freezing
To freeze coconut curry lentil soup, let it cool completely. Pour the soup into freezer-safe bags or containers. Leave some space for expansion as it freezes. It can freeze well for up to three months. When you want to eat it, thaw it in the fridge overnight. For reheating, warm it on the stove over low heat. Stir often to keep it from sticking. You can also use a microwave, heating it in short bursts.
Reusing Leftovers
Leftover soup can be fun! You can use it as a sauce over rice or quinoa. Add cooked grains for a hearty lunch. Blend the soup for a creamy dressing for salads. You can also mix it with some sautéed veggies for a quick stir-fry. Let your creativity flow!
FAQs
How long does Coconut Curry Lentil Soup last in the fridge?
Coconut Curry Lentil Soup lasts about 4 to 5 days in the fridge. Store it in an airtight container. This keeps it fresh and safe to eat.
Can I make this soup ahead of time?
Yes, you can make this soup ahead of time. It tastes even better the next day. The flavors blend well as it sits. Just reheat it gently on the stove.
What can I serve with Coconut Curry Lentil Soup?
I love serving this soup with crusty bread or rice. You can also pair it with a fresh salad. Adding lime wedges brings a nice zing to every bite.
Is Coconut Curry Lentil Soup healthy?
Coconut Curry Lentil Soup is very healthy. Lentils provide protein and fiber. Coconut milk adds creaminess and healthy fats. The spices offer many health benefits too. This soup is a great option for a balanced meal.
This blog post covered how to make delicious Coconut Curry Lentil Soup. We discussed key ingredients, from red lentils to fresh produce. I outlined easy step-by-step cooking instructions and shared tips for enhancing flavor and nutrition. We also explored variations and storage methods for leftovers.
In short, this soup is versatile, healthy, and perfect for any meal. You can enjoy it fresh or as leftovers. Try it out, and make it your ow

Coconut Curry Lentil Soup
Ingredients
- 1 cup red lentils, thoroughly rinsed and drained
- 1 can coconut milk, full-fat for creaminess
- 1 medium onion, finely chopped
- 2 cloves garlic, minced
- 1 tablespoon fresh ginger, grated
- 1 tablespoon yellow curry powder, adjust for spice preference
- 1 teaspoon ground cumin
- 1 teaspoon turmeric powder
- 1 medium carrot, peeled and diced
- 1 cup diced tomatoes, canned or fresh
- 4 cups vegetable broth, low-sodium preferred
- 1 tablespoon olive oil, can substitute with coconut oil for additional flavor
- to taste salt and freshly ground black pepper
- for garnish fresh cilantro leaves
- for serving lime wedges
Instructions
- In a large pot, heat the olive oil over medium heat until shimmering. Add the chopped onion and sauté for 5-7 minutes until they become translucent and slightly golden, stirring occasionally to ensure even cooking.
- Once the onions have softened, add the minced garlic and grated ginger. Cook for an additional 1-2 minutes, stirring continuously, until the mixture is fragrant and the garlic is lightly golden.
- Sprinkle in the yellow curry powder, ground cumin, and turmeric. Stir well to coat the onions and release the spices’ essential oils, cooking for about 1 minute until the spices are aromatic.
- Add the diced carrot to the pot, mixing well, and sauté for 3-4 minutes until the carrot begins to soften slightly.
- Next, incorporate the rinsed red lentils and diced tomatoes into the pot. Stir everything together until well combined.
- Pour in the vegetable broth and coconut milk, stirring gently to blend. Increase the heat slightly to bring the soup to a gentle simmer.
- Once simmering, reduce the heat to low, cover the pot, and let it cook for 20-25 minutes. Stir occasionally to prevent the lentils from sticking to the bottom of the pot, until the lentils are tender and the soup has thickened.
- Taste the soup and season with salt and freshly ground black pepper. If the soup appears too thick, add additional broth or water one ladle at a time until the desired consistency is reached.
- Serve the soup hot, garnished with a handful of fresh cilantro and a generous squeeze of lime juice to brighten the flavors.


![To make these crispy fish tacos, gather these key items: - 1 lb white fish fillets (cod or tilapia work great) - 1 cup all-purpose flour - 1 cup cornmeal - 1 teaspoon paprika - 1/2 teaspoon cayenne pepper - 1/2 teaspoon garlic powder - 1/2 teaspoon salt - 1/4 teaspoon black pepper - 2 large eggs, beaten - Vegetable oil, for frying - 8 small corn tortillas The toppings add flavor and texture to your tacos. Here are my favorites: - 1/2 cup red cabbage, thinly sliced - 1 avocado, sliced - Fresh cilantro leaves, for garnish - Lime wedges, for serving To round out your meal, consider these sides: - Fresh salsa for a zesty kick - A drizzle of spicy crema for creaminess - Mexican rice for a hearty addition These ingredients make crispy fish tacos a fun and tasty weeknight meal. For the full recipe, be sure to check out the details above! Start by drying the fish fillets with paper towels. This step helps the coating stick better. Cut the fish into strips that are about 1 inch wide. This size cooks evenly and fits nicely in the tacos. In a medium bowl, mix the flour, cornmeal, paprika, cayenne pepper, garlic powder, salt, and black pepper. Stir until well combined. In another bowl, beat the eggs until smooth. This egg wash will help the coating stick. Heat about 1 inch of vegetable oil in a large skillet over medium-high heat. Check if the oil is hot by dropping in a pinch of the flour mix; if it sizzles, it's ready. Dip each fish strip into the egg wash, letting excess drip off. Then coat it in the flour mixture, pressing lightly to ensure it sticks. Place the coated fish in the hot oil, frying in batches to prevent overcrowding. Cook for 3-4 minutes on each side until golden brown. Transfer the fried fish to a plate lined with paper towels to absorb extra oil. Warm each corn tortilla in a dry skillet for about 30 seconds on each side. This makes them soft and easy to fold. For each tortilla, place 2-3 pieces of crispy fish. Top with sliced red cabbage, avocado, and fresh cilantro. Don’t forget to serve the tacos with lime wedges. A squeeze of lime adds a bright, fresh flavor. For the full recipe, you can check the complete details above. To get that perfect crunch, follow these steps: - Dry the Fish: Start by patting the fish fillets with paper towels. This removes moisture and helps them get crispy. - Use Cornmeal: Mixing cornmeal with flour gives extra texture and crunch. It makes the coating thicker and crispier. - Hot Oil: Make sure the oil is hot enough before frying. If it’s too cool, the fish will absorb oil and turn soggy. - Don’t Overcrowd: Fry the fish in batches. Too many pieces at once cools the oil and affects crispiness. Here are some common mistakes you should steer clear of: - Skipping the Egg Wash: The egg wash helps the coating stick. Don’t skip this step! - Not Heating the Oil Properly: Always test the oil. If it’s not hot, you’ll end up with greasy fish. - Using Wet Fish: Wet fish won’t fry well. Always dry them before coating. - Flipping Too Soon: Let the fish cook fully on one side before flipping. This helps it stay intact and crispy. Enhance your tacos with these tasty garnishes: - Fresh Cilantro: Adds a burst of freshness and color. - Avocado: Creamy avocado pairs well with crispy fish. - Lime Wedges: A squeeze of lime brightens up the flavors. - Salsa or Crema: A drizzle of spicy crema or your favorite salsa adds flavor and moisture. For the full recipe, check out [Full Recipe]. {{image_4}} If you want to try a different protein, shrimp works great. Just peel and devein before cooking. You can also use chicken strips. They need a bit more time to cook, so adjust frying time. Another option is tofu for a different texture. Press it to remove water and cut into strips. For a vegetarian twist, use cauliflower. Cut it into small florets, coat, and fry. It gets nice and crispy. If you want a vegan option, tempeh is fantastic. Slice it thin and marinate for flavor before frying. Just make sure to use a plant-based egg wash or a mixture of flour and water. To boost flavor, add lime zest to the coating mix. It brightens each bite. For spice, increase the cayenne pepper in the coating. You can also create a spicy sauce for drizzling on top. Mix yogurt or mayo with hot sauce for a creamy kick. Fresh herbs like cilantro or parsley can add freshness too. These variations keep the dish exciting, ensuring you can enjoy crispy fish tacos in many ways! Try out the full recipe to explore these options. To keep your crispy fish tacos fresh, store leftovers in an airtight container. Place the fish in one container and the toppings in another. This keeps the fish crispy and the toppings fresh. You can also wrap the tortillas in foil for better storage. To reheat, use the oven or an air fryer for best results. Preheat your oven to 350°F (175°C). Place the fish on a baking sheet and bake for about 10 minutes. If using an air fryer, heat it to 350°F (175°C) and fry for 5 minutes. This way, the fish stays crispy. Cooked fish lasts about 2-3 days in the fridge. Fresh toppings, like cabbage and avocado, can last 1-2 days. Store each item separately. If you have leftover tortillas, they can stay fresh in a sealed bag for up to a week. Always check for signs of spoilage before using any of the ingredients. For the full recipe, check the complete list of ingredients. I recommend using white fish like cod or tilapia. These fish have a mild flavor and cook well. They stay tender inside while getting crispy on the outside. Other good options include haddock or snapper. Yes, you can prepare the fish ahead of time. Cut the fish into strips and coat them. Keep the coated fish in the fridge for up to an hour. This helps the coating stick better when you fry them. If you can't find corn tortillas, flour tortillas are a good choice. You can also use lettuce leaves for a low-carb option. They add a nice crunch and freshness to your tacos. Crispy fish tacos can be gluten-free if you use gluten-free flour. Make sure to check the labels on your ingredients. Corn tortillas are naturally gluten-free, so they work well for this dish. For the best results, use gluten-free breadcrumbs or a gluten-free flour blend for coating the fish. Crispy fish tacos are a fun dish to make at home. We discussed key ingredients, topped it with tasty options, and paired it with sides. The steps from preparing the fish to frying it were simple and clear. Use my tips for crispy results and avoid common mistakes. You can also explore variations for flavors and dietary choices. Proper storage will keep your tacos fresh. Now, enjoy making and sharing your crispy fish tacos! They’re sure to impress.](https://goldendishy.com/wp-content/uploads/2025/06/e15c4a6f-d152-43b4-ae39-d2f9004115b6-768x768.webp)


![To make honey lemon roasted salmon, you need a few simple items: - 4 salmon fillets (6 oz each) - 1/4 cup honey - 2 tablespoons freshly squeezed lemon juice - Zest of 1 lemon (about 1 teaspoon) - 2 tablespoons extra virgin olive oil - 3 cloves garlic, finely minced - Salt and black pepper to taste These ingredients work well together. The honey adds sweetness, while the lemon gives a bright flavor. The olive oil helps keep the salmon moist. Garlic brings a nice kick to the dish. You can add some optional garnishes to make your dish look even better. Consider these: - Fresh dill sprigs for a pop of color and taste - Extra lemon wedges for serving These garnishes add freshness and make the dish more appealing. They also enhance the flavors. If you don't have all the ingredients, don't worry! You can swap some things out: - Use maple syrup instead of honey for a different sweet flavor. - Lime juice can replace lemon juice for a zesty twist. - If you lack fresh garlic, garlic powder works in a pinch. These swaps can still give you a tasty meal. Feel free to get creative! For the full recipe, check the detailed steps. To start, preheat your oven to 400°F (200°C). This gives the salmon a nice roast. In a bowl, mix honey, lemon juice, lemon zest, olive oil, and minced garlic. Whisk it well until smooth. Next, take your salmon fillets and season both sides with salt and black pepper. This will boost the flavor. Place the fillets skin-side down on a baking sheet lined with parchment paper. This step makes cleanup easy. Now, use a brush or spoon to spread the honey lemon mix over the salmon fillets. Make sure to coat them well for great taste. Now, place the baking sheet in the oven. Roast the salmon for 12-15 minutes. It’s done when the flesh looks opaque and flakes easily with a fork. This means it's tender and juicy. After roasting, take the salmon out of the oven. Let it rest for a few minutes. This keeps it warm and moist. When serving, lay the salmon on a white platter. Drizzle any leftover honey lemon mixture from the baking sheet on top. For a nice touch, add lemon wedges around the salmon. If you like, you can garnish with fresh dill sprigs. This adds color and flavor. You can find the full recipe and more tips at [Full Recipe]. Enjoy your meal! To get perfectly roasted salmon, start with fresh fillets. Fresh fish tastes better. Always preheat your oven to 400°F (200°C). This helps the salmon cook evenly. Make sure to line your baking sheet with parchment paper. This keeps the salmon from sticking. For a nice glaze, brush the honey lemon mixture on thick. This adds more flavor and caramelizes well. Roast for 12 to 15 minutes. The salmon is done when it flakes easily with a fork. One common mistake is overcooking the salmon. This makes it dry and tough. Always check it a few minutes before the time is up. Another mistake is not seasoning enough. Salt and pepper bring out the salmon's natural taste. Skipping the marinade is also a no-go. The honey and lemon mix adds great flavor. Lastly, don’t skip resting the salmon after cooking. This keeps it juicy and tender. Marinating is key to enhancing flavor. You can use the honey lemon mix as a marinade. Let the salmon sit in the mixture for 30 minutes before cooking. This allows the fish to soak up all the flavors. Feel free to add herbs like thyme or rosemary. These herbs pair well with salmon. You can also try different citrus juices for a twist. Orange or lime can add a nice touch. For more ideas, check out the Full Recipe. {{image_4}} Grilling salmon gives it a lovely smoky flavor. Start with the same honey lemon mix. Marinate the salmon in this blend for about 30 minutes. Preheat your grill to medium-high heat. Cook each side for about 5-7 minutes. Look for grill marks and a nice char. This method adds depth to the dish. Fresh herbs can brighten your meal. Add herbs like thyme or parsley to the honey lemon mix. These herbs work well with the salmon's rich flavor. Simply brush the mixture over the salmon fillets before cooking. It gives each bite a fresh taste. You can also sprinkle herbs on top after cooking for added color and flavor. Want a faster option? Pan-searing is quick and easy. Heat a bit of olive oil in a skillet over medium heat. Season the salmon with the honey lemon mix. Place the fillets skin-side down in the hot skillet. Cook for about 4-5 minutes per side. This method gives you a crispy skin and juicy inside. It's a great way to enjoy salmon on a busy night. For more cooking ideas, check out the Full Recipe. After cooking your honey lemon roasted salmon, let it cool down. Place the leftover salmon in an airtight container. This keeps it fresh. Store it in the fridge for up to three days. If you want to enjoy it later, do not wait too long. The sooner you store it, the better it tastes when you reheat. You can freeze honey lemon salmon if you have extra. Wrap each piece tightly in plastic wrap. Then, place them in a freezer-safe bag. Squeeze out the air before sealing. Label the bag with the date. You can freeze it for up to three months. When you're ready to eat it, thaw it overnight in the fridge. To reheat salmon, the oven works best. Preheat the oven to 275°F (135°C). Place the salmon on a baking sheet. Cover it with foil to prevent drying. Heat for about 15 minutes or until warm. You can also use a microwave. Put it on a plate and cover it with a microwave-safe lid. Heat for 30 seconds at a time until warm. Enjoy your meal again! For the full recipe, check back to our earlier section. You can tell salmon is done when it looks opaque. The flesh should flake easily with a fork. Use a meat thermometer if you want to be sure. The internal temp should reach 145°F (63°C). If you cut into the fish, it should look moist and tender. Overcooked salmon can be dry, so check it closely. Yes, you can use frozen salmon for honey lemon roasted salmon. Just make sure to thaw it first. Place the salmon in the fridge overnight or run it under cold water. Once thawed, pat it dry with a paper towel. Then, follow the recipe as usual. Cooking from frozen may require a few extra minutes. Honey lemon roasted salmon pairs well with many sides. Here are some ideas: - Steamed broccoli - Roasted asparagus - Quinoa salad - Garlic mashed potatoes - Lemon rice - Mixed greens with vinaigrette These sides add color and nutrition to your meal. You can mix and match based on your taste. Enjoy trying out different combinations! For the full recipe, check out the section above. This blog post covered how to make honey lemon roasted salmon. We explored key ingredients, including essential and optional items. I shared step-by-step cooking instructions and tips to avoid mistakes. You also learned about variations and how to store salmon. Try these methods to create simple and tasty meals. With practice, you'll impress yourself and others with your cooking skills. Enjoy your journey to making delicious honey lemon salmon!](https://goldendishy.com/wp-content/uploads/2025/07/988a6f99-fc0c-4e25-b6bc-fd8b1dc60d33-768x768.webp)