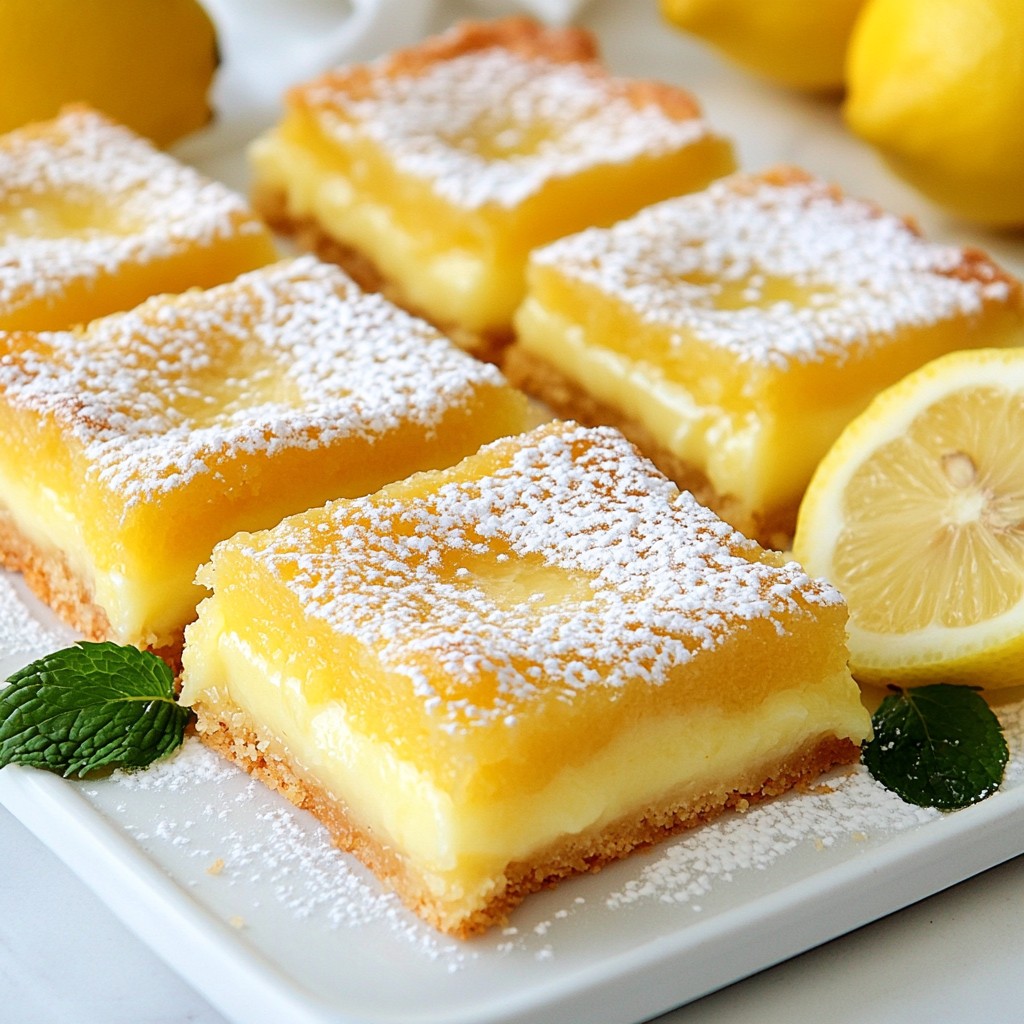
When you think of a tangy, refreshing dessert, classic lemon bars come to mind. These delightful treats combine zesty lemon flavor with a buttery crust that melts in your mouth. In this post, I’ll guide you step-by-step through making the perfect lemon bars, share tips to avoid common mistakes, and highlight tasty variations. Get ready to impress your friends and family with a sweet and sour dessert that’s simply irresistible!
Why I Love This Recipe
- Bright and Tangy Flavor: The combination of freshly squeezed lemon juice and zest creates a vibrant taste that perfectly balances sweetness and tartness, making each bite refreshing.
- Simple Preparation: With just a few straightforward steps, these lemon bars are easy to whip up, making them a great option for both seasoned bakers and beginners.
- Perfect for Any Occasion: Whether it's a summer picnic or a cozy winter gathering, these zesty lemon bars are a delightful treat that everyone will love.
- Visual Appeal: The bright yellow filling contrasted with a dusting of powdered sugar makes for an eye-catching dessert that’s sure to impress your guests.
Ingredients
List of Essential Ingredients
- 1 cup all-purpose flour
- 1/4 cup powdered sugar
- 1/2 cup unsalted butter, softened
- 2 large eggs, at room temperature
- 1 cup granulated sugar
- 2 tablespoons all-purpose flour (for filling)
- 1/2 teaspoon baking powder
- 1/4 cup freshly squeezed lemon juice
- Zest of 1 lemon
- Pinch of salt
- Additional powdered sugar for dusting
When making classic lemon bars, I focus on fresh, simple ingredients. Each one plays a key role in creating that tangy, sweet flavor.
The all-purpose flour builds the crust. It gives the right base to hold everything together. Powdered sugar adds a soft sweetness. Unsalted butter provides creaminess and richness.
Eggs are a must. They help bind the filling and give it a fluffy texture. Granulated sugar balances the tartness of the lemon juice.
For the filling, I use more flour and baking powder for a smooth and airy texture. Fresh lemon juice brings that bright flavor. The zest adds extra zing.
Lastly, a pinch of salt enhances all the flavors. Don’t forget the dusting of powdered sugar on top! It gives a nice finish and looks pretty, too.
Using these ingredients, you will create a treat that is both zesty and sweet. Each bite will be refreshing and satisfying.

Step-by-Step Instructions
Preparation of the Oven and Pan
- Preheat oven to 350°F (175°C).
- Prepare an 8x8 inch square baking pan. Grease it lightly or use parchment paper.
Making the Crust
- In a medium bowl, combine 1 cup of all-purpose flour and 1/4 cup of powdered sugar.
- Add 1/2 cup of softened butter. Mix with a fork until it looks like wet sand.
- Press this crust mixture into the bottom of the prepared pan. Make it even and tight.
Pouring and Baking the Filling
- In a separate bowl, whisk together 2 large eggs, 1 cup of granulated sugar, and 2 tablespoons of flour.
- Add 1/2 teaspoon of baking powder, 1/4 cup of fresh lemon juice, lemon zest, and a pinch of salt. Whisk until smooth.
- Once the crust is baked, carefully pour the lemon filling over the hot crust.
- Bake for 20-25 minutes. The filling should set and feel firm at the edges.
- Let the lemon bars cool completely in the pan on a wire rack. For the best texture, refrigerate for at least 2 hours.
Tips & Tricks
Achieving the Perfect Texture
To get the best texture in your lemon bars, start with room temperature ingredients. This helps them mix better and creates a smooth filling. When you bake, let the bars cool in the pan on a wire rack. For the best flavor, chill them in the fridge for at least two hours.
Avoiding Common Mistakes
One common pitfall is not measuring your ingredients accurately. Use a kitchen scale or measuring cups to ensure precision. Another mistake is underbaking the filling. It should feel firm around the edges but slightly soft in the center. This means it's just right!
Presentation Ideas
For a lovely presentation, sprinkle your lemon bars with powdered sugar. Add slices of fresh lemon and a few mint leaves on top. This will make your dessert look bright and fresh. Serve them on a decorative platter for special occasions, making your dessert stand out at any gathering.
Pro Tips
- Use Fresh Lemons: Always opt for fresh lemons for the juice and zest; they provide a brighter, more vibrant flavor compared to bottled alternatives.
- Chill for Best Texture: Allow the lemon bars to chill in the refrigerator for a couple of hours after baking to achieve the perfect firm and creamy texture.
- Cut with Care: For clean cuts, use a sharp knife and wipe it with a damp cloth between cuts to keep the edges neat.
- Enhance with Garnishes: Consider adding a light dusting of powdered sugar or fresh mint leaves on top just before serving for a beautiful presentation.
Variations
Gluten-Free Options
To make gluten-free lemon bars, you can swap the all-purpose flour. Use almond flour or a gluten-free blend instead. These options will give you a tasty crust. Make sure to check that your powdered sugar is also gluten-free.
Flavor Variations
You can change the flavor of lemon bars by using other citrus fruits. Try lime or orange juice for a fun twist. For a unique taste, add fresh herbs like basil or mint to the filling. This will give your bars a fresh and exciting flavor profile.
Vegan Substitutes
If you want to make vegan lemon bars, there are easy swaps for butter and eggs. Use coconut oil or a plant-based butter for the crust. For the filling, replace eggs with flaxseed meal mixed with water. This keeps the texture while making it plant-based.
Storage Info
Best Practices for Storing Lemon Bars
To keep your lemon bars fresh, store them in the fridge. Place them in an airtight container. This method helps maintain their tangy flavor and soft texture. If you use parchment paper, it makes for easy removal.
If you want to save some for later, freezing is a great option. Cut the lemon bars into squares first. Wrap each piece tightly in plastic wrap. Then, place them in a freezer bag. This way, they will stay fresh for up to three months.
Shelf Life of Lemon Bars
When stored properly, lemon bars last about one week in the fridge. You can tell they are still good if they smell fresh and look firm. If you see any mold or they smell off, it’s best to toss them out. Always check before serving to ensure safety and taste!
FAQs
How Can I Prevent My Lemon Bars from Being Too Tart?
To balance sweetness and tartness, adjust the sugar. You can add more granulated sugar to the filling. Another tip is to use a mix of lemon juice and zest. This helps keep that bright flavor while softening the tartness. Taste your filling before you bake. If it feels too sour, add a little more sugar.
Can I Use Bottled Lemon Juice Instead of Fresh?
Yes, you can use bottled lemon juice. It is convenient and saves time. However, fresh lemon juice has a better flavor. Bottled juice may contain additives. Check the label to ensure it is 100% juice. For the best taste, I recommend using fresh lemons when you can.
What Should I Serve with Lemon Bars?
Lemon bars pair well with sweet tea or lemonade. For a fun twist, try serving them with mint tea. A scoop of vanilla ice cream or whipped cream adds a nice touch. You can also offer fresh berries on the side for extra flavor and color.
Can I Double the Recipe for a Larger Batch?
Yes, you can double the recipe. Just double all the ingredients listed. Use a larger pan, like a 9x13 inch dish. Keep an eye on the baking time. You may need to bake longer. Check the filling for doneness; it should set in the center.
This post covered how to make tasty lemon bars. We shared the key ingredients, clear steps, and handy tips to avoid mistakes. You learned about flavor variations, gluten-free options, and how to store your bars for freshness. Use these ideas to impress your guests or treat yourself. Simple steps lead to great results. Enjoy your lemon bars, and don’t forget to share them! Happy baking!