Classic Chocolate Mousse Irresistible and Creamy Delight

If you crave a rich, creamy dessert, classic chocolate mousse is your answer. With just a few quality ingredients, you can create a delightful treat that boasts a smooth texture and deep chocolate flavor. I’ll guide you step-by-step through crafting this irresistible indulgence. Get ready to impress your family and friends with a dessert that’s as simple as it is sophisticated. Let’s whip up some magic!
Ingredients
When making classic chocolate mousse, using the right ingredients is key. Here’s what you need:
– 200g dark chocolate (70% cocoa), finely chopped
– 3 large eggs, separated
– 50g granulated sugar
– 1 teaspoon vanilla extract
– 1 cup heavy whipping cream
– A pinch of salt
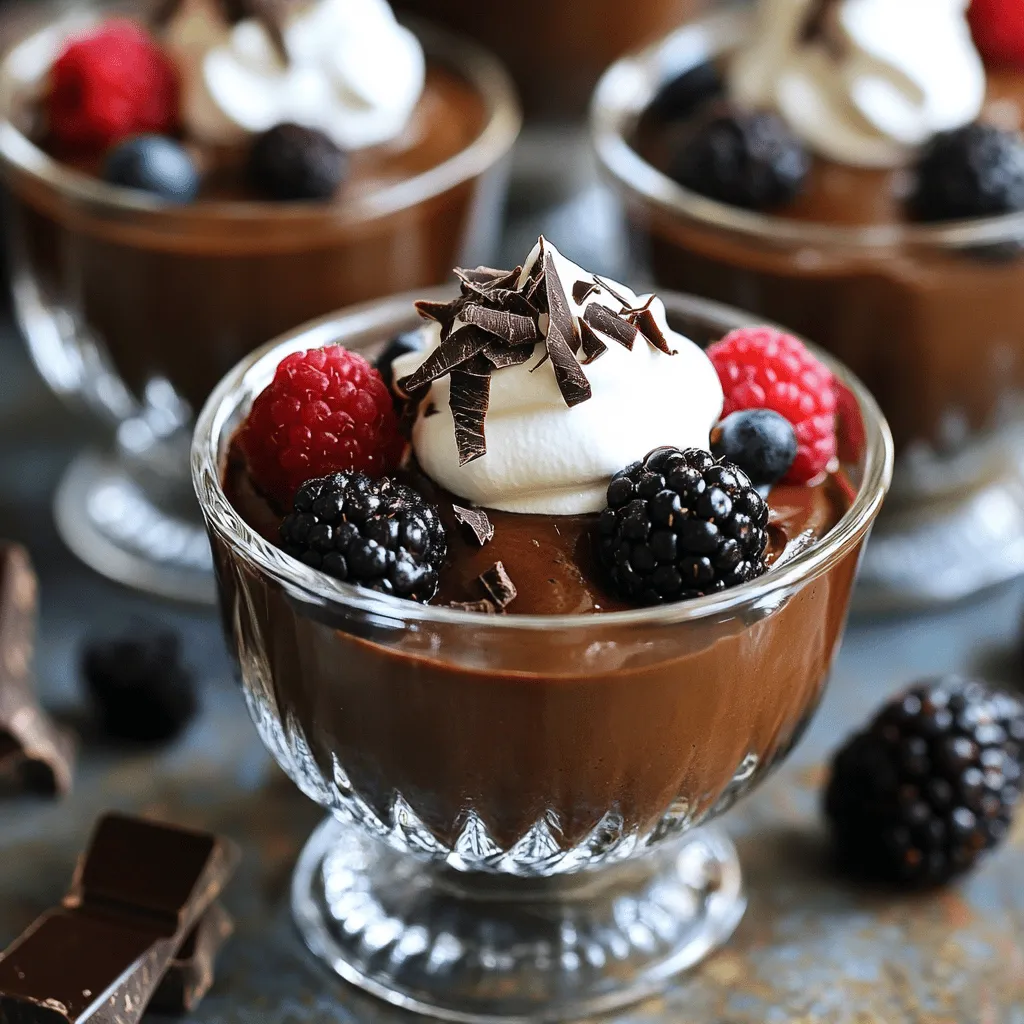
– Dark chocolate shavings or fresh berries, for garnish
These ingredients create a rich and creamy mousse that melts in your mouth. The dark chocolate gives it depth, while the whipped cream adds lightness. Each component plays a vital role in achieving that perfect texture and flavor.
What if I can’t find 70% cocoa chocolate?
You can use a lower cocoa percentage, but the mousse may taste sweeter. Adjust the sugar to balance it.
Why separate the eggs?
Separating the eggs helps create a fluffy texture. The whipped egg whites add air, making the mousse light.
Can I use different sweeteners?
Yes, you can use alternatives like honey or agave syrup. Just remember to adjust the amount to taste.
How do I store leftovers?
If you have any mousse left, place it in an airtight container and refrigerate. Enjoy within a few days for the best taste.
Step-by-Step Instructions
Melting the Chocolate
To start, set up a double boiler. This is simple. Place a heatproof bowl on top of a pot filled with simmering water. Make sure the bowl does not touch the water. Next, add your finely chopped dark chocolate to the bowl. Stir it constantly with a spatula. This keeps the chocolate from burning and helps it melt evenly. When the chocolate is smooth and melted, take it off the heat and let it cool slightly.
Whipping the Egg Whites
Grab a clean mixing bowl for the egg whites. Add a pinch of salt to help with the whipping. Use an electric whisk to beat the egg whites. First, whip them until soft peaks form. This means they should hold a shape but still look shiny. Now, slowly add half of your granulated sugar while whisking. Keep going until you reach stiff peaks. This means the egg whites stand up straight and do not fall. Set this bowl aside for later.
Preparing the Egg Yolk Mixture
Take another bowl for the egg yolks. Add the remaining sugar and vanilla extract. Use a mixer to beat this mixture. You want it to turn pale and creamy. Once it reaches that point, slowly fold in the melted chocolate. Use a spatula to combine them well. Make sure the chocolate is evenly mixed in, so every bite is rich in flavor.
Whipping the Cream
In a clean bowl, pour in the heavy cream. Use a whisk or mixer to whip it. Beat until soft peaks form, which means the cream should hold its shape but still be smooth. Now, gently fold the whipped cream into the chocolate mixture using a spatula. Be careful not to deflate the air you just whipped in. This will keep your mousse light and airy.
Combining the Mixtures
Now it’s time to combine everything. Carefully add the whipped egg whites to the chocolate mixture in three parts. Use a gentle folding technique. This helps maintain the lightness of the mousse. Make sure to fold slowly and with care until everything is blended. You want a moussey consistency, fluffy yet rich.
Portioning and Chilling
Once blended, it’s time to portion the mousse. Spoon or pipe the mixture into individual cups or bowls. This makes serving easy. After that, cover the cups with plastic wrap. Place them in the fridge for at least two hours. Chilling helps the mousse set and become firm. The wait is worth it for a creamy delight!
Tips & Tricks
Achieving the Perfect Texture
To get a smooth chocolate mousse, avoid lumps in your chocolate. When melting, use a double boiler. This method keeps the chocolate from burning. Stir the chocolate continuously until it melts completely. Let it cool a bit before mixing it with other ingredients.
Folding is key for a light mousse. Use a spatula to gently combine the whipped cream and the chocolate mixture. Start by adding a small amount of whipped cream to the chocolate. This helps to lighten it. Then, add the rest, folding it in carefully. This keeps the air in and makes your mousse fluffy.
Common Mistakes to Avoid
Over-whipping cream or egg whites is a common mistake. For the cream, stop whipping when soft peaks form. If you whip it too much, it can turn into butter, ruining the mousse. For egg whites, look for stiff peaks. They should stand straight up when you lift the whisk.
Also, check the temperature of your ingredients. Use room-temperature eggs for the best results. Cold eggs can be harder to whip, leading to less volume. The same goes for the heavy cream. Make sure it’s cold when you whip it.
Presentation Ideas
Garnishing your mousse can elevate its look. Try topping it with dark chocolate shavings or fresh berries. These add color and texture. You can also add a dollop of whipped cream on top.
For a sophisticated look, use clear cups or glasses. This way, you can show off the layers of the mousse. Pipe the mousse into the cups for a neat finish. A sprinkle of cocoa powder on top adds a nice touch, too.

Variations
Flavor Adaptations
You can change the taste of your chocolate mousse easily. Adding espresso gives it a rich kick. A bit of orange zest adds a fresh twist. Both options enhance the chocolate flavor. You can also use different types of chocolate. Milk chocolate offers a sweeter taste. White chocolate creates a creamier mousse. Each type gives a unique spin on this classic dessert.
Dietary Modifications
If you need gluten-free options, this mousse fits the bill! All the ingredients are naturally gluten-free. Just be sure to check your chocolate label for any hidden gluten. For those who want a vegan treat, you can swap out the eggs. Use aquafaba, which is the liquid from canned chickpeas. It whips up like egg whites and works great. This way, everyone can enjoy a creamy dessert.
Serving Pairings
To make your mousse even better, consider what to serve with it. Cookies are a great side for some crunch. Fresh fruit, like berries, adds a nice tartness. Ice cream can make it extra special. As for drinks, coffee is a classic choice. A glass of dessert wine pairs nicely too.
Storage Info
How to Store Chocolate Mousse
To keep chocolate mousse fresh, use airtight containers. Glass jars or plastic containers work well. Before sealing, place a piece of plastic wrap directly on the mousse. This prevents air from causing it to dry out. Store the mousse in the fridge. Avoid stacking other items on top, as this can ruin its shape.
Shelf Life
Chocolate mousse stays good in the fridge for about three days. After that, its texture may change. Look for signs of spoilage like a sour smell or discoloration. If you see any of these signs, it’s best to throw it away.
Can You Freeze It?
You can freeze chocolate mousse, but it may change texture. If you want to freeze it, use an airtight container. Leave some space at the top, as it expands when frozen. To thaw, move it to the fridge for several hours. Stir gently before serving to restore creaminess. Enjoy your mousse at its best!
FAQs
How long does it take for chocolate mousse to set?
Chocolate mousse needs about 2 hours to chill and set. This time allows the mousse to firm up and develop its rich texture. I suggest chilling it longer for a firmer bite.
Can I use different types of chocolate for this mousse?
Yes, you can use different chocolates! Dark chocolate gives a deep flavor. Milk chocolate offers a sweeter taste. White chocolate adds creaminess but lacks cocoa depth. Each type changes the mousse’s flavor and texture.
Is it safe to eat raw eggs in chocolate mousse?
Raw eggs can pose a risk, but you can use pasteurized eggs. These eggs are safe because they undergo treatment to kill harmful bacteria. You can also try egg substitutes, like silken tofu, for a vegan option.
What is the best way to serve chocolate mousse?
Serve chocolate mousse chilled. It tastes best cold and velvety. Use small cups or bowls for individual servings. Garnish with whipped cream, dark chocolate shavings, or fresh berries for a lovely look.
Can I make chocolate mousse in advance?
Yes, you can prepare chocolate mousse ahead of time. Make it a day before your event. Just keep it covered in the fridge. This way, the flavors meld, and it tastes even better!
You learned how to make a delicious chocolate mousse. We covered the key ingredients, like dark chocolate and heavy cream. Step-by-step, I showed you melting chocolate and whipping egg whites. Avoid common mistakes for the best texture, and try fun variations, too. Remember to store your mousse properly for freshness. This treat is simple yet fancy, perfect for any occasion. Enjoy making this chocolate delight and impress your friends and family.


![To bake a delicious Raspberry Lemon Loaf, you need these key ingredients: - 1 ½ cups all-purpose flour - 1 teaspoon baking powder - ½ teaspoon baking soda - ¼ teaspoon salt - ½ cup unsalted butter, softened - 1 cup granulated sugar - 2 large eggs, at room temperature - 1 teaspoon pure vanilla extract - Zest of 1 lemon, finely grated - ½ cup freshly squeezed lemon juice - 1 cup fresh raspberries (or frozen, thawed, and drained) - ¼ cup powdered sugar for glazing - 1 tablespoon freshly squeezed lemon juice for glazing You can add extra flavor or texture with these options: - ½ cup chopped nuts, like walnuts or almonds - ½ teaspoon almond extract for a nutty taste - Lemon zest can be increased for a stronger flavor - A handful of blueberries can mix well with raspberries If you run out of an ingredient, here are some swaps: - Use coconut oil instead of butter for a dairy-free version - Applesauce can replace eggs for a vegan loaf - If you lack lemon juice, use lime juice instead - Whole wheat flour can stand in for all-purpose flour, but it may change the texture With these ingredients and options, you can customize your Raspberry Lemon Loaf to fit your taste! Start by preheating your oven to 350°F (175°C). Grab a 9x5 inch loaf pan. Grease it with butter and lightly dust it with flour. This will help the loaf come out easily. In a medium bowl, whisk together the following: - 1 ½ cups all-purpose flour - 1 teaspoon baking powder - ½ teaspoon baking soda - ¼ teaspoon salt Set this mixture aside for later use. This step ensures the leavening agents are evenly distributed. In a large mixing bowl, use an electric mixer to cream together: - ½ cup unsalted butter, softened - 1 cup granulated sugar Beat them for about 3-5 minutes. The mixture should turn light and fluffy. This helps air to blend into the butter. Now, add 2 large eggs one at a time. Mix well after each addition. Next, stir in: - 1 teaspoon pure vanilla extract - Zest of 1 lemon Make sure everything combines fully. This adds a nice flavor to your loaf. Slowly pour in ½ cup of freshly squeezed lemon juice. Mix gently until it blends well with the other wet ingredients. This step gives your loaf a bright, zesty taste. Gradually add the dry mixture to the wet mix. Stir gently until just combined. Be careful not to overmix. This keeps your loaf light and airy. Now, it’s time to add the fun part! Gently fold in 1 cup of fresh raspberries. If you use frozen ones, coat them lightly in flour. This helps them stay suspended in the batter. Pour the batter into your prepared loaf pan. Smooth the top with a spatula. Bake in the preheated oven for 50-60 minutes. Check for doneness by inserting a toothpick in the center. It should come out clean. Once baked, let the loaf cool in the pan for about 10 minutes. Then transfer it to a wire rack to cool completely. For glazing, mix together: - ¼ cup powdered sugar - 1 tablespoon freshly squeezed lemon juice Drizzle this glaze over the cooled loaf for a sweet finish. Slice the loaf into generous pieces. Enjoy the burst of raspberry and lemon flavors in every bite! You can serve it on pretty plates. Garnish with fresh raspberries and a sprinkle of lemon zest for an elegant touch. This loaf is perfect for breakfast or a sweet snack! For the Full Recipe, check out the detailed instructions. One big mistake is overmixing the batter. This can make the loaf tough. Mix until just combined for a light texture. Another mistake is not checking the oven temperature. An oven thermometer can help ensure accuracy. Also, if you forget to grease your pan, the loaf may stick. Always prepare your pan before pouring in the batter. For a soft and moist loaf, use room temperature ingredients. Cold butter or eggs can lead to uneven mixing. When folding in raspberries, do it gently. This helps keep them whole and prevents a mushy loaf. Make sure your oven is fully preheated. This ensures even baking and a perfect rise. To boost flavor, add more lemon zest. This can brighten the taste. You can also mix in a dash of almond extract for a unique twist. If you want a sweeter glaze, add more powdered sugar. For a touch of spice, a pinch of cinnamon can be delightful. Enjoy experimenting with flavors to find your perfect blend! {{image_4}} To make a gluten-free version, swap the all-purpose flour with a gluten-free blend. Use one that works well for baking. The texture may change slightly, but the taste will still shine. This version is just as delicious and perfect for those with gluten issues. For a vegan twist, replace the eggs with flax eggs. Mix one tablespoon of ground flaxseed with three tablespoons of water. Let it sit for five minutes. Use a plant-based butter instead of regular butter. This keeps the loaf moist and tasty while being dairy-free. You can switch out the raspberries for other fruits! Blueberries or strawberries work well. For a tropical touch, try diced pineapple or mango. Each fruit brings its own flavor, making your loaf unique. Experiment and find your favorite mix! For the full recipe, refer to the section above. After you bake your Raspberry Lemon Loaf, let it cool completely. Wrap it tightly in plastic wrap or foil. You can also place it in an airtight container. Store it at room temperature for up to three days. If you prefer, keep it in the fridge for about a week. This helps keep it fresh and moist. To freeze the loaf, first cool it completely. Then, slice it into even pieces. Wrap each slice in plastic wrap. Next, place the wrapped slices in a freezer-safe bag. You can freeze them for up to three months. When you’re ready to enjoy a slice, thaw it in the fridge overnight or let it sit at room temperature for a few hours. Reheating is simple. You can use a microwave or an oven. For the microwave, heat a slice for about 15-20 seconds. Check if it’s warm enough. If you use the oven, preheat it to 350°F (175°C). Place the slice on a baking sheet for about 5-10 minutes. This method keeps the loaf soft and tasty. Enjoy your Raspberry Lemon Loaf warm with a cup of tea or coffee! You can check if your loaf is done by inserting a toothpick in the center. If it comes out clean or with just a few crumbs, your loaf is ready. You can also look for a golden-brown crust and a slight spring back when you gently press the top. Yes, you can use frozen raspberries! Just make sure to thaw them and drain off any extra liquid. Toss them in some flour before folding them into the batter. This helps to keep them from sinking to the bottom while baking. If you don't have lemon juice, you can use lime juice or even apple cider vinegar. Both options will give a nice tang to your loaf. Just remember that the flavor will change slightly. The Raspberry Lemon Loaf will stay fresh for about 3-4 days at room temperature if stored in an airtight container. It also freezes well for up to 3 months. Just wrap it tightly before freezing. Absolutely! You can make the loaf a day or two ahead of time. Store it in an airtight container to keep it moist. You can also prepare the batter in advance and bake it later for a fresh treat. Be sure to check the [Full Recipe] for more tips! Here is the full recipe for Raspberry Lemon Dream Loaf. This treat is bright, sweet, and tangy. You will want to make it again and again. Ingredients: - 1 ½ cups all-purpose flour - 1 teaspoon baking powder - ½ teaspoon baking soda - ¼ teaspoon salt - ½ cup unsalted butter, softened to room temperature - 1 cup granulated sugar - 2 large eggs, at room temperature - 1 teaspoon pure vanilla extract - Zest of 1 lemon, finely grated - ½ cup freshly squeezed lemon juice - 1 cup fresh raspberries (or frozen raspberries, thawed and drained) - ¼ cup powdered sugar for glazing - 1 tablespoon freshly squeezed lemon juice for glazing This loaf serves about 10 people. Each slice has around 200 calories. You get a nice mix of carbs, fat, and protein. The fresh raspberries add fiber and vitamins, too. Slice the loaf into thick pieces. Each slice is perfect for a dessert or a snack. You can serve it on its own or with a cup of tea. The bright flavors make it a crowd-pleaser. For a fancy touch, add a few raspberries on top. Enjoy every bite! In this article, we explored the essential ingredients for a Raspberry Lemon Loaf, including optional add-ins and substitutions. I provided clear, step-by-step instructions to guide you from mixing to baking. We discussed tips for avoiding mistakes and achieving the right texture. You also learned about variations, storage methods, and answers to common questions. Now, with these insights, you can create a delicious loaf that suits your taste and needs. Enjoy baking and sharing this delightful treat!](https://goldendishy.com/wp-content/uploads/2025/07/83025fd5-21c0-4ee2-bbe4-d247d9a88122-768x768.webp)

. To keep your scones fresh, let them cool completely. Place them in an airtight container. You can store them at room temperature for up to three days. If you live in a humid area, refrigerate them to prevent spoilage. Use parchment paper between layers to keep them from sticking. Reheat your scones for the best taste. Preheat your oven to 350°F (175°C). Place the scones on a baking sheet. Heat them for about 5 to 10 minutes, or until warm. You can also use a microwave. Heat them for 15 to 20 seconds. This warms them quickly but may make them soft. To freeze scones, wrap each one in plastic wrap. Place them in a freezer bag or airtight container. Label with the date for easy tracking. They can last up to three months in the freezer. When ready to eat, thaw them in the fridge overnight. Reheat as mentioned above for a fresh taste. Check the Full Recipe for more tips on making these treats! To make cinnamon roll scones, follow this simple process. First, mix the dry ingredients in a bowl. This includes flour, sugar, baking powder, salt, and cinnamon. Next, cut in cold butter until the mix looks crumbly. Then, whisk buttermilk, melted butter, and vanilla in another bowl. Combine the wet and dry mixes gently. Pat the dough into a rectangle, brush melted butter, and sprinkle brown sugar for the swirl. Roll it up, slice it, and bake. For the full recipe, check the details above. Yes, you can use milk instead of buttermilk. If you do, add a splash of lemon juice or vinegar. This helps the milk mimic buttermilk's tangy flavor. It also makes the scones soft and fluffy. However, buttermilk adds a richer taste. Serve cinnamon roll scones warm for the best taste. Drizzle the icing over the top just before serving. You can also sprinkle a little cinnamon on top for added flavor. Pair them with coffee or tea for a relaxing treat. They look great on a nice platter. Cinnamon roll scones last for about two days at room temperature. To keep them fresh longer, store them in an airtight container. You can also refrigerate them for up to a week. Just warm them in the oven before serving to regain that fresh-baked taste. Yes, you can make cinnamon roll scones ahead of time. Prepare the dough, and cut the scones. Then, place them on a baking sheet and freeze until firm. After that, transfer them to a bag or container. When you’re ready, bake them straight from the freezer, adding a few extra minutes to the baking time. This way, you enjoy fresh scones anytime! Making scones is simple and fun. You learned about ingredients, tools, and baking steps. I shared tips to help you avoid mistakes and find the best flavors. You also discovered flavor variations and storage methods. Scones can be your tasty treat for any occasion. With a few easy steps, you can impress your friends. Enjoy baking, and don’t forget to share your tasty results!](https://goldendishy.com/wp-content/uploads/2025/07/878de396-77ac-4fc1-b8cf-b56551936fe1-768x768.webp)
![To make Lemon Blueberry Overnight Oats, you need: - 1 cup rolled oats - 1 cup milk (dairy or any plant-based alternative) - 1/2 cup Greek yogurt (or plant-based yogurt) - 1/2 cup fresh blueberries (or frozen, thawed) - Zest of 1 medium lemon - 2 tablespoons fresh lemon juice - 1 tablespoon maple syrup (optional for sweetness) - 1/2 teaspoon pure vanilla extract - Pinch of salt - Toppings: extra fresh blueberries, sliced almonds, and chia seeds You can switch out some ingredients if needed: - Use almond milk or oat milk instead of dairy milk. - Swap Greek yogurt for coconut yogurt for a dairy-free option. - Replace maple syrup with honey or agave for sweetness. - If you don’t have fresh blueberries, frozen ones work great too. Each ingredient plays a key role in this recipe: - Rolled oats provide the base. They soak up the liquid and become soft. - Milk adds creaminess and helps oats absorb flavors. - Greek yogurt offers protein and a nice texture. - Blueberries add sweetness and antioxidants. - Lemon zest and juice bring brightness and a fresh taste. - Maple syrup sweetens the dish naturally. - Vanilla extract enhances the overall flavor. - Salt balances the sweetness. - Toppings like almonds and chia seeds add crunch and nutrients. These ingredients come together to create a tasty and healthy breakfast. For the full recipe, refer to the earlier section. First, gather all your ingredients. You need rolled oats, milk, Greek yogurt, blueberries, lemon zest, lemon juice, maple syrup, vanilla extract, and salt. This simple mix brings bright flavors to your morning. It takes just ten minutes to prep. In a medium bowl, combine the rolled oats, Greek yogurt, and milk. Add in the lemon zest, lemon juice, maple syrup, vanilla extract, and a pinch of salt. Use a spoon or spatula to mix everything well. Make sure the oats soak up the liquid. This step is key for the best texture. Once mixed, gently fold in the fresh blueberries. Be careful not to mash them. Now, divide the oat mixture into two glass jars or containers. Make sure each jar has an even amount. Seal the jars tightly and place them in the fridge. Let them chill overnight or for at least four hours. This waiting time allows the oats to soften and soak in all those tasty flavors. In the morning, stir the oats. If they are too thick, add a splash of milk. Top with extra blueberries, sliced almonds, and chia seeds. Enjoy this delicious, healthy breakfast! For the full recipe, check out the provided instructions. To get the best texture, use rolled oats. They soak well and stay chewy. Mix your oats with yogurt and milk in a bowl. This makes them creamy. You can add lemon zest and juice for a bright taste. If you want more sweetness, a little maple syrup works great. Stir the mixture until it is smooth, and the oats are well covered. Don’t forget to gently fold in the blueberries. This keeps them intact, adding bursts of flavor. When serving, use clear jars to show off the colors. A sprinkle of sliced almonds gives a nice crunch. You can top it with extra blueberries for freshness. A few chia seeds add a fun texture and more nutrients. For a zesty look, place a lemon slice on the jar’s edge. This makes your oats not just tasty but also pretty! To boost nutrition, consider adding nuts or seeds. Almonds and chia seeds are great options. They add healthy fats and protein. You can also swap regular yogurt for Greek yogurt for extra protein. If you want a vegan option, use plant-based yogurt and milk. This keeps it creamy and dairy-free. By adding these ingredients, you can make your overnight oats even healthier while still enjoying the delicious flavor. For the complete recipe, check out the Full Recipe section. {{image_4}} You can switch the blueberries for other fruits. Try strawberries, raspberries, or peaches. Each fruit brings its own flavor and texture. You can also mix fruits for a fun twist. Just keep the same amount of fruit to match the recipe. If you want a different sweet taste, use honey or agave syrup. You can also skip sweeteners altogether if you prefer a tart flavor. Adjust the amount to suit your taste. Remember, the fruit adds natural sweetness too! Add spices for extra flavor. Cinnamon or nutmeg can give warmth. You might also try adding a teaspoon of almond extract for a nutty twist. If you like it creamy, add more Greek yogurt. For crunch, mix in nuts or seeds. These simple changes can make your oats unique and delicious. For the full recipe, check out the instructions above! Store your lemon blueberry overnight oats in airtight containers. This keeps them fresh and prevents spills. Glass jars work great. They also show off the beautiful layers. Always seal them tightly. Your oats will stay good in the fridge for up to five days. The flavors will blend better as they sit. Check for any off smells before eating. If they look or smell funny, toss them out. You can eat these oats cold, right from the fridge. If you prefer them warm, heat them in the microwave. Add a splash of milk if they seem too thick. Heat for about 30 seconds, then stir. Enjoy your creamy, zesty oats! Check the [Full Recipe] for details on how to make them. Yes, you can use quick oats. They will cook faster than rolled oats. Quick oats may make your mixture creamier. However, they might lose some texture. Rolled oats offer a nice chewiness. I have found that rolled oats work best for overnight oats. These oats last about 3 to 5 days in the fridge. Store them in airtight containers. This keeps them fresh and tasty. Just stir before eating. You may need to add a splash of milk if they seem thick. Yes, you can easily make these oats vegan. Use plant-based milk and yogurt. Maple syrup is a great sweetener. This keeps the recipe delicious. You won’t lose any flavor. Check the Full Recipe for more tips! This article covered the key ingredients and their roles in making Lemon Blueberry Overnight Oats. We explored step-by-step methods for mixing and chilling. Tips and tricks helped improve texture and flavor. Variations allow customization to suit your taste. Lastly, we discussed storage details to keep your oats fresh. Overall, making overnight oats is easy and flexible. Enjoy experimenting with different flavors and ingredients!](https://goldendishy.com/wp-content/uploads/2025/06/368f6847-7d49-481c-8601-ff06e206830f-768x768.webp)
![For the baked cinnamon apple chips, you will need: - 2 large apples (Honeycrisp or Fuji are ideal for sweetness and texture) - 1 teaspoon ground cinnamon - 1 tablespoon sugar (coconut sugar serves as a healthier alternative) - A pinch of salt - Optional: 1 teaspoon lemon juice (to prevent browning of the apple slices) You can switch out the sugar for a natural sweetener like honey or agave. For a fun twist, try adding a sprinkle of nutmeg or cardamom in place of cinnamon. If you want to skip the lemon juice, you can use vinegar. Just remember, it may change the flavor a bit. I recommend using Honeycrisp or Fuji apples. They offer a great mix of sweetness and crunch. Other good choices are Granny Smith for a tart flavor or Gala for a milder taste. Each type brings its own charm to the chips, so feel free to experiment with your favorites. First, set your oven to 225°F (110°C). This low heat helps the apples dry out slowly. While the oven warms up, line two baking sheets with parchment paper. This keeps the apple chips from sticking and makes cleanup easy. Next, wash the apples under cool water. This step is key for cleanliness. Use an apple corer or a sharp knife to remove the cores. Slice the apples into thin rounds, about 1/8 inch thick. If you want to keep them fresh, sprinkle a bit of lemon juice on the slices. This will stop browning. Now, lay the apple slices on the baking sheets. Make sure they do not overlap. Overcrowding will make it hard for them to crisp up. When the apple slices bake for about 45 minutes, flip them over. This helps them cook evenly. Use a spatula and be careful not to break them. Keep an eye on the apple chips as they bake. After 1 to 1.5 hours, they should look golden and feel crisp. If they still feel soft, let them bake a little longer. Once done, take them out and let them cool on the sheets. They will get crunchier as they cool. For the complete recipe, check out the Full Recipe section! To get your apple chips nice and crispy, slice them thin. Aim for about 1/8 inch thick. The thinner the slice, the crunchier the chip. Lay the slices flat on your baking sheet without overlapping. This helps them bake evenly. Baking at a low temperature, like 225°F, lets the moisture escape slowly. Flip them halfway through baking for even crispiness. Keep an eye on the apple chips as they bake. They can go from crisp to burnt quickly. Check them every 15 minutes towards the end of baking. Look for a light golden color and a crisp texture. If they bend, they need more time. If they snap, they're done. This way, you can catch them at just the right moment. These apple chips are great on their own, but you can make them even better. Serve them in a bright bowl for a fun touch. Pair them with dips like nut butter or yogurt for a tasty snack. You can also sprinkle some extra cinnamon on top before serving for added flavor. Enjoy them as a healthy treat any time of day! {{image_4}} You can change the spice game with nutmeg or cloves. Nutmeg gives a warm, sweet taste. Cloves add a rich, spicy flavor. Try mixing cinnamon with these spices for a fun twist. A little goes a long way, so start small. Just a pinch can transform your apple chips into something special. If you want to switch things up, use different sweeteners. Honey adds a nice floral note. Agave syrup is a great vegan choice. Coconut sugar offers a brown sugar taste. Each sweetener brings its unique flavor. Just remember to adjust the amount based on sweetness. Check the [Full Recipe] for guidance on using your chosen sweetener. Want to boost flavor? Add nuts or dried fruit. Chopped almonds or walnuts add crunch and protein. Dried cranberries or raisins can bring sweetness. Mix them into your cinnamon-sugar blend for an extra treat. You can even sprinkle them on top before baking. This way, each bite becomes a delightful surprise. To keep your baked cinnamon apple chips fresh, use an airtight container. Glass jars work well. You can also use resealable plastic bags. Just make sure to remove as much air as possible. Store them in a cool, dark place. Avoid direct sunlight or heat, which can make them soggy. When stored properly, these chips can last about one week. After that, they may lose some crunch. If you place them in the fridge, they can last longer, but the texture might change. Always check for any signs of moisture or softness before enjoying them. If your apple chips lose their crunch, don’t worry! You can easily revive them. Simply preheat your oven to 200°F (93°C). Spread the chips on a baking sheet in a single layer. Bake them for about 5 to 10 minutes. This will help bring back their crispy texture. Enjoy them fresh from the oven! Yes, you can use a dehydrator. Just slice the apples thinly. Set the dehydrator to 135°F (57°C). Dehydrate for 6 to 8 hours. Check them often. You want them crisp but not burnt. This method keeps more nutrients than baking. To stop browning, you can use lemon juice. Just sprinkle a teaspoon on the slices. This acid slows down the browning process. You can also soak the slices in a mix of water and lemon juice for a few minutes. Rinse and dry them before baking. Apple chips are a great snack! They have fiber that helps digestion. They are low in calories, making them a healthier choice. You get natural sweetness without added sugar. Plus, they contain vitamins A and C. They are good for your skin and immune system. Yes, you can freeze them! First, let them cool completely. Place them in a single layer on a baking sheet. Freeze until solid. Then, transfer to an airtight bag. They can last up to 6 months in the freezer. Just let them thaw before eating. For the full recipe, check the earlier section. In this post, we explored how to make delicious baked cinnamon apple chips. We covered ingredients, substitutions, and the best apple varieties. The step-by-step guide included tips for achieving crispiness and avoiding overbaking. You also learned variations with spices and sweeteners, along with storage information. Now you have all the tools to create your own tasty snacks. Enjoy your homemade apple chips!](https://goldendishy.com/wp-content/uploads/2025/07/917ca0c2-206f-45f2-a1a8-9893eb8662bc-768x768.webp)