Cilantro Lime Shrimp Tacos Fresh and Flavorful Dish

If you crave a meal that’s both fresh and packed with flavor, look no further! Cilantro lime shrimp tacos are the perfect solution. With juicy shrimp marinated in a zesty mix, topped with your favorite fixings, these tacos will become your new go-to dish. I’ll guide you through each step, share handy tips, and offer tasty variations so you can whip up this delightful meal with ease. Ready to dive in? Let’s go!
Ingredients
Main Ingredients for Cilantro Lime Shrimp Tacos
– 1 lb large shrimp, peeled and deveined
– 2 tablespoons extra virgin olive oil
– 3 tablespoons freshly squeezed lime juice
– Zest of 1 lime
– 2 cloves garlic, finely minced
– 1 teaspoon ground cumin
– 1 teaspoon smoked paprika
– Salt and freshly ground black pepper to taste
– ½ cup fresh cilantro, roughly chopped
– 8 corn or flour tortillas (your choice)
These ingredients create a bright and zesty flavor in your tacos. The shrimp, marinated in olive oil, lime juice, and spices, become the star of the dish. Remember to choose fresh shrimp for the best taste.
Optional Toppings
– 1 ripe avocado, sliced
– 1 cup red cabbage, finely shredded
– ½ cup sour cream or Greek yogurt (for a healthier twist)
– Lime wedges, for serving
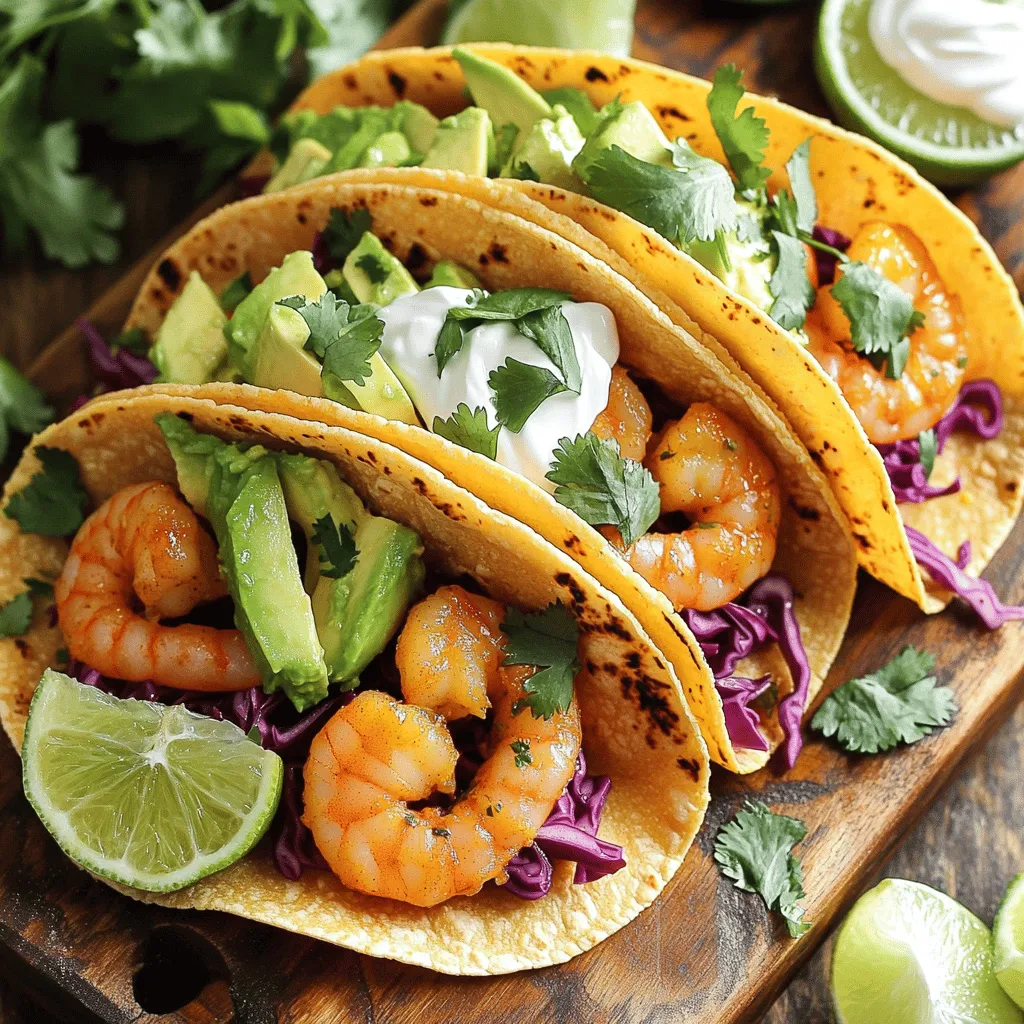
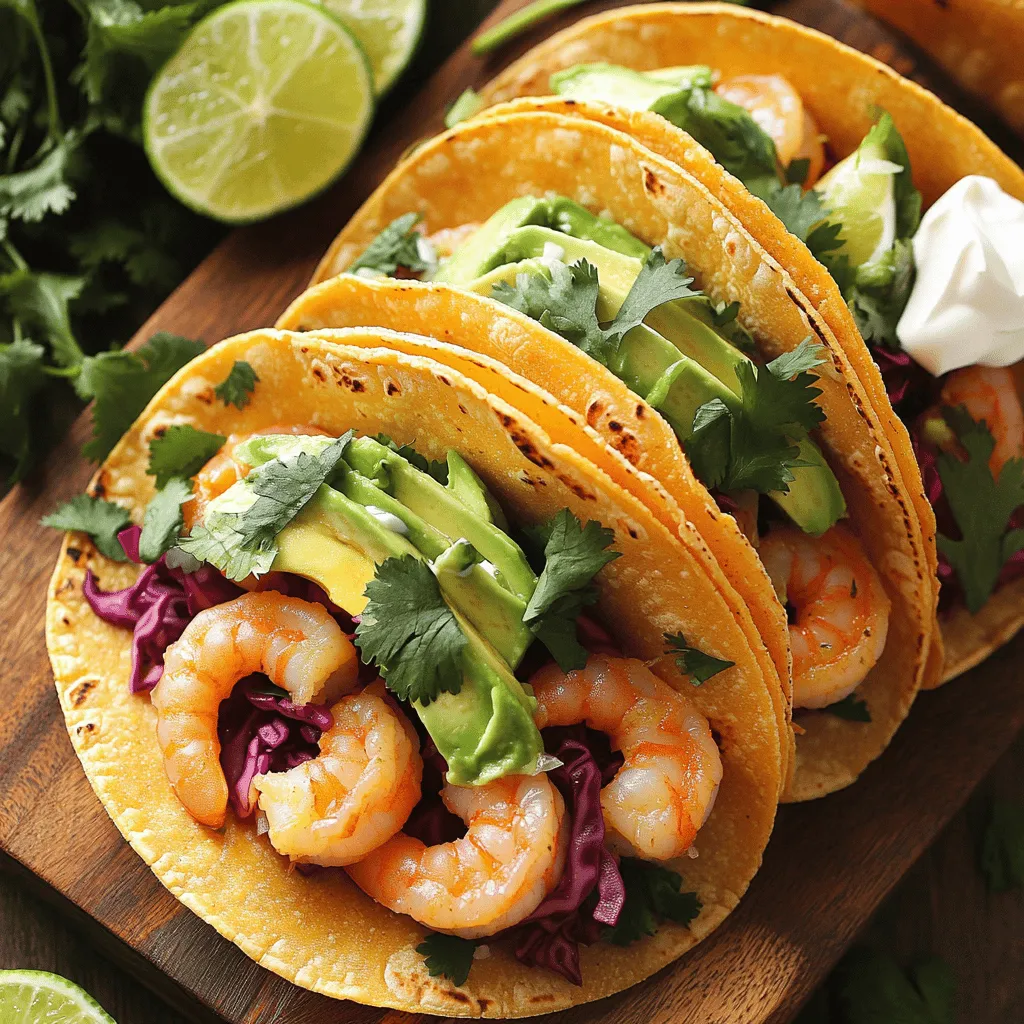
These toppings add texture and creaminess. Avocado brings a rich flavor, while red cabbage offers a nice crunch. Sour cream or Greek yogurt gives a cool touch, balancing the spices.
Recommended Side Dishes
– Mexican rice
– Black beans
– Grilled corn on the cob
– Fresh salsa or guacamole
Pairing your tacos with these sides enhances the meal. Mexican rice and black beans offer hearty flavors, while grilled corn adds a sweet crunch. Salsa or guacamole will give an extra burst of freshness.
Step-by-Step Instructions
Marinade Preparation
To start, grab a large mixing bowl. Add 2 tablespoons of extra virgin olive oil. Next, squeeze in 3 tablespoons of fresh lime juice. Don’t forget the zest of 1 lime for extra flavor. Now, finely mince 2 cloves of garlic and add them to the bowl. Sprinkle in 1 teaspoon of ground cumin and 1 teaspoon of smoked paprika. Season with salt and black pepper. Whisk everything together until it’s smooth and fragrant. This marinade is key for juicy, tasty shrimp.
Cooking the Shrimp
After the shrimp has marinated for 15-30 minutes, heat a skillet over medium-high heat. Once the skillet is hot, add the shrimp carefully. Cook for about 2-3 minutes on each side. Keep an eye on them; they should turn pink and opaque. Overcooked shrimp can become tough, so take them off the heat when they look just right.
Assembling the Tacos
Now it’s time to build your tacos! Warm your tortillas in the skillet or microwave. Place a warm tortilla on your plate. Add a generous amount of sautéed shrimp in the center. Top it with slices of ripe avocado and a handful of finely shredded red cabbage. Drizzle some sour cream or Greek yogurt on top for creaminess. Finally, sprinkle fresh cilantro for a burst of flavor. Serve with lime wedges on the side for those who want a tangy kick. Enjoy your fresh and flavorful dish!
Tips & Tricks
Choosing Fresh Shrimp
When picking shrimp, look for a few key things. Choose shrimp that feel firm and look shiny. They should smell like the ocean, not fishy. For the best flavor, buy shrimp that are fresh or frozen. Large shrimp work best for tacos, as they hold up well. If you can, buy shrimp that are wild-caught for great taste and quality.
Avoiding Overcooked Shrimp
Cooking shrimp can be tricky. Overcooked shrimp become tough and rubbery. To avoid this, pay close attention while cooking. Sauté shrimp for only 2-3 minutes on each side. They should turn pink and opaque when done. If you see them curling tightly, they’re overcooked. Remove them from the heat as soon as they look perfect.
Perfecting Flavor Combinations
The marinade makes the shrimp shine. Use fresh lime juice and zest for a bright taste. Ground cumin and smoked paprika add warmth and depth. Fresh cilantro gives a nice herbal note. Don’t forget to add salt and pepper, as they enhance all the flavors. For a tasty twist, try adding diced jalapeños or a splash of hot sauce. These small changes can make a big difference in your tacos.

Variations
Dietary Adjustments (Gluten-Free, Dairy-Free)
To make Cilantro Lime Shrimp Tacos gluten-free, choose corn tortillas. They are safe and tasty. For a dairy-free option, swap sour cream with Greek yogurt or a vegan alternative. You can use cashew cream or avocado instead. These swaps keep the dish fresh and flavorful.
Different Proteins (Fish, Chicken)
You can easily switch shrimp for fish or chicken. For fish, I recommend using white fish like tilapia or cod. Season and cook it just like the shrimp. If you prefer chicken, use boneless, skinless breasts. Slice them thin and marinate as you would the shrimp. Cook until no longer pink.
Vegetarian Alternatives
For a vegetarian version, skip the shrimp altogether. Use black beans or grilled veggies like bell peppers and zucchini. Marinate them in lime juice and spices for flavor. These options give you a hearty and satisfying taco without meat. Enjoy the same fresh toppings for color and taste.
Storage Info
Storing Leftover Shrimp
If you have leftover shrimp, store it in an airtight container. Place it in the fridge. It will stay fresh for about two days. Make sure the shrimp cools down before you store it. This helps keep the flavors intact. If you notice any strong smells, it’s best to toss it.
Reheating Instructions
To reheat shrimp, I suggest using a skillet. Heat the skillet over medium-low heat. Add a splash of olive oil to keep it moist. Cook for a few minutes until it’s warm. Avoid high heat; this can make the shrimp tough. You can also microwave it, but be careful not to overdo it. Heat in short bursts of 20 seconds.
Freezing Tacos for Later
If you want to freeze tacos, wrap them tightly in plastic wrap first. Then, place them in a freezer bag. They can last up to three months. When ready to eat, thaw them in the fridge overnight. Reheat in the oven or on a skillet for the best taste. Fresh toppings can be added when serving.
FAQs
How can I make Cilantro Lime Shrimp Tacos ahead of time?
You can prepare the shrimp marinade ahead. Mix the olive oil, lime juice, garlic, cumin, paprika, salt, and pepper in a bowl. Store it in the fridge for up to a day. When ready to cook, just add the shrimp to the marinade. Let them soak for 15 to 30 minutes before cooking. You can also chop the veggies and slice the avocado ahead of time. Just keep everything covered in the fridge.
What are the best tortillas to use?
Corn tortillas work well for these tacos. They add a nice texture and flavor. Flour tortillas can also work if you prefer them. Choose what you like best. Warm them before filling to keep them soft and pliable. This makes them easier to fold without tearing.
Can I use frozen shrimp for this recipe?
Yes, you can use frozen shrimp. Just make sure to thaw them first. You can do this by placing them in a bowl of cold water for about 15-20 minutes. Once thawed, peel and devein them if needed. Then, follow the recipe as usual.
How spicy are Cilantro Lime Shrimp Tacos?
These tacos are not very spicy. The recipe uses smoked paprika and cumin for flavor, not heat. If you want more spice, you can add diced jalapeños or a pinch of cayenne pepper. Adjust to your taste, and enjoy the burst of fresh flavors!
Cilantro Lime Shrimp Tacos are quick and fun to make. We covered key ingredients, step-by-step instructions, and helpful tips. You can even switch things up with different proteins or store leftovers easily. These tacos are great for any meal and super tasty. Experiment with toppings and sides to make them your own. Enjoy your cooking, and share your delicious results with friends!


![- 8 ounces fettuccine or spaghetti - 1 pound boneless, skinless chicken breast - 2 cups cremini or button mushrooms - 3 cloves garlic - 1 medium onion - 1 cup heavy cream - 1 tablespoon extra virgin olive oil - 1 teaspoon dried thyme - 1/2 cup freshly grated Parmesan cheese When you gather these ingredients, you're on your way to a delicious meal. The fettuccine or spaghetti forms the base of the dish. I love using fresh chicken breast; it cooks quickly and stays juicy. The mushrooms add a rich flavor that pairs perfectly with the cream sauce. For the additional ingredients, garlic and onion bring depth. They form the aromatic base of your sauce. The heavy cream is key for that creamy finish that makes this dish so comforting. Don't forget the seasonings! Extra virgin olive oil helps cook the chicken and gives a lovely flavor. Dried thyme adds a nice herbal note, while the Parmesan cheese makes everything taste even better. This dish is not just tasty; it’s simple and quick. You can find the full recipe to guide you step by step. Enjoy the process of cooking and savor your savory chicken and mushroom pasta! To start, bring a large pot of salted water to a rolling boil. Add 8 ounces of fettuccine or spaghetti. Cook the pasta according to the package directions until it is al dente. This usually takes about 8-10 minutes. When the pasta is ready, drain it but save about 1 cup of the pasta water. This water is important for later. It helps make the sauce creamy and smooth. While the pasta cooks, heat 1 tablespoon of extra virgin olive oil in a large skillet over medium heat. Add 1 pound of diced boneless, skinless chicken breast to the skillet. Cook the chicken for about 6-8 minutes, stirring occasionally. You want it golden brown and fully cooked. Season the chicken with salt and freshly ground black pepper. This will boost the flavor. Once done, take the chicken out and set it aside on a plate. In the same skillet, add 1 medium onion, finely chopped, and 3 cloves of minced garlic. Sauté these for about 3 minutes. You want the onion to turn translucent and fragrant. Next, add 2 cups of sliced cremini or button mushrooms to the skillet. Cook the mushrooms for about 5 minutes, stirring now and then. They should soften and release their moisture. Now, sprinkle 1 teaspoon of dried thyme and 1 teaspoon of Italian seasoning blend over the mushrooms. Stir to mix it well. Pour in 1 cup of heavy cream and bring the mixture to a gentle simmer. Let it thicken for about 3-5 minutes, stirring often. Finally, return the cooked chicken to the skillet. Mix it well with the sauce. If the sauce is too thick, gradually add some reserved pasta water until you reach your desired consistency. Now, add the drained pasta to the skillet. Toss everything together until the pasta is well coated with the sauce. Stir in 1/2 cup of freshly grated Parmesan cheese until it melts and creates a rich, creamy texture. Taste and adjust the seasoning with more salt or pepper if needed. For more detail, check the [Full Recipe]. Enjoy creating this delightful dish! To make your chicken and mushroom pasta really shine, consider adding a dash of lemon juice or zest. It brightens up the dish. Fresh herbs like basil or oregano also add great flavor. You can use a splash of white wine while cooking the chicken. This adds depth and richness. For cooking techniques, try searing the chicken on high heat. This gives it a nice golden crust. When cooking mushrooms, don't crowd the pan. This helps them brown nicely. To thicken your sauce, let it simmer longer. Stir it often to avoid burning. You can also add a bit of grated cheese. This helps create a creamy texture. If your sauce is too thick, use reserved pasta water. Slowly add it in, mixing well. This water has starch that helps the sauce stick to the pasta. For plating, use a large bowl or individual plates. Twirl the pasta with a fork for a neat look. Top each serving with a sprinkle of fresh parsley. This adds color and a fresh taste. To elevate your dish, add more grated Parmesan on top. A light sprinkle of cracked black pepper adds a nice touch. Enjoy your beautiful and tasty meal! {{image_4}} You can change the protein in this dish to fit your taste. If you want to try other meats, consider using shrimp or turkey. Both blend well with the creamy sauce and mushrooms. If you're looking for vegetarian options, tofu or chickpeas work great. They add protein and soak up the flavors. If you have dietary restrictions, you can swap the chicken for plant-based alternatives. Many brands offer delicious meatless chicken that mimics the texture and taste. This makes it easy for everyone to enjoy this dish. Switching up the type of pasta can give your meal a fresh twist. You can use penne, rigatoni, or even whole wheat pasta. Each choice brings its own flavor and texture. If you need gluten-free options, look for pasta made from rice, corn, or lentils. These options are tasty and keep the dish light. If you're looking for dairy-free options, substitute heavy cream with coconut milk or cashew cream. Both will provide a rich and creamy texture. You can also add veggies to boost flavor. Spinach, broccoli, or bell peppers can enhance the dish. Just sauté them with the onions and garlic for added taste. For the full recipe, check out Heavenly Chicken & Mushroom Fettuccine. To keep chicken and mushroom pasta fresh, store it in an airtight container. Always let it cool first before sealing. Place the container in the fridge. It should last for 3 to 4 days. Use glass or BPA-free plastic containers for the best results. To freeze chicken and mushroom pasta, follow these steps: 1. Allow the dish to cool completely. 2. Place it in a freezer-safe container or heavy-duty freezer bag. 3. Remove as much air as possible before sealing. 4. Label the container with the date. It can stay frozen for up to 2 months. When ready to eat, thaw it in the fridge overnight. To reheat your pasta, use these methods: - Stovetop: Heat in a skillet over medium heat. Add a splash of water or broth to prevent sticking. - Microwave: Place in a microwave-safe bowl. Cover with a damp paper towel and heat in 1-minute intervals. Avoid overcooking by checking often. Stir to ensure even heating. Enjoy your meal! For the full recipe, check out Heavenly Chicken & Mushroom Fettuccine. Chicken and mushroom pasta lasts about 3 to 4 days in the fridge. Store it in an airtight container. This keeps the pasta fresh and safe to eat. Make sure to cool it to room temperature before putting it in the fridge. This helps prevent bacteria growth. Yes, you can make chicken and mushroom pasta ahead of time. Cook the dish and let it cool completely. Then, store it in the fridge. When you are ready to eat, reheat it on low heat. Add a splash of cream or pasta water to keep it creamy. Side dishes that pair well include: - Garlic bread - A fresh green salad - Steamed vegetables - Roasted asparagus These options add variety and color to your meal. Yes, chicken and mushroom pasta is great for meal prep. You can store individual portions in containers. This makes it easy to grab a meal on busy days. Just remember to keep the pasta sauce separate if you want to avoid soggy noodles. You can use dried mushrooms if fresh ones are not available. Just soak them in warm water for about 20 to 30 minutes. Drain and chop them before adding to the dish. This way, you still get rich mushroom flavor in your pasta. For the best results, use a mix of dried and fresh mushrooms if you can. In this post, we covered how to make a tasty Chicken and Mushroom Pasta. You learned about key ingredients like chicken, mushrooms, and pasta. We walked through each step, from cooking the pasta to making a creamy sauce. You now have tips to boost flavor and present your dish well. Remember, you can adapt this recipe with different proteins or sauces. Keep it fresh by following our storage tips. Enjoy cooking and sharing this delicious meal!](https://goldendishy.com/wp-content/uploads/2025/06/be10f885-e993-4582-ae05-a82ade9d612d-768x768.webp)
![- 4 salmon fillets (approximately 6 oz each) - 3 tablespoons miso paste (white or yellow) - 2 tablespoons honey - 1 tablespoon soy sauce (or tamari for gluten-free) - 1 tablespoon rice vinegar - 1 tablespoon sesame oil - 2 cloves garlic, minced - 1 teaspoon freshly grated ginger - Green onions, thinly sliced (for garnish) - Sesame seeds (for garnish) This list has everything you need for a tasty miso glazed salmon. The salmon fillets are the star of the show. Miso paste adds a rich flavor. Honey gives it a touch of sweetness. Soy sauce or tamari brings in saltiness. Rice vinegar adds a bit of tang. Sesame oil gives a nice nutty taste. Garlic and ginger add warmth and depth. Don't forget the green onions and sesame seeds! They make the dish look great and add a bit of crunch. You can find the full recipe to see how to combine these ingredients into a delicious meal. To start, gather your ingredients. In a mixing bowl, combine the miso paste, honey, soy sauce, rice vinegar, sesame oil, minced garlic, and grated ginger. Use a whisk to blend the ingredients. Mix until smooth and creamy. This glaze adds a sweet and savory flavor to the salmon. Next, place the salmon fillets in a shallow dish or a sealable bag. Pour the miso glaze over the salmon. Make sure each piece is well-coated. Cover the dish or seal the bag and marinate the salmon in the fridge. For best results, allow it to marinate for at least 30 minutes. If you have time, two hours gives a richer flavor. Now, preheat your oven to 400°F (200°C). Line a baking sheet with parchment paper to prevent sticking. After marinating, take the salmon out of the glaze. Let any excess glaze drip off, then place the fillets skin-side down on the sheet. Bake the salmon for 12 to 15 minutes. The fish is done when it turns opaque and flakes easily with a fork. You can find the complete instructions in the [Full Recipe]. You can boost the taste of miso glazed salmon by adding fresh herbs. Try using cilantro or basil for a fresh kick. You can also add spices like chili flakes for heat or black sesame seeds for extra crunch. These small tweaks can take your dish to a whole new level. For the best flavor, I suggest marinating the salmon for at least 30 minutes. If you have time, let it sit for up to 2 hours. This longer marinating lets the flavors soak in deeply. Just remember not to marinate too long, as the acid in the marinade can make the fish mushy. While baking the salmon is great, you can also broil or grill it. Broiling gives a nice char and caramelization, making it even tastier. If you grill, keep the heat medium to avoid burning the glaze. Whichever method you choose, keep an eye on the salmon. It cooks fast! {{image_4}} You can switch the salmon for other fish, like cod or trout. Both work well with miso glaze. Chicken is another great option. You can use chicken breasts or thighs. The cooking time will change, so check for doneness. For plant-based choices, try tofu or tempeh. Both absorb flavors well. Marinate them just like you do with salmon. Bake them until golden brown and firm. You can adjust the taste of the miso glaze. If you like it sweeter, add more honey. For a saltier flavor, increase the soy sauce. You can also try adding a splash of citrus juice. Lime or lemon will brighten the dish. Feel free to add other ingredients too. A spoonful of sriracha gives a spicy kick. You can also mix in chopped herbs like cilantro or basil for freshness. To make a full meal, serve the salmon with sides. Steamed vegetables like broccoli or green beans add color and nutrition. Jasmine rice or quinoa pairs well too. You can also add a simple salad for crunch. For a fun twist, serve the salmon on a bed of noodles. Drizzle some leftover glaze for extra flavor. Check out the Full Recipe for more tips on creating a balanced plate. To store leftover miso glazed salmon, let it cool first. Place it in an airtight container. Make sure to cover it well so it stays fresh. It can last in the fridge for up to three days. If your salmon has a strong smell, it’s best to throw it away. To freeze the salmon, wrap each piece tightly in plastic wrap. Then, place them in a freezer-safe bag. This method helps prevent freezer burn. Miso glazed salmon can be frozen for up to three months. When you’re ready to eat it, move it to the fridge for a night to thaw. For reheating, use an oven or a stovetop. If using the oven, preheat it to 350°F (175°C). Place the salmon on a baking sheet. Heat it for about 10 minutes. This method keeps it moist. If you prefer the stovetop, heat a pan over low heat. Add a splash of water to keep the fish from drying out. Cook for a few minutes until warmed through. You should marinate the salmon for at least 30 minutes. This gives the flavors time to soak in. For a richer taste, I recommend marinating for up to 2 hours. The longer the fish sits in the marinade, the better the flavor will be. Yes, you can use different types of miso. White miso is sweeter and milder. Yellow miso is a bit stronger but still smooth. Red miso is more intense and salty. Each type brings a unique flavor to the salmon. Experiment with what you like best! I love serving Miso Glazed Salmon with steamed rice. Jasmine or brown rice works great. You can also add some roasted veggies or a fresh salad. These sides balance the rich glaze. They make your plate colorful and fun! Check out the Full Recipe for more ideas. This blog post showed how to make miso-glazed salmon. You learned about the key ingredients, preparation, and cooking steps. I shared tips to enhance flavor and offered variations if you want to try something new. Proper storage can keep leftovers tasty for later. Remember, cooking should be fun! Experiment with flavors and enjoy your meal. With these insights and tips, you will create a dish that’s both delicious and satisfying. Happy cooking!](https://goldendishy.com/wp-content/uploads/2025/07/7f43d765-f0ef-46f9-86e2-eabd5628ba72-768x768.webp)
![For this recipe, you need key ingredients to make the salmon shine. Here’s what to gather: - 4 salmon fillets (approximately 6 oz each) - 2 tablespoons Sriracha sauce - 3 tablespoons honey - 1 tablespoon soy sauce - 2 cloves garlic, finely minced - 1 tablespoon fresh ginger, finely grated - 2 tablespoons olive oil - Salt and freshly ground black pepper, to taste These main ingredients create a sweet and spicy glaze that makes the salmon pop. Seasoning is crucial in cooking. It helps to enhance the natural flavors of the fish. Use these simple items: - Salt - Freshly ground black pepper Make sure to season both sides of the salmon. This step adds depth to every bite. Garnishes make your dish look great and add extra flavor. For this salmon recipe, you will need: - 1 tablespoon sesame seeds - 2 green onions, thinly sliced Sprinkling these on top gives the meal a beautiful finish. The sesame seeds add crunch, while green onions bring freshness. To see the full details for cooking, check the [Full Recipe]. To make the glaze, grab a medium bowl. Combine 2 tablespoons of Sriracha sauce, 3 tablespoons of honey, and 1 tablespoon of soy sauce. Add 2 minced garlic cloves and 1 tablespoon of freshly grated ginger. Whisk these together until the mixture is smooth. This sweet and spicy glaze will add the perfect flavor to your salmon. Set this aside for later use. Next, take 4 salmon fillets and dry them with a paper towel. This step helps the skin get crispy. Now, sprinkle salt and pepper on both sides of each fillet. Make sure to cover every inch. This simple seasoning enhances the natural taste of the fish. Now, heat 2 tablespoons of olive oil in a large skillet over medium-high heat. Once the oil shimmers, carefully place the salmon fillets in the skillet, skin-side down. Sear them for about 4-5 minutes until the skin turns golden and crispy. Once that happens, gently flip the fillets over. Lower the heat to medium and pour the glaze over the salmon. Cook for another 4-5 minutes, basting the salmon occasionally with the glaze. When it is cooked through and caramelized, remove the fillets from the skillet. Enjoy every bite of this flavorful salmon dish! For the full recipe, check out the details above! To get that perfect crispy skin, start with dry salmon. Use a paper towel to pat it well. This removes extra moisture, which helps the skin crisp nicely. Heat your skillet until it shimmers before adding the salmon. Place the fillets skin-side down and don’t move them for the first few minutes. This helps create a nice golden crust. Sear for about 4-5 minutes, then flip gently to finish cooking. If you like a milder glaze, reduce the Sriracha amount. Start with 1 tablespoon instead of 2. You can also add extra honey to balance the heat. For spice lovers, add more Sriracha or a pinch of cayenne pepper. Taste the glaze before pouring it on the salmon. This way, you can adjust it to your liking. Using the right tools makes cooking easier. Here’s what I recommend: - Large skillet for searing - Mixing bowl for the glaze - Whisk for blending ingredients - Paper towels for drying salmon - Spatula for flipping fillets These tools help you create a delicious Sriracha honey glazed salmon from the [Full Recipe]. {{image_4}} You can switch up the Sriracha honey glaze if you want. Try a sweet soy glaze instead. Mix soy sauce, brown sugar, and ginger for a tasty alternative. You can also use teriyaki sauce for a different flavor. It adds a rich, savory taste that pairs well with salmon. Another option is a citrus glaze. Mix orange juice and honey for a bright, zesty twist. While salmon shines in this recipe, other fish work too. Try using trout, which has a similar flavor and texture. Mahi-mahi also holds up well to grilling and glazing. Cod is another great option, as it absorbs flavors nicely. Each fish brings its own unique taste, so feel free to experiment. Toppings can elevate your dish further. Try adding sliced avocados for creaminess. Chopped cilantro or parsley adds a fresh touch. You can also sprinkle crushed peanuts or cashews for crunch. For a spicy kick, add sliced jalapeños. These toppings can make your meal even more fun and flavorful. Enjoy customizing your Sriracha honey glazed salmon with these ideas! Store your leftover salmon in an airtight container. Make sure to let it cool first. Place a piece of parchment paper between layers if stacking. This keeps the fish from sticking together. Refrigerate the salmon for up to three days. If you plan to keep it longer, freezing is a better option. To reheat, use the oven for the best taste. Preheat to 350°F (175°C). Place the salmon on a baking sheet and cover it with foil. Heat for about 10 to 15 minutes. This keeps the salmon moist and tasty. You can also use the microwave. Heat it in short bursts of 30 seconds. Check often to avoid overcooking. If you want to freeze your salmon, do it right after cooking. Wrap each piece tightly in plastic wrap. Then, place them in a freezer bag. Remove as much air as you can before sealing. You can freeze it for up to three months. When ready to eat, thaw it in the fridge overnight before reheating. For more ideas, check out the Full Recipe. You can tell if the salmon is cooked when it flakes easily with a fork. The flesh should be opaque and no longer translucent. A good rule is to cook it for about 4-5 minutes per side, depending on thickness. Use a food thermometer if you want to be precise. The internal temperature should reach 145°F (63°C). Cooking it just right keeps it moist and tasty. Yes, you can prepare the glaze ahead of time. Just store it in the fridge in an airtight container. This makes cooking easier later. However, I recommend cooking the salmon fresh. This keeps it juicy and full of flavor. If you must, you can cook the salmon and store it in the fridge for up to 2 days. For a full meal, pair the salmon with fluffy jasmine rice or quinoa. Steamed broccoli or snap peas add color and crunch. You can also serve it with a fresh salad for a light touch. If you want something more filling, try roasted potatoes or sweet potatoes. These sides balance the bold flavors of the salmon well. Check out the Full Recipe for more details! This blog post shared key details about making Sriracha Honey Glazed Salmon. You learned what ingredients to use, including seasoning and garnishes. I outlined simple steps to prepare the glaze, season the fish, and achieve that perfect sear. Plus, you found helpful tips for crispy skin and spice adjustments. I also covered variations for sauces and fish, along with storage options for leftovers. Savor this dish and share it with others. Enjoy your cooking!](https://goldendishy.com/wp-content/uploads/2025/07/1e0cb0f2-d69e-43b4-ab0e-316143d411f1-768x768.webp)
