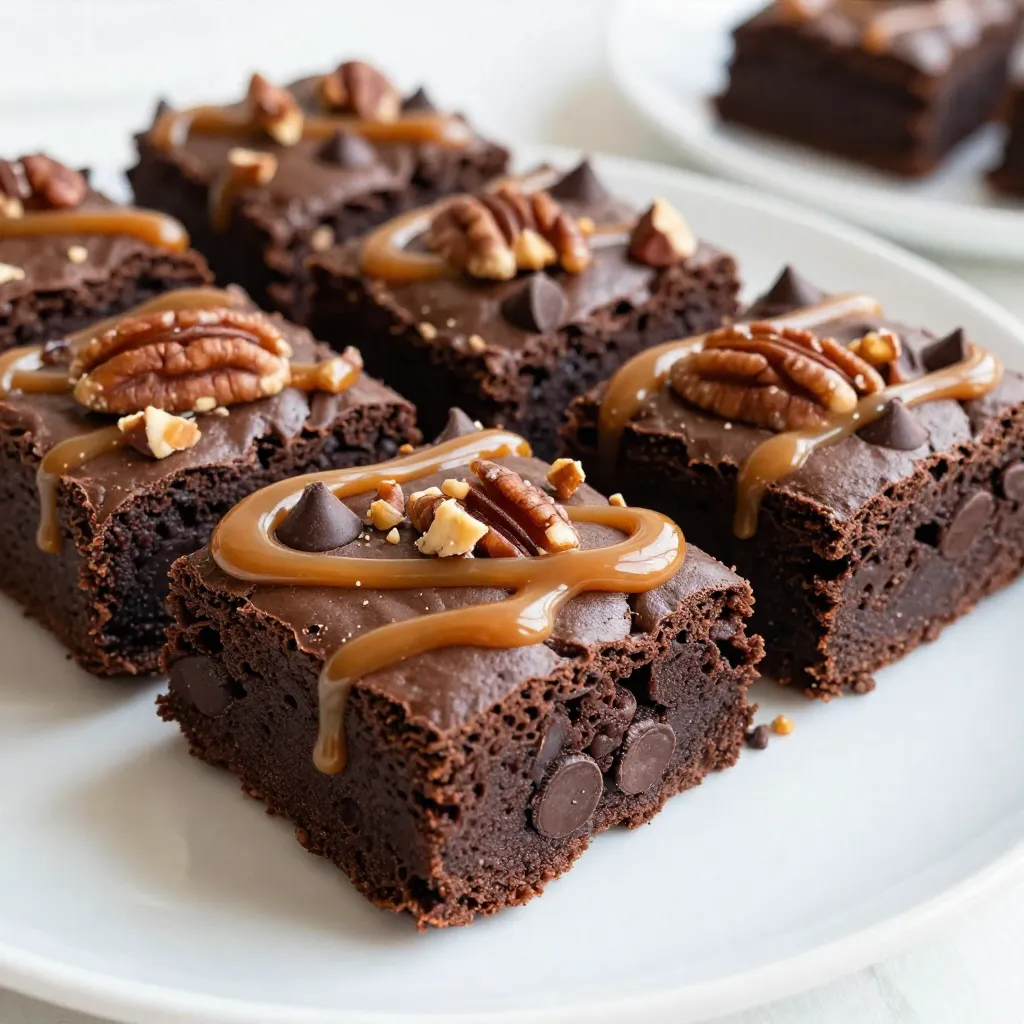
Are you ready to indulge in a treat that combines rich chocolate, creamy caramel, and crunchy nuts? In this post, I’ll show you how to create Chocolate Turtle Brownies that are both decadent and irresistible. With simple ingredients and easy steps, these brownies will delight your taste buds and impress your friends. Let’s dive into this sweet adventure that transforms classic flavors into a delightful dessert.
Why I Love This Recipe
- Decadent Flavor: These brownies are rich, chocolaty, and packed with the delightful combination of caramel and pecans, making each bite a heavenly experience.
- Easy to Make: With straightforward steps and easily accessible ingredients, this recipe is perfect for both beginner and experienced bakers.
- Perfect for Sharing: This recipe yields a generous batch of 24 squares, making it ideal for gatherings, potlucks, or simply treating your loved ones.
- Customization Options: You can easily modify the recipe by adding different nuts, using dark chocolate, or experimenting with flavored caramel to suit your taste.
Ingredients
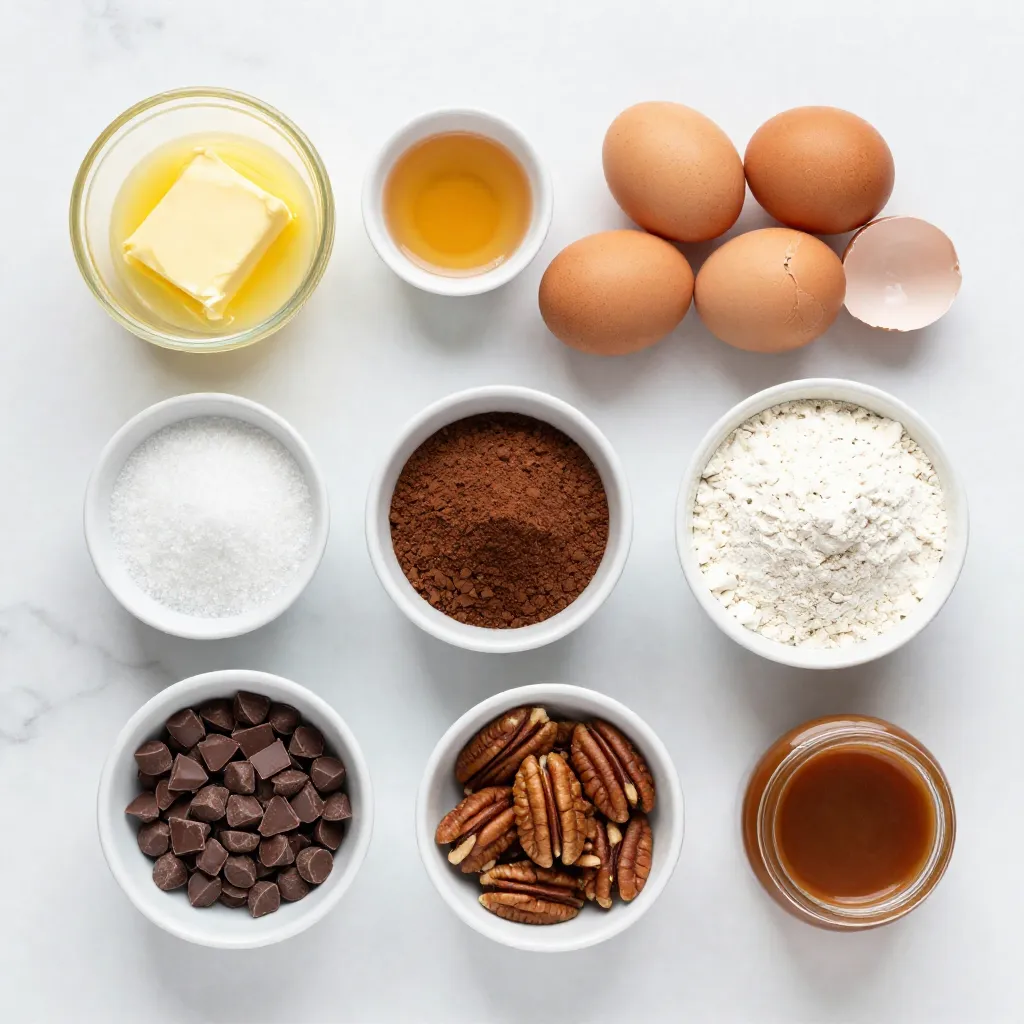
List of Ingredients
– 1 cup unsalted butter, melted
– 2 cups granulated sugar
– 1 tablespoon pure vanilla extract
– 4 large eggs
– 1 cup all-purpose flour
– 1 cup unsweetened cocoa powder
– 1/2 teaspoon salt
– 1 cup semi-sweet chocolate chips
– 1 cup pecans, coarsely chopped
– 1/2 cup caramel sauce
Notes on Ingredient Quality
Using high-quality ingredients matters. Choose fresh unsalted butter for a rich taste. Granulated sugar should be fine and free of clumps. Pure vanilla extract makes a big difference. I always opt for the real thing, as imitation can taste different. Fresh eggs give better texture and flavor. When it comes to cocoa powder, a good brand brings out the chocolate flavor. For chocolate chips, I prefer semi-sweet for balance. Lastly, fresh pecans add crunch and a nutty taste.
Substitutions for Common Ingredients
You can swap some items if needed. Use coconut oil instead of butter for a dairy-free option. Brown sugar works well in place of granulated sugar for added moisture. If you lack vanilla extract, use almond extract for a twist. For eggs, consider flax eggs or applesauce as vegan options. Gluten-free flour can replace all-purpose flour if you need gluten-free brownies. And for the caramel sauce, homemade or store-bought both work well.
Step-by-Step Instructions
Prepping the Oven and Baking Dish
Start by preheating your oven to 350°F (175°C). This step is key for even baking. Then, prepare a 9×13 inch baking dish. You can grease it lightly or line it with parchment paper. This makes it easy to remove the brownies later.
Mixing Wet Ingredients
In a large mixing bowl, pour in 1 cup of melted unsalted butter. Add 2 cups of granulated sugar. Using a whisk, mix them well until smooth. Next, stir in 1 tablespoon of pure vanilla extract. Then, crack in 4 large eggs, one at a time. Mix until the batter is glossy and well combined.
Combining Dry Ingredients
In another bowl, sift together 1 cup of all-purpose flour, 1 cup of unsweetened cocoa powder, and 1/2 teaspoon of salt. This helps remove lumps. Gradually add this dry mix to the wet batter. Fold the two together carefully. Be gentle, so you don’t make the brownies tough.
Creating the Brownie Batter
Now, it’s time to create the brownie batter. Fold in 1 cup of semi-sweet chocolate chips. Also, add half of the chopped pecans. Save the other half for later. Mix until just combined. This will give your brownies a lovely chocolatey flavor.
Adding the Caramel and Toppings
Transfer the brownie batter into your prepared baking dish. Spread it evenly with a spatula. Drizzle 1/2 cup of caramel sauce over the batter. Use a knife to swirl the caramel gently. This creates a beautiful marbled effect. Finally, sprinkle the reserved chopped pecans on top.
Baking and Cooling Instructions
Place the baking dish in your preheated oven. Bake for 30-35 minutes. Check for doneness by inserting a toothpick into the center. It should come out with a few moist crumbs. Once baked, take the brownies out of the oven. Let them cool completely in the dish. After cooling, cut them into squares and enjoy your delicious treat!
Tips & Tricks
Achieving the Perfect Texture
To get brownies with a soft and chewy texture, use fresh eggs. Let them sit at room temperature before mixing. This helps them blend better. Always melt the butter instead of using cold butter. It adds richness and moisture, making your brownies perfect.
Preventing Overmixing
Mix the batter just until combined. Overmixing can lead to tough brownies. When you add the dry ingredients to the wet, fold gently. This keeps air in the batter, giving you a light and fluffy treat.
Storing Leftovers for Freshness
Store brownies in an airtight container. This keeps them moist and chewy. You can also wrap them in plastic wrap before placing them in the container. They stay fresh for up to a week. If you want to keep them longer, freeze them. Just thaw them at room temperature before serving.
Presentation Tips for Serving
Serve brownies on a pretty platter. Drizzle extra caramel sauce over them for a beautiful look. A sprinkle of flaky sea salt on top adds a touch of elegance. Cut them into neat squares for a professional touch.
Pro Tips
- Use Room Temperature Ingredients: Ensure your eggs and butter are at room temperature for a smoother batter that mixes more evenly.
- Don’t Overmix: When combining the dry and wet ingredients, mix until just combined to keep your brownies fudgy and soft.
- Swirl the Caramel: For a beautiful presentation, use a toothpick to create a marbled effect with the caramel without mixing it completely into the batter.
- Cool Before Cutting: Allow the brownies to cool completely in the pan before cutting to ensure clean edges and easy removal.
Variations
Alternative Nut Options
If you want to mix things up, try different nuts in your brownies. Walnuts add a rich taste and crunch. Almonds bring a nice sweetness and texture. Cashews can give your brownies a creamy bite. Just remember to chop them coarsely, like the pecans, for the best results. You can also skip nuts altogether if you prefer a nut-free treat.
Flavor Enhancements
Add a twist to your brownies with flavor boosters. A sprinkle of sea salt on top can bring out the chocolate’s sweetness. It gives a nice contrast. You can also add a teaspoon of espresso powder to the batter. This adds depth to the chocolate flavor without tasting like coffee. For a fruity hint, mix in orange or mint extract instead of vanilla.
Different Caramel Sauce Choices
Choosing the right caramel sauce can change the whole vibe of your brownies. Store-bought sauces are quick and easy. Look for high-quality brands for the best flavor. If you’re feeling adventurous, try making your own caramel sauce. It’s simple! Just cook sugar until it melts and turns golden, then add cream and butter. You can also use salted caramel for a savory touch. Each option brings something unique to your dessert.
Storage Info
Best Practices for Storing Brownies
To keep your Chocolate Turtle Brownies fresh, store them in an airtight container. Ensure the brownies are completely cool before sealing. This prevents moisture from making them soggy. You can layer parchment paper between brownies to avoid sticking. Keep them at room temperature for up to four days.
Freezing Instructions
If you want to save some for later, freezing is a great option. First, cut the brownies into squares. Wrap each square tightly in plastic wrap. Then, place them in a freezer-safe bag or container. Label it with the date. You can freeze them for up to three months. To enjoy later, thaw them in the fridge overnight.
Reheating for Optimal Taste
To reheat your brownies, you can use the microwave or the oven. For the microwave, place a brownie on a plate and warm it for about 10-15 seconds. This makes it soft and gooey. For the oven, preheat to 350°F (175°C). Place brownies on a baking sheet and heat for about 5-10 minutes. This will bring back their fresh-baked taste. Enjoy your delicious treats warm!
FAQs
What is the origin of Chocolate Turtle Brownies?
Chocolate Turtle Brownies blend the classic brownie with turtle candies. Turtle candies have caramel, chocolate, and nuts. They come from the early 1900s in the United States. The sweet mix of flavors makes these brownies a favorite.
Can I make these brownies gluten-free?
Yes, you can make these brownies gluten-free. Simply swap all-purpose flour for a gluten-free blend. Look for a brand that measures cup-for-cup. This will help keep the texture of the brownies rich and moist.
How do I know when my brownies are done?
To check if your brownies are done, use a toothpick. Insert it into the center of the brownies. If it comes out with a few moist crumbs, they are ready. Be careful not to overbake, or they may become dry.
What are the best ways to serve Chocolate Turtle Brownies?
Serve these brownies warm for a gooey treat. You can top them with more caramel sauce. A scoop of vanilla ice cream also pairs well. Arrange them on a nice platter for a pretty display. Add a sprinkle of sea salt for extra flavor.
You learned about making Chocolate Turtle Brownies, from ingredients to storage tips. Quality ingredients make a big difference. Follow the steps to create a soft, chewy texture. Don’t forget the fun variations to taste! Remember to store your brownies right for freshness. You can freeze them or reheat for a treat later. With these tips and tricks, you can impress anyone with your baking skills. Enjoy every bite of your delicious brownie