Looking for a tasty energy boost? These Chocolate Peanut Butter Granola Bars are perfect! They pack flavor, nutrition, and satisfaction into one easy snack. With just a few simple ingredients, you can whip up a batch at home. I'll guide you through the steps, ingredient tips, and ways to customize your bars. Let's dive into this yummy recipe that you and your family will love!
Why I Love This Recipe
- Healthy Ingredients: This recipe uses wholesome ingredients like rolled oats, natural peanut butter, and mixed nuts, making it a nutritious snack option.
- Easy to Make: With minimal prep and bake time, these granola bars can be whipped up quickly, perfect for busy schedules.
- Customizable: You can easily swap out nuts or add different mix-ins like dried fruit or seeds to suit your taste preferences.
- Deliciously Satisfying: The combination of dark chocolate and peanut butter creates a rich flavor that is both satisfying and indulgent.
Ingredients
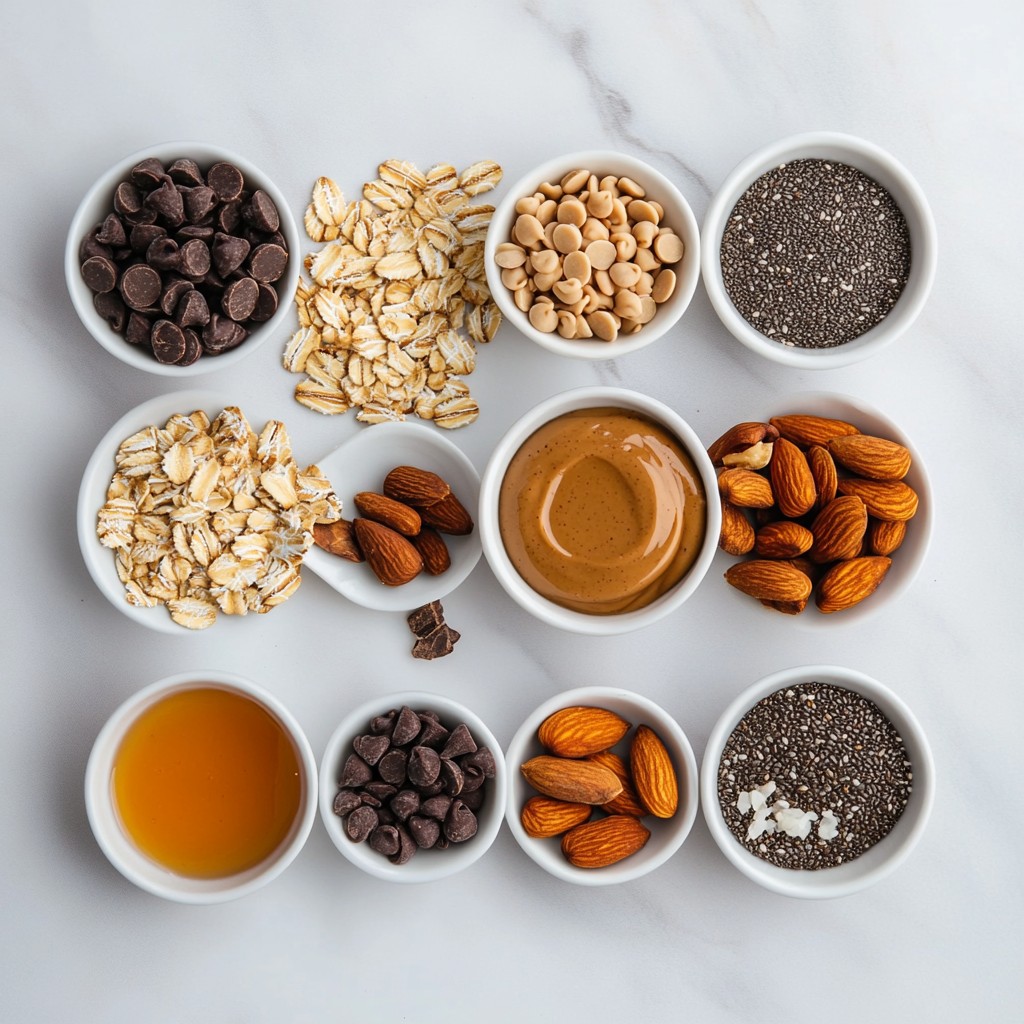
Detailed ingredient list for Chocolate Peanut Butter Granola Bars
- 2 cups rolled oats
- 1/2 cup natural peanut butter
- 1/4 cup honey or pure maple syrup
- 1/2 cup dark chocolate chips
- 1/2 cup mixed nuts (e.g., almonds, walnuts, pecans)
- 1/4 cup chia seeds
- 1 teaspoon vanilla extract
- A pinch of sea salt
These ingredients work together to create a tasty snack. Rolled oats form the base. Peanut butter gives it a rich, creamy texture. Honey or maple syrup adds sweetness. Dark chocolate chips bring a hint of indulgence. Mixed nuts add crunch and healthy fats. Chia seeds boost nutrition, while vanilla extract enhances flavor. A pinch of sea salt balances everything.
Nutritional information for ingredients
Here’s a quick look at the nutrition you get from these bars:
- Rolled oats: High in fiber and great for energy.
- Peanut butter: Packed with protein and healthy fats.
- Honey or maple syrup: Natural sweeteners that provide quick energy.
- Dark chocolate chips: Rich in antioxidants and adds flavor.
- Mixed nuts: Great source of proteins, vitamins, and minerals.
- Chia seeds: Full of omega-3 fatty acids and fiber.
- Vanilla extract: Adds flavor without calories.
- Sea salt: Enhances taste and helps with hydration.
Combining these ingredients gives you a snack that not only tastes good but also fuels your body.
Tips for selecting quality ingredients
- Rolled oats: Choose organic oats for fewer chemicals. Look for whole oats for more nutrition.
- Peanut butter: Select natural peanut butter with no added sugar or oils. It should have just peanuts and salt.
- Honey or maple syrup: Opt for raw honey or pure maple syrup for better taste and nutrients.
- Dark chocolate chips: Look for at least 70% cocoa for more antioxidants.
- Mixed nuts: Choose unsalted and raw nuts for the healthiest option.
- Chia seeds: Buy whole seeds for better nutrition. Check for freshness to avoid spoilage.
- Vanilla extract: Use pure vanilla extract for the best flavor. Avoid artificial flavors.
- Sea salt: Go for high-quality sea salt for the best taste and minerals.
Quality ingredients make a big difference in flavor and nutrition. Always check labels for the best choices.
Step-by-Step Instructions
Preheating and preparation of baking dish
First, preheat your oven to 350°F (175°C). Grab an 8-inch square baking dish. Line it with parchment paper, letting some paper hang over the edges. This helps you lift out the bars later.
Mixing dry ingredients
In a large mixing bowl, add 2 cups of rolled oats, 1/2 cup of mixed nuts, 1/4 cup of chia seeds, and a pinch of sea salt. Stir these dry ingredients well. This step is key to ensure every bite is tasty.
Making the peanut butter mixture
In a small saucepan, mix 1/2 cup of natural peanut butter, 1/4 cup of honey or maple syrup, and 1 teaspoon of vanilla extract. Heat this over low heat. Stir it continuously until it is smooth. This mixture gives the bars their sweet and creamy flavor.
Combining and baking the granola bars
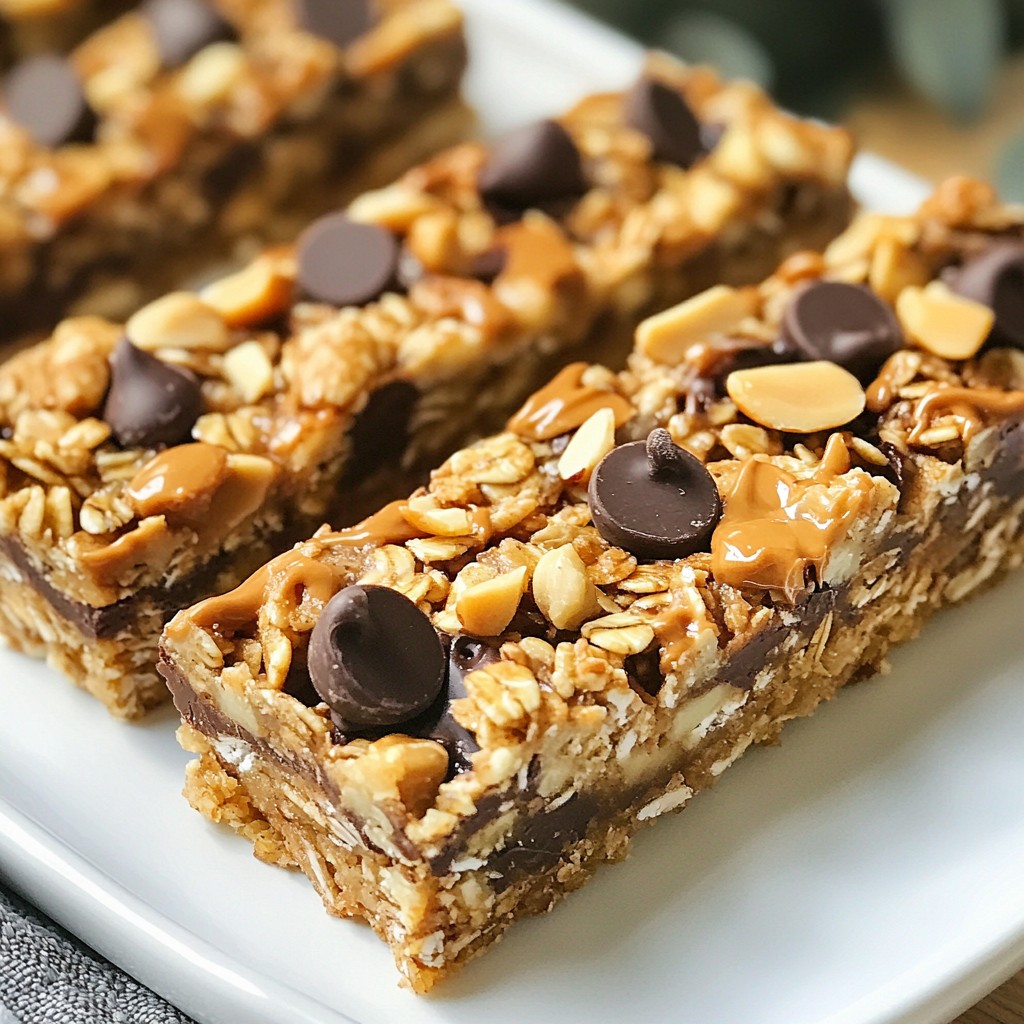
Pour the warm peanut butter mixture over the dry ingredients. Use a spatula to mix it well. Make sure all the oats and nuts get coated. Gently fold in 1/2 cup of dark chocolate chips. Then, spoon the mixture into your baking dish. Press it down firmly with a spatula or your hands. Bake for about 20 minutes, until the edges are golden brown.
Cooling and cutting the bars
Once baked, take the dish out of the oven. Let the granola cool for about 30 minutes. This cooling time is important for the bars to set. After cooling, lift the bars out using the parchment paper. Cut them into squares or rectangles with a sharp knife. Enjoy your homemade snack!
Tips & Tricks
How to ensure the bars hold together
To make sure your granola bars stay firm, you need to press the mix tightly. After pouring the wet mix over the dry ingredients, use a spatula or your hands to pack it down hard in the baking dish. This helps bind everything together. Also, let them cool completely before cutting. If you cut them too soon, they may crumble.
Suggestions for customizing flavors
You can switch up the nuts or chocolate to fit your taste. Try using walnuts, pecans, or even sunflower seeds for a different crunch. For a fruity twist, add dried fruit like cranberries or apricots. If you like spices, a pinch of cinnamon or nutmeg can add warmth. Want more chocolate? Swap some oats for cocoa powder.
Recommended baking time adjustments
Baking time can differ based on your oven and dish size. If your bars look very soft after 20 minutes, give them a few more minutes. Check for a light golden edge. If you use a larger dish, your bars may bake faster. Always watch closely to avoid burning the edges while ensuring the center is firm.
Pro Tips
- Use Fresh Ingredients: Always opt for fresh rolled oats and nuts for the best flavor and texture in your granola bars.
- Customize Your Nuts: Feel free to mix and match your favorite nuts or seeds to create a unique flavor profile tailored to your taste.
- Check for Doneness: Keep an eye on the bars as they bake; they should be golden brown around the edges but not overcooked.
- Chill Before Cutting: For cleaner cuts, refrigerate the bars for about 15 minutes after cooling to room temperature before slicing.
Variations
Alternative ingredients for dietary restrictions
You can easily adapt this recipe for anyone. If you need a nut-free option, replace the peanut butter with sun butter. This keeps the same creamy texture. For those who follow a vegan diet, swap honey for pure maple syrup. Make sure to use dairy-free chocolate chips. These small changes make the bars tasty and safe for everyone.
Flavor variations
Want to mix it up? You can add spices like cinnamon or nutmeg for warmth. If you prefer a different chocolate taste, try milk chocolate or white chocolate chips. You can even use cocoa powder to make the bars extra chocolatey. These changes allow you to create a unique flavor that suits your taste.
Using different forms of sweeteners
You can switch up the sweetener in this recipe. Instead of honey or maple syrup, use agave nectar or brown rice syrup. Each sweetener gives a different flavor and sweetness level. You can also try adding mashed bananas or applesauce for a natural sweet taste. These options provide flexibility and make the bars fun to create.
Storage Info
Best practices for storing homemade granola bars
To keep your chocolate peanut butter granola bars fresh, store them in a cool place. An airtight container works best. This helps prevent them from drying out or absorbing moisture. I find that stacking them with parchment paper between layers can help avoid sticking.
Air-tight container recommendations
When choosing a container, select one that seals tightly. Glass containers with lids are great. You can also use plastic ones if they are BPA-free. Make sure the bars fit comfortably inside without getting squished. This keeps them looking nice and intact.
Freezing instructions for longer storage
If you want to save granola bars for later, freezing is a good option. Wrap each bar in plastic wrap or foil. Then place them in a freezer bag or container. This helps keep them fresh for up to three months. When ready to eat, just thaw them overnight in the fridge. Enjoying a tasty, homemade snack is always a treat!
FAQs
Can I use other nut butters instead of peanut butter?
Yes, you can use other nut butters. Almond butter or cashew butter work well. Just remember, each nut butter has its own taste. This change may alter the flavor. Make sure the nut butter is natural and smooth for the best results.
How do I make these granola bars gluten-free?
To make these bars gluten-free, use gluten-free rolled oats. Many brands are now available. Always check the label to ensure they are certified gluten-free. This small change will keep your snack safe for gluten-sensitive eaters.
Can I add protein powder to the recipe?
Yes, you can add protein powder. Mix in about a quarter cup of your favorite protein powder. This enhancement boosts the protein content. It may change the texture slightly, so adjust other wet ingredients if needed.
How long will these granola bars last?
These granola bars last up to two weeks in an airtight container. Store them in the fridge for freshness. You can also freeze them for longer storage. They will keep well for up to three months in the freezer.
This article walked you through making tasty Chocolate Peanut Butter Granola Bars. You learned about essential ingredients, nutritional info, and tips for quality selection. I shared steps to mix, bake, and cool your bars, plus ways to ensure they hold together. You saw options for flavor and dietary needs, along with storage tips to keep them fresh. In summary, making your own granola bars is simple and fun. Enjoy customizing flavors and sharing them with friends!


