
If you crave a sweet, buttery treat that's easy to make, look no further! Chocolate chip scones are the perfect pairing for your morning coffee or afternoon tea. In this guide, I'll walk you through a simple recipe that results in warm, delicious scones loaded with chocolatey goodness. With just a few ingredients and straightforward steps, you'll impress your friends and family in no time. Let’s get baking!
Why I Love This Recipe
- Irresistible Flavor: The combination of rich chocolate chips and buttery scone dough creates a decadent treat that is hard to resist.
- Quick and Easy: This recipe is simple to follow, making it a perfect choice for both novice and experienced bakers.
- Perfect for Any Occasion: Whether it's a cozy brunch, an afternoon tea, or a special gathering, these scones fit right in.
- Customizable: You can easily adjust the recipe by adding nuts, dried fruits, or different types of chocolate to suit your taste.
Ingredients
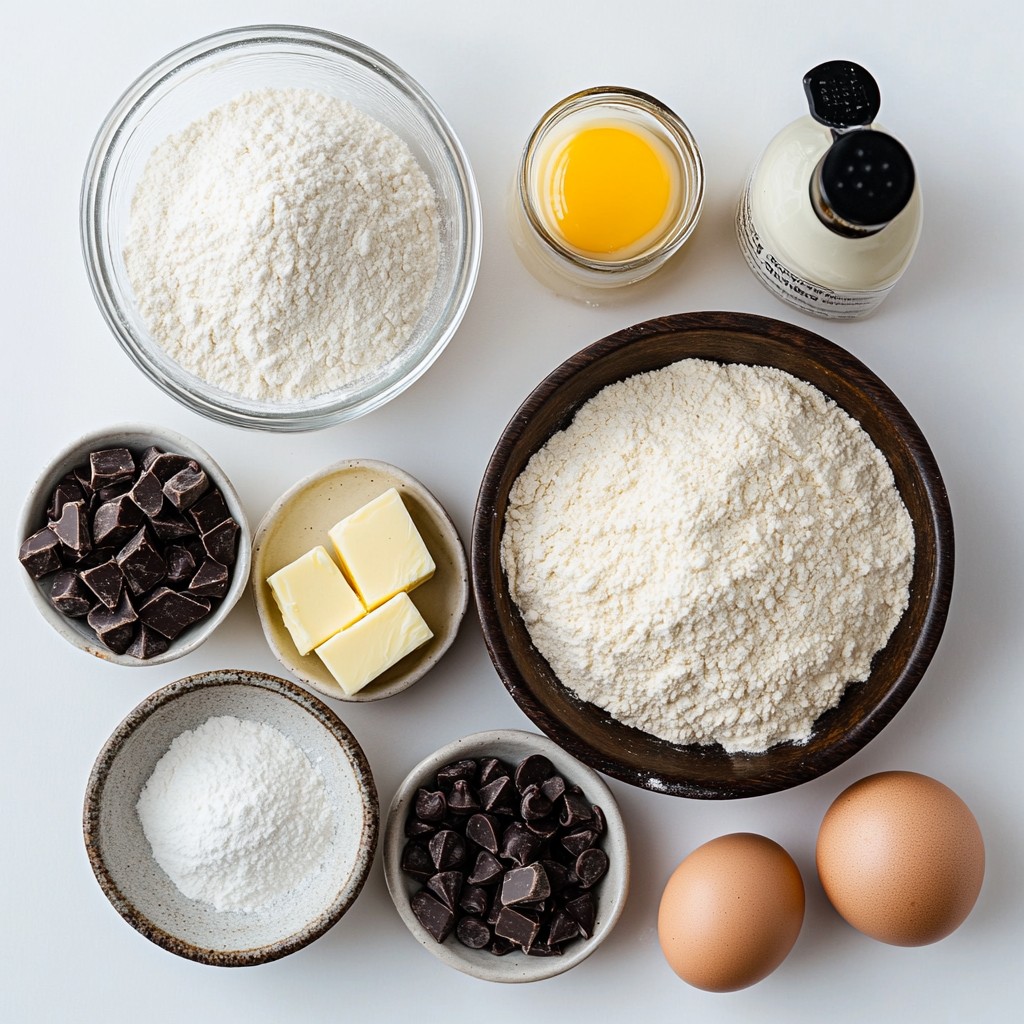
List of Essential Ingredients
- 2 cups all-purpose flour
- 1/4 cup granulated sugar
- 1 tablespoon baking powder
- 1/2 teaspoon salt
- 1/4 cup cold unsalted butter, cubed
- 1/2 cup heavy cream
- 1 large egg
- 1 teaspoon vanilla extract
- 1 cup semi-sweet chocolate chips
- Optional: coarse sugar for sprinkling
To make chocolate chip scones, use these simple ingredients. Each one plays a key role. The flour gives the scones their base. Sugar adds sweetness, while baking powder helps them rise.
Salt enhances the flavors in your scones. Cold butter creates that lovely crumbly texture. Heavy cream adds richness and moisture. The egg binds everything together. Vanilla extract brings warmth and depth. Finally, chocolate chips are what make these scones so delightful.
Tools Needed
- Mixing bowls
- Pastry cutter or fork
- Baking sheet
- Parchment paper
- Knife or cookie cutter
Gather these tools to make your scones. Mixing bowls help combine ingredients. A pastry cutter or fork mixes the butter into the flour. A baking sheet lined with parchment paper prevents sticking.
A knife or cookie cutter shapes the scones. Having the right tools makes the process easier and more fun. You’ll enjoy every step of making these tasty treats!
Step-by-Step Instructions
Preparing the Dough
1. Preheat your oven to 400°F (200°C). Line a baking sheet with parchment paper. This keeps the scones from sticking.
2. In a large bowl, mix 2 cups of all-purpose flour, 1/4 cup of granulated sugar, 1 tablespoon of baking powder, and 1/2 teaspoon of salt. Whisk until it is lump-free.
3. Add 1/4 cup of cold, cubed unsalted butter to the bowl. Use your fingers or a pastry cutter to blend it in. Keep mixing until the mix looks like coarse crumbs. You want some pieces to stay about the size of small peas.
Mixing Wet Ingredients
1. In another bowl, whisk together 1/2 cup of heavy cream, 1 large egg, and 1 teaspoon of vanilla extract. Make sure it is smooth and mixed well.
2. Pour this wet mix into the dry ingredients. Gently stir with a spatula until just combined. Don’t overmix, or your scones will be tough.
Shaping and Baking
1. Fold in 1 cup of semi-sweet chocolate chips. Make sure they spread throughout the dough.
2. Lightly flour your clean surface. Place the dough on it and pat it into a circle about 1 inch thick.
3. Use a sharp knife to cut the dough into 8 wedges, or use a cookie cutter for round shapes.
4. Place the scones on the baking sheet and leave space between them. Brush the tops with an egg wash (1 egg beaten with 1 tablespoon of water). If you like, sprinkle some coarse sugar on top for extra sweetness.
5. Bake in the preheated oven for 15-20 minutes. Look for a golden brown color around the edges. A toothpick should come out clean from the center.
6. Let the scones cool on the baking sheet for a few minutes. Then, transfer them to a wire rack to cool completely.
Tips & Tricks
Perfecting the Texture
To get the best scones, you must avoid overmixing the dough. When you mix too much, scones can turn out tough. Stir the dough until it just comes together. This keeps your scones light and fluffy.
Next, ensure that the butter is properly cold. Cold butter helps create flaky layers. If the butter warms up, the scones will not rise well. Cut the butter into small cubes and keep it in the fridge until you're ready to use it.
Baking Time & Temperature
For optimal scones, I recommend baking them at 400°F (200°C) for 15-20 minutes. Keep an eye on them during the last few minutes. They should turn golden brown around the edges.
To check for doneness, use a toothpick. Insert it into the center of a scone. If it comes out clean, the scones are ready. If there is wet dough on the toothpick, bake them a bit longer.
Serving Suggestions
Pair your warm scones with a hot cup of tea or coffee. They make a delightful snack. You can also drizzle a little melted chocolate on top for extra sweetness.
For presentation, serve the scones on a beautiful plate. Dust them lightly with powdered sugar for a nice touch. This makes them look as good as they taste!
Pro Tips
- Use Cold Butter: Ensure your butter is very cold before mixing; this helps create flaky layers in your scones.
- Don’t Overmix: Mix the dough just until combined to prevent tough scones; a light hand is key!
- Chill the Dough: If time allows, refrigerate the dough for about 30 minutes before baking for even better texture.
- Experiment with Flavors: Try adding nuts, dried fruits, or different chocolate varieties to customize your scones!
Variations
Gluten-Free Options
You can make chocolate chip scones gluten-free. Use a gluten-free flour blend instead of all-purpose flour. Look for blends that have xanthan gum for better texture. You might need to add a bit more liquid to the dough. Start with an extra tablespoon of cream if the dough feels dry.
Vegan Modifications
To make vegan chocolate chip scones, replace the butter with coconut oil or a vegan butter. Use plant-based milk, like almond or soy milk, in place of heavy cream. For the egg, use one tablespoon of ground flaxseed mixed with three tablespoons of water. Let it sit for five minutes until it becomes thick.
Flavor Variations
Spice up your scones by adding cinnamon or nutmeg. A teaspoon of orange or lemon zest adds a fresh twist. You can also mix in nuts or dried fruits. Try chopped walnuts, pecans, or dried cranberries for extra flavor. Be creative and make the scones your own!
Storage Info
Short-Term Storage
To keep leftover scones fresh, store them in an airtight container. This helps them stay soft. You can also wrap them in plastic wrap for extra protection. Keep the container at room temperature for up to two days. Avoid placing them in the fridge, as this can make them dry.
Freezing Scones
You can freeze scones before or after baking. To freeze before baking, shape the dough and place the wedges on a baking sheet. Freeze them for about an hour until firm, then transfer to a freezer bag. For after baking, let the scones cool completely. Then, wrap each scone tightly in plastic wrap and place them in a freezer bag. They can last up to three months.
To thaw, simply take them out of the freezer. Leave them in the fridge overnight or let them sit at room temperature for a few hours. For best results, reheat them after thawing.
Reheating Guidelines
To reheat the scones and keep them fresh, use an oven. Preheat it to 350°F (175°C). Place the scones on a baking sheet. Bake for about 10 minutes, or until warm. You can also use a microwave, but this may make them a bit soft. Heat them for about 15 seconds. Enjoy your scones warm for the best taste!
FAQs
How do I know when the scones are done baking?
To check if your scones are done, look for a few signs. First, they should be golden brown around the edges. Second, insert a toothpick into the center. If it comes out clean, your scones are ready. If not, give them a few more minutes. The tops should feel firm but not hard.
Can I make scones in advance?
Yes, you can prepare scones ahead of time. You can mix the dry ingredients and keep them stored in a bowl. Just add the wet ingredients when you're ready to bake. You can also shape the dough into wedges and freeze them. Bake straight from the freezer, adding a few extra minutes to the baking time.
What can I substitute for heavy cream?
If you need a lighter option, you can use milk with a bit of butter. Mix 1/2 cup of milk with 2 tablespoons of melted butter. For a dairy-free choice, try almond milk or coconut cream. Each option gives a different taste, so choose what suits your needs.
How long do chocolate chip scones last?
Chocolate chip scones stay fresh for about two days at room temperature. Store them in an airtight container to keep them soft. If you want to keep them longer, freeze them. They can last up to three months in the freezer. Just thaw and reheat when you're ready to enjoy!
In this post, I covered essential ingredients and tools for making chocolate chip scones. I walked you through step-by-step instructions, tips for perfect texture, and variations for gluten-free or vegan options. I also shared storage information and answered common questions.
Now you can bake delicious scones with confidence. Enjoy the process and share your tasty results!


