Looking for a fun treat that's easy to make? You've come to the right place! This Chocolate Chip Cookie Dough Dip is a sweet delight everyone will love. With simple steps and basic ingredients, I promise you'll impress friends and family. Plus, you can customize it to satisfy your taste. Ready to dive into this creamy, cookie-like goodness? Let’s get started!
Why I Love This Recipe
- Decadent Flavor: This dip is a chocolate lover's paradise, combining creamy textures with rich chocolate chips for a delightful taste experience.
- Easy to Make: With just a few simple steps and no baking required, this recipe allows you to whip up a delicious treat in no time!
- Versatile Dippers: Serve it with a variety of dippers like graham crackers, fresh fruit, or pretzels, making it a fun and interactive dessert.
- Great for Gatherings: This dip is perfect for parties or family gatherings, as it easily serves multiple people and is always a crowd-pleaser.
Ingredients
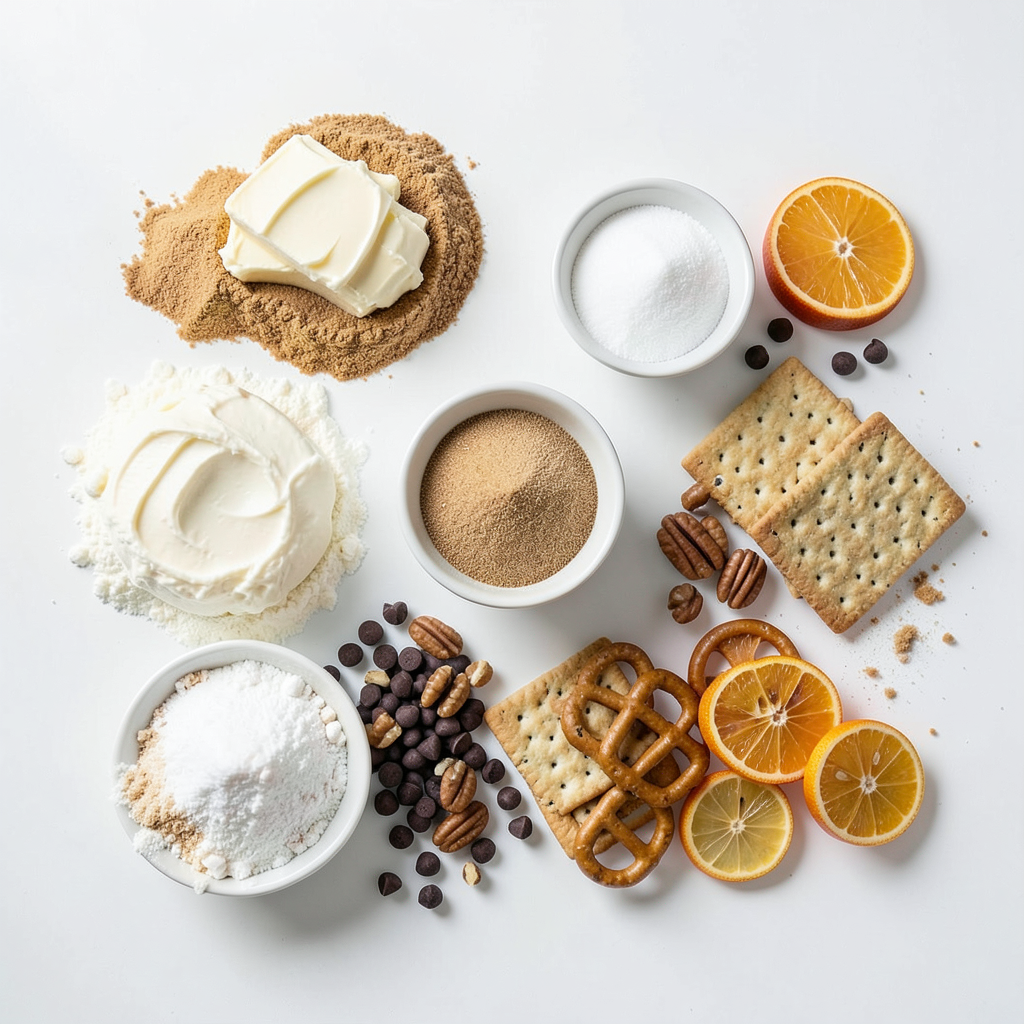
Complete List of Ingredients
- 1 cup all-purpose flour (heat-treated for safety)
- 1/2 cup unsalted butter, softened to room temperature
- 1/2 cup packed brown sugar (light or dark, your choice)
- 1/4 cup granulated sugar
- 1 teaspoon pure vanilla extract
- 1/4 teaspoon fine sea salt
- 1/2 cup cream cheese, softened to room temperature
- 1 cup mini chocolate chips
- 1/4 cup chopped nuts (optional; pecans or walnuts work wonderfully)
- Assorted dippers for serving (suggestions: graham crackers, pretzels, fresh fruit slices)
Optional Ingredients for Customization
You can add a twist to your dip. Here are some fun ideas:
- Add a scoop of peanut butter for a nutty flavor.
- Mix in some melted chocolate for extra richness.
- Use different types of chocolate chips, like dark or white chocolate.
- Swap in different nuts like almonds or hazelnuts.
Allergen Information
This dip contains common allergens. Here are the main ones:
- Wheat: from the all-purpose flour.
- Dairy: from the butter and cream cheese.
- Nuts: if you choose to add them.
Always check labels to ensure they meet your dietary needs.
Step-by-Step Instructions
Preparing the Flour Safely
Start by preheating your oven to 350°F (175°C). Spread 1 cup of all-purpose flour evenly on a baking sheet. Bake it for about 5-7 minutes. This heat treatment makes the flour safe to eat. After baking, let the flour cool completely before using it in the dip.
Mixing the Base Ingredients
In a large mixing bowl, combine the softened butter, 1/2 cup packed brown sugar, and 1/4 cup granulated sugar. Use an electric mixer on medium speed. Beat these ingredients together until creamy and smooth. This should take about 2-3 minutes.
Incorporating Additional Flavor and Texture
Next, add in 1/2 cup softened cream cheese. Mix until the dip is velvety and fluffy. Don’t forget to scrape down the sides of the bowl. Then, add 1 teaspoon of pure vanilla extract and 1/4 teaspoon of fine sea salt. Mix until well combined for that extra flavor boost.
Chilling the Dip for Best Results
Gradually add the cooled heat-treated flour to your creamy mixture. Mix on low speed until just combined. Be careful not to overmix, as this can change the texture. For the best taste, chill your dip in the refrigerator for at least 30 minutes. You can eat it right away if you're in a hurry!
Serving Suggestions
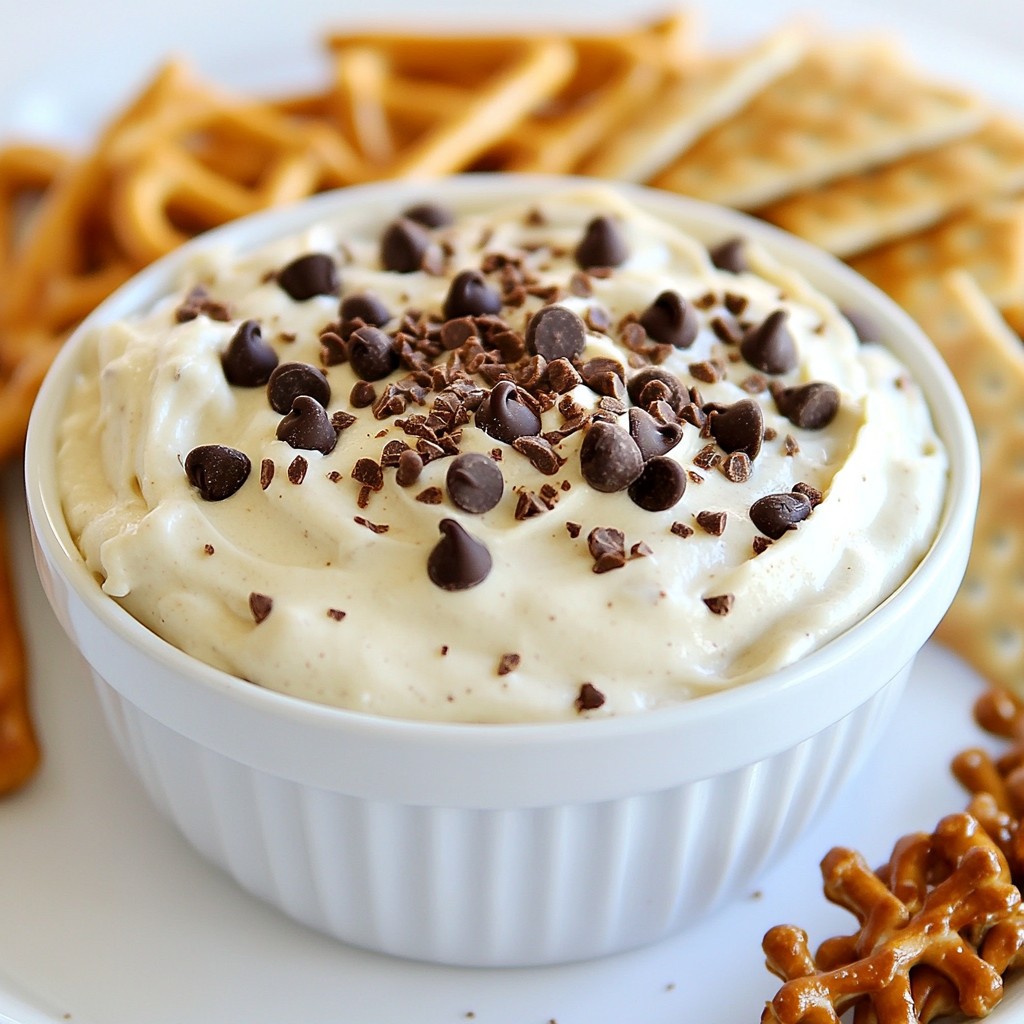
Transfer your dip to a bright serving bowl. Arrange assorted dippers around it. Great options are graham crackers, pretzels, or fresh fruit slices. For a fun touch, top the dip with extra chocolate chips and cookie crumbs. This makes it even more inviting!
Tips & Tricks
How to Make the Dip Even Creamier
To make your dip extra creamy, use room-temperature butter and cream cheese. This soft texture helps blend the ingredients well. Beat them together thoroughly until smooth. You can also add a splash of milk or heavy cream. This will make your dip silkier and more luscious.
Substitutions for Healthier Options
If you want a lighter version, try these swaps:
- Use Greek yogurt instead of cream cheese.
- Replace half the butter with unsweetened applesauce.
- Use coconut sugar instead of brown sugar.
These changes will cut some calories while keeping the taste amazing.
Presentation Tips for Serving
For a fun and pretty look, choose a colorful bowl for your dip. Top it with extra chocolate chips and a sprinkle of cookie crumbs. Arrange your dippers around the bowl in a circle. You can use graham crackers, pretzels, or fresh fruit slices. This makes your dip not just tasty but also a feast for the eyes!
Pro Tips
- Heat-Treat the Flour: Always heat-treat your flour before using it in raw recipes to ensure safety and enhance flavor.
- Choose Your Sweetener: Experiment with different types of brown sugar, like dark or light, to customize the depth of flavor in your dip.
- Mixing Technique: Be careful not to overmix when incorporating the flour. This will help maintain a light and creamy texture.
- Chilling is Key: For the best flavor and consistency, let the dip chill in the refrigerator for at least 30 minutes before serving.
Variations
Chocolate Chip Cookie Dough Dip with Peanut Butter
You can easily make this dip even better with peanut butter. Just mix in 1/2 cup of creamy peanut butter after you combine the butter and sugars. This adds a rich, nutty flavor that pairs wonderfully with the chocolate chips. You might want to reduce the amount of granulated sugar by a tablespoon, since peanut butter is sweet too.
Gluten-Free Adaptation
For a gluten-free version of this dip, swap the all-purpose flour for a gluten-free flour blend. Make sure it is heat-treated just like regular flour. Most gluten-free blends work well in this dip. Just follow the same steps, and enjoy the same great taste without the gluten!
Seasonal Flavor Infusions
You can change the flavor of the dip for different seasons. In the fall, add a teaspoon of pumpkin spice for a cozy taste. During winter, try stirring in some crushed peppermint candies for a festive touch. In the summer, consider mixing in fresh berries for a fruity twist. Each season brings a new way to enjoy this dip!
Storage Info
How to Store Leftover Dip
To store leftover dip, place it in an airtight container. Seal it well to keep out air. Store it in the fridge for up to five days. Always check for freshness before eating.
Freezing Instructions
You can freeze the dip if you have more than you need. Use a freezer-safe container and leave some space at the top. This space helps the dip expand as it freezes. It can last up to three months in the freezer. To thaw, move it to the fridge overnight before serving.
Reheating Tips
When ready to enjoy, let the dip sit at room temperature for about 30 minutes. This helps restore its creamy texture. If it feels too thick, mix in a bit of milk or cream. Avoid reheating it in the microwave, as this can change the texture. Enjoy your dip fresh!
FAQs
Can you eat raw flour?
No, you should not eat raw flour. It can have germs that cause illness. To make it safe, heat the flour in the oven for 5-7 minutes. This kills any harmful bacteria, making it safe to use in your dip. Always remember to let it cool before mixing.
How long does Chocolate Chip Cookie Dough Dip last?
Your dip can last up to five days. Store it in an airtight container in the fridge. After this time, it may lose its taste and texture. Always check for any signs of spoilage before eating.
What can I use as dippers?
You have many great options for dippers! Here are a few ideas:
- Graham crackers
- Pretzels
- Fresh fruit slices, like apples or strawberries
- Cookies
- Rice cakes
These dippers add fun flavors and textures to your dip.
Is this dip suitable for kids?
Yes, this dip is great for kids! It’s sweet and fun to eat. Just ensure they know to dip safely. The ingredients are kid-friendly, and it can be a fun activity to make together.
Can you make this ahead of time?
Yes, you can make this dip ahead of time. It tastes even better after chilling in the fridge. Prepare it a day before your event for the best flavor. Just store it in an airtight container until you’re ready to serve.
This guide walks you through making a tasty Chocolate Chip Cookie Dough Dip. We covered key ingredients, mixing tips, and ways to customize your dip. You learned how to store leftovers and even freeze them. Remember, this dip is easy to make and fun to share. With these tips and variations, you can impress friends and family. Enjoy your flavor explorations and share your creations!


