Chocolate Cherry Smoothie Bowl Rich in Flavor

If you’re craving a treat that’s both tasty and good for you, try my Chocolate Cherry Smoothie Bowl. This bowl is rich in flavor and packs a nutritious punch. I’ll guide you through simple steps to create a delicious blend, perfect for breakfast or a snack. Plus, I’ll share tips on customizing it to your taste. Are you ready to make this delightful dish? Let’s dive in!
Why I Love This Recipe
- Delicious Flavor Combination: The rich chocolate taste pairs perfectly with the tartness of cherries, creating a delightful treat that satisfies sweet cravings.
- Nutritious Ingredients: This smoothie bowl is packed with vitamins, antioxidants, and healthy fats, making it a great breakfast or snack option.
- Customizable Toppings: You can personalize your bowl with a variety of toppings, from granola to fresh fruits, enhancing both flavor and texture.
- Quick and Easy: With just a few simple steps and minimal prep time, you can whip up this smoothie bowl in under 10 minutes!
Ingredients
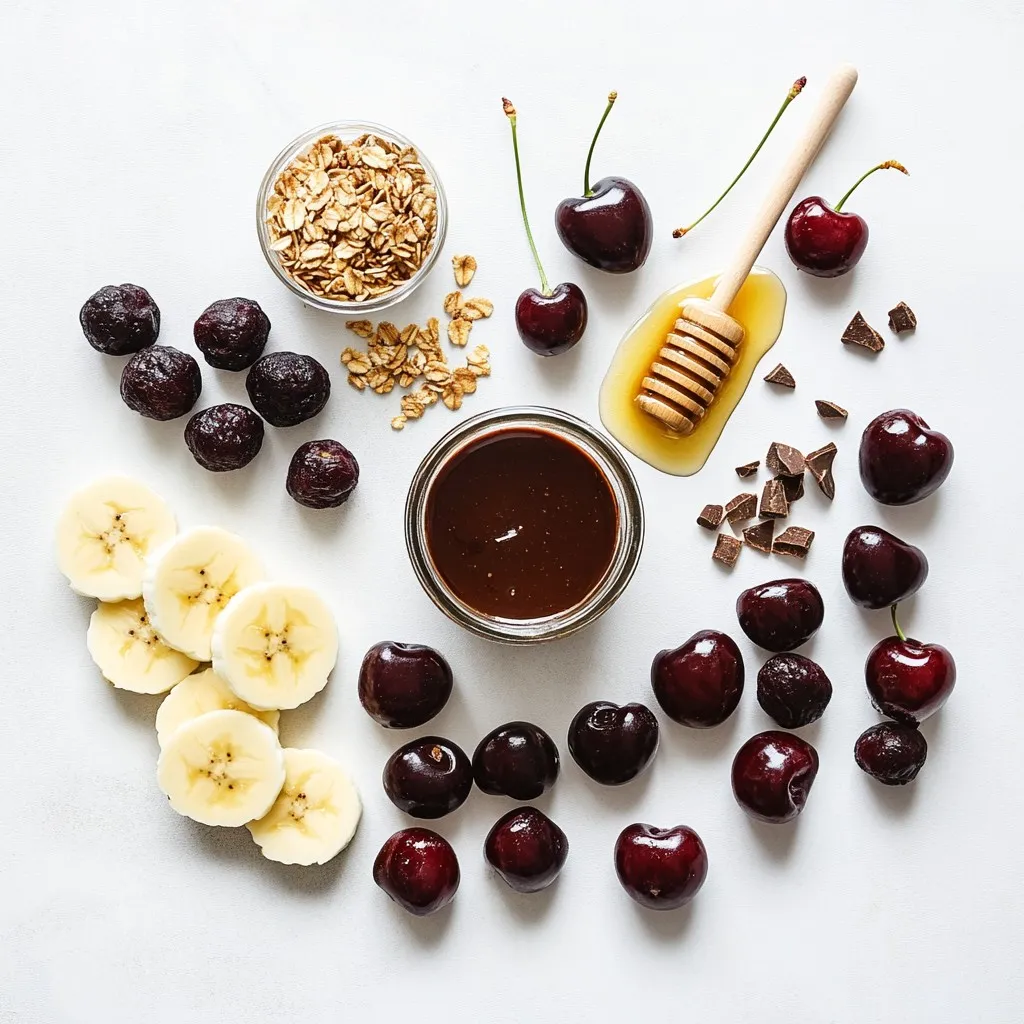
Main Ingredients for Chocolate Cherry Smoothie Bowl
To create a rich and tasty chocolate cherry smoothie bowl, you need a few key items:
– 1 cup frozen cherries
– 1 medium banana, sliced
– 1 tablespoon unsweetened cocoa powder
– ½ cup almond milk (or any milk of your choice)
– 1 tablespoon almond butter (you can use peanut butter if you want)
These main ingredients give the smoothie its creamy texture and bold flavor. The frozen cherries provide sweetness and a lovely color. The banana adds creaminess, while cocoa powder offers a deep chocolate taste. Almond milk keeps it dairy-free and smooth. Almond butter adds healthy fats for a boost.
Optional Sweeteners
If you want your smoothie bowl sweeter, consider adding some optional sweeteners:
– 1 tablespoon honey
– 1 tablespoon maple syrup
These sweeteners can enhance the flavor. You can use them based on your taste. Add just a bit and blend to see if it meets your needs.
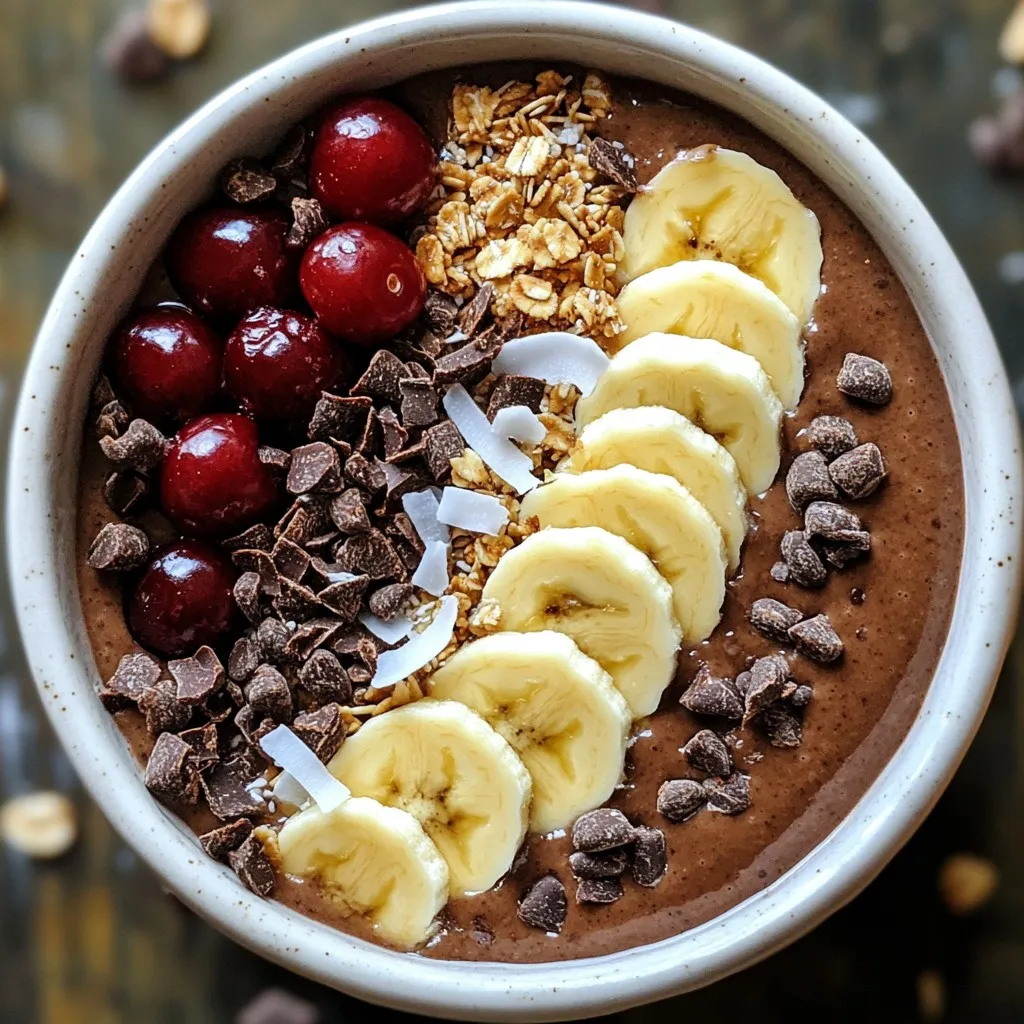
Suggested Toppings
To make your smoothie bowl even better, try these fun toppings:
– Granola
– Fresh cherries
– Sliced banana
– Cocoa nibs
– Shredded coconut
These toppings add crunch and extra flavor. Granola gives a nice texture, while fresh fruit adds color and freshness. Cocoa nibs provide a rich chocolatey bite, and shredded coconut adds a tropical twist. You can mix and match to find your perfect combination!

Step-by-Step Instructions
Step 1: Blend the Base
First, gather your ingredients. You will need:
– 1 cup frozen cherries
– 1 medium banana, sliced
– 1 tablespoon unsweetened cocoa powder
– ½ cup almond milk
– 1 tablespoon almond butter
Place these items in your high-powered blender. Blend on high speed until everything mixes well.
Step 2: Achieve Smooth Consistency
Blend the mixture until it is smooth and creamy. Stop the blender now and then. Scrape down the sides to mix well. You want a nice, creamy texture.
Step 3: Adjust Consistency
If your smoothie bowl is too thick, add more almond milk. Do this one tablespoon at a time. Blend again after each addition. Keep going until you reach your desired thickness.
Step 4: Sweeten to Taste
Taste your smoothie. If you want it sweeter, add honey or maple syrup. Blend briefly again to mix the sweetener in well.
Step 5: Ladle into Bowl
Pour your delicious chocolate cherry smoothie into a bowl. Use a spoon to create a nice swirl on top. This makes it look pretty!
Step 6: Add Toppings
Now for the fun part! Add your favorite toppings. I suggest:
– Granola
– Fresh cherries
– Sliced banana
– Cocoa nibs
– Shredded coconut
These toppings add great texture and flavor to your smoothie bowl. Enjoy!
Tips & Tricks
How to Make Your Smoothie Bowl Extra Creamy
To achieve that smooth and creamy texture, start with frozen cherries. Frozen fruit blends better and gives a thick feel. Use a ripe banana to add natural creaminess. The almond butter also helps. It adds protein and a nice texture. If you want more creaminess, blend in a bit more almond milk slowly.
Best Practices for Blending
Always use a high-powered blender for the best results. It helps mix everything evenly. Start on low speed, then increase to high. This method ensures all ingredients blend well. Stop the blender and scrape down the sides. This way, nothing gets left behind. If your mix is too thick, add a little milk. Blend until smooth.
Customizing Sweetness and Flavor
Taste your smoothie before you serve it. If it needs more sweetness, add honey or maple syrup. Blend again to mix in the sweetener. You can also try adding vanilla extract for extra flavor. If you like it richer, add a bit more cocoa powder. Adjust it to your taste for the perfect balance.
Pro Tips
- Use Frozen Cherries: Using frozen cherries not only makes the smoothie colder and more refreshing but also helps achieve a thicker texture.
- Experiment with Sweetness: Adjust the sweetness to your preference by starting with less honey or maple syrup and adding more as needed.
- Blend Thoroughly: Ensure your smoothie is blended thoroughly for a creamy consistency; stopping to scrape down the sides of the blender helps incorporate all ingredients.
- Customize Your Toppings: Feel free to customize your toppings based on your preferences or what you have on hand for a unique twist each time.

Variations
Substitutes for Almond Milk and Almond Butter
If you don’t have almond milk, use any milk you like. Coconut milk adds a nice flavor. You can also try oat milk or soy milk. For almond butter, peanut butter works great. Sunflower seed butter is another option. Each choice changes the taste a little but keeps it creamy.
Different Topping Ideas
Toppings make your smoothie bowl fun! Try adding granola for crunch. Fresh berries or banana slices add color and taste. Cocoa nibs give a rich chocolate flavor. Shredded coconut adds a tropical twist. You can also sprinkle some nuts or seeds for extra protein. Mix and match to find your favorite combo!
Making it Vegan or Dairy-Free
To keep this smoothie bowl vegan, choose plant-based milk and butter. Almond milk and peanut butter fit perfectly. Use maple syrup instead of honey for sweetness. All these changes keep your bowl vegan and tasty. Enjoy it guilt-free!
Storage Info
How to Store Leftover Smoothie
To store your leftover smoothie, pour it into a sealed container. This helps keep it fresh. Place it in the fridge. Use it within 24 hours for the best taste. If you see any separation, stir it well before enjoying.
Best Practices for Freezing Ingredients
Freezing ingredients helps keep them fresh longer. For cherries, wash and pit them first. Spread them on a baking sheet. Freeze until solid, then transfer to a bag. For bananas, peel and slice them. Freeze each slice on a tray before bagging. This keeps them from sticking together.
Reheating or Re-blending Tips
If your smoothie has thickened in the fridge, don’t worry! Add a splash of almond milk. Blend it again until smooth. If you prefer it cold, enjoy it straight from the fridge. For a warmer treat, heat gently in a pot. Stir well and watch the temperature closely.
FAQs
What Can I Use Instead of Cherries?
You can use other frozen fruits. Try strawberries, raspberries, or blueberries. Each will change the taste. Mix and match for fun flavors. Just keep the same amount of fruit for balance.
Can I Add Protein Powder to My Smoothie Bowl?
Yes, you can add protein powder. It boosts nutrition and keeps you full. Use a scoop of your favorite kind. Mix it in when you blend the base. This makes it a great post-workout meal.
How to Make a Larger Batch of Smoothie Bowls?
To make more servings, just double or triple the recipe. Use a bigger blender to mix everything well. Pour into bowls once blended. You can save some for later too!
Is It Healthy to Eat a Smoothie Bowl for Breakfast?
Yes, a smoothie bowl can be very healthy. It combines fruits, healthy fats, and nutrients. The ingredients provide fiber, vitamins, and energy. Enjoy it without guilt!
How Many Calories Are in a Chocolate Cherry Smoothie Bowl?
A chocolate cherry smoothie bowl has about 300 calories. This depends on your toppings and sweeteners. Check your ingredients to get the exact count. It’s a tasty treat that’s not too heavy.
You learned how to make a tasty chocolate cherry smoothie bowl. We discussed key ingredients, sweeteners, and toppings. I shared simple steps for blending it right. You can also customize the texture and sweetness to fit your taste. Storing leftover smoothie and variations for diets was covered, too.
This smoothie bowl is fun, healthy, and packed with flavor. Enjoy experimenting and satisfying your craving

Chocolate Cherry Smoothie Bowl
Ingredients
- 1 cup frozen cherries
- 1 medium banana, sliced
- 1 tablespoon unsweetened cocoa powder
- ½ cup almond milk (or any milk of your choice)
- 1 tablespoon almond butter (substitute with peanut butter if desired)
- 1 tablespoon honey or maple syrup (optional, for sweetness)
- to taste toppings: granola, fresh cherries, sliced banana, cocoa nibs, shredded coconut
Instructions
- In a high-powered blender, combine the frozen cherries, banana slices, cocoa powder, almond milk, and almond butter.
- Blend on high speed until the mixture becomes smooth and creamy. Stop occasionally to scrape down the sides of the blender to ensure all ingredients are well combined.
- If the smoothie is too thick for your liking, slowly add additional almond milk, one tablespoon at a time, blending in between until you achieve your desired consistency.
- Taste your smoothie mixture and add honey or maple syrup if you prefer it sweeter. Blend again briefly to incorporate the sweetener fully.
- Pour the luscious chocolate cherry smoothie into a serving bowl. Use a spoon to swirl the surface for an appealing presentation.
- Enhance your smoothie bowl with your choice of toppings, such as a sprinkle of granola, fresh cherries, banana slices, a sprinkle of cocoa nibs, and a shower of shredded coconut for delightful texture and flavor contrasts.


![- 1 cup strawberries, hulled and sliced - 1 cup blueberries - 1 ripe mango, peeled and diced - 1 cup pineapple, diced - 1 banana, sliced The fruit selection is key. I enjoy using a mix of colors and flavors. Strawberries bring sweetness, while blueberries add a nice pop of tartness. The mango gives a tropical vibe, and pineapple adds a refreshing taste. The banana adds creaminess and helps balance the flavors. - 1/4 cup honey - 2 tablespoons freshly squeezed lime juice - Zest of 1 lime The dressing pulls everything together. I use honey for natural sweetness. Fresh lime juice brightens the dish, making it taste fresh. The lime zest adds an extra layer of flavor that's hard to resist. - Fresh mint leaves, for garnish Mint leaves add a beautiful touch. They not only look good but also give a nice hint of freshness. If you want to impress guests, sprinkle some mint on top before serving. Make sure to check out the Full Recipe for a detailed guide on how to combine these ingredients into a delicious Honey Lime Fruit Salad. To start, gather your fruits. Grab one cup of hulled and sliced strawberries, one cup of blueberries, one ripe mango peeled and diced, one cup of diced pineapple, and one sliced banana. In a large mixing bowl, combine all these fruits. Gently mix them to spread the flavors evenly. This step helps each fruit shine in the salad. Next, we make the dressing. In a separate bowl, add a quarter cup of honey, two tablespoons of freshly squeezed lime juice, and the zest of one lime. I like to whisk these together until the mixture is smooth. This dressing adds a sweet and zesty kick to the salad. Now, it's time to bring it all together. Drizzle the honey-lime dressing over your prepared fruits. Toss everything gently with a spatula or large spoon. Make sure each piece of fruit gets coated in the dressing. Let the salad sit for about ten minutes at room temperature. This resting time lets the flavors blend beautifully. Enjoy your fresh and colorful Honey Lime Fruit Salad! You can find the Full Recipe for details on preparation. To make a great Honey Lime Fruit Salad, choose ripe, seasonal fruits. Fresh fruits provide the best taste and texture. Look for strawberries with bright red color. Blueberries should be plump and firm. Pick mangoes that give slightly when you press them. Pineapples should smell sweet at the base. Bananas need to be ripe but not brown. When you select these fruits, you ensure a delightful salad. Let your salad rest for at least 10 minutes before serving. This short wait helps the flavors blend. The honey lime dressing seeps into the fruits. This makes each bite burst with flavor. The longer the salad sits, the better it tastes. You can prepare this ahead of time for easy serving. Presentation matters when serving this salad. You can use individual bowls for a personal touch. A large platter works well for gatherings. Arrange the fruits in a colorful pattern. Add lime wedges on the side for extra zest. A few fresh mint leaves on top make it look appealing. Your guests will love the bright colors and fresh taste. For the full recipe, check the instructions above. {{image_4}} You can easily change this fruit salad to suit your taste. Adding fruits like kiwi or grapes can make it even better. Kiwi adds a bright green color and a tangy taste. Grapes are sweet, crunchy, and add variety. Just chop them up and toss them in. Mix and match to create your dream fruit salad! For a fun tropical vibe, try adding shredded coconut or a splash of coconut juice. Shredded coconut gives a chewy texture and a hint of sweetness. Coconut juice can make the dressing even more refreshing. This twist takes your fruit salad to a whole new level. You’ll feel like you’re on a sunny beach with every bite! If you want a vegan option, use agave syrup instead of honey. Agave syrup is a great sweetener that works well in this recipe. It blends nicely with lime juice and keeps the salad tasty. This swap still gives you that sweet flavor without using honey. Enjoy your fruit salad without any worries! For the full recipe, check out the [Full Recipe]. Keep the salad in an airtight container in the fridge. This helps keep it fresh. Avoid letting the salad sit out for too long. If you plan to serve it later, store it right away. Consume within 1-2 days for best freshness. The fruits will start to lose their crispness after that. If you notice any browning, it’s time to toss it out. Always check for changes in smell or texture. Freezing fruit salad can change its texture. If you want to freeze it, use firm fruits like pineapple and mango. Avoid bananas, as they turn mushy. To freeze, place the salad in a freezer-safe container. When ready to eat, let it thaw in the fridge. You can also add fresh honey-lime dressing after defrosting for extra flavor. Yes, you can use frozen fruits in this salad. Frozen fruits can be a great option when fresh fruits are out of season. They are often picked at their peak and frozen right away, keeping their nutrients intact. However, frozen fruits can release more water as they thaw. This might make the salad a bit watery. To avoid this, let the frozen fruits thaw and drain excess liquid before mixing them in. Fresh fruits offer a crunchier texture and vibrant look, so choose based on your preference. No, this salad is not vegan due to honey. Honey comes from bees, making it an animal product. If you want a vegan option, you can easily replace honey with agave syrup or maple syrup. Both alternatives provide sweetness and work well with lime. The taste will differ slightly, but the salad will still be delicious. Just make sure to use the same amount of the substitute for the best flavor balance. This fruit salad is packed with vitamins and minerals. Here are some key benefits of its ingredients: - Strawberries: High in vitamin C and antioxidants, good for your skin. - Blueberries: Great for brain health, rich in fiber, and low in calories. - Mango: Full of vitamins A and C, supports eye health and boosts immunity. - Pineapple: Contains bromelain, which helps digestion and reduces inflammation. - Banana: A good source of potassium, great for heart health. Overall, this salad provides a mix of nutrients that can boost energy and support overall health. It’s a tasty way to enjoy fruits every day. For the full recipe, check out the details above. This blog post shared how to make a delicious Honey Lime Fruit Salad. I covered the best ingredients, including fresh fruits and a zesty dressing. You learned how to prepare everything step-by-step and found tips for picking juicy fruits. I also shared fun ways to adapt the salad to your taste. Finally, remember to store it properly to keep it fresh. Enjoy this vibrant mix and feel good about your healthy choice!](https://goldendishy.com/wp-content/uploads/2025/07/db0dca5e-aa0e-4365-a3c2-c9e5564148e0-768x768.webp)


![To bake a delicious Raspberry Lemon Loaf, you need these key ingredients: - 1 ½ cups all-purpose flour - 1 teaspoon baking powder - ½ teaspoon baking soda - ¼ teaspoon salt - ½ cup unsalted butter, softened - 1 cup granulated sugar - 2 large eggs, at room temperature - 1 teaspoon pure vanilla extract - Zest of 1 lemon, finely grated - ½ cup freshly squeezed lemon juice - 1 cup fresh raspberries (or frozen, thawed, and drained) - ¼ cup powdered sugar for glazing - 1 tablespoon freshly squeezed lemon juice for glazing You can add extra flavor or texture with these options: - ½ cup chopped nuts, like walnuts or almonds - ½ teaspoon almond extract for a nutty taste - Lemon zest can be increased for a stronger flavor - A handful of blueberries can mix well with raspberries If you run out of an ingredient, here are some swaps: - Use coconut oil instead of butter for a dairy-free version - Applesauce can replace eggs for a vegan loaf - If you lack lemon juice, use lime juice instead - Whole wheat flour can stand in for all-purpose flour, but it may change the texture With these ingredients and options, you can customize your Raspberry Lemon Loaf to fit your taste! Start by preheating your oven to 350°F (175°C). Grab a 9x5 inch loaf pan. Grease it with butter and lightly dust it with flour. This will help the loaf come out easily. In a medium bowl, whisk together the following: - 1 ½ cups all-purpose flour - 1 teaspoon baking powder - ½ teaspoon baking soda - ¼ teaspoon salt Set this mixture aside for later use. This step ensures the leavening agents are evenly distributed. In a large mixing bowl, use an electric mixer to cream together: - ½ cup unsalted butter, softened - 1 cup granulated sugar Beat them for about 3-5 minutes. The mixture should turn light and fluffy. This helps air to blend into the butter. Now, add 2 large eggs one at a time. Mix well after each addition. Next, stir in: - 1 teaspoon pure vanilla extract - Zest of 1 lemon Make sure everything combines fully. This adds a nice flavor to your loaf. Slowly pour in ½ cup of freshly squeezed lemon juice. Mix gently until it blends well with the other wet ingredients. This step gives your loaf a bright, zesty taste. Gradually add the dry mixture to the wet mix. Stir gently until just combined. Be careful not to overmix. This keeps your loaf light and airy. Now, it’s time to add the fun part! Gently fold in 1 cup of fresh raspberries. If you use frozen ones, coat them lightly in flour. This helps them stay suspended in the batter. Pour the batter into your prepared loaf pan. Smooth the top with a spatula. Bake in the preheated oven for 50-60 minutes. Check for doneness by inserting a toothpick in the center. It should come out clean. Once baked, let the loaf cool in the pan for about 10 minutes. Then transfer it to a wire rack to cool completely. For glazing, mix together: - ¼ cup powdered sugar - 1 tablespoon freshly squeezed lemon juice Drizzle this glaze over the cooled loaf for a sweet finish. Slice the loaf into generous pieces. Enjoy the burst of raspberry and lemon flavors in every bite! You can serve it on pretty plates. Garnish with fresh raspberries and a sprinkle of lemon zest for an elegant touch. This loaf is perfect for breakfast or a sweet snack! For the Full Recipe, check out the detailed instructions. One big mistake is overmixing the batter. This can make the loaf tough. Mix until just combined for a light texture. Another mistake is not checking the oven temperature. An oven thermometer can help ensure accuracy. Also, if you forget to grease your pan, the loaf may stick. Always prepare your pan before pouring in the batter. For a soft and moist loaf, use room temperature ingredients. Cold butter or eggs can lead to uneven mixing. When folding in raspberries, do it gently. This helps keep them whole and prevents a mushy loaf. Make sure your oven is fully preheated. This ensures even baking and a perfect rise. To boost flavor, add more lemon zest. This can brighten the taste. You can also mix in a dash of almond extract for a unique twist. If you want a sweeter glaze, add more powdered sugar. For a touch of spice, a pinch of cinnamon can be delightful. Enjoy experimenting with flavors to find your perfect blend! {{image_4}} To make a gluten-free version, swap the all-purpose flour with a gluten-free blend. Use one that works well for baking. The texture may change slightly, but the taste will still shine. This version is just as delicious and perfect for those with gluten issues. For a vegan twist, replace the eggs with flax eggs. Mix one tablespoon of ground flaxseed with three tablespoons of water. Let it sit for five minutes. Use a plant-based butter instead of regular butter. This keeps the loaf moist and tasty while being dairy-free. You can switch out the raspberries for other fruits! Blueberries or strawberries work well. For a tropical touch, try diced pineapple or mango. Each fruit brings its own flavor, making your loaf unique. Experiment and find your favorite mix! For the full recipe, refer to the section above. After you bake your Raspberry Lemon Loaf, let it cool completely. Wrap it tightly in plastic wrap or foil. You can also place it in an airtight container. Store it at room temperature for up to three days. If you prefer, keep it in the fridge for about a week. This helps keep it fresh and moist. To freeze the loaf, first cool it completely. Then, slice it into even pieces. Wrap each slice in plastic wrap. Next, place the wrapped slices in a freezer-safe bag. You can freeze them for up to three months. When you’re ready to enjoy a slice, thaw it in the fridge overnight or let it sit at room temperature for a few hours. Reheating is simple. You can use a microwave or an oven. For the microwave, heat a slice for about 15-20 seconds. Check if it’s warm enough. If you use the oven, preheat it to 350°F (175°C). Place the slice on a baking sheet for about 5-10 minutes. This method keeps the loaf soft and tasty. Enjoy your Raspberry Lemon Loaf warm with a cup of tea or coffee! You can check if your loaf is done by inserting a toothpick in the center. If it comes out clean or with just a few crumbs, your loaf is ready. You can also look for a golden-brown crust and a slight spring back when you gently press the top. Yes, you can use frozen raspberries! Just make sure to thaw them and drain off any extra liquid. Toss them in some flour before folding them into the batter. This helps to keep them from sinking to the bottom while baking. If you don't have lemon juice, you can use lime juice or even apple cider vinegar. Both options will give a nice tang to your loaf. Just remember that the flavor will change slightly. The Raspberry Lemon Loaf will stay fresh for about 3-4 days at room temperature if stored in an airtight container. It also freezes well for up to 3 months. Just wrap it tightly before freezing. Absolutely! You can make the loaf a day or two ahead of time. Store it in an airtight container to keep it moist. You can also prepare the batter in advance and bake it later for a fresh treat. Be sure to check the [Full Recipe] for more tips! Here is the full recipe for Raspberry Lemon Dream Loaf. This treat is bright, sweet, and tangy. You will want to make it again and again. Ingredients: - 1 ½ cups all-purpose flour - 1 teaspoon baking powder - ½ teaspoon baking soda - ¼ teaspoon salt - ½ cup unsalted butter, softened to room temperature - 1 cup granulated sugar - 2 large eggs, at room temperature - 1 teaspoon pure vanilla extract - Zest of 1 lemon, finely grated - ½ cup freshly squeezed lemon juice - 1 cup fresh raspberries (or frozen raspberries, thawed and drained) - ¼ cup powdered sugar for glazing - 1 tablespoon freshly squeezed lemon juice for glazing This loaf serves about 10 people. Each slice has around 200 calories. You get a nice mix of carbs, fat, and protein. The fresh raspberries add fiber and vitamins, too. Slice the loaf into thick pieces. Each slice is perfect for a dessert or a snack. You can serve it on its own or with a cup of tea. The bright flavors make it a crowd-pleaser. For a fancy touch, add a few raspberries on top. Enjoy every bite! In this article, we explored the essential ingredients for a Raspberry Lemon Loaf, including optional add-ins and substitutions. I provided clear, step-by-step instructions to guide you from mixing to baking. We discussed tips for avoiding mistakes and achieving the right texture. You also learned about variations, storage methods, and answers to common questions. Now, with these insights, you can create a delicious loaf that suits your taste and needs. Enjoy baking and sharing this delightful treat!](https://goldendishy.com/wp-content/uploads/2025/07/83025fd5-21c0-4ee2-bbe4-d247d9a88122-768x768.webp)