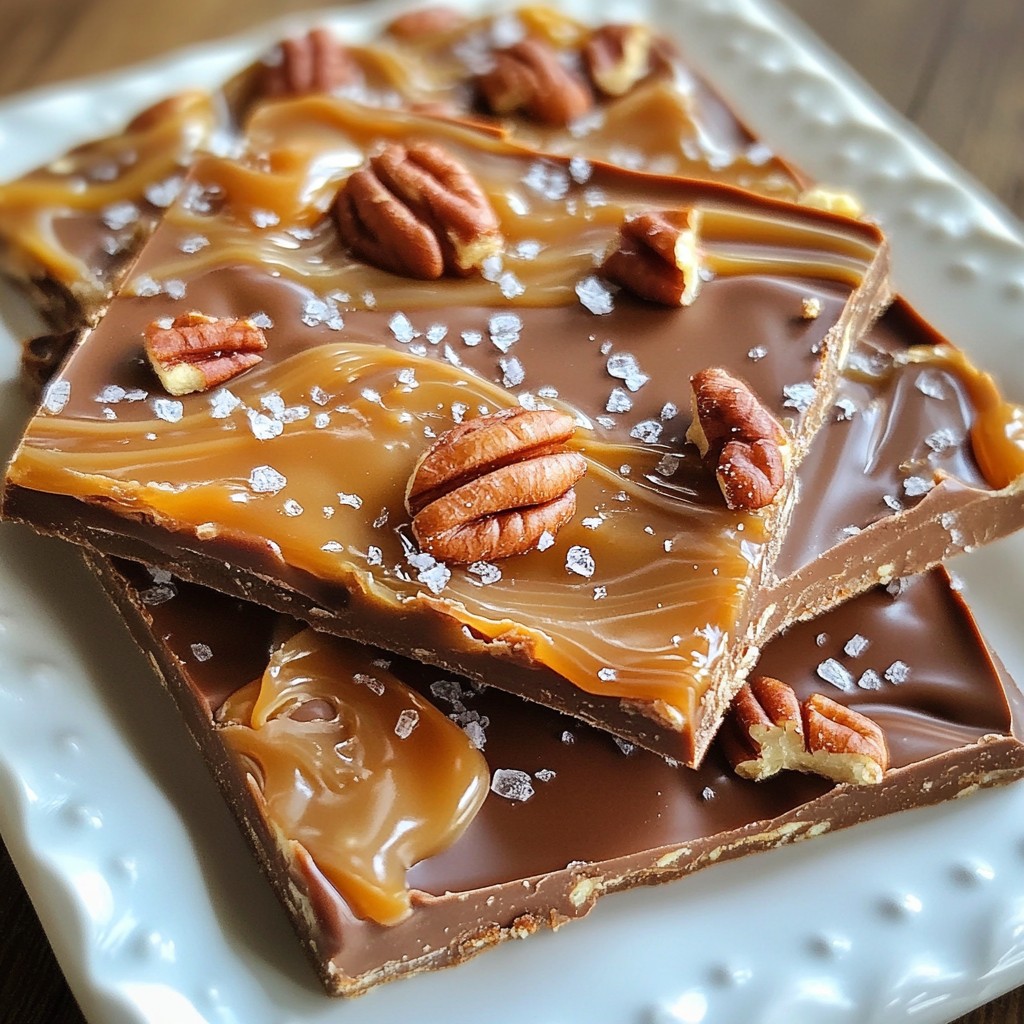
Indulge your sweet tooth with my easy Chocolate Caramel Turtle Bark recipe! This delightful dessert treat combines creamy chocolate, rich caramel, and crunchy pecans for a flavor explosion. Whether you're hosting a party or treating yourself, this bark is sure to impress. I’ll guide you step by step, with tips to make the perfect batch every time. Get ready to discover your new favorite treat!
Why I Love This Recipe
- Decadent Flavor Combination: The rich blend of milk and semi-sweet chocolate combined with gooey caramel and crunchy pecans creates an indulgent treat that satisfies every sweet tooth.
- Easy to Make: This recipe requires minimal effort and time, making it perfect for both novice and experienced bakers looking for a quick dessert option.
- Perfect for Sharing: With approximately 24 bite-sized pieces, this turtle bark is great for gatherings, parties, or simply sharing with friends and family.
- Customizable Treat: Feel free to experiment with different nuts or chocolate types, allowing you to personalize the flavor profile to your liking!
Ingredients
For a delicious Chocolate Caramel Turtle Bark, you need the following ingredients:
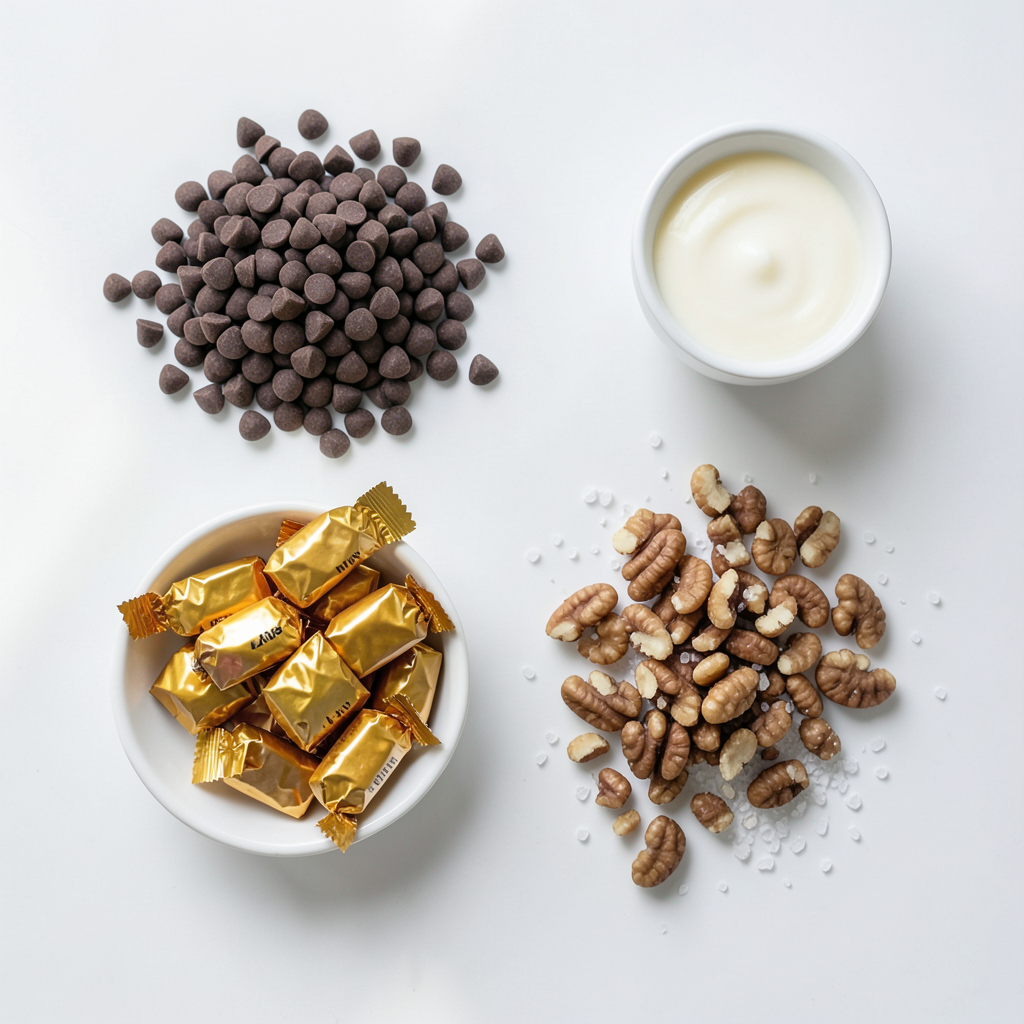
- 12 ounces milk chocolate chips
- 12 ounces semi-sweet chocolate chips
- 1 cup caramel candies, unwrapped
- 1/4 cup heavy cream
- 1 cup pecans, roughly chopped
- Sea salt, for sprinkling
These ingredients create a perfect blend of sweet and salty flavors. The milk chocolate gives a creamy taste, while the semi-sweet chocolate adds depth. The caramel candies melt into a glossy layer, making the bark rich and inviting. Pecan pieces add a nice crunch. Finally, a sprinkle of sea salt balances everything out.
When you gather these ingredients, think about the joy they will bring. Each bite will have smooth chocolate, gooey caramel, and crunchy pecans. This treat is perfect for sharing or enjoying on your own.
Step-by-Step Instructions
Preparing the Baking Sheet
Start by grabbing a baking sheet that is about 11x17 inches. Line it with parchment paper. Make sure to leave some paper hanging over the edges. This will help you lift the bark out later.
Melting the Chocolate
Next, take a microwave-safe bowl and add both the milk and semi-sweet chocolate chips. Heat the bowl in the microwave in 30-second bursts. Stir the chocolate well each time. Keep heating until it is completely melted and smooth.
Spreading the Chocolate
Now, pour the melted chocolate onto your prepared baking sheet. Use a spatula to spread it evenly. Aim for a nice, uniform thickness so it sets well.
Melting the Caramel
For the caramel, take a small saucepan. Over low heat, place the unwrapped caramel candies and the heavy cream inside. Stir it continuously until the caramels melt and blend into a smooth mixture.
Layering the Caramel
Drizzle the warm caramel on top of your chocolate spread. Use a knife or toothpick to swirl the caramel into the chocolate. This creates a beautiful marbled design.
Adding the Pecans
Now, sprinkle the chopped pecans evenly over the caramel. Press them down gently. This will help them stick to the caramel and chocolate.
Finishing Touches
To finish, lightly sprinkle sea salt over the top. This adds a nice contrast to the sweet flavors.
Chilling the Bark
Transfer the baking sheet to the refrigerator. Chill it for at least 2 hours or until it feels firm to the touch.
Breaking into Pieces
Once set, take the baking sheet out of the fridge. Use the parchment paper to lift the bark out. Break or cut it into bite-sized pieces. Enjoy your delicious chocolate caramel turtle bark!
Tips & Tricks
Perfecting Your Chocolate Melt
To melt chocolate, start with good quality chips. Use a microwave-safe bowl. Combine milk chocolate and semi-sweet chocolate chips. Heat in 30-second bursts. Stir well between each burst. This helps avoid burning. When melted, the chocolate should be smooth. If it is too thick, add a little bit of coconut oil for a silky texture.
Achieving the Right Caramel Consistency
For perfect caramel, use unwrapped caramel candies. Heat them slowly with heavy cream in a small saucepan. Stir constantly to avoid burning. The caramel should be smooth and glossy when done. If it looks grainy, add a splash more cream. This will help get it back to a nice, creamy texture.
Customizing the Flavor with Different Nuts
Pecans are a classic choice for turtle bark. However, you can mix it up! Try walnuts or almonds for a different taste. Each nut brings its own flavor and crunch. Chop them roughly for even distribution. Press them gently into the caramel layer for a perfect bite.
Pro Tips
- Use Quality Chocolate: Opt for high-quality chocolate chips for a smoother melt and richer flavor, enhancing the overall taste of your bark.
- Swirl with Care: When swirling the caramel into the chocolate, use a gentle hand to avoid mixing them completely; the marbled effect adds visual appeal.
- Press the Pecans: After sprinkling the pecans, press them gently into the caramel to ensure they stay in place once the bark sets.
- Storage Tips: Store the bark in an airtight container at room temperature for up to a week, or refrigerate to extend its freshness.
Variations
White Chocolate Turtle Bark
You can make a tasty white chocolate version. Simply swap the milk and semi-sweet chocolate chips for 24 ounces of white chocolate chips. Melt them just like the other chocolates. Drizzle the warm caramel and sprinkle the pecans on top. This variation is sweet and creamy, perfect for those who love white chocolate.
Dark Chocolate Turtle Bark
For a richer flavor, try dark chocolate turtle bark. Use 24 ounces of dark chocolate chips instead of milk and semi-sweet. Dark chocolate gives a deep, bold taste that pairs well with caramel and nuts. Follow the same steps for melting and layering. This version is perfect for dark chocolate lovers!
Adding Other Ingredients
You can get creative by adding more ingredients. Dried fruits like cranberries or apricots bring in a chewy texture. Pretzels add a nice crunch and saltiness. Simply mix these extra ingredients into the pecans. This adds a fun twist to your bark and makes each bite unique. Feel free to experiment with flavors that you love!
Storage Info
Best Practices for Storing Chocolate Bark
To keep your chocolate caramel turtle bark fresh, follow these tips:
- Use an Airtight Container: Place the bark in a clean, airtight container. This helps keep moisture out.
- Layer with Parchment Paper: If stacking pieces, place parchment paper between layers. This prevents sticking.
- Store in a Cool, Dark Place: Keep the container in a cool, dark spot, away from heat. Avoid sunlight to prevent melting.
How Long Will Turtle Bark Last?
When stored correctly, chocolate caramel turtle bark can last up to two weeks. If you notice any changes in smell or appearance, it’s best to discard it. For the best taste, eat it fresh, as flavors may fade over time.
Freezing Chocolate Caramel Turtle Bark
You can freeze turtle bark for longer storage. Here’s how to do it:
- Wrap Well: Wrap each piece of bark tightly in plastic wrap. Then place them in a freezer-safe bag.
- Label and Date: Write the date on the bag. This helps you keep track of how long they’ve been frozen.
- Thawing: To enjoy, take the bark out of the freezer. Let it sit at room temperature for about 30 minutes before eating. This restores the texture and flavor.
FAQs
Can I use different types of chocolate?
Yes, you can use other chocolates. Dark chocolate or white chocolate works well too. Each type gives a unique taste. Mix and match to find your favorite.
How do I fix a grainy caramel?
To fix grainy caramel, add a splash of water or cream. Heat it gently while stirring. This can help make the texture smooth again. Be patient; it may take time.
Is Turtle Bark gluten-free?
Yes, Turtle Bark is gluten-free. All the ingredients in this recipe do not contain gluten. Always check labels to be sure. This makes it a great treat for everyone.
This blog post covered how to make Turtle Bark with milk and semi-sweet chocolate, caramel, and pecans. You learned to melt chocolate, layer caramel, and chill the mixture. Remember, you can customize it with different nuts or chocolates. Proper storage helps it last longer, too. Making this treat is fun and simple. Try your own twists to make it unique. Enjoy sharing with friends and family or keep it all for yourself!


