If you’re craving a dish packed with flavor, the Chipotle Chicken Enchilada Skillet is your answer. This one-pan recipe is simple and fun to make. I’ll guide you through every step from cooking tender chicken to melting gooey cheese. Plus, I’ll share tips for spice adjustments and delicious variations. Let’s dive into this quick, tasty meal that’s perfect for any night!
Why I Love This Recipe
- Flavorful and Zesty: This dish combines the perfect balance of spices and fresh ingredients, delivering a vibrant flavor profile that’s sure to please your taste buds.
- Quick and Easy: With a total preparation time of just 30 minutes, this skillet meal is perfect for busy weeknights when you want something delicious without the hassle.
- Versatile Ingredients: It incorporates a variety of ingredients like beans and corn, making it not only tasty but also nutritious and satisfying.
- Fun to Share: Serving it with tortilla chips makes it a fun, interactive meal that’s great for gatherings and casual dinners alike.
Ingredients
List of Ingredients
– 1 lb boneless, skinless chicken breasts, diced into bite-sized pieces
– 1 tablespoon olive oil
– 1 medium onion, finely diced
– 2 cloves garlic, minced
– 1 can (14 oz) diced tomatoes with green chilies, undrained
– 1 can (15 oz) black beans, thoroughly rinsed and drained
– 1 cup corn kernels (can be fresh, canned, or frozen)
– 1 tablespoon chipotle powder
– 1 teaspoon ground cumin
– 1 teaspoon smoked paprika
– Salt and freshly ground black pepper to taste
– 1 cup shredded sharp cheddar cheese
– 1 cup shredded Monterey Jack cheese
– 1/4 cup fresh cilantro, roughly chopped
– Tortilla chips, for serving
Measurement Details
– For chicken, use one pound. This gives a good amount for four servings.
– The olive oil should be one tablespoon. This helps cook the chicken perfectly.
– Use one medium onion for flavor. Dice it finely for even cooking.
– You need two cloves of garlic. This adds a nice aroma and taste.
– One can of diced tomatoes adds moisture and spice. The green chilies make it zesty.
– Use one can of black beans. Rinse and drain them well. This removes extra salt.
– One cup of corn adds sweetness. You can use fresh, canned, or frozen corn.
– One tablespoon of chipotle powder gives heat. Adjust based on your spice preference.
– Use one teaspoon each of cumin and smoked paprika for depth of flavor.
– Season with salt and black pepper to taste. This enhances all the flavors.
– For cheese, use one cup each of sharp cheddar and Monterey Jack. This makes it gooey.
– Finally, use a quarter cup of chopped cilantro for freshness.
– Serve with tortilla chips for scooping.
Ingredient Substitutions
– If you don’t have chicken breasts, use thighs. They stay moist and are tasty.
– Olive oil can be replaced with vegetable oil or avocado oil.
– Any type of onion works, but red onion adds sweetness.
– If you lack fresh garlic, use garlic powder. One teaspoon is enough.
– Substitute diced tomatoes with green chilies for regular diced tomatoes. Add some hot sauce for spice.
– You can skip black beans for a lighter dish or use pinto beans instead.
– Frozen corn can replace fresh corn. Just thaw it before using.
– For chipotle powder, use smoked paprika and a pinch of cayenne.
– Use any cheese you like. Pepper jack adds heat, while mozzarella offers a milder flavor.
– Fresh parsley can replace cilantro if you prefer a different herb.
– Serve with corn chips, pita chips, or even sliced veggies for dipping.

Step-by-Step Instructions
Cooking Chicken
First, take a large skillet and heat one tablespoon of olive oil over medium-high heat. Once the oil is hot, add one pound of diced chicken breasts. Season the chicken with salt, black pepper, chipotle powder, ground cumin, and smoked paprika. Cook the chicken for about six to seven minutes. Your goal is to have it cooked through and lightly browned.
Adding Vegetables and Sauces
Now, it’s time to bring in some flavor. Add one finely diced medium onion and two minced garlic cloves to the skillet. Stir them in with the chicken. Cook everything together until the onion is soft and clear, about three to four minutes. Next, stir in one can of diced tomatoes with green chilies, one can of rinsed black beans, and one cup of corn. Mix well and let this simmer for five to six minutes. This helps all those yummy flavors blend together.
Melting the Cheese
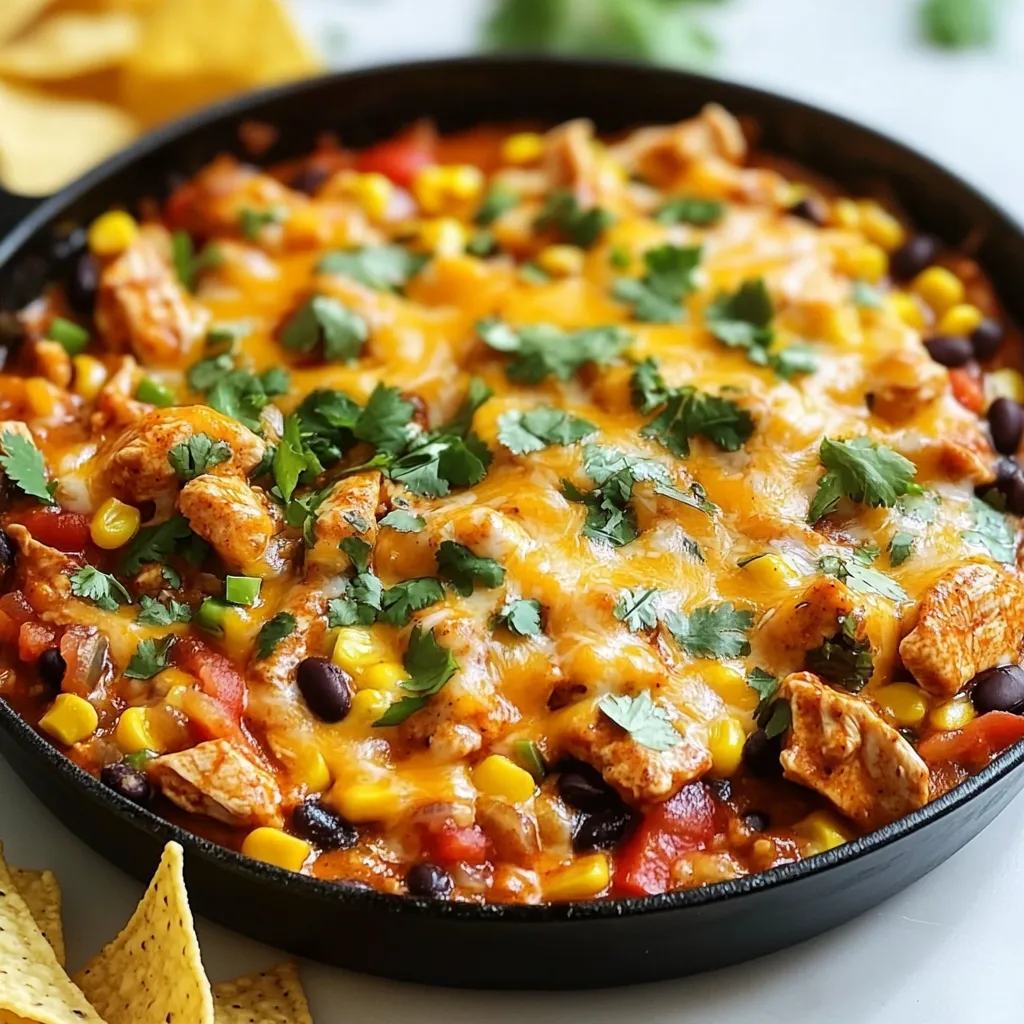
Reduce the heat to low and sprinkle one cup each of shredded sharp cheddar and Monterey Jack cheese over the top. Cover the skillet with a lid. Let the cheese melt for about three to five minutes. This creates a delicious, gooey layer. Once the cheese is melted, remove the skillet from heat. Garnish with freshly chopped cilantro for a fresh touch. Serve warm with tortilla chips for a fun, tasty meal!
Tips & Tricks
Spice Level Adjustments
You can change the spice level to fit your taste. If you like it mild, use less chipotle powder. For a spicier kick, add more. You can also mix in diced jalapeños or hot sauce for extra heat. Always taste as you go. This way, you keep control over the spice.
Cooking Techniques for Juicy Chicken
To get juicy chicken, heat the skillet well before adding the meat. Use a bit of olive oil to help with browning. Don’t overcrowd the pan; cook in batches if needed. This helps the chicken brown nicely. Season it well with salt and spices. Cook until it’s no longer pink, about 6-7 minutes.
Presentation and Serving Suggestions
For a great look, serve the skillet right from the pan. Garnish with fresh cilantro on top. You can add a drizzle of sour cream for creaminess. Slices of avocado also make a tasty addition. Don’t forget the tortilla chips for scooping! These little touches make your dish pop.
Pro Tips
- Adjust the Spice Level: If you prefer a milder dish, reduce the amount of chipotle powder or substitute it with smoked paprika for a smoky flavor without the heat.
- Cheese Variations: Experiment with different types of cheese such as pepper jack for a spicy kick or a combination of mozzarella and gouda for a creamy texture.
- Make it a Meal Prep: This skillet dish stores well in the refrigerator for up to 3 days. Reheat and serve with fresh tortilla chips for a quick meal.
- Fresh Garnishes: Enhance the flavor by adding sliced avocado, jalapeños, or a dollop of sour cream on top before serving for an extra layer of richness.
Variations
Vegetarian Options
You can easily make this dish meat-free. Just swap the chicken for hearty veggies. Use diced zucchini, bell peppers, or mushrooms. You can also add more beans for protein. Black beans work well, or try pinto beans. For extra flavor, add more spices or even some extra chipotle powder. This gives a nice kick without the meat.
Protein Alternatives
If you want to switch up the protein, there are many options. You can use ground turkey or beef instead of chicken. Cook them in the same way as the chicken. Shredded rotisserie chicken is also a great choice. It’s quick and still tasty. You might even try tofu for a plant-based protein. Just ensure it’s firm and well-seasoned.
Toppings and Add-ons
Toppings can make your enchilada skillet even better. Fresh cilantro adds a bright flavor. Slices of avocado bring creaminess. You can sprinkle some crumbled queso fresco or feta cheese on top for extra taste. A dollop of sour cream or Greek yogurt gives a cool contrast to the spice. Tortilla chips are a must for scooping up that delicious mix!
Storage Info
How to Store Leftovers
To keep your Chipotle Chicken Enchilada Skillet fresh, let it cool first. Transfer it to an airtight container. This way, it stays tasty for up to three days in the fridge. Make sure to store any tortilla chips separately to keep them crunchy.
Freezing Instructions
If you want to freeze your enchilada skillet, it’s easy! First, let the dish cool completely. Then, place it in a freezer-safe container. This meal can stay good for up to three months. When you’re ready to eat, just thaw it in the fridge overnight.
Reheating Tips
When it’s time to enjoy your leftovers, reheat them gently. You can use the microwave for quick warming. For best results, heat it on the stove over low heat. Stir occasionally until it’s hot. If the cheese is too thick, add a splash of water for moisture. Enjoy your flavorful meal!
FAQs
Can I make this dish gluten-free?
Yes, you can make this dish gluten-free! Use corn tortillas instead of regular ones. Check all canned ingredients for gluten. Many canned beans and tomatoes are gluten-free, but always read the labels. This way, you can enjoy the flavors without any gluten issues.
What can I serve with Chipotle Chicken Enchilada Skillet?
You can serve this dish with tortilla chips, rice, or a fresh salad. A side of sour cream enhances the flavors. Guacamole or salsa also pairs well with it. You can even add some sliced avocado for a creamy touch. Each side makes the meal more fun!
How long does this dish last in the fridge?
This dish lasts about 3 to 4 days in the fridge. Store it in an airtight container to keep it fresh. Before eating, reheat it in the microwave or on the stove. Just make sure it’s heated well before you dig in again!
This blog post covered all you need to make a great Chipotle Chicken Enchilada Skillet. We detailed ingredients, including measurements and substitutions. I provided step-by-step instructions for cooking the dish perfectly. We explored tips for adjusting spice levels and techniques for juicy chicken. Variations and storage tips ensure you can enjoy this meal again. In conclusion, this dish is easy to modify and serve. I hope you feel inspired to make it your ow


