
Looking for a fresh and flavorful meal? The Chili Lime Steak Salad fits the bill! This dish combines juicy grilled flank steak with vibrant greens and tasty toppings. You’ll whisk together a zesty marinade that makes the steak shine. In just a few steps, you can create a colorful, tasty meal that’s perfect for any day. Let’s dive in and get cooking!
Why I Love This Recipe
- Bold Flavors: The combination of chili and lime creates a vibrant flavor profile that elevates the simple steak salad into a gourmet dish.
- Quick and Easy: With minimal prep time and a short marinating period, this recipe is perfect for a weeknight dinner without sacrificing taste.
- Healthy Ingredients: Packed with fresh greens, avocados, and tomatoes, this salad is not only delicious but also nutritious and satisfying.
- Versatile Meal: This dish can be served as a main course or a side, making it a versatile option for any meal occasion.
Ingredients
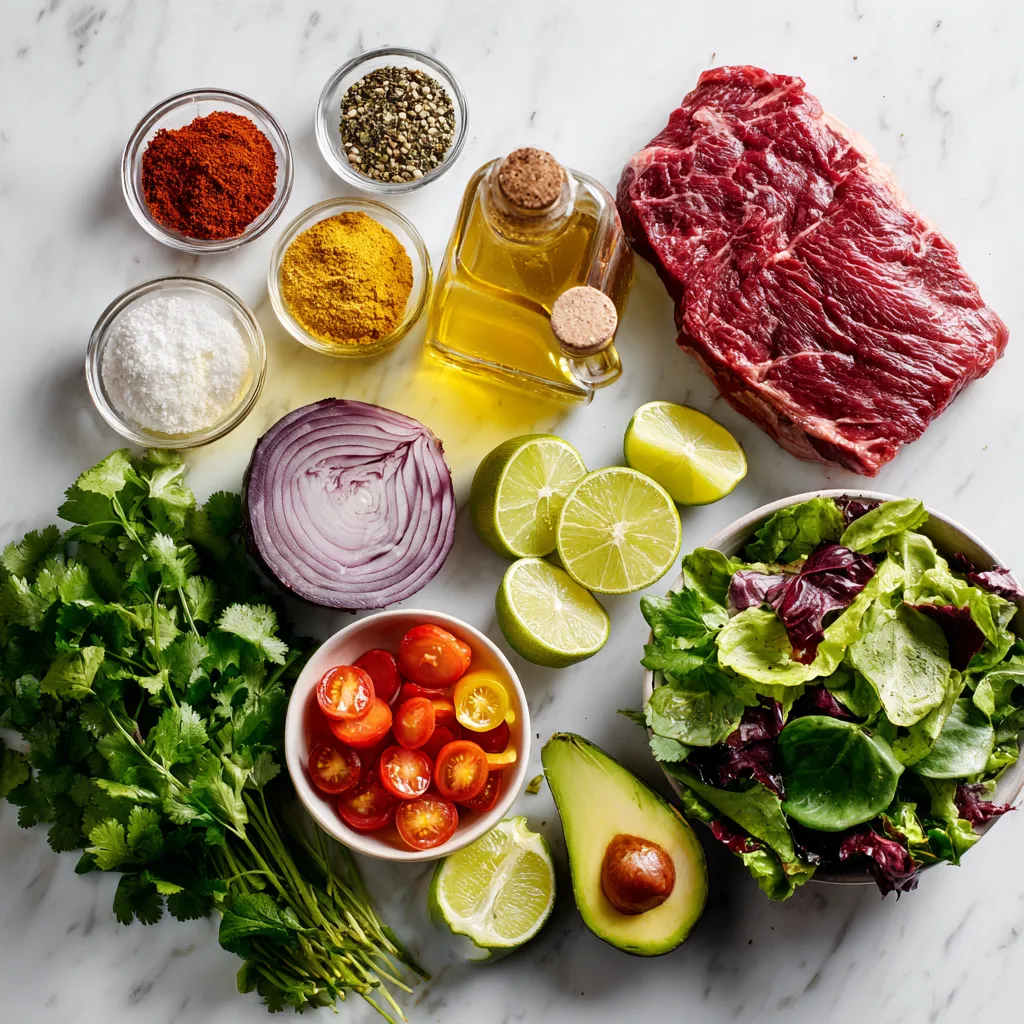
Main Ingredients
– 1 lb flank steak
– Mixed salad greens (arugula, baby spinach, romaine)
Marinade Ingredients
– 1 tablespoon chili powder
– 1 teaspoon ground cumin
– 1 teaspoon garlic powder
– 1 teaspoon onion powder
– Juice of 2 fresh limes
– 2 tablespoons extra virgin olive oil
– Salt and freshly cracked black pepper to taste
Toppings
– 1 cup cherry tomatoes, halved
– 1 ripe avocado, sliced
– 1/2 cup red onion, thinly sliced
– Fresh cilantro leaves for garnish
In this salad, the main star is the flank steak. It brings rich flavor and a great texture. The mixed salad greens add freshness and crunch. I love using a mix of arugula, baby spinach, and romaine. This blend gives the salad a nice depth.
For the marinade, we use simple spices that pack a punch. Chili powder gives heat, while cumin adds a warm, earthy taste. Garlic and onion powder enhance the overall flavor. Fresh lime juice adds brightness, making everything come alive. Olive oil helps blend it all together and adds a smooth finish.
The toppings are where the salad shines. Cherry tomatoes bring sweetness and color. Avocado adds creaminess, while red onion gives a bit of sharpness. Finally, fresh cilantro adds a burst of flavor. This combination makes every bite a delight.
You can see how each ingredient plays a role in this dish. It’s not just a salad; it’s a celebration of flavors!
Step-by-Step Instructions
Preparing the Marinade
Whisk together the following ingredients in a bowl:
– 1 tablespoon chili powder
– 1 teaspoon ground cumin
– 1 teaspoon garlic powder
– 1 teaspoon onion powder
– Juice of 2 fresh limes
– 2 tablespoons extra virgin olive oil
– Salt and freshly cracked black pepper to taste
Mix until you see a smooth blend. This marinade adds a zesty kick to the steak.
Marinating the Steak
Take 1 lb flank steak and coat it evenly in the marinade. Ensure every part has flavor. Place the steak in a shallow dish or a resealable plastic bag. Seal the dish or bag, and refrigerate. Let it marinate for at least 30 minutes. For the best taste, let it sit for up to 2 hours.
Cooking the Steak
Preheat your grill or grill pan over medium-high heat. Make sure it is hot before cooking. Remove the steak from the marinade, letting the extra drip off. Place it on the grill. Cook for about 4-5 minutes on each side for a medium-rare steak. Adjust the cooking time based on how you like it cooked. After cooking, set the steak aside to rest for about 5 minutes. This helps the juices stay inside.
Assembling the Salad
In a large bowl, mix together the salad greens. Use about 4 cups of mixed greens like arugula, baby spinach, and chopped romaine. Add in:
– 1 cup cherry tomatoes, halved
– 1 ripe avocado, sliced
– 1/2 cup red onion, thinly sliced
Toss everything gently to mix. Now, slice the rested steak thinly against the grain. Arrange the steak on top of the salad mixture. Drizzle any leftover marinade over the steak if you like. Finally, garnish with fresh cilantro leaves for a colorful touch. This salad is now ready to impress!
Tips & Tricks
Achieving the Perfect Steak
For great steak, cook it to your desired doneness. Here are some cooking times:
– Medium-Rare: 4-5 minutes per side
– Medium: 5-6 minutes per side
– Medium-Well: 6-7 minutes per side
Always let the steak rest after cooking. This step is key for juicy meat. Let it rest for about 5 minutes. This allows the juices to move back into the meat.
Enhancing Flavor
To boost flavor, consider adding spices. Try smoked paprika, oregano, or cayenne for extra kick. Fresh herbs like basil or thyme work well too.
If you have leftover marinade, use it wisely. You can drizzle it over the salad. Just make sure to heat it first to kill any bacteria.
Presentation Ideas
Plating is important for a great look. Use a large, shallow bowl. Neatly arrange the steak slices on top of the salad. This creates a beautiful layer.
Add garnishes for extra appeal. Fresh cilantro leaves add a nice touch. Lime wedges also brighten the dish. These simple steps make your meal look restaurant-worthy!
Pro Tips
- Marinate Longer for More Flavor: For the best flavor, let the steak marinate for at least 2 hours. If time allows, marinating overnight will enhance the taste even more.
- Let the Steak Rest: After grilling, always let the steak rest for about 5 minutes. This helps the juices redistribute, resulting in a more tender and juicy steak.
- Slice Against the Grain: When slicing the steak, be sure to cut against the grain. This will ensure each slice is tender and easy to chew.
- Fresh Ingredients Make a Difference: Using fresh, high-quality ingredients for your salad will elevate the dish. Opt for ripe avocados and vibrant greens for the best results.
Variations
Alternative Proteins
You can switch flank steak with other proteins. Chicken is a great option. It cooks fast and absorbs flavor well. Just marinate it like the steak. Shrimp also works nicely. It cooks quickly on the grill, too. For a vegetarian choice, try grilled tofu. Tofu takes on flavors from the marinade, making it tasty and filling.
Different Dressings
Dressings can change the salad’s taste. A citrus vinaigrette adds a zesty kick. It pairs well with the steak’s spices. Creamy avocado dressing is another choice. It adds a rich, smooth flavor that complements the salad. You can also try a yogurt-based dressing for a fresh twist.
Seasonal Ingredients
Using seasonal ingredients can enhance your salad. In spring, add fresh peas or asparagus. In summer, ripe peaches or berries can brighten the dish. Fall brings in roasted squash, and winter calls for hearty greens. Adjust your salad based on what is fresh and available. This not only tastes better but also supports local farms.
Storage Info
Storing Leftovers
To keep your salad fresh, store it in an airtight container. Make sure you separate the greens from the steak. This way, the greens stay crisp. You can keep the salad in the fridge for up to three days. After that, the greens may wilt.
Freezing Options
You can freeze the cooked steak but not the salad greens. Wrap the steak tightly in plastic wrap, then place it in a freezer bag. It will stay good for up to three months. When you’re ready to eat, thaw it in the fridge overnight.
To reheat, place the steak in a hot skillet for a few minutes on each side. This warms it up without drying it out. Avoid reheating the greens. Instead, serve them fresh for the best taste.
Serving Suggestions
When you’re ready to enjoy leftovers, reassemble the salad. Place fresh greens in a bowl, add the steak, and top with tomatoes and avocado. You can drizzle lime juice for extra flavor.
Pair this salad with simple sides like crusty bread or corn on the cob. These sides balance the meal while keeping it light. Enjoy your fresh and vibrant meal!
FAQs
How do I make the marinade more flavorful?
You can boost the marinade with herbs and spices. Try adding:
– Cumin
– Paprika
– Fresh garlic
– Fresh cilantro
– Oregano
These additions add depth and warmth. You can also use lime zest for a bright kick. Adjust to your taste and enjoy the extra flavor.
Can I prepare the salad in advance?
Yes, you can make the salad in advance. Here are some tips:
– Prepare the salad greens and toppings separately.
– Store them in airtight containers.
– Assemble the salad just before serving.
This keeps the greens crisp. The flavors will mix well when combined later.
What can I serve with Chili Lime Steak Salad?
There are many great sides to pair with this salad. Here are a few ideas:
– Grilled corn on the cob
– Black bean quesadillas
– Rice or quinoa
– Fresh fruit salad
– Light beers or citrus drinks
These sides complement the salad’s flavors well.
How do I choose the right cut of steak?
Choosing the right steak cut is key for this salad. Here are some good options:
– Flank steak: Juicy and flavorful, perfect for grilling.
– Skirt steak: Tender and great for marinating.
– Sirloin: Leaner but still tasty when cooked well.
Each cut has its unique taste. Pick one that you enjoy!
This recipe for Chili Lime Steak Salad highlights key ingredients, easy steps, and helpful tips. From marinating the flank steak to choosing the best toppings, you can create a delicious meal. Remember to store and reheat properly for maximum flavor. Experiment with alternative proteins and dressings to make the dish your own. With simple adjustments, you can enjoy a fresh and tasty salad every time. Embrace these ideas, and you’ll impress your family and friend


