Chewy Caramel Snickerdoodles Simple and Delicious Treat

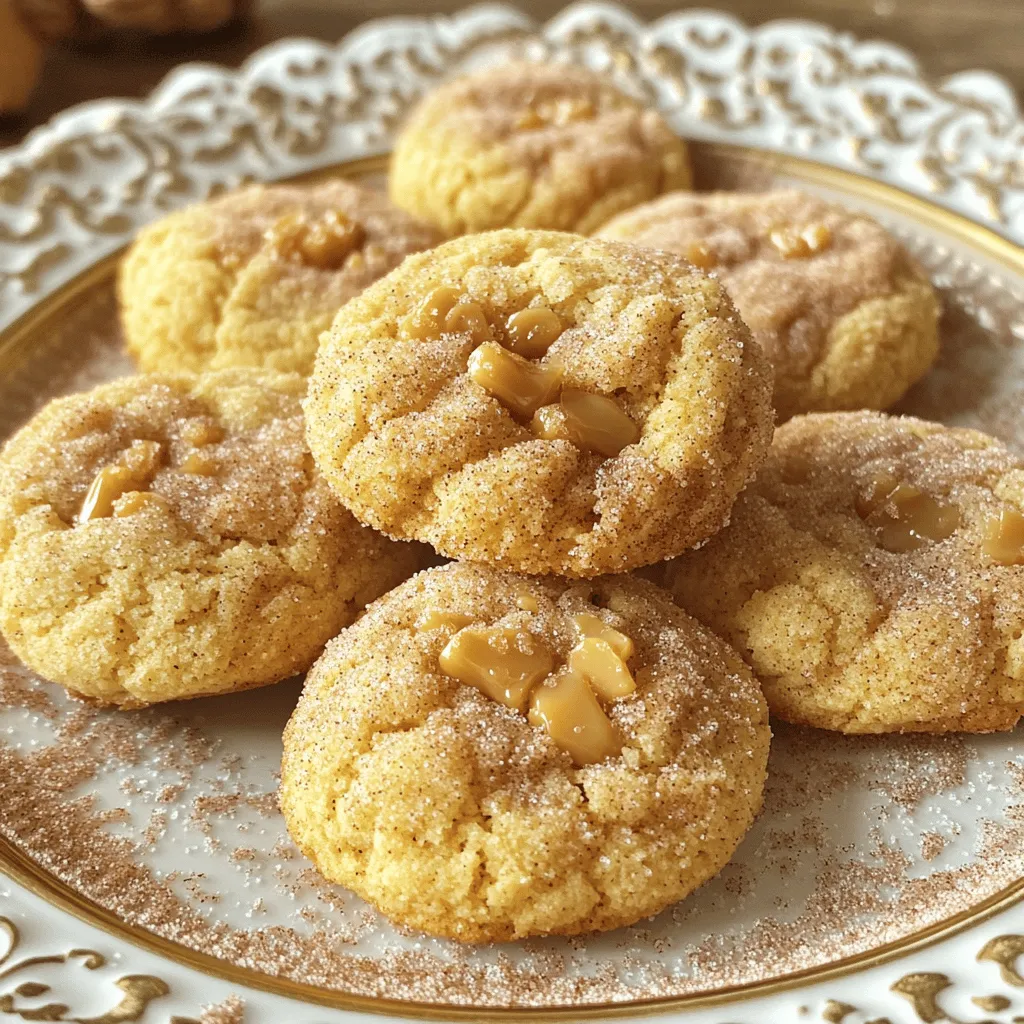
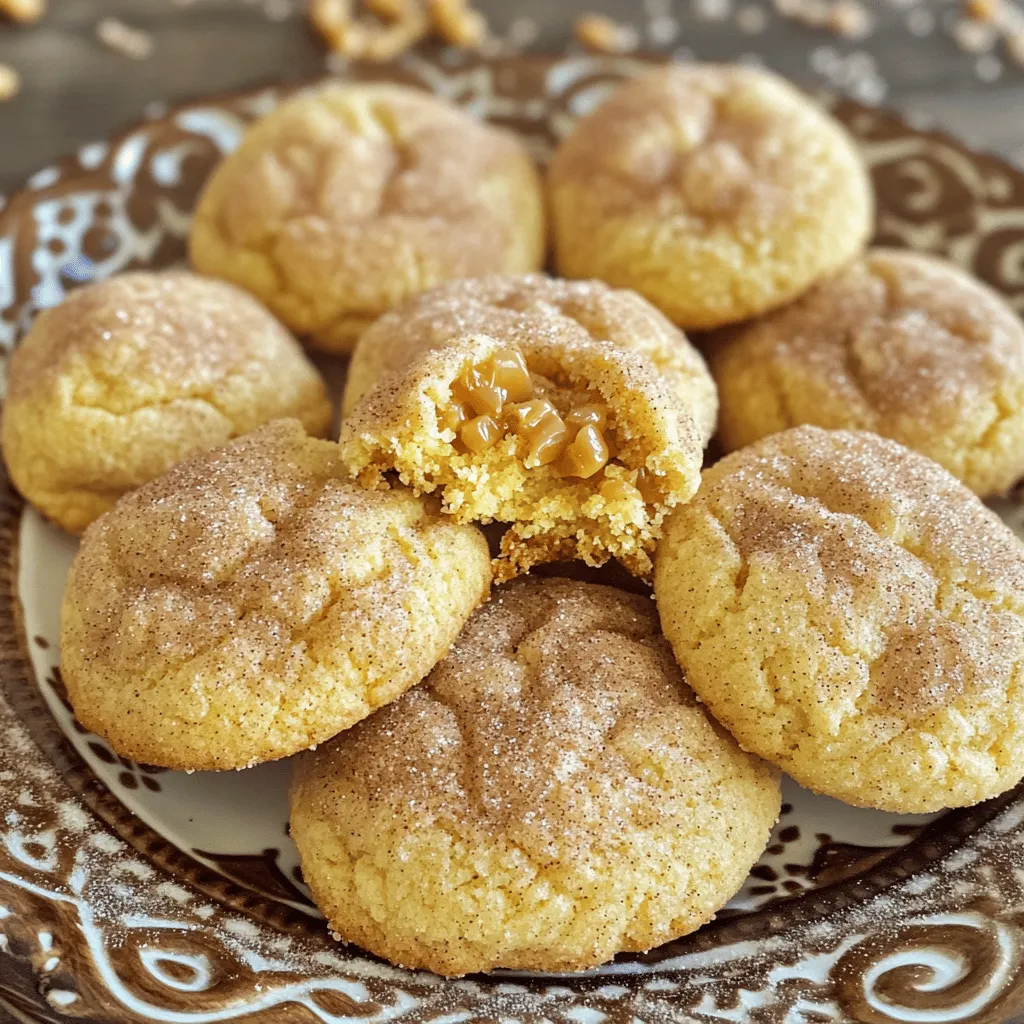
Craving a sweet treat that’s both chewy and delicious? Look no further! These Chewy Caramel Snickerdoodles blend the classic snickerdoodle flavor with a surprising burst of chewy caramel. In just a few simple steps, you can whip up warm, gooey cookies that will impress your friends and family. Get ready to elevate your baking game with this delightful recipe that’s easy to follow and utterly satisfying!
Ingredients
To make Chewy Caramel Snickerdoodles, you need a few key ingredients. Each one plays a big role in creating the perfect cookie with a chewy texture and rich caramel flavor.
List of Ingredients
– 2 ¾ cups all-purpose flour
– 1 teaspoon baking soda
– 2 teaspoons cream of tartar
– ½ teaspoon salt
– 1 cup unsalted butter, softened to room temperature
– 1 ½ cups granulated sugar, divided
– 2 large eggs
– 1 teaspoon pure vanilla extract
– ½ cup chewy caramel candies, chopped into small pieces
– ¼ cup cinnamon sugar (mix 2 tablespoons granulated sugar with 1 teaspoon ground cinnamon)
Each ingredient adds something special. The flour gives structure. Baking soda helps the cookies rise. Cream of tartar adds that classic snickerdoodle tang. Salt enhances the flavors.
Butter is key for a rich taste and chewy texture. Granulated sugar sweetens the cookies and helps create a nice crust. Eggs bind everything together and add moisture.
The vanilla extract gives a warm, sweet aroma. Chopped caramel candies create pockets of gooey goodness in every bite. Lastly, the cinnamon sugar adds a delightful finish that makes these cookies truly special.
Gather these ingredients and get ready to bake a batch of delicious chewy caramel snickerdoodles!
Step-by-Step Instructions
Prepping the Oven and Baking Sheets
– Preheat your oven to 350°F (175°C).
– Line two baking sheets with parchment paper. This helps the cookies not stick.
Combining Dry Ingredients
– In a medium bowl, whisk together:
– 2 ¾ cups all-purpose flour
– 1 teaspoon baking soda
– 2 teaspoons cream of tartar
– ½ teaspoon salt
This mixture is key for the cookie’s texture.
Creaming Butter and Sugar
– In a large bowl, cream together:
– 1 cup unsalted butter, softened
– 1 ½ cups granulated sugar
Beat until the mix is light and fluffy. This should take about 2-3 minutes.
– Add in:
– 2 large eggs
– 1 teaspoon pure vanilla extract
Mix well until everything is combined.
Forming the Dough
– Gradually add the dry mix to the wet mix.
– Stir until a soft dough forms.
– Gently fold in:
– ½ cup chewy caramel candies, chopped
This adds sweet pockets of caramel in every bite.
– Use a tablespoon or cookie scoop to portion the dough into balls.
Rolling and Arranging Cookies
– Roll each dough ball in:
– ½ cup granulated sugar
– ¼ cup cinnamon sugar (mix 2 tablespoons granulated sugar with 1 teaspoon ground cinnamon)
This gives a sweet and spicy coating.
– Place the coated balls on the baking sheets, spaced about 2 inches apart.
Baking the Cookies
– Bake in the preheated oven for 10-12 minutes.
Watch for the edges to turn golden brown.
– Let the cookies cool on the baking sheets for 5 minutes.
This helps them set before moving to a wire rack.
Tips & Tricks
Achieving the Perfect Chewy Texture
– Use softened butter instead of melted. Softened butter helps keep the cookies tender.
– Be careful not to overmix the dough. Mix just until combined to maintain a soft texture.
Enhancing the Caramel Flavor
– Use high-quality caramel candies. Good caramel adds rich flavor and gooeyness.
– Consider adding a pinch of sea salt. A touch of salt boosts the sweet caramel taste and balances flavors.
Presentation Suggestions
– Stack cookies on a decorative plate. A nice plate makes them look even more inviting.
– Garnish with a sprinkle of cinnamon sugar. This adds a sweet touch and enhances the snickerdoodle vibe.

Variations
Alternative Flavor Combinations
You can give Chewy Caramel Snickerdoodles a fun twist. One great idea is to add chocolate chips or chopped nuts. This adds a new layer of flavor and texture. Dark chocolate chips pair well with the sweet caramel. Chopped pecans or walnuts add a nice crunch.
You can also try different types of sugar. Using brown sugar gives a richer taste. It can make the cookies chewier, too. You might even mix white and brown sugars for a balanced flavor. Each change brings a new surprise to every bite!
Dietary Adjustments
If you need gluten-free cookies, there are options! You can use almond flour or a gluten-free blend. Make sure to check the package for measurements. This keeps the texture just right.
For vegan versions, swap in dairy-free butter. You can use applesauce or flaxseed meal as an egg substitute. This keeps the cookies moist and tasty. There are many ways to enjoy Chewy Caramel Snickerdoodles while fitting your dietary needs!
Storage Info
How to Store Cookies
To keep your Chewy Caramel Snickerdoodles fresh, place them in an airtight container. Store them at room temperature. This helps maintain their soft and chewy texture. If you have leftovers, they can last for about a week. Just make sure to keep them sealed tight to avoid drying out.
Freezing Options
You can freeze cookie dough for later baking. Shape the dough into balls, then place them on a baking sheet. Freeze until solid, then transfer them to a freezer bag. This way, you can bake fresh cookies anytime you want. For baked cookies, let them cool completely, then store them in the freezer. They will stay fresh for up to three months.
Best Serving Practices
To enjoy your cookies warm, reheat them slightly in the microwave. Just 10-15 seconds will do the trick. This gives you that fresh-out-of-the-oven taste. The caramel will soften, making each bite even more delightful. Serve them with a glass of milk for a classic treat!
FAQs
Can I make Chewy Caramel Snickerdoodles ahead of time?
Yes, you can prepare the dough in advance and refrigerate or freeze it. This makes baking easy on busy days. Just wrap the dough tightly in plastic wrap. When you’re ready to bake, let it thaw in the fridge overnight. This way, you have fresh cookies whenever you want.
What should I do if my cookies spread too much?
Ensure the butter is softened properly, and avoid overmixing the dough. When butter is too soft or melted, cookies can spread too much. Mix until just combined to keep them thick. Chilling the dough for 30 minutes can also help keep their shape.
Are Chewy Caramel Snickerdoodles meant to be soft or crispy?
They are designed to be soft and chewy in the center with slightly crisp edges. This texture gives you that delightful bite. Baking them just until the edges are golden helps achieve this perfect balance.
How can I enhance the caramel flavor even more?
Consider using flavored caramel candies or adding extra vanilla extract. You can also sprinkle a bit of sea salt on top right before baking. This adds a nice contrast and enhances the caramel taste. Experiment with these tips for more flavor!
You can now bake delicious Chewy Caramel Snickerdoodles at home. With simple ingredients and easy steps, you’ll create a treat everyone loves. Remember to use softened butter for the right texture and mix carefully. Feel free to try variations for extra fun! Store your cookies in an airtight container for freshness. Enjoy the warmth and sweetness these cookies bring. Happy baking!


![To make Lemon Blueberry Overnight Oats, you need: - 1 cup rolled oats - 1 cup milk (dairy or any plant-based alternative) - 1/2 cup Greek yogurt (or plant-based yogurt) - 1/2 cup fresh blueberries (or frozen, thawed) - Zest of 1 medium lemon - 2 tablespoons fresh lemon juice - 1 tablespoon maple syrup (optional for sweetness) - 1/2 teaspoon pure vanilla extract - Pinch of salt - Toppings: extra fresh blueberries, sliced almonds, and chia seeds You can switch out some ingredients if needed: - Use almond milk or oat milk instead of dairy milk. - Swap Greek yogurt for coconut yogurt for a dairy-free option. - Replace maple syrup with honey or agave for sweetness. - If you don’t have fresh blueberries, frozen ones work great too. Each ingredient plays a key role in this recipe: - Rolled oats provide the base. They soak up the liquid and become soft. - Milk adds creaminess and helps oats absorb flavors. - Greek yogurt offers protein and a nice texture. - Blueberries add sweetness and antioxidants. - Lemon zest and juice bring brightness and a fresh taste. - Maple syrup sweetens the dish naturally. - Vanilla extract enhances the overall flavor. - Salt balances the sweetness. - Toppings like almonds and chia seeds add crunch and nutrients. These ingredients come together to create a tasty and healthy breakfast. For the full recipe, refer to the earlier section. First, gather all your ingredients. You need rolled oats, milk, Greek yogurt, blueberries, lemon zest, lemon juice, maple syrup, vanilla extract, and salt. This simple mix brings bright flavors to your morning. It takes just ten minutes to prep. In a medium bowl, combine the rolled oats, Greek yogurt, and milk. Add in the lemon zest, lemon juice, maple syrup, vanilla extract, and a pinch of salt. Use a spoon or spatula to mix everything well. Make sure the oats soak up the liquid. This step is key for the best texture. Once mixed, gently fold in the fresh blueberries. Be careful not to mash them. Now, divide the oat mixture into two glass jars or containers. Make sure each jar has an even amount. Seal the jars tightly and place them in the fridge. Let them chill overnight or for at least four hours. This waiting time allows the oats to soften and soak in all those tasty flavors. In the morning, stir the oats. If they are too thick, add a splash of milk. Top with extra blueberries, sliced almonds, and chia seeds. Enjoy this delicious, healthy breakfast! For the full recipe, check out the provided instructions. To get the best texture, use rolled oats. They soak well and stay chewy. Mix your oats with yogurt and milk in a bowl. This makes them creamy. You can add lemon zest and juice for a bright taste. If you want more sweetness, a little maple syrup works great. Stir the mixture until it is smooth, and the oats are well covered. Don’t forget to gently fold in the blueberries. This keeps them intact, adding bursts of flavor. When serving, use clear jars to show off the colors. A sprinkle of sliced almonds gives a nice crunch. You can top it with extra blueberries for freshness. A few chia seeds add a fun texture and more nutrients. For a zesty look, place a lemon slice on the jar’s edge. This makes your oats not just tasty but also pretty! To boost nutrition, consider adding nuts or seeds. Almonds and chia seeds are great options. They add healthy fats and protein. You can also swap regular yogurt for Greek yogurt for extra protein. If you want a vegan option, use plant-based yogurt and milk. This keeps it creamy and dairy-free. By adding these ingredients, you can make your overnight oats even healthier while still enjoying the delicious flavor. For the complete recipe, check out the Full Recipe section. {{image_4}} You can switch the blueberries for other fruits. Try strawberries, raspberries, or peaches. Each fruit brings its own flavor and texture. You can also mix fruits for a fun twist. Just keep the same amount of fruit to match the recipe. If you want a different sweet taste, use honey or agave syrup. You can also skip sweeteners altogether if you prefer a tart flavor. Adjust the amount to suit your taste. Remember, the fruit adds natural sweetness too! Add spices for extra flavor. Cinnamon or nutmeg can give warmth. You might also try adding a teaspoon of almond extract for a nutty twist. If you like it creamy, add more Greek yogurt. For crunch, mix in nuts or seeds. These simple changes can make your oats unique and delicious. For the full recipe, check out the instructions above! Store your lemon blueberry overnight oats in airtight containers. This keeps them fresh and prevents spills. Glass jars work great. They also show off the beautiful layers. Always seal them tightly. Your oats will stay good in the fridge for up to five days. The flavors will blend better as they sit. Check for any off smells before eating. If they look or smell funny, toss them out. You can eat these oats cold, right from the fridge. If you prefer them warm, heat them in the microwave. Add a splash of milk if they seem too thick. Heat for about 30 seconds, then stir. Enjoy your creamy, zesty oats! Check the [Full Recipe] for details on how to make them. Yes, you can use quick oats. They will cook faster than rolled oats. Quick oats may make your mixture creamier. However, they might lose some texture. Rolled oats offer a nice chewiness. I have found that rolled oats work best for overnight oats. These oats last about 3 to 5 days in the fridge. Store them in airtight containers. This keeps them fresh and tasty. Just stir before eating. You may need to add a splash of milk if they seem thick. Yes, you can easily make these oats vegan. Use plant-based milk and yogurt. Maple syrup is a great sweetener. This keeps the recipe delicious. You won’t lose any flavor. Check the Full Recipe for more tips! This article covered the key ingredients and their roles in making Lemon Blueberry Overnight Oats. We explored step-by-step methods for mixing and chilling. Tips and tricks helped improve texture and flavor. Variations allow customization to suit your taste. Lastly, we discussed storage details to keep your oats fresh. Overall, making overnight oats is easy and flexible. Enjoy experimenting with different flavors and ingredients!](https://goldendishy.com/wp-content/uploads/2025/06/368f6847-7d49-481c-8601-ff06e206830f-768x768.webp)


![- 1 ½ cups graham cracker crumbs - ½ cup unsalted butter, melted - 2 tablespoons granulated sugar - 16 oz cream cheese, softened to room temperature - 1 cup granulated sugar - 3 large eggs, at room temperature - 1 teaspoon pure vanilla extract - 2 tablespoons fresh lemon zest - ½ cup freshly squeezed lemon juice - 1 cup fresh blueberries - Powdered sugar for dusting (optional) The key to great Lemon Blueberry Cheesecake Bars lies in using fresh, high-quality ingredients. The combination of cream cheese and lemon creates a creamy texture with a bright flavor. The blueberries add bursts of sweetness and color. - If you need a gluten-free option, try almond flour or gluten-free cookies for the crust. - For a vegan version, you can use plant-based cream cheese. Look for brands that offer a similar taste. - If you want to cut sugar, use coconut sugar or a sugar substitute like stevia. These substitutions help you customize the recipe to fit your needs while keeping it delicious. For the full recipe, check the detailed instructions above. 1. First, preheat your oven to 350°F (175°C). This step is key for even baking. 2. Next, prepare an 8x8 inch baking pan. Line it with parchment paper. Let the paper hang over the sides. This helps when lifting the bars out later. 3. In a medium mixing bowl, combine 1 ½ cups of graham cracker crumbs, ½ cup melted unsalted butter, and 2 tablespoons of granulated sugar. Mix until it looks like damp sand. 4. Press this mixture firmly into the bottom of the pan. This forms your crust. Bake it for 8-10 minutes until it turns lightly golden. Remove it from the oven and let it cool slightly. 1. In a large bowl, use an electric mixer to beat 16 oz of softened cream cheese with 1 cup of granulated sugar. Mix until it is smooth and creamy. This should take about 2-3 minutes. 2. Add 3 large eggs, one at a time. Mix on low speed after each egg. Avoid overmixing to keep air bubbles out. 3. Now, stir in 1 teaspoon of vanilla extract, 2 tablespoons of fresh lemon zest, and ½ cup of freshly squeezed lemon juice. Make sure everything blends well. 4. Gently fold in 1 cup of fresh blueberries with a spatula. Be careful not to crush them; you want them whole in the bars. 1. Pour the cheesecake mixture over the cooled crust in the pan. Spread it evenly using a spatula. 2. Bake the mixture in the preheated oven for 25-30 minutes. The center should look set but still jiggle slightly. It will firm up more as it cools. 3. Once baked, take the pan out and let it cool to room temperature. After it cools, refrigerate for at least 4 hours. For best results, leave it overnight. 4. When you’re ready to serve, lift the cheesecake out of the pan using the parchment paper. Cut into squares and enjoy! You can dust the tops with powdered sugar for a nice touch. For the full recipe and more details, check out the [Full Recipe]. Avoiding cracks in the cheesecake To prevent cracks, do not overmix the batter. Overmixing adds air, which can create bubbles. Also, use room temperature ingredients. Cold cream cheese can make lumps. Bake the bars at a lower temperature for a longer time. A water bath can help keep the heat even. Achieving the perfect texture For a creamy texture, blend the cream cheese until smooth. Mix in the eggs one at a time. This keeps the batter light and fluffy. Do not rush this step. After baking, let the bars cool slowly to room temp. Chill them in the fridge for at least four hours. Creative ways to present the bars Cut the bars into squares and place them on a nice plate. You can garnish with fresh blueberries and lemon slices for color. A drizzle of lemon glaze adds shine and flavor. Serve them with a dollop of whipped cream for extra flair. Complementary toppings and sides Top each bar with a sprinkle of powdered sugar for sweetness. A scoop of vanilla ice cream pairs well, too. You can also serve with a side of lemon curd for a zesty punch. Fresh mint leaves add a pop of color and freshness. Fixing undercooked bars If the bars are too soft, return them to the oven. Bake for an additional 5-10 minutes. The center should have a slight jiggle but not be runny. Make sure to let them cool before checking the texture. Preventing overbaking Keep an eye on your bars as they bake. If the edges start to brown too much, cover them with foil. Use a toothpick to check doneness. It should come out mostly clean but with a bit of moist filling clinging to it. {{image_4}} You can mix up the flavors in your cheesecake bars easily. Swap blueberries for other berries like raspberries or strawberries. You can even use a mix of berries for a fun twist. If you love chocolate, add some chocolate chips. This makes the bars sweeter and richer. If you need gluten-free options, use gluten-free graham crackers for the crust. They work just as well and taste great. For those on a dairy-free diet, try using vegan cream cheese. It gives you a similar creamy texture without the dairy. Change the fruits based on what’s in season. In summer, use fresh peaches or cherries for a juicy taste. In the fall, think about adding pumpkin or apple flavors. You can also dress up the bars for holidays. Try adding whipped cream or holiday-themed sprinkles for fun. These variations let you enjoy lemon blueberry cheesecake bars in new ways. Don't forget to check out the Full Recipe for more details! To store leftover Lemon Blueberry Cheesecake Bars, place them in an airtight container. This keeps them fresh and tasty. You can also cover them with plastic wrap. Store them in the fridge for up to five days. For the best flavor, eat them within the first two days. You can freeze these cheesecake bars for longer storage. First, cut them into squares. Wrap each square in plastic wrap, then place them in a freezer-safe bag. They will last about three months in the freezer. When you're ready to enjoy them, take out the bars and place them in the fridge overnight to thaw. You can also let them sit at room temperature for about 30 minutes before serving. If you plan to serve these bars at a gathering, make them a day ahead. This allows the flavors to blend nicely. To keep the bars fresh, store them in the fridge until you're ready to serve. For a beautiful touch, dust the tops with powdered sugar just before serving. This keeps the bars looking fresh and inviting even a day later. For the full recipe, check out the Lemon Blueberry Cheesecake Bars section. Lemon Blueberry Cheesecake Bars are a creamy and tangy dessert. They combine smooth cheesecake with fresh blueberries and zesty lemon. The base is a crispy graham cracker crust that adds crunch. These bars are easy to slice and serve, making them perfect for gatherings. You can enjoy them chilled, which enhances the flavors. Each bite is a delightful mix of sweet and tart. Yes, you can make these bars ahead of time. They taste even better when chilled overnight. Prepare the bars and let them cool to room temperature. Place them in the fridge for at least four hours. If you want to make them days in advance, store them in an airtight container. Just remember to cut them into squares before serving. This way, you save time on the day of your event. You can tell when cheesecake bars are done by looking for a few signs. The edges should be set, while the center may jiggle slightly. This jiggle means they will firm up as they cool. Another sign is a light golden color around the edges. If you see cracks forming, they may be overbaked. Keep an eye on them during the last few minutes of baking. Yes, there are several substitutes for eggs in this recipe. You can use unsweetened applesauce; a quarter cup replaces one egg. Another option is silken tofu, blended until smooth. Use about one quarter cup for each egg needed. You can also try using flaxseed meal mixed with water. One tablespoon of flaxseed meal mixed with three tablespoons of water equals one egg. These alternatives keep your cheesecake rich and creamy. In this blog post, we covered how to create delicious lemon blueberry cheesecake bars. We started with the ingredients, explored substitutions, and shared step-by-step instructions. Tips for serving, variations, and storage were also discussed. These tips help ensure your cheesecake turns out perfectly every time. Remember, baking is fun, and experimenting with flavors leads to great treats. Enjoy your baking journey and share your creations with friends and family!](https://goldendishy.com/wp-content/uploads/2025/07/2e10f80d-a440-4f9c-b53b-c6e4b2946195-768x768.webp)
