Cheesy Stuffed Meatballs Flavorful and Simple Recipe

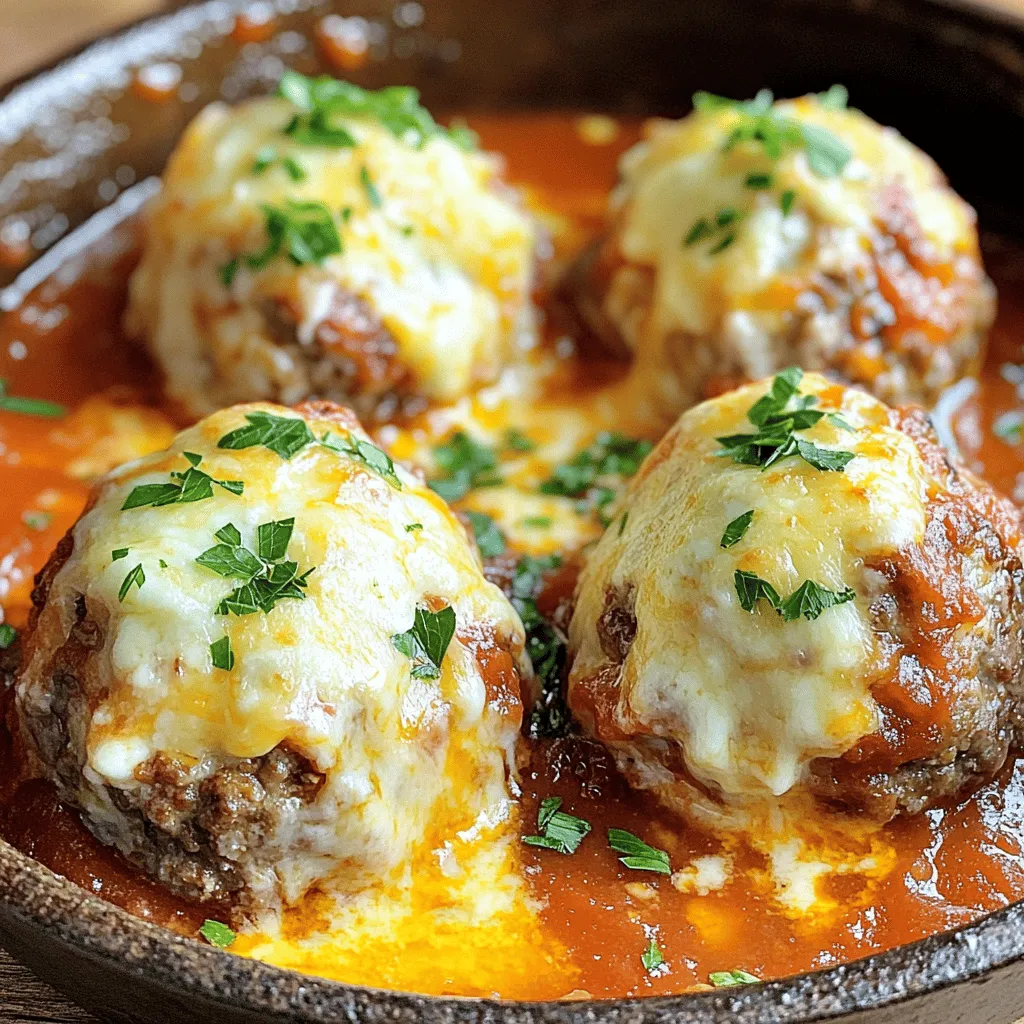
Get ready to impress your dinner guests with my Cheesy Stuffed Meatballs! This simple recipe mixes ground beef and chicken, packed with gooey cheese and fresh herbs. You’ll love how easy they are to make and how full of flavor they become. Perfect for family gatherings or a cozy night in, these meatballs are sure to be a hit. Let’s dive into the delicious details!
Ingredients
Main Ingredients
– 1 lb ground beef
– 1/2 lb ground chicken
– 1 cup breadcrumbs
Cheese and Seasoning Components
– 1/4 cup grated Parmesan cheese
– 1 cup mozzarella cheese, cut into small cubes
– Salt and freshly ground black pepper
Fresh Ingredients
– 1/4 cup fresh parsley, finely chopped
– 2 cloves garlic, minced
– 1 teaspoon onion powder
For cheesy stuffed meatballs, choose quality ingredients. Fresh ground meat gives the best taste. I like a mix of beef and chicken for richness and moisture. Breadcrumbs hold everything together and add a nice texture. Look for Italian-seasoned ones if you want extra flavor.
Cheese is the star of this dish. Use mozzarella for its gooey melt. A sprinkle of Parmesan adds a savory kick. Don’t forget to season well with salt and black pepper. Fresh parsley brightens the dish and makes it look pretty. Garlic brings depth, while onion powder adds sweetness.Enjoy gathering these ingredients!
Step-by-Step Instructions
Combine Ingredients
First, mix the meat and seasonings. In a large bowl, add 1 lb of ground beef and 1/2 lb of ground chicken. Next, sprinkle in 1 cup of breadcrumbs, 1/4 cup of grated Parmesan cheese, and 1/4 cup of finely chopped parsley. Then, add 2 cloves of minced garlic, 1 teaspoon of onion powder, and 1 teaspoon of Italian seasoning. Don’t forget to crack in 1 large egg. Season with salt and pepper to taste. Use your hands to mix everything well. Make sure all the ingredients blend evenly.
Form the Meatballs
Now, it’s time to shape the meatballs. Take a handful of the meat mixture, about the size of a golf ball. Gently flatten it in your palm. For the cheesy surprise, place a small cube of mozzarella cheese in the center of the flattened meat. Carefully wrap the meat around the cheese. Roll it back into a ball shape, ensuring the cheese is fully enclosed. Repeat this until you have around 12-15 stuffed meatballs.
Cooking the Meatballs
Start cooking by browning the meatballs in olive oil. Heat a generous drizzle of olive oil in a large skillet over medium heat. Once the oil is hot and shimmering, add the meatballs to the skillet. Sear them for about 5-7 minutes. Turn occasionally so they get a nice golden-brown crust on all sides.
Next, simmer the meatballs in marinara sauce. After browning, carefully pour 1 jar of marinara sauce over the meatballs. Lower the heat, cover the skillet, and let them simmer for 15-20 minutes. This step helps the flavors mix and the cheese melt into gooey perfection.
Tips & Tricks
Perfecting Texture and Flavor
To keep your meatballs moist, use a mix of ground beef and ground chicken. The chicken adds juiciness. You can also add a bit of milk to the mix. This will help keep the meatballs tender.
For seasoning, taste your mixture before cooking. If you want more flavor, add more garlic or Italian herbs. A pinch of red pepper flakes can add a nice kick.
Cooking Techniques
For crispy exteriors, heat your olive oil until it shimmers. This means it’s hot enough to brown the meatballs well. Don’t overcrowd the pan; cook in batches if needed.
To ensure even cooking, turn the meatballs gently every few minutes. This way, all sides get that lovely golden color. Simmer the meatballs in marinara sauce after browning. This step helps them cook through while soaking in flavor.
Serving Suggestions
Garnish your cheesy stuffed meatballs with chopped parsley and grated Parmesan. This adds a fresh look and taste.
For side dishes, serve them with crusty bread or a side of spaghetti. A simple green salad can also balance the meal nicely.

Variations
Different Meats
You can change the meats in cheesy stuffed meatballs. Ground beef works great, but you can also use ground chicken. If you want a leaner option, try ground turkey. It will still taste good and stay moist. Pork is another tasty choice. Each type of meat adds a unique flavor. Feel free to mix two types of meat, like beef and pork. This mix can make your meatballs even better.
Cheese Options
The cheese inside these meatballs is important. Mozzarella is classic, but you can switch it up. Try using cheddar for a sharper taste. Feta cheese adds a nice tang. If you want something different, use pepper jack for a spicy kick. To add more flavor, mix herbs into the cheese. Try basil or oregano for a fresh touch. You can also add garlic to the cheese for extra zest.
Dietary Adjustments
If you need a gluten-free option, replace regular breadcrumbs. Use gluten-free breadcrumbs or crushed rice cereal. Both work well and keep the meatballs tender. For lower-calorie meatballs, use less cheese or leaner meats. You can also skip the breadcrumbs entirely and use oats instead. This will cut calories and add fiber. These adjustments help you enjoy this dish, no matter your diet.
Storage Info
Refrigerating Leftovers
Leftovers from cheesy stuffed meatballs last about 3-4 days in the fridge. To store them, place the meatballs in an airtight container. This keeps them fresh and prevents any odors. When you’re ready to eat, just reheat them in the microwave or on the stove.
Freezing Meatballs
You can freeze cooked meatballs for later use. First, let them cool completely. Then, arrange the meatballs in a single layer on a baking sheet. Freeze them for about an hour. After that, transfer them to a freezer-safe bag. Be sure to remove as much air as possible. For reheating, you can thaw them in the fridge overnight. Then, heat them gently in a skillet with some marinara sauce. This keeps them tasty and moist.
Meal Prep Suggestions
If you want quick meals, make meatballs in advance. You can prepare them up to a day before cooking. Just form the meatballs and place them on a tray. Cover the tray with plastic wrap and store it in the fridge. This way, you can cook them when you’re ready. For pre-cooking storage, you can also freeze the formed meatballs. Just follow the freezing steps mentioned earlier. This makes dinner easy on busy nights.
FAQs
How do I know when the meatballs are cooked through?
To ensure your meatballs are safe to eat, check the internal temperature. Use a meat thermometer. The safe temperature for ground beef and chicken is 165°F (75°C). When the meatballs reach this temperature, they are fully cooked. Check the center of one meatball to confirm. If it’s not quite there, let them cook a bit longer.
Can I bake these meatballs instead of frying?
Yes, you can bake these meatballs. Preheat your oven to 400°F (200°C). Place the meatballs on a baking sheet lined with parchment paper. Bake for about 20-25 minutes. You may want to flip them halfway through for even cooking. Baking is a healthier option and keeps the kitchen cool.
What sauce pairs best with cheesy stuffed meatballs?
Marinara sauce is a classic choice. It complements the cheesy flavors well. You can also try Alfredo or a spicy arrabbiata sauce. For a twist, make a garlic butter sauce. Each sauce adds a unique taste to your meatballs. Feel free to experiment and find your favorite!
How to make cheesy stuffed meatballs spicy?
To add heat, mix in red pepper flakes or chopped jalapeños. You can also use spicy sausage instead of regular ground meat. Another option is to serve the meatballs with a hot sauce on the side. Adjust the spice level to your liking, making each bite exciting.
Can I use pre-made meat for this recipe?
You can use pre-seasoned meat for convenience. However, be cautious with the flavors. Pre-made options can be saltier or spicier than you expect. Check the ingredients and adjust your seasonings in the recipe. This way, you control the taste while saving time.
You’ve learned how to make cheesy stuffed meatballs from scratch. We covered the best ingredients and cooking methods. We also shared tips to perfect texture and flavor.
Now you’re ready to create delicious meatballs your family will love. Remember, there are many ways to customize this recipe to suit your taste. Enjoy your cooking journey and impress everyone with your homemade cheesy stuffed meatballs.


![- 1 can (15 oz) black beans, drained and rinsed - 1/2 cup cooked quinoa, cooled - 1/2 cup breadcrumbs (gluten-free option available) - 1 small red onion, finely diced - 2 cloves garlic, minced - 1 small jalapeño, minced (seeds removed for less heat) - 1 tablespoon chili powder - 1 teaspoon ground cumin - 1/2 teaspoon smoked paprika - Sea salt and black pepper, to taste - 2 tablespoons fresh cilantro, finely chopped - 1 large egg (or for a vegan option, mix 1 tablespoon ground flaxseed with 2.5 tablespoons water) - Olive oil for frying To make these spicy black bean burgers, choose fresh ingredients when you can. Fresh veggies add great flavor and crunch. However, pantry staples like canned black beans and quinoa work well too. When picking black beans, look for those with a firm texture. Check the can for any damage. Good beans should have a clean label with no added preservatives. For a gluten-free option, look for gluten-free breadcrumbs at your store. They are easy to find and useful in many dishes. You can also use oats or crushed corn chips if needed. This recipe is not just tasty but also easy to prepare. It allows you to explore new flavors while making a healthy meal. For the full recipe, check the instructions provided above. 1. Mashing black beans for ideal texture: Start with a large bowl. Use a fork or potato masher to mash the black beans. Aim for a mix of smooth and chunky. This gives your burger a great texture. 2. Mixing all ingredients thoroughly: After mashing, add the cooked quinoa, breadcrumbs, diced onion, minced garlic, chopped jalapeño, chili powder, cumin, smoked paprika, salt, pepper, and cilantro. Mix everything well. You want each bite to have a burst of flavor. 3. Tips for shaping patties consistently: To shape patties, wet your hands slightly. This helps the mixture stick less. Form about four to six patties, depending on your size preference. Make them even in thickness for even cooking. 1. Heating the skillet correctly: Pour a good drizzle of olive oil into a non-stick skillet. Heat it on medium. Wait until the oil shimmers before adding patties. This step is key for crispiness. 2. Cooking times for achieving crispy patties: Cook each patty for 5 to 6 minutes. Check for a golden brown color before flipping. This ensures a nice crust forms. 3. How to avoid breakage while flipping: Use a spatula to gently lift each patty. Flip them carefully to keep them intact. If they feel too soft, let them cook a bit longer. To get the right texture, add ingredients in the right order. Start with the black beans. Mash them well, but leave some chunks. This gives your burger a nice bite. Next, mix in the quinoa and breadcrumbs. These help bind your burger. If you want a firmer burger, add more breadcrumbs. For a softer burger, reduce them. Use olive oil for frying. It adds great flavor and helps the patties crisp up nicely. Spice up your burgers with extra spices. Consider adding cayenne for heat or oregano for earthiness. You can make a homemade spicy mayo. Mix mayo with hot sauce and lime juice. This makes a great dip too! Pair your burgers with tasty sides. Sweet potato fries or a fresh salad work well. These add color and flavor to your meal. For the full recipe, check out [Full Recipe]. {{image_4}} You can easily change this recipe to suit your taste. Here are a few ideas: - Different Beans or Grains: If you want a twist, try using kidney beans or chickpeas. You can also swap quinoa for brown rice or oats. Each option brings a unique flavor and texture. - Adding Cheese: For a creamy touch, mix in some cheese. Cheddar or pepper jack adds great flavor. If you prefer a vegan option, use vegan cheese or nutritional yeast. Both will give a cheesy taste without dairy. - Adjusting Spice Levels: Want it milder? Skip the jalapeño or use less chili powder. If you love heat, double the spices or add hot sauce. Make it just right for you. Take your spicy black bean burgers to the next level with these fun ideas: - Unique Toppings: Try avocado slices, pickled onions, or spicy slaw. Fresh herbs like cilantro or basil add a bright touch too. Experiment and find your favorite combo! - Suggested Sides: Pair your burgers with sweet potato fries, a crisp salad, or coleslaw. These sides add crunch and flavor to your meal. - Creative Presentation: Stack your burger high with colorful veggies. Serve it on a wooden board for a rustic look. Use fun plates to make your dish pop. Your guests will love it! For the full recipe, check out the [Full Recipe]. After enjoying your spicy black bean burgers, store leftovers in the fridge. Place cooked patties in an airtight container. They stay fresh for about three to four days. For uncooked patties, wrap them tightly in plastic wrap or place them in a freezer-safe bag. This way, you can freeze them for up to three months. To reheat, heat a skillet over medium heat. Add a little olive oil and cook the patties for about five minutes on each side. This will keep them crispy. You can also use an oven. Preheat it to 350°F (175°C) and bake for about 10-15 minutes. Cooked spicy black bean burgers last for up to four days in the fridge. If you freeze them, they can last for about three months. Look for signs of spoilage, like an off smell or a change in color. If the burgers feel slimy or dry, it's best to throw them away. Always trust your senses to keep your food safe! Can I make these burgers ahead of time? Yes, you can make these spicy black bean burgers ahead of time. Shape the patties and store them in the fridge for up to a day. This saves time on busy nights. You can also freeze them for up to three months. Just make sure to separate them with parchment paper. Are spicy black bean burgers gluten-free? Yes, they can be gluten-free! Use gluten-free breadcrumbs instead of regular ones. Many brands offer tasty options that work well in this recipe. Always check the label for hidden gluten. What can I use as a binder if I can’t use eggs? If you can’t use eggs, try a flax egg. Mix 1 tablespoon of ground flaxseed with 2.5 tablespoons of water. Let it sit for about five minutes until it thickens. This works great to hold the burger together. How can I make these burgers spicier? To add more heat, include extra jalapeños or use a spicier pepper like serrano. You can also add hot sauce or cayenne pepper to the mixture. Experiment to find your perfect spice level! Can I cook these on a grill instead? Absolutely! Grilling adds a nice smoky flavor. Preheat your grill and lightly oil the grates. Cook the patties for about 5-6 minutes on each side, just like in a skillet. What are the best buns to use for black bean burgers? I recommend whole wheat or brioche buns for great flavor. Lettuce wraps are an option too for a low-carb meal. Choose what fits your taste and diet best! Tips for meal prepping these burgers for the week. Make a large batch of patties and store them in the fridge or freezer. You can reheat them quickly for lunch or dinner. Pair with fresh toppings for a nice meal. Having these ready to go makes weeknight cooking easier! You learned how to make delicious black bean burgers. We covered key ingredients, step-by-step instructions, and great tips. Remember to choose fresh ingredients for the best flavor. Mix your beans well to get the right texture. Don’t forget to try different variations and toppings to suit your taste. Proper storage will help you enjoy leftovers later. With these tips, you can impress anyone at your next meal. Enjoy creating your perfect black bean burger!](https://goldendishy.com/wp-content/uploads/2025/06/68a5a06a-1097-44cf-8076-380ecc54e2d9-768x768.webp)

![- 4 salmon fillets (approximately 6 oz each) - 3 tablespoons miso paste (white or yellow) - 2 tablespoons honey - 1 tablespoon soy sauce (or tamari for gluten-free) - 1 tablespoon rice vinegar - 1 tablespoon sesame oil - 2 cloves garlic, minced - 1 teaspoon freshly grated ginger - Green onions, thinly sliced (for garnish) - Sesame seeds (for garnish) This list has everything you need for a tasty miso glazed salmon. The salmon fillets are the star of the show. Miso paste adds a rich flavor. Honey gives it a touch of sweetness. Soy sauce or tamari brings in saltiness. Rice vinegar adds a bit of tang. Sesame oil gives a nice nutty taste. Garlic and ginger add warmth and depth. Don't forget the green onions and sesame seeds! They make the dish look great and add a bit of crunch. You can find the full recipe to see how to combine these ingredients into a delicious meal. To start, gather your ingredients. In a mixing bowl, combine the miso paste, honey, soy sauce, rice vinegar, sesame oil, minced garlic, and grated ginger. Use a whisk to blend the ingredients. Mix until smooth and creamy. This glaze adds a sweet and savory flavor to the salmon. Next, place the salmon fillets in a shallow dish or a sealable bag. Pour the miso glaze over the salmon. Make sure each piece is well-coated. Cover the dish or seal the bag and marinate the salmon in the fridge. For best results, allow it to marinate for at least 30 minutes. If you have time, two hours gives a richer flavor. Now, preheat your oven to 400°F (200°C). Line a baking sheet with parchment paper to prevent sticking. After marinating, take the salmon out of the glaze. Let any excess glaze drip off, then place the fillets skin-side down on the sheet. Bake the salmon for 12 to 15 minutes. The fish is done when it turns opaque and flakes easily with a fork. You can find the complete instructions in the [Full Recipe]. You can boost the taste of miso glazed salmon by adding fresh herbs. Try using cilantro or basil for a fresh kick. You can also add spices like chili flakes for heat or black sesame seeds for extra crunch. These small tweaks can take your dish to a whole new level. For the best flavor, I suggest marinating the salmon for at least 30 minutes. If you have time, let it sit for up to 2 hours. This longer marinating lets the flavors soak in deeply. Just remember not to marinate too long, as the acid in the marinade can make the fish mushy. While baking the salmon is great, you can also broil or grill it. Broiling gives a nice char and caramelization, making it even tastier. If you grill, keep the heat medium to avoid burning the glaze. Whichever method you choose, keep an eye on the salmon. It cooks fast! {{image_4}} You can switch the salmon for other fish, like cod or trout. Both work well with miso glaze. Chicken is another great option. You can use chicken breasts or thighs. The cooking time will change, so check for doneness. For plant-based choices, try tofu or tempeh. Both absorb flavors well. Marinate them just like you do with salmon. Bake them until golden brown and firm. You can adjust the taste of the miso glaze. If you like it sweeter, add more honey. For a saltier flavor, increase the soy sauce. You can also try adding a splash of citrus juice. Lime or lemon will brighten the dish. Feel free to add other ingredients too. A spoonful of sriracha gives a spicy kick. You can also mix in chopped herbs like cilantro or basil for freshness. To make a full meal, serve the salmon with sides. Steamed vegetables like broccoli or green beans add color and nutrition. Jasmine rice or quinoa pairs well too. You can also add a simple salad for crunch. For a fun twist, serve the salmon on a bed of noodles. Drizzle some leftover glaze for extra flavor. Check out the Full Recipe for more tips on creating a balanced plate. To store leftover miso glazed salmon, let it cool first. Place it in an airtight container. Make sure to cover it well so it stays fresh. It can last in the fridge for up to three days. If your salmon has a strong smell, it’s best to throw it away. To freeze the salmon, wrap each piece tightly in plastic wrap. Then, place them in a freezer-safe bag. This method helps prevent freezer burn. Miso glazed salmon can be frozen for up to three months. When you’re ready to eat it, move it to the fridge for a night to thaw. For reheating, use an oven or a stovetop. If using the oven, preheat it to 350°F (175°C). Place the salmon on a baking sheet. Heat it for about 10 minutes. This method keeps it moist. If you prefer the stovetop, heat a pan over low heat. Add a splash of water to keep the fish from drying out. Cook for a few minutes until warmed through. You should marinate the salmon for at least 30 minutes. This gives the flavors time to soak in. For a richer taste, I recommend marinating for up to 2 hours. The longer the fish sits in the marinade, the better the flavor will be. Yes, you can use different types of miso. White miso is sweeter and milder. Yellow miso is a bit stronger but still smooth. Red miso is more intense and salty. Each type brings a unique flavor to the salmon. Experiment with what you like best! I love serving Miso Glazed Salmon with steamed rice. Jasmine or brown rice works great. You can also add some roasted veggies or a fresh salad. These sides balance the rich glaze. They make your plate colorful and fun! Check out the Full Recipe for more ideas. This blog post showed how to make miso-glazed salmon. You learned about the key ingredients, preparation, and cooking steps. I shared tips to enhance flavor and offered variations if you want to try something new. Proper storage can keep leftovers tasty for later. Remember, cooking should be fun! Experiment with flavors and enjoy your meal. With these insights and tips, you will create a dish that’s both delicious and satisfying. Happy cooking!](https://goldendishy.com/wp-content/uploads/2025/07/7f43d765-f0ef-46f9-86e2-eabd5628ba72-768x768.webp)


