
If you’re craving a warm, cheesy dish that’s both easy to make and delicious, you’re in the right place. Cheesy Spinach Stuffed Shells combine jumbo pasta shells, fresh spinach, and a blend of cheeses for a meal that’s sure to please anyone at your table. In this post, I’ll guide you through each step, share tips for perfecting the dish, and offer creative variations. Let’s dive in and make your next family meal unforgettable!
Why I Love This Recipe
- Deliciously Cheesy: The combination of ricotta, mozzarella, and Parmesan creates a creamy and rich filling that melts in your mouth.
- Nutritious Spinach: Packed with fresh spinach, this dish not only tastes amazing but also adds a healthy dose of greens to your meal.
- Comfort Food Classic: Stuffed pasta shells are a beloved comfort food that is perfect for family dinners or cozy nights in.
- Easy to Prepare: With simple ingredients and straightforward steps, this recipe is accessible for cooks of all skill levels.
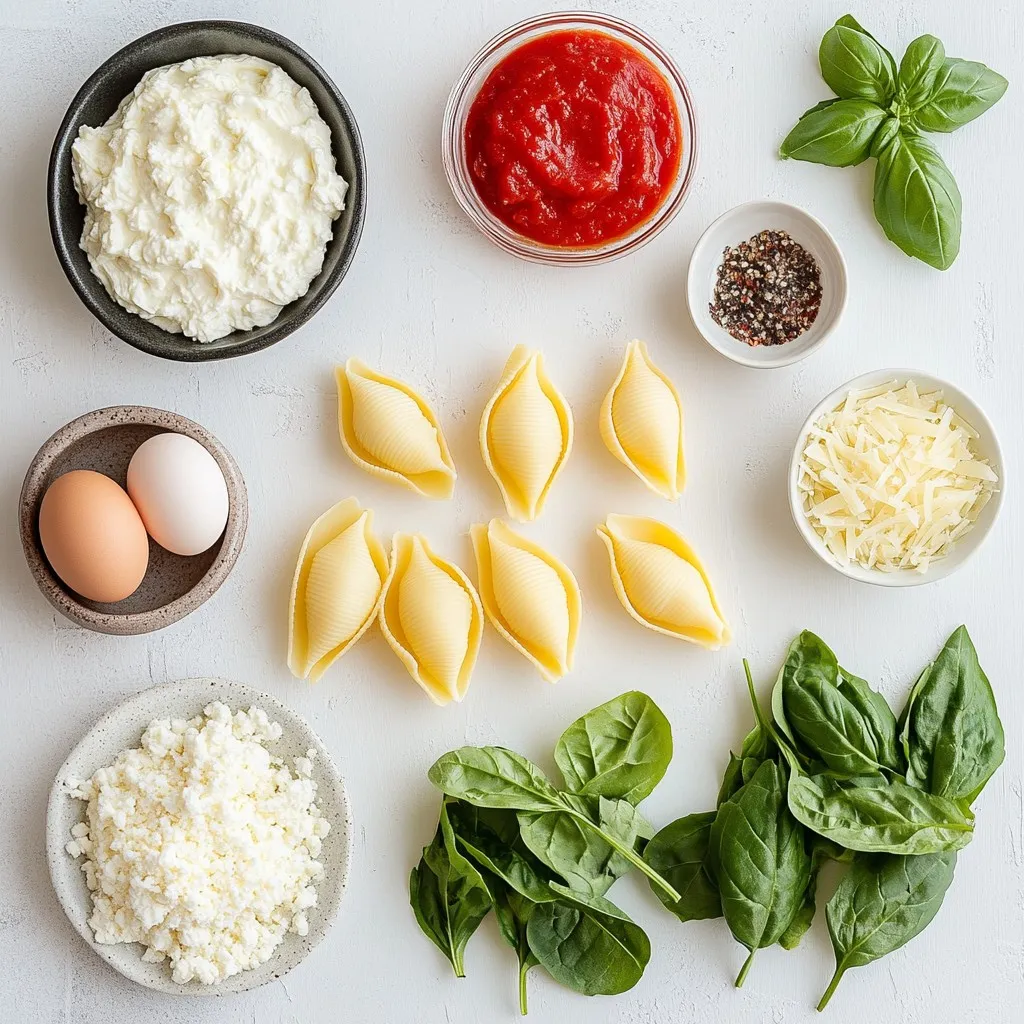
Ingredients
Main Ingredients
– 20 jumbo pasta shells
– 2 cups fresh spinach, finely chopped
– 1 cup ricotta cheese
– 1 cup shredded mozzarella cheese, divided
– 1/2 cup grated Parmesan cheese
Seasoning and Extras
– 1 teaspoon garlic powder
– 1/2 teaspoon onion powder
– Salt and black pepper, to taste
– 2 cups marinara sauce, divided
Garnishing
– Fresh basil leaves
The main ingredients create a rich and creamy filling. Jumbo pasta shells serve as a perfect vessel for this delicious mix. I love using fresh spinach for its vibrant color and flavor. Ricotta cheese adds a smooth texture, while mozzarella cheese gives it that stretchy, melty goodness. Grated Parmesan cheese provides a lovely nutty taste that brings all the flavors together.
For seasoning, garlic powder and onion powder add depth without overpowering the dish. A sprinkle of salt and black pepper helps balance the flavors. Marinara sauce not only adds moisture but also a bright acidity that complements the creamy filling.
Finally, garnishing with fresh basil leaves adds a burst of color and a hint of freshness. This combination makes for a simple yet tasty dish that you can enjoy any night of the week.
Step-by-Step Instructions
Prepping the Pasta
First, preheat your oven to 375°F (190°C). Next, bring a large pot of salted water to a boil. Cook the jumbo pasta shells according to the package directions until they are al dente. This should take about 10-12 minutes. Once cooked, drain the shells well. Set them aside to cool for a few minutes.
Making the Filling
In a large mixing bowl, combine the finely chopped spinach, ricotta cheese, 1/2 cup of shredded mozzarella cheese, grated Parmesan cheese, and a beaten egg. Add garlic powder, onion powder, and a sprinkle of salt and pepper. Mix all the ingredients thoroughly until you have a creamy filling. This step is key for great flavor.
Assembling the Dish
Now comes the fun part: stuffing the pasta shells! Take each cooled shell and gently stuff it with the spinach and cheese mixture. Be careful not to tear the shell. In a glass or ceramic baking dish, pour 1 cup of marinara sauce evenly across the bottom. This helps prevent sticking. Arrange the stuffed shells in the dish with the openings facing up. Cover the shells with the remaining marinara sauce, making sure each shell is well coated.
Sprinkle the remaining 1/2 cup of shredded mozzarella cheese evenly over the top. Cover the dish tightly with aluminum foil and place it in the preheated oven. Bake for 25 minutes. After that, carefully remove the foil and bake for an additional 10-15 minutes. This helps the cheese become bubbly and golden brown. Once done, take the dish out of the oven and let it cool for about 5 minutes. Garnish with fresh basil leaves just before serving. Enjoy!
Tips & Tricks
Perfecting the Filling
To make the filling just right, use fresh spinach. It adds great flavor. Chop it finely for an even blend. Mix it with ricotta and mozzarella for creaminess. The egg binds it all together.
Seasoning is key. Start with garlic powder and onion powder. Add salt and pepper to your taste. If you like it spicy, try adding a pinch of red pepper flakes. Taste the filling as you mix. Adjust until it’s just right.
Baking Techniques
Cover the dish with foil when baking. This keeps the shells moist and tender. After 25 minutes, remove the foil. This helps the cheese brown nicely. Watch the cheese closely; you want it bubbly and golden.
If you want extra crispiness, broil for a minute or two at the end. Just keep an eye on it. You don’t want burnt cheese!
Serving Suggestions
For a beautiful presentation, serve on warm plates. Drizzle marinara sauce around the shells. Scatter fresh basil leaves on top for color. This makes the dish look fresh and inviting.
Pair these stuffed shells with a simple green salad. A light vinaigrette works well. Garlic bread is also a great choice. Enjoy your meal with a side that complements the rich flavors!
Pro Tips
- Perfect Pasta Texture: Make sure to cook the jumbo shells al dente, as they will continue to cook in the oven. This prevents them from becoming mushy.
- Customize Your Cheese: Feel free to experiment with different types of cheese in the filling. Adding feta or goat cheese can give a unique flavor twist.
- Extra Flavor Boost: For more depth of flavor, sauté the spinach in a little olive oil and minced garlic before mixing it into the cheese filling.
- Make Ahead: These stuffed shells can be assembled ahead of time and stored in the fridge. Just bake them when you’re ready to serve for a quick meal.
Variations
Ingredient Substitutions
If you want to change the cheese, try cottage cheese instead of ricotta. It gives a nice texture too. You can also use goat cheese for a tangy flavor. If you want more veggies, add chopped mushrooms or bell peppers. These add great taste and color to your dish.
Dietary Adaptations
For a gluten-free version, choose gluten-free jumbo shells. They work just as well. If you want a vegan dish, skip the egg and use tofu instead of cheese. Blend the tofu with spices to mimic the creamy filling. You can also use nutritional yeast for a cheesy taste.
Flavor Enhancements
To add more flavor, mix in some Italian herbs like oregano or basil. A pinch of red pepper flakes gives a nice kick. For toppings, try adding breadcrumbs for crunch or more cheese for extra gooeyness. You can also drizzle olive oil before serving for a rich finish.
Storage Info
Storing Leftovers
To keep your cheesy spinach stuffed shells fresh, store them in an airtight container. You can refrigerate them for up to three days. If you want to save them for longer, freezing is a great option. Place the cooled shells in a freezer-safe container or wrap them tightly in plastic wrap. They can last up to three months in the freezer.
Reheating Instructions
When you’re ready to enjoy your leftovers, reheating is simple. You can use the oven or microwave. For the oven, preheat it to 350°F (175°C). Place the shells in a baking dish, cover with foil, and heat for about 20 minutes. This method keeps the flavors rich and the cheese melty. If you use a microwave, place a few shells on a plate and cover them with a damp paper towel. Heat in 30-second intervals until warm. This helps keep the shells moist.
Shelf Life
Cheesy spinach stuffed shells can stay safe to eat for up to three days in the fridge. If frozen, they are good for about three months. After that, the taste and texture may change. Always check for any signs of spoilage before eating.
FAQs
Can I make cheesy spinach stuffed shells ahead of time?
Yes, you can prep cheesy spinach stuffed shells ahead of time. Make the filling and stuff the shells. Place them in a baking dish with marinara sauce. Cover the dish with foil and store it in the fridge. They will stay fresh for up to two days. When you’re ready to bake, add a few extra minutes to the cook time. You can also freeze the stuffed shells. Just wrap them tightly in plastic wrap and then foil. They can last for up to three months in the freezer. Thaw them in the fridge before baking.
What can I serve with cheesy spinach stuffed shells?
Cheesy spinach stuffed shells pair well with many side dishes. I suggest a simple green salad with a light vinaigrette. Garlic bread is another great choice, adding a crunchy texture. You could also serve steamed vegetables like broccoli or green beans. For a heartier option, a side of roasted potatoes would work well too.
How do I know when the shells are fully cooked?
You can tell when the shells are fully cooked by checking the cheese. It should be bubbly and golden brown on top. The sauce should be hot and slightly bubbling around the edges. If you insert a knife into the filling, it should feel warm throughout. Make sure not to overbake them, as they can dry out.
Can I use frozen spinach instead of fresh?
Yes, you can use frozen spinach in this recipe. Frozen spinach is convenient and saves prep time. Just be sure to thaw it and drain off excess water before using. However, fresh spinach has a brighter flavor and better texture. Frozen spinach may also become mushy in the filling. So, if you want the best taste, fresh spinach is the way to go.
Cheesy spinach stuffed shells are easy and fun to make. We covered the key ingredients, like jumbo shells, spinach, and different cheeses. I shared steps to prepare, stuff, and bake your dish perfectly. Use my tips to enhance flavors or make it gluten-free or vegan. Store leftovers the right way to keep them fresh. Enjoy these shells with a side salad or a tasty sauce. I hope you feel ready to create a delicious mea


