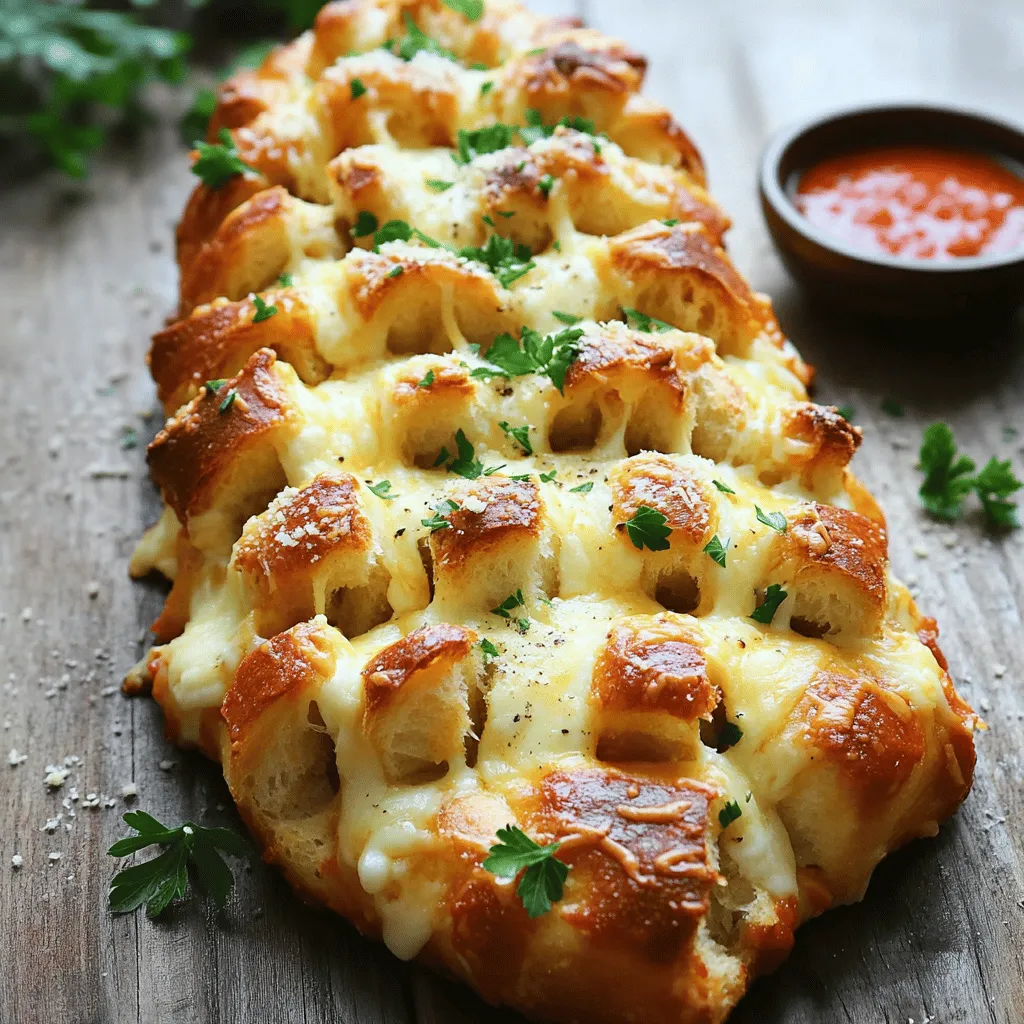
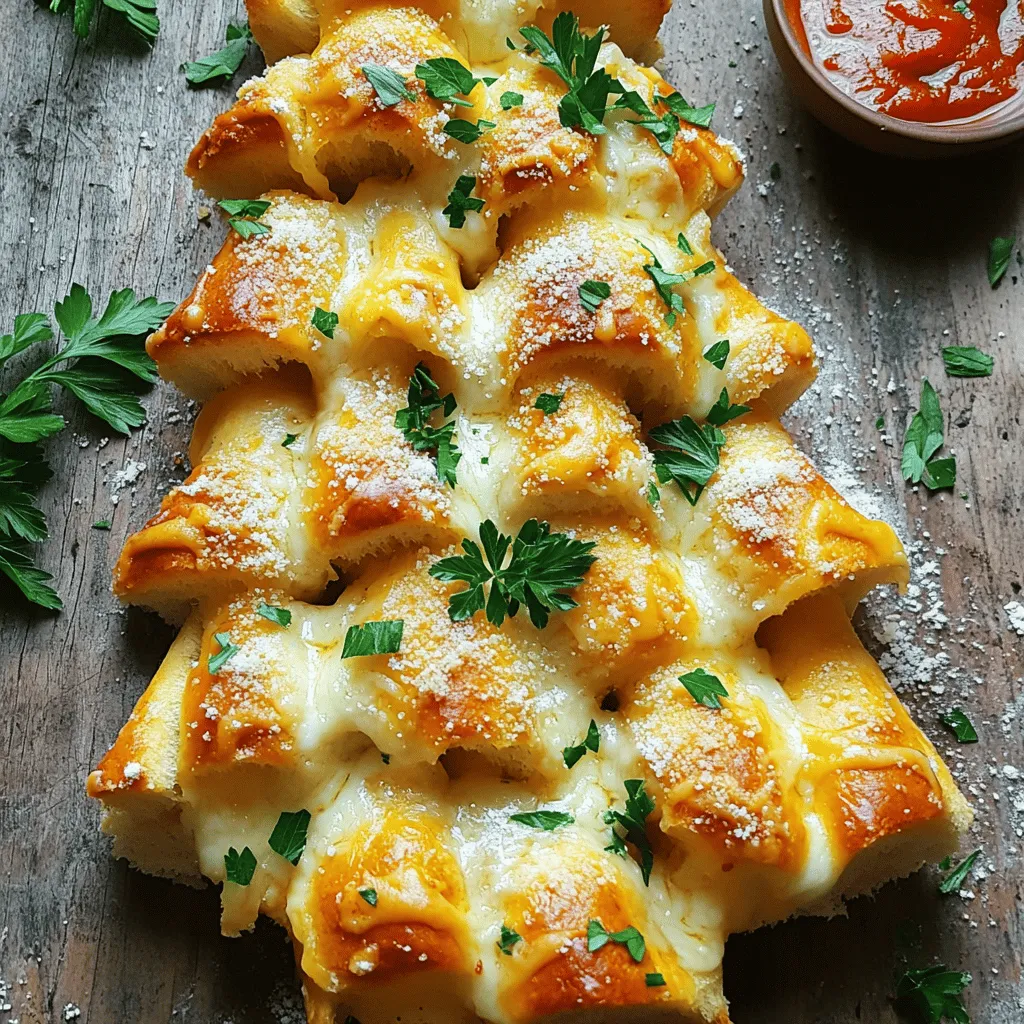
Cheesy Pull-Apart Christmas Tree Bread Delightful Recipe

Are you ready to impress your family this holiday season? This Cheesy Pull-Apart Christmas Tree Bread recipe is simple, fun, and delicious! With gooey cheese and fresh herbs, it’s the perfect dish for your festive gatherings. You’ll learn easy steps to create a stunning bread that looks as good as it tastes. Let’s dive in and make this delightful treat together!
Ingredients
List of Ingredients
– 3 cups all-purpose flour
– 1 packet (2 ¼ tsp) instant yeast
– 1 teaspoon granulated sugar
– 1 teaspoon fine sea salt
– ½ cup whole milk, warmed to about 110°F
– ¼ cup warm water (approximately 110°F)
– 2 tablespoons extra virgin olive oil
– 1 cup shredded mozzarella cheese
– ½ cup grated Parmesan cheese
– 2 tablespoons finely chopped fresh parsley
– 1 teaspoon garlic powder
– 1 large egg (for egg wash)
Importance of Fresh Ingredients
Using fresh ingredients is key to great flavor. Fresh herbs bring bright taste. Fresh cheese melts better and adds creaminess. Fresh flour helps dough rise well. Always check the dates on your ingredients. This small step can make a big difference in taste.
Alternative Ingredients for Dietary Restrictions
You can easily swap some ingredients to fit different diets. For a gluten-free option, use gluten-free flour blend. If you want dairy-free, try vegan cheese. For a lower-carb version, use cauliflower dough. These swaps keep the festive spirit while meeting your needs.
Step-by-Step Instructions
Preparing the Dough
To make the dough, grab a large mixing bowl. Combine warm milk, warm water, granulated sugar, and instant yeast. Stir gently and let it sit for about five minutes. You want it to get frothy on top. This shows the yeast is active and ready. Next, add all-purpose flour, sea salt, and olive oil to the yeast mix. Mix until the dough starts to come together. Now, transfer it to a floured surface. Knead the dough for eight to ten minutes until it feels smooth and elastic.
Once done, lightly coat a clean bowl with olive oil. Place your kneaded dough inside and cover it with a damp cloth. Let it rise in a warm spot for about one hour or until it doubles in size. This step is key for fluffy bread.
Assembling the Cheese Layers
After the dough rises, punch it down gently to release air bubbles. Roll it out into a rectangle, about 12 by 18 inches. Evenly sprinkle shredded mozzarella and grated Parmesan cheese over the dough, leaving a one-inch border. Next, add the chopped parsley and garlic powder on top of the cheese. This adds flavor and a nice color.
Using a sharp knife or pizza cutter, slice the rectangle into twelve equal squares. You should create a 3×3 grid. Carefully stack the squares on top of each other. This will create the layered shape of your “tree.”
Shaping the Christmas Tree
Now, transfer the stacked dough onto a parchment-lined baking sheet. Shape it into a Christmas tree silhouette. Feel free to trim the base of the stack to create a trunk effect. It should look festive and fun! Cover the shaped dough with a cloth. Let it rise again for another 30 minutes while you preheat your oven to 375°F (190°C).
In a small bowl, beat the egg until mixed well. Brush it generously over the top of the dough. This will give it a beautiful golden color when baked. Place the baking sheet in the oven and bake for 25 to 30 minutes. You want the bread to be golden brown, with cheese bubbling and melted. Once it’s done, let it cool slightly on the baking sheet.
Now, you can pull apart the cheesy pieces from the bottom. Enjoy your delightful creation!
Tips & Tricks
Common Baking Pitfalls to Avoid
Baking can be tricky. Here are some common mistakes to watch for:
– Not measuring flour properly: Use a kitchen scale for best results.
– Skipping the yeast proofing: Always let the yeast foam before mixing it in.
– Over-kneading the dough: Knead just until smooth and elastic, about 8-10 minutes.
– Not letting the dough rise enough: Give it time to double in size for fluffiness.
– Baking the bread too long: Keep an eye on the oven; every oven is different.
How to Achieve the Perfect Golden Finish
A golden crust makes your bread look and taste amazing. Here’s how to get that perfect finish:
– Use an egg wash: Beat one egg and brush it on before baking.
– Bake at the right temperature: Preheat your oven to 375°F (190°C) for even cooking.
– Check for doneness: The bread should be golden brown and cheese bubbly.
– Let it cool slightly: This helps the crust stay crisp when you serve it.
Serving Suggestions and Presentation Ideas
Serving your Cheesy Pull-Apart Christmas Tree Bread is just as fun as making it. Here are some ideas:
– Garnish with parsley: Place fresh chopped parsley around the base for a festive touch.
– Serve with dips: Offer warm marinara sauce or herbed olive oil for extra flavor.
– Create a centerpiece: Shape the bread into a tree and place it on a nice platter.
– Add festive decorations: Use edible decorations like star-shaped cheese on top.
Variations
Different Cheese Combinations
You can change the cheese in this recipe. I love using different types for unique flavors. Try using sharp cheddar for a tangy kick. Creamy gouda adds richness. A blend of cheeses gives a special touch. Mix mozzarella with feta for a Mediterranean twist. Just keep the same amounts for the best result.
Seasonal Ingredient Additions
Add seasonal ingredients to make this bread even better. In winter, include some chopped spinach or roasted red peppers. Fresh herbs like thyme or rosemary boost the flavor. For a sweet touch, try adding cranberries or walnuts. These additions can make your bread special for any holiday gathering.
Gluten-Free Adaptation
If you need a gluten-free version, it’s easy to adapt. Use a gluten-free flour blend instead of all-purpose flour. Make sure the blend has xanthan gum for structure. Follow the same steps for mixing and rising the dough. This way, everyone can enjoy cheesy pull-apart bread during the holidays.
Storage Info
Best Practices for Storing Leftovers
To keep your cheesy pull-apart bread fresh, store it in an airtight container. If you have a lot left, wrap it in plastic wrap first. This helps to keep moisture in and air out. Place it in the fridge if you plan to eat it within a few days. For longer storage, you can freeze it.
Reheating Tips for Maximum Freshness
When you’re ready to enjoy your leftovers, preheat your oven to 350°F (175°C). Place the bread on a baking sheet and cover it with foil. This helps to keep the bread soft while it warms. Heat it for about 10-15 minutes, or until it’s warm inside. You could also use a microwave, but the oven gives a better texture.
Freezing Pre-Made Dough
If you want to make the dough ahead of time, you can freeze it. First, shape it into a ball and wrap it tightly in plastic wrap. Then, place it in a freezer bag. It can freeze for up to three months. When you’re ready to bake, let it thaw in the fridge overnight. Then, let it rise before baking. This method saves time and adds convenience to your holiday baking.
FAQs
How long does it take to make Cheesy Pull-Apart Christmas Tree Bread?
Making Cheesy Pull-Apart Christmas Tree Bread takes about 1 hour and 30 minutes. This time includes prep and baking. You spend 15 minutes prepping the dough. Then, let it rise for about an hour. Finally, it bakes for 25 to 30 minutes.
Can I use a different type of cheese?
Yes, you can use other cheeses. Cheddar, gouda, or fontina work well. Each cheese brings a unique flavor. Just ensure the cheese melts nicely. Mixing different cheeses can add more taste.
Is this recipe suitable for beginners?
Absolutely! This recipe is great for beginners. The steps are simple and clear. You don’t need advanced skills to make this bread. The dough is easy to handle. Plus, the results are delicious and fun to share.
You learned how to make a fun, cheesy pull-apart Christmas tree bread. We covered key ingredients, the importance of fresh choices, and how to adjust for diets. The step-by-step guide helps you create a beautiful tree. I shared tips to avoid common baking mistakes and offered variations for extra flavor. Storing and reheating this dish was also discussed.
Enjoy making this bread. It’s perfect for sharing during the holidays. Happy baking!

![To make Zucchini Ricotta Fritters, gather these simple ingredients: - 2 medium zucchinis, grated - 1 cup ricotta cheese - 1/2 cup all-purpose flour - 2 large eggs, beaten - 1/4 cup grated Parmesan cheese - 2 green onions, finely chopped - 1/2 teaspoon garlic powder - Salt and pepper, to taste - Olive oil, for frying - Fresh basil or parsley, for garnish These ingredients work together to create crispy, tasty fritters that everyone will love. The fresh zucchini adds moisture and flavor, while the ricotta cheese gives a creamy texture. Using grated Parmesan cheese enhances the savory taste of the fritters. Make sure to squeeze out as much moisture from the zucchini as you can. This step is key to ensure your fritters do not get soggy. You can use a clean kitchen towel for this. Want to dive deeper into making these fritters? Check out the Full Recipe for all the steps! Start by grating the zucchinis. You can use a box grater or a food processor. After grating, place the zucchini in a clean kitchen towel. Gather the towel around the zucchini and twist it. This will help squeeze out the extra moisture. Removing moisture is key. It keeps the fritters from becoming soggy. In a large bowl, combine the drained zucchini, ricotta cheese, flour, and beaten eggs. Add grated Parmesan, chopped green onions, garlic powder, salt, and pepper. Use a sturdy spoon to mix everything. The batter should be slightly chunky, not too smooth. This texture helps the fritters hold their shape when cooking. Heat a non-stick skillet over medium heat and add a few tablespoons of olive oil. Let the oil heat until it shimmers. Once hot, drop spoonfuls of batter into the skillet. Gently flatten each fritter with a spoon. Cook them for about 3-4 minutes on each side. They should turn golden brown and crispy. Don't overcrowd the skillet. If needed, cook in batches. After cooking, place the fritters on a plate lined with paper towels. This will absorb any excess oil. Serve warm with chopped basil or parsley for a fresh touch. To make your fritters crispy, start by removing moisture. Zucchini has a lot of water. When you grate it, you must squeeze it in a towel. This helps the fritters stay firm. Next, heat your oil until it shimmers. A hot skillet cooks the fritters quickly and keeps them crispy. If the oil is not hot enough, they can soak up too much oil and become soggy. Herbs and spices can elevate your fritters. I love adding fresh basil or parsley for brightness. You can also try a pinch of red pepper flakes for heat. For dips, a tangy yogurt sauce pairs well. You can also serve them with a tasty marinara. These additions make each bite even better. Avoid overcrowding your skillet. Too many fritters at once can lower the heat. This can lead to uneven cooking. Instead, cook them in small batches. Keep the cooked fritters warm by placing them on a plate in a low oven. This way, they stay warm and crisp until you serve them. {{image_4}} You can change the taste of your fritters easily. Try adding different cheeses like feta or mozzarella. You can also mix in finely chopped veggies such as bell peppers or spinach. Fresh herbs like dill or thyme add a nice touch too. These small changes can create a whole new snack experience. If you need a gluten-free version, use almond flour or coconut flour instead of all-purpose flour. Both options work well and will keep your fritters light and crispy. Just be sure to adjust the amount used, as these flours can absorb moisture differently. For a vegan twist, replace the ricotta with a plant-based cheese. Flaxseed meal can work well as an egg substitute. Just mix one tablespoon of flaxseed with three tablespoons of water and let it sit for a few minutes. If you want low-carb fritters, swap the flour for grated cauliflower. This keeps the fritters tasty while cutting down on carbs. For the full recipe, check out the [Full Recipe]. To keep your zucchini ricotta fritters fresh, you should refrigerate them. Place the leftover fritters in an airtight container. This helps prevent them from drying out. Make sure to layer them with paper towels to absorb extra moisture. You can store them for up to three days in the fridge. If you want to save some for later, freezing is a great option. First, let the fritters cool completely. Then, place them in a single layer on a baking sheet. Freeze them for about one hour. This step helps them keep their shape. After they are frozen, transfer them to a freezer bag. Label the bag with the date. They can stay good for up to two months. When you’re ready to eat your frozen fritters, reheat them in the oven. Preheat the oven to 375°F (190°C). Place the fritters on a baking sheet and bake for about 15-20 minutes. This method will help them regain their crispy texture. Enjoy your tasty snack! For the full recipe, check out the detailed instructions above. Yes, you can bake them! Place the fritters on a baking sheet lined with parchment paper. Brush them lightly with olive oil. Bake at 400°F for about 20-25 minutes. Flip them halfway through to get both sides crispy. To reheat, use an oven or an air fryer. Preheat the oven to 350°F. Place the fritters on a baking sheet and bake for about 10 minutes. This will keep them crispy. You can make the batter ahead of time! Store it in the fridge for up to 24 hours. Just remember to mix it again before cooking. The moisture from the zucchini can settle. Fritters are done when they are golden brown and crispy on both sides. You can also gently press them. If they feel firm and do not sink, they are ready. Yes, they are great for meal prep! You can cook them and store in the fridge for up to 3 days. They make a tasty snack or meal addition. For more details, check the Full Recipe. Zucchini ricotta fritters are a simple and tasty snack. You can enjoy them any time of the day. Here’s how to make them: - 2 medium zucchinis, grated - 1 cup ricotta cheese - 1/2 cup all-purpose flour - 2 large eggs, beaten - 1/4 cup grated Parmesan cheese - 2 green onions, finely chopped - 1/2 teaspoon garlic powder - Salt and pepper, to taste - Olive oil, for frying - Fresh basil or parsley, for garnish To start, I recommend grating the zucchinis. Use a box grater or food processor to make it quick. After grating, take a clean kitchen towel. Place the zucchini in the middle and twist the towel. This helps squeeze out extra moisture. It’s important to do this step to keep your fritters crispy. Next, grab a large mixing bowl. Add the drained zucchini, ricotta cheese, flour, beaten eggs, Parmesan, green onions, garlic powder, and some salt and pepper. Mix everything well with a spatula. The batter should feel a bit chunky. Now, heat a non-stick skillet over medium heat. Drizzle in some olive oil to coat the bottom. Let the oil heat until it looks shiny. This ensures a nice fry for your fritters. Once the oil is hot, drop spoonfuls of the batter into the skillet. Use the back of a spoon to flatten each fritter a bit. This helps them cook evenly. Fry for about 3-4 minutes on each side. You want them golden brown and crispy. Don’t overcrowd the skillet; work in batches if needed. When done, transfer the fritters to a plate lined with paper towels. This will soak up any extra oil. Serve them warm, topped with fresh basil or parsley. These toppings add a lovely touch to your dish. For the full recipe, check out the detailed instructions above. Enjoy making these tasty treats! In this blog post, we covered how to make Zucchini Ricotta Fritters from start to finish. We shared a list of simple ingredients and provided step-by-step cooking instructions. You learned tips to ensure crispiness and explored tasty variations. Storing and reheating tips were also discussed to help keep your fritters fresh. Overall, these fritters are easy to make and delicious. They offer a healthy twist for any meal. Enjoy experimenting with different flavors and variations!](https://goldendishy.com/wp-content/uploads/2025/06/35e9f5a9-d1bf-47b3-b252-98dbfdd31548-768x768.webp)

. 1. Heat olive oil in a large skillet over medium heat. 2. Add finely chopped red onion to the skillet. 3. Sauté the onion for 2-3 minutes until it becomes soft. 4. Now, add diced red and green bell peppers to the skillet. 5. Cook for 3-4 minutes until the peppers soften. 6. Stir in corn kernels and black beans. 7. Season with ground cumin, smoked paprika, garlic powder, salt, and pepper. 8. Mix well and cook for 5 more minutes until hot. 1. Heat another skillet over medium heat. 2. Place a tortilla in the skillet and sprinkle ¼ cup of cheese on it. 3. Layer ½ cup of the veggie mixture over the cheese. 4. Top with another ¼ cup of cheese for extra flavor. 5. Fold the tortilla in half, covering the filling. 6. Cook for 3-4 minutes until golden brown on one side. 7. Flip the quesadilla gently using a spatula. 8. Cook for another 3-4 minutes until crispy and cheese melts. - Keep the heat at medium for a crispy texture. - Use a spatula to flip the quesadilla easily. - Check for doneness by ensuring both sides are golden brown. These simple steps make it easy to create loaded veggie quesadillas at home. For the full recipe, refer to the recipe section above. Enjoy the process! Choosing the right cheese is key. I love a mix of cheddar and mozzarella. This mix melts well and adds great flavor. You want the cheese to stretch and pull when you take a bite. Balancing spices and seasonings is also important. Start with the basics like salt and pepper. Then, add spices like cumin and smoked paprika. Adjust them to fit your taste. A little heat can come from red pepper flakes if you like it spicy. Day-to-day storage tips help keep your quesadillas fresh. Place leftovers in an airtight container. Keep them in the fridge for up to three days. You can also wrap them tightly in foil or plastic wrap. Reheating suggestions for best flavor include using the oven or skillet. For the oven, preheat to 350°F. Heat the quesadillas for about 10 minutes. In a skillet, cook them over medium heat. This method keeps them crispy and delicious. Plating ideas can make your meal pop. Arrange the quesadillas in a fan shape on a colorful plate. This makes them look fun and inviting. Adding colorful garnishes like fresh cilantro adds a nice touch. You can also sprinkle some diced tomatoes or avocado on top. These small changes make your meal look gourmet. Enjoy your loaded veggie quesadillas! For the full recipe, check out the Loaded Veggie Quesadillas 🥑 section. {{image_4}} You can make loaded veggie quesadillas even more fun. Here are some easy ideas. Want some extra protein? You can add grilled chicken or tofu. Just cook them first, then slice and add to your quesadilla mix. If you like seafood, try shrimp. Cook them quickly and toss them in for a tasty twist. Spices can change the game. Try different spices like chili powder or oregano. They add depth and warmth. You can also add sauces or marinades. A dash of hot sauce or a sprinkle of lime juice can elevate your quesadillas. Need gluten-free options? Use gluten-free tortillas. They work great and taste just as good. If you're vegan, swap out the cheese for a plant-based version. There are many tasty dairy-free cheeses out there that melt well. You can find the full recipe for loaded veggie quesadillas to get started on these variations. To keep your uncooked quesadillas fresh, wrap them tightly in plastic wrap. This keeps out moisture and air. You can also place them in an airtight container. If you want to freeze them, stack the quesadillas with parchment paper in between. This prevents them from sticking together. Uncooked quesadillas can stay in the freezer for up to three months. After cooking, let the quesadillas cool completely. Then, wrap them in foil or place them in a container. Store them in the fridge for up to four days. I find they taste best within the first two days. If you notice any odd smell or mold, it’s best to toss them. To reheat, use an oven or a skillet. For the oven, preheat to 350°F (175°C). Place the quesadilla on a baking sheet and heat for about 10 minutes. If using a skillet, add a little oil and heat over medium heat for about 3-4 minutes on each side. Leftover quesadillas can also become a fun breakfast. Chop them up and add them to scrambled eggs for a tasty twist. For more ideas, check out the Full Recipe. Making loaded veggie quesadillas is quick and easy. It takes about 10 minutes to prep. Cooking them takes around 15 minutes. In total, you can make them in about 25 minutes. This makes them a great choice for busy days or quick meals. Yes, you can prep loaded veggie quesadillas in advance. To do this, cook the veggie mixture and let it cool. Then, assemble the quesadillas but do not cook them. Store them in an airtight container in the fridge for up to two days. You can also freeze them for a month. When ready to eat, just cook them straight from the fridge or freezer. This makes meal prepping super easy! You can mix and match many veggies in quesadillas. Some great options include: - Spinach or kale for a green boost - Mushrooms for a savory taste - Zucchini or squash for extra texture - Jalapeños for a spicy kick - Tomatoes for freshness Feel free to get creative! Each veggie adds its own flavor and texture. You can make quesadillas that fit your taste perfectly. For more ideas, check out the Full Recipe. These loaded veggie quesadillas are fun and easy to make. We explored essential ingredients like black beans, bell peppers, and corn. I’ve shared tips for perfect texture, storing leftovers, and creative garnishes. Remember, you can customize them with protein or spices to suit your taste. In the end, these quesadillas are more than just food; they bring flavor and joy. Enjoy making them your own!](https://goldendishy.com/wp-content/uploads/2025/06/a7c52493-2108-4a2f-8f90-ee80e7df7b2a-768x768.webp)