Cheesy Garlic Pull-Apart Bread Delightful and Easy

Welcome to the world of Cheesy Garlic Pull-Apart Bread! This warm, gooey treat is a favorite at any gathering. You’ll love how easy it is to make with just a few simple ingredients like bread, cheese, and garlic. In this guide, I’ll show you step-by-step how to create this delicious dish. Whether for a snack, party, or dinner, it’s sure to impress. Let’s dive in and get baking!
Why I Love This Recipe
- Comfort Food Classic: This cheesy garlic pull-apart bread is the epitome of comfort food, perfect for sharing with family and friends during cozy gatherings.
- Easy to Make: The straightforward steps make this recipe accessible for cooks of all levels, ensuring delicious results every time without the fuss.
- Customizable Flavors: You can easily adapt this recipe by adding your favorite herbs or cheeses, allowing for a personalized touch that suits your taste.
- Impressive Presentation: This bread not only tastes amazing but also looks fantastic when served, making it a showstopper on any table.
Ingredients
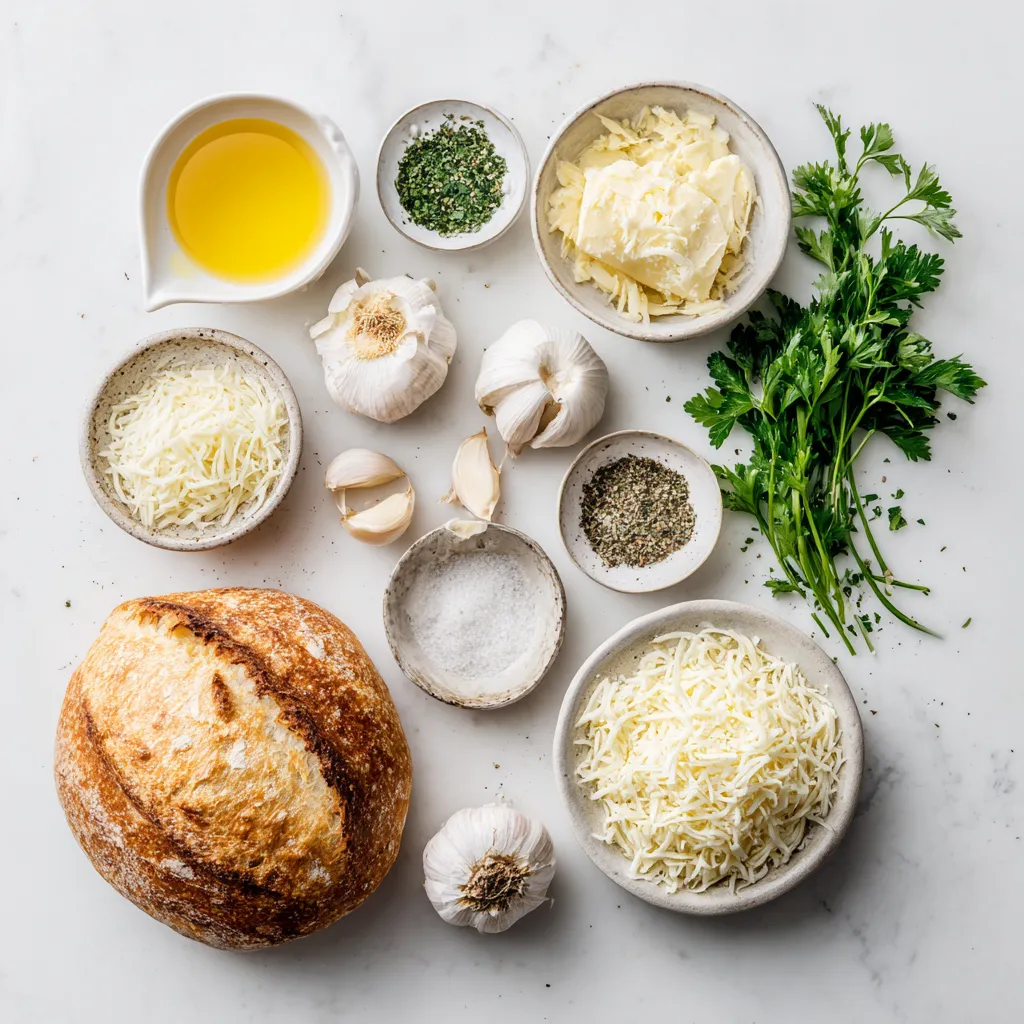
To make Cheesy Garlic Pull-Apart Bread, you need a few simple ingredients. Each one adds flavor and texture. Here’s what you’ll need:
– Bread Type: Choose a large loaf of fresh sourdough or Italian bread. Both give a nice chewy texture.
– Garlic and Herbs: You’ll need 4 cloves of minced garlic, 1 teaspoon of dried oregano, and 1 teaspoon of dried parsley. These ingredients create a fragrant and tasty garlic butter.
– Cheese Varieties: Use 1 cup of shredded mozzarella cheese and 1/2 cup of grated Parmesan cheese. They melt beautifully and add a rich, cheesy flavor.
– Butter and Seasoning: You’ll need 1/2 cup (1 stick) of unsalted butter, melted. Add salt and pepper to taste for extra flavor.
These ingredients work together to make each bite of bread gooey and delicious. They also help create that mouthwatering aroma that fills your kitchen while baking.

Step-by-Step Instructions
Prepping the Oven
First, I preheat my oven to 350°F (175°C). This step gets the oven ready for baking. A hot oven helps the bread bake evenly.
Mixing the Garlic Butter
Next, I grab a medium bowl. I pour in 1/2 cup of melted butter. After that, I add 4 minced garlic cloves. I also include 1 teaspoon of dried oregano and 1 teaspoon of dried parsley. A pinch of salt and pepper adds flavor. I mix everything well and set the garlic butter aside. The aroma will make you eager to bake!
Cutting and Filling the Bread
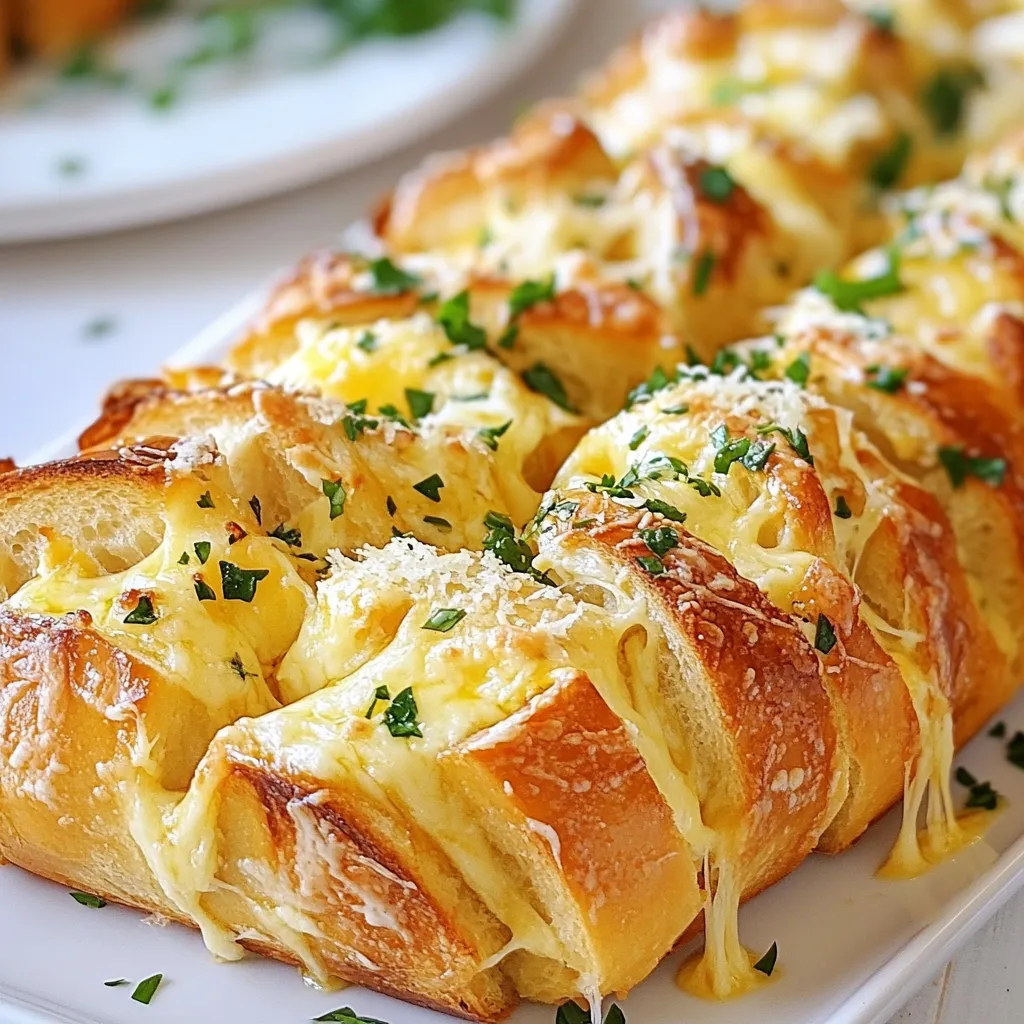
For the bread, I take a large loaf of sourdough or Italian bread. Using a serrated knife, I carefully slice the loaf into 1-inch thick pieces. I ensure not to cut all the way through the bottom. This keeps the loaf intact. Once sliced, I lay the bread on aluminum foil. I drizzle half of the garlic butter over the bread, letting it seep into the slices. Then, I fill each slice with shredded mozzarella cheese and sprinkle Parmesan cheese in the gaps.
Baking Process
I drizzle the rest of the garlic butter on top of the loaf. Then, I wrap the bread in aluminum foil. This creates a sealed package that keeps the bread moist. I place the wrapped loaf on a baking sheet. I bake it for 15 minutes. After that, I carefully open the foil to let the top show. I bake for an additional 10-15 minutes. I watch for the cheese to melt and the top to turn golden brown.
Serving Suggestions
Once the bread is done, I remove it from the oven. I let it cool for a few minutes. If I want, I can garnish it with fresh parsley for color. When it’s time to serve, I place it on a wooden board. This makes it easy for everyone to pull apart the cheesy slices. It’s perfect for sharing with friends or family!
Tips & Tricks
Ensuring Perfect Flavor
To get the best taste from your Cheesy Garlic Pull-Apart Bread, use fresh ingredients. Fresh garlic gives a bold flavor. Opt for high-quality mozzarella and Parmesan cheese for that gooey goodness. Adding a pinch of salt and pepper to the garlic butter enhances the taste. Experiment with herbs like thyme or rosemary for a twist.
Tools and Utensils Needed
Having the right tools makes cooking easier. Here’s what you’ll need:
– Serrated bread knife
– Medium-sized mixing bowl
– Measuring cups and spoons
– Aluminum foil
– Baking sheet
These tools help you prepare and bake the bread without hassle.
Common Mistakes to Avoid
Avoid cutting the bread too deep. You want it to hold together. If you don’t drizzle enough garlic butter, the bread might taste dry. Be sure to stuff plenty of cheese between the slices. Lastly, don’t skip the final baking time; this makes the cheese melt perfectly and creates a crispy top.
Pro Tips
- Choose the Right Bread: Use a fresh sourdough or Italian loaf for the best flavor and texture. These breads have a sturdy crust that holds up well to the fillings and allows for easy pull-apart servings.
- Customize Your Cheeses: Feel free to mix different types of cheeses such as cheddar, gouda, or even a spicy pepper jack for a unique twist. The variety will enhance the flavor profile and add dimension.
- Make Ahead: You can prepare the garlic butter mixture and slice the bread in advance. Store them separately in the fridge, then assemble and bake when you’re ready to serve for a fresh-out-of-the-oven experience.
- Serve with Dips: Enhance your cheesy pull-apart bread experience by serving it with marinara or homemade garlic dip. This adds an extra layer of flavor and an inviting option for your guests.

Variations
Different Cheese Options
You can use many types of cheese in this bread. Mozzarella is the star, but others shine too. Try cheddar for a sharp taste. Gouda adds a rich, smoky flavor. Fontina melts well and gives a creamy texture. Mix and match your favorites for unique bites.
Added Ingredients (Bacon, Veggies)
Want to switch it up? Add cooked bacon for a savory crunch. Just chop it into small bits and tuck it between the bread slices. You can also sneak in veggies. Spinach or roasted peppers add color and nutrients. Just remember to chop them finely.
Flavor Variations (Spicy, Herbal)
If you love heat, sprinkle in some red pepper flakes. This gives the bread a spicy kick. For a fresh taste, add fresh herbs like basil or thyme. These herbs brighten the flavor and smell amazing. Experiment with your favorite spices to find your perfect blend!
Storage Info
How to Store Leftovers
To keep your cheesy garlic pull-apart bread fresh, wrap it tightly in plastic wrap. You can also place it in an airtight container. Store it at room temperature for up to two days. If you want it to last longer, refrigerate it. Just note that refrigeration may dry it out a bit.
Reheating Instructions
When it’s time to enjoy leftovers, preheat your oven to 350°F (175°C). Unwrap the bread and place it on a baking sheet. Heat it for about 10-15 minutes. This warms the bread and melts the cheese again, making it gooey and tasty. You can also microwave individual pieces for about 20-30 seconds. Just be careful not to overheat, or it may become tough.
Freezing and Thawing Tips
If you want to freeze your cheesy garlic pull-apart bread, wrap it well in plastic wrap and then in foil. This keeps it safe from freezer burn. It can stay in the freezer for up to three months. When you’re ready to eat it, thaw it overnight in the fridge. After that, reheat it in the oven to bring back its original texture and flavor.
FAQs
Can I use a different bread type?
Yes, you can use other bread types. Some great options include French bread or ciabatta. These breads can offer a different texture and flavor. Just make sure the bread is fresh and sturdy enough to hold the cheese and garlic butter.
How to make it gluten-free?
To make this dish gluten-free, choose a gluten-free bread. Many stores sell gluten-free options that work well. You can use a gluten-free sourdough or Italian bread. Just ensure that all your other ingredients, like cheese and butter, are also gluten-free.
What can I serve with Cheesy Garlic Pull-Apart Bread?
This cheesy bread pairs nicely with various dishes. Here are some ideas:
– Soups, like tomato or minestrone
– Salads, such as Caesar or mixed greens
– Dips, like marinara or spinach artichoke
These options enhance your meal and keep things tasty.
How to adjust the recipe for a smaller or larger loaf?
To adjust for size, simply change the amount of bread and other ingredients. For a smaller loaf, cut the cheese and butter in half. For a larger loaf, double the ingredients. Just keep the baking time in mind. Check for doneness by looking for bubbly cheese and a golden top.
Cheesy Garlic Pull-Apart Bread combines simple ingredients and clear steps. You learned how to choose bread, mix flavors, and bake perfectly. Remember, you can customize with different cheeses or toppings. With these tips, you can avoid common mistakes. Store leftovers right and enjoy them later. Now you have the know-how to impress friends and family at your next gathering. Get cooking and share your delicious creatio

Cheesy Garlic Pull-Apart Bread
Ingredients
- 1 large loaf fresh sourdough or Italian bread
- 0.5 cup unsalted butter, melted
- 4 cloves garlic, minced
- 1 teaspoon dried oregano
- 1 teaspoon dried parsley
- to taste salt and pepper
- 1 cup shredded mozzarella cheese
- 0.5 cup grated Parmesan cheese
- optional fresh parsley for garnish
Instructions
- Begin by preheating your oven to 350°F (175°C) to prepare for baking.
- In a medium-sized mixing bowl, combine the melted butter, minced garlic, dried oregano, dried parsley, and a pinch of salt and pepper. Mix thoroughly and set this flavorful garlic butter aside.
- With a serrated bread knife, carefully slice the loaf of bread into 1-inch thick slices, ensuring that you don’t cut all the way through the bottom. The goal is to keep the loaf intact for easy pull-apart sections.
- Lay the bread onto a large piece of aluminum foil, leaving it slightly open for easy handling.
- Generously drizzle half of the prepared garlic butter mixture over the bread, making certain to pour some into the crevices between the slices for maximum flavor.
- Stuff each slice with a hearty amount of shredded mozzarella cheese, and sprinkle the grated Parmesan cheese in between the cuts to create a gooey, cheesy experience.
- Take the remaining garlic butter and drizzle it generously over the top of the loaf, ensuring a lovely flavor infusion.
- Carefully wrap the bread in the aluminum foil, creating a sealed package, and place it on a baking sheet to catch any drips.
- Bake the wrapped bread in your preheated oven for 15 minutes. After this time, carefully open the foil to expose the top of the loaf, and continue baking for an additional 10-15 minutes until the cheese is melted, bubbly, and the top turns a delightful golden brown.
- Once done, remove the bread from the oven and allow it to cool for a few minutes before serving. If desired, garnish with freshly chopped parsley for a colorful touch.
- Serve the bread warm, inviting guests to pull apart the cheesy, aromatic slices and enjoy every delicious bite!


![- 1 can refrigerated pizza dough - 4 tablespoons unsalted butter, melted - 4 cloves garlic, finely minced - 1 teaspoon dried oregano - 1 teaspoon dried parsley - 1/2 teaspoon sea salt - 1/4 teaspoon freshly cracked black pepper - Optional toppings: Grated Parmesan cheese To make these breadsticks, you need simple ingredients. The key is the pizza dough. It makes the process quick and easy. The butter and garlic blend perfectly to give a rich flavor. Oregano and parsley add freshness. Sea salt and black pepper enhance all the tastes. - Baking sheet - Parchment paper - Mixing bowl - Knife or pizza cutter - Measuring spoons You will need a few basic kitchen tools. A baking sheet and parchment paper help with easy cleanup. A mixing bowl mixes your garlic butter. A knife or pizza cutter cuts the dough into strips. Measuring spoons ensure you use the right amounts. Using the right ingredients and tools will make your garlic breadsticks tasty and fun to make. You can find the full recipe in the earlier section. Start by preheating your oven to 400°F (200°C). This ensures the oven is hot when you bake. Next, take your can of refrigerated pizza dough. On a clean, lightly floured surface, roll out the dough into a rectangle. Aim for a thickness of about 1/2 inch. A uniform thickness helps the breadsticks bake evenly. Now it’s time to cut the dough into strips. Use a sharp knife or pizza cutter for best results. Cut the dough into strips that are around 1-inch wide. This size is perfect for dipping. Make sure your cuts are even, as this will give you uniform breadsticks. In a small bowl, mix the melted butter with minced garlic, dried oregano, dried parsley, sea salt, and black pepper. Stir well until all the ingredients blend together. This garlic butter mixture adds tons of flavor. Make sure you coat each strip of dough evenly for the best taste. Line a baking sheet with parchment paper. Arrange the breadstick strips on the sheet, leaving about an inch of space between each one. This space allows them to bake evenly. Place the baking sheet in your preheated oven. Bake for 12-15 minutes, until the breadsticks turn golden brown. Keep an eye on them to avoid overbaking. When done, let them cool for a few minutes before serving. Enjoy your garlic breadsticks! For the complete recipe, check the Full Recipe section. To get that perfect breadstick texture, start with a hot oven. A preheated oven at 400°F (200°C) helps brown the breadsticks well. Place your baking sheet in the middle of the oven for even heat. Check them often as they bake. You want them golden brown, not burnt. Keep an eye on them during the last few minutes. If they look golden, they are ready. Overbaking can make them hard. So, watch closely! Adding herbs can boost the flavor of your breadsticks. Try mixing in fresh basil or thyme for a twist. If you like a spicy kick, add red pepper flakes to the garlic butter. You can also try mixing in some Italian seasoning or rosemary. Experimenting lets you find your favorite flavor. Use what you enjoy most! For a fun and creative way to serve your breadsticks, stand them upright in a tall glass. It looks nice and keeps them warm. You can also place them in a basket lined with a cloth. This adds a rustic touch. Pair your breadsticks with marinara sauce or garlic-infused olive oil for dipping. It makes each bite even better. Enjoy the flavors! {{image_4}} For a cheesy twist, you can stuff your breadsticks. First, roll out the pizza dough. Cut it into strips, about 1-inch wide. Place a small piece of cheese in the middle of each strip. Then, fold the dough over the cheese and pinch it to seal. Great cheese options include: - Mozzarella - Cheddar - Cream cheese These cheeses melt well and add a rich flavor. You can make garlic breadsticks even better by using fresh herbs. Try adding chopped basil or thyme to the garlic butter mix. This adds a bright flavor. You can also mix in a little lemon zest. It brightens up the taste even more. Combining flavors is easy. Use sun-dried tomatoes or olives in the dough. These give a unique twist to your breadsticks. If you want a vegan version, swap out the butter. You can use olive oil or vegan butter. Both give great flavor without dairy. Also, check your pizza dough. Some brands have dairy, so look for vegan options. Adjust your garlic butter mix to include your chosen fat. Enjoy the same delicious taste without any animal products. For the full recipe, check out the [Full Recipe]. To keep your leftover breadsticks fresh, follow these tips: - Refrigeration: Place the breadsticks in an airtight container. This helps keep them soft and tasty. They will last for up to three days in the fridge. - Freezing: For longer storage, freeze the breadsticks. Wrap them tightly in plastic wrap and then in foil. This prevents freezer burn. They can be frozen for up to three months. When you want to enjoy your breadsticks again, reheating is key. Here are two popular methods: - Oven Method: Preheat your oven to 350°F (175°C). Place the breadsticks on a baking sheet. Heat them for about 10 minutes. This will make them warm and crisp. - Microwave Method: If you need a quick fix, use the microwave. Place the breadsticks on a microwave-safe plate. Cover them with a damp paper towel. Heat for about 20-30 seconds. This keeps them soft but may not give the same crispness as the oven. Yes, you can use homemade pizza dough for these breadsticks. Just make sure your dough is soft and easy to roll out. If you choose to use a thicker dough, you may need to bake it a bit longer. Roll the dough to about 1/2 inch thick. This thickness helps the breadsticks cook evenly. Remember to season your garlic butter mixture well, as homemade dough can absorb flavors differently. To make gluten-free garlic breadsticks, use a gluten-free pizza dough mix. Many brands offer ready-made options. You can also make it from scratch with gluten-free flour. Make sure to follow the instructions on the package for best results. Add the same garlic butter mixture for great flavor. This way, everyone can enjoy tasty garlic breadsticks! Garlic breadsticks are great with many meals. They go well with pasta dishes, like spaghetti or fettuccine alfredo. You can also serve them with soups, like minestrone or tomato basil. For drinks, pair them with a light salad or a refreshing sparkling water. You can even enjoy them with a glass of red wine if you prefer. The flavors of garlic and herbs complement many dishes, making them a versatile side! You now know how to make easy garlic breadsticks from simple ingredients. With just a few steps, you can prepare delicious breadsticks that add flavor to any meal. Remember to experiment with toppings and herbs to create your own unique twist. Store any leftovers properly, or even freeze them for later. Enjoy baking these treats and sharing them with others. Your homemade garlic breadsticks will surely impress everyone!](https://goldendishy.com/wp-content/uploads/2025/07/3052f1a4-9d5f-43ae-ba15-9488150fef43-768x768.webp)

. - Combine 1 cup warm water, 2 ¼ teaspoons yeast, and 1 teaspoon sugar. - Let this sit for 5-10 minutes until it becomes frothy. This means the yeast is ready. - In a large bowl, mix 3 cups flour and 1 teaspoon salt. - Pour in the activated yeast mixture and 2 tablespoons olive oil. - Use your hands to mix until a sticky dough forms. - Place the dough on a floured surface and knead for about 5 minutes. - The goal is a smooth and elastic dough. - Lightly grease a bowl and place the kneaded dough inside. - Cover it with a kitchen towel and let it rise for 1 hour. - Once it doubles in size, gently punch it down to release air. - Roll the dough into a rectangle, about ½ inch thick. - Transfer it to a baking sheet, and score it into breadstick shapes. You can find the complete process in the Full Recipe. To make great breadsticks, check your dough's texture. The dough should feel smooth and soft. If it sticks to your fingers, it is too wet. If it pulls away cleanly, you’re on the right track. Knead it until it is elastic. This gives you that perfect bite. For the best results, preheat your oven to 425°F (220°C). This hot oven helps the breadsticks puff up and get golden. Line your baking sheet with parchment paper. This keeps your breadsticks from sticking and makes cleanup easy. Bake for 12-15 minutes. Watch for a golden brown color, that means they are ready! Want to spice things up? You can add extra flavors to your breadsticks. Try adding crushed red pepper for heat or fresh basil for a hint of sweetness. You can also use different cheeses. Cheddar or pepper jack can give you a fun twist. Mix and match to find your favorite! For the full recipe, check out the detailed steps. {{image_4}} You can change the cheese to make each batch unique. Try using cheddar for a sharp taste. Pepper jack adds a fun spicy kick. Mix and match cheeses to create your favorite flavor. Just remember, the more cheese, the better! If you want a vegan option, use plant-based cheese. There are many tasty brands available today. You can also make a garlic spread with olive oil and herbs instead of butter. This keeps the flavor rich while being dairy-free. Add fresh herbs to bring new life to your breadsticks. Chopped basil or thyme can add a lovely aroma. You can mix herbs into the dough or sprinkle them on top before baking. These small changes make a big difference. Try one of these variations next time you bake your cheesy garlic breadsticks using the Full Recipe! To store leftover breadsticks, let them cool completely first. Place them in an airtight container. This keeps them fresh. You can also wrap them in plastic wrap. Store them at room temperature for up to two days. If you want them to last longer, keep them in the fridge. Just remember, cold breadsticks can lose some of their warmth. Freezing is a great way to keep these breadsticks tasty for later. After they cool, wrap each breadstick in plastic wrap. Then, place them in a freezer bag. Make sure to remove as much air as possible. This helps avoid freezer burn. To reheat, take them out and let them thaw first. Then, bake them at 350°F (175°C) for about 10 minutes. They will taste fresh again! When stored properly, these breadsticks stay fresh for about two days at room temperature. In the fridge, they can last up to a week. If frozen, they can last for about three months. Just remember, the sooner you eat them, the better they will taste. For more details, check the Full Recipe. To make your breadsticks extra cheesy, you can add more cheese. Here are some tips: - Use a blend of mozzarella and cheddar for depth. - Sprinkle cheese on top before baking. - Add cheese to the dough for a cheesy base. - Mix in cream cheese with your garlic butter for a rich flavor. Each of these tips gives your breadsticks a gooey, cheesy texture. It enhances the flavor and makes every bite delightful. Yes, you can prepare these breadsticks ahead of time! Here’s how: - Make the dough and let it rise. - Shape the breadsticks and cover them with plastic wrap. - Store in the fridge for up to 24 hours. When you are ready, just take them out to rise a bit more and bake. This method saves time and allows you to enjoy fresh breadsticks without the fuss. Dipping sauces elevate your cheesy garlic breadsticks. Here are some great options: - Marinara sauce adds a classic touch. - Garlic butter enhances the garlic flavor. - Ranch dressing offers a creamy contrast. - Alfredo sauce gives a rich, cheesy dip. These dips not only complement the breadsticks but also add fun flavors to each bite. You can mix and match to find your perfect pairing! In this post, I shared how to make delicious cheesy garlic breadsticks. We covered essential ingredients, step-by-step instructions, and helpful tips. I also shared variations if you want something different. Now, you have the tools and knowledge to create your own. Enjoy these tasty treats with family or friends. Happy cooking!](https://goldendishy.com/wp-content/uploads/2025/06/f014268d-bdac-4f9e-9ca6-06fbafbccd76-768x768.webp)