Cheesy Chicken Alfredo Lasagna Comforting and Delicious

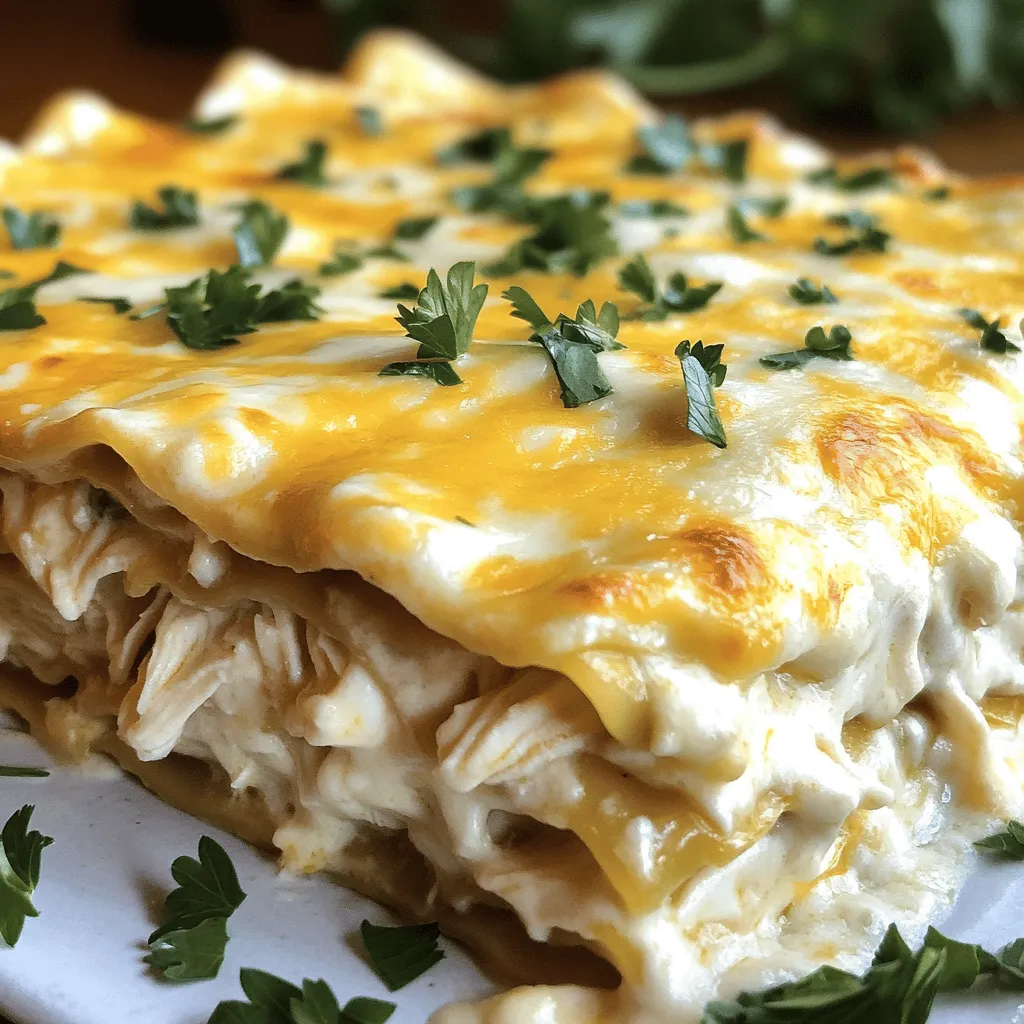
Craving comfort food? Look no further! My Cheesy Chicken Alfredo Lasagna is a warm hug on a plate. With layers of creamy sauce, tender chicken, and melty cheese, this dish leaves no room for leftovers. I’ll guide you through each simple step, help you choose fresh ingredients, and share tips to make it your own. Let’s turn mealtime into a delightful experience!
Ingredients
List of Required Ingredients
To make Cheesy Chicken Alfredo Lasagna, gather these items:
– 12 lasagna noodles
– 2 cups cooked chicken, shredded
– 3 cups Alfredo sauce (store-bought or homemade)
– 2 cups ricotta cheese
– 2 cups shredded mozzarella cheese
– 1 cup grated Parmesan cheese
– 1 tablespoon olive oil
– 1 teaspoon garlic powder
– 1 teaspoon Italian seasoning
– Salt and black pepper to taste
– Fresh parsley, finely chopped, for garnish
Ingredient Substitutions
You can adjust some ingredients if needed. Here are a few swaps:
– Lasagna Noodles: Use no-boil noodles for quicker prep.
– Chicken: Swap chicken for cooked turkey or even shredded veggies for a meatless option.
– Cheeses: Substitute ricotta with cottage cheese or cream cheese for a different taste.
– Alfredo Sauce: Make your own using butter, cream, and cheese, or use a vegan option.
Importance of Fresh Ingredients
Using fresh ingredients makes a huge difference. Fresh chicken tastes better and adds more flavor. Fresh herbs, like parsley, brighten the dish. Quality cheeses melt better and create that perfect gooey texture. Plus, fresh ingredients are often healthier and can make your cooking experience more enjoyable. Always choose the best you can find for the best results.
Step-by-Step Instructions
Prepping the Oven and Noodles
First, you need to preheat your oven to 375°F (190°C). This step is key for even cooking. While the oven warms up, fill a large pot with water and add a pinch of salt. Bring the water to a boil. Once it’s bubbling, add the lasagna noodles. Cook them until they are al dente, usually about 8-10 minutes. After cooking, drain the noodles and lay them flat on a kitchen towel. This prevents them from sticking together.
Preparing the Chicken Mixture
Next, grab a medium-sized mixing bowl. Here, you will combine your shredded chicken with 1 cup of Alfredo sauce, garlic powder, Italian seasoning, and a pinch of salt and pepper. Mix everything well until the chicken is fully coated. Allow this mixture to sit for a few minutes. This resting time lets the flavors blend beautifully.
Assembling the Lasagna Layers
Now, it’s time to build your lasagna! Start by spreading a thin layer of Alfredo sauce at the bottom of a greased 9×13 inch baking dish. Lay down 3 lasagna noodles side by side on the sauce. Take half of the ricotta cheese and dollop it on the noodles. Use a spatula to spread it evenly. Add half of the chicken mixture on top, covering the noodles fully. Sprinkle 1 cup of shredded mozzarella and 1/3 cup of Parmesan cheese over the chicken.
Repeat these layers. Add 3 more noodles, the remaining ricotta, the rest of the chicken mixture, and another cup of mozzarella. For the final layer, place the last 3 noodles on top. Cover these noodles generously with the remaining Alfredo sauce. Top with the rest of the mozzarella and Parmesan cheese to create a cheesy crust.
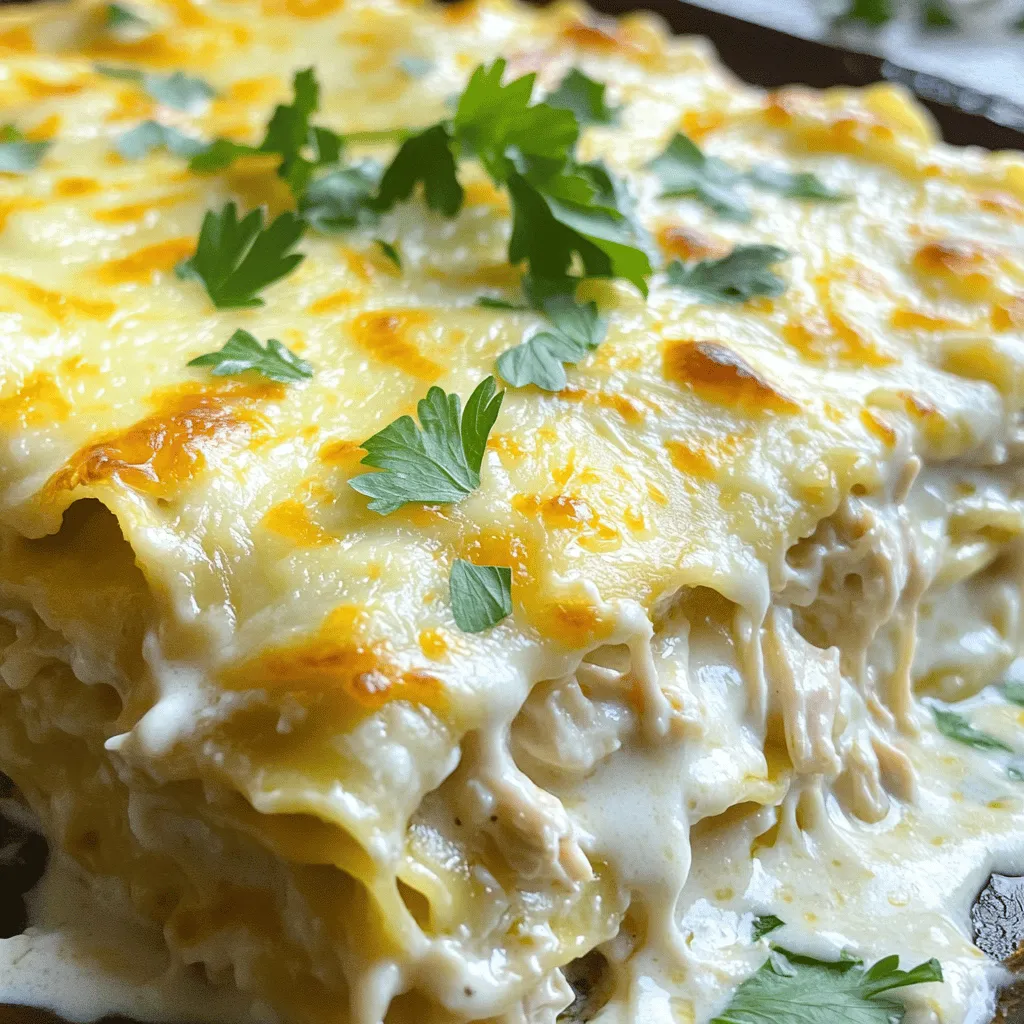
Cover the baking dish with aluminum foil. This keeps the moisture in. Bake for 25 minutes. After that, remove the foil. Bake for an extra 15-20 minutes until the cheese is golden and bubbly. Let the lasagna cool for 10 minutes before slicing. This helps the layers hold together. Garnish with fresh parsley for a pop of color. Enjoy your Cheesy Chicken Alfredo Lasagna!
Tips & Tricks
How to Prevent Soggy Lasagna
To keep your lasagna from being soggy, cook your noodles al dente. This means they should still be firm. After cooking, lay them flat on a towel. This helps them dry out a bit. Also, use less sauce in your layers. Too much sauce can make the lasagna wet.
Best Practices for Layering
Layering is key for a great lasagna. Start with sauce on the bottom. This helps the noodles not stick. Then, place three noodles side by side. Spread ricotta evenly, then add the chicken mix. Don’t rush; make sure each layer is nice and even. Repeat layers until you run out of noodles.
Tips for the Perfect Cheese Crust
For a great cheese crust, add more cheese on top. Use a mix of mozzarella and Parmesan. This gives a nice flavor and texture. Cover the dish with foil for the first part of baking. Remove it for the last 15-20 minutes. This helps the cheese get golden and bubbly.
These tips will help you make a delicious Cheesy Chicken Alfredo Lasagna.

Variations
Vegetarian Cheesy Alfredo Lasagna
You can make a tasty vegetarian version of this dish. Just swap out the chicken for your favorite veggies. Think mushrooms, zucchini, or bell peppers. Each of these adds great flavor. You still use the same layers of sauce and cheese. This keeps the creamy and cheesy goodness intact.
Adding Spinach or Other Vegetables
Adding spinach is a great idea for this lasagna. It packs in nutrients and brings a nice color. Just chop fresh spinach and mix it with the ricotta. You can also try other vegetables like broccoli or kale. Just remember to sauté them first to reduce moisture. This helps keep your lasagna from getting soggy.
Using Different Types of Cheese
Don’t feel limited to just mozzarella and Parmesan. You can mix it up with different cheeses. Try adding provolone, gouda, or even a bit of feta. Each type gives a unique taste. Mixing cheeses adds depth to the flavor. It also makes the dish extra cheesy and delicious.
Storage Info
How to Store Leftovers
To keep your Cheesy Chicken Alfredo Lasagna fresh, let it cool first. Cover it tightly with plastic wrap or foil. You can also place it in an airtight container. Store it in the fridge for up to three days. This helps keep the flavors nice and fresh.
Reheating Instructions
When you’re ready to enjoy your leftovers, preheat your oven to 350°F (175°C). Place the lasagna in an oven-safe dish and cover it with foil. Heat for about 20-25 minutes, or until it’s warmed through. You can also microwave individual slices for a quick meal. Just heat for about 1-2 minutes, checking to avoid overheating.
Freezing for Later Use
If you want to save your lasagna for later, freezing is a great option. Cut it into portions and wrap each piece in plastic wrap. Then, place them in a freezer-safe bag or container. This way, you can enjoy it for up to three months. When ready to eat, thaw it overnight in the fridge. Then, reheat it using the instructions above or bake it from frozen at 375°F (190°C) for 45-60 minutes.
FAQs
Can I prepare Cheesy Chicken Alfredo Lasagna in advance?
Yes, you can make Cheesy Chicken Alfredo Lasagna ahead of time. Just assemble it without baking. Cover it tightly and store it in the fridge. When you are ready to eat, bake it straight from the fridge. This will save you time on busy days.
What can I serve with Cheesy Chicken Alfredo Lasagna?
I love serving this dish with a simple salad. A fresh green salad adds a nice crunch. You can also pair it with garlic bread. Both options balance the creamy flavors of the lasagna.
How long does Cheesy Chicken Alfredo Lasagna last in the fridge?
It lasts about 3 to 5 days in the fridge. Just make sure to keep it covered. If you want it to last longer, you can freeze it. It will be good for up to 3 months in the freezer.
Can I use homemade Alfredo sauce?
Absolutely! I often use homemade Alfredo sauce for better flavor. Making it from scratch allows you to control the ingredients. This makes your lasagna even more special. If you need a quick recipe for Alfredo, let me know!
In this post, we covered the key steps to make Cheesy Chicken Alfredo Lasagna. We looked at what ingredients you need and how to substitute them. We also discussed the importance of fresh items for great flavor.
I shared tips to avoid soggy layers, how to layer properly, and ways to get a nice cheese crust. You can even try fun variations like adding spinach or using different cheeses.
Finally, I gave you storage tips for leftovers. Enjoy making your lasagna! It’s a hearty dish that never disappoints.


![- Bell peppers: Choose bright colors like red, yellow, or orange. These colors not only look great but also add natural sweetness. Each pepper holds the filling nicely and provides a tasty bite. - Quinoa: Rinse the quinoa well under cold water. This step removes the bitter coating called saponin. Rinsing ensures your quinoa has a clean, nutty flavor that shines in the dish. - Vegetable broth: Use low-sodium broth for better control of the flavor. It enhances the taste of quinoa and adds depth to the dish. You can also try homemade broth for a fresher taste. - Ground spices: Cumin, smoked paprika, and chili powder are key. Cumin gives an earthy flavor, while paprika adds a hint of smokiness. Chili powder can amp up the heat level, making your dish exciting. - Beans and corn: Black beans add protein and fiber, making the meal hearty. Corn brings sweetness and crunch, creating a balanced texture. Both ingredients make the filling more nutritious and filling. - Cheese alternatives: Depending on your diet, choose cheddar for a classic taste or opt for a dairy-free cheese. Both melt well and enhance the flavors, giving a creamy finish to each stuffed pepper. For the full list of ingredients, check the Full Recipe. Start by preheating your oven to 375°F (190°C). This step matters because the right heat cooks the peppers evenly and makes them tender. While the oven warms up, you can prepare the bell peppers. Cut the tops off and scoop out the seeds and membranes inside. Stand the peppers upright in a baking dish. This helps them stay stable while they bake. Next, it’s time to cook the quinoa. In a medium saucepan, add 1 cup of rinsed quinoa and 2 cups of vegetable broth. Bring it to a boil, then lower the heat. Cover and let it simmer for about 15 minutes. You want the quinoa to be fluffy and all the liquid should be gone. While the quinoa cooks, you can mix the filling. In a large bowl, combine the fluffy quinoa, black beans, corn, diced tomatoes, cumin, smoked paprika, and chili powder. Add salt and pepper to taste. Make sure everything is mixed well to ensure a consistent flavor in every bite. Now comes the fun part—stuffing the peppers! Use a spoon to fill each bell pepper with your quinoa mixture. Pack it down gently to fit as much filling as possible. Once filled, sprinkle a good amount of cheese on top of each pepper. Cover the baking dish with aluminum foil and place it in the oven. Bake for 25 minutes. After that, remove the foil and bake for another 10 minutes. This helps the cheese melt and become bubbly. The peppers should be tender but still hold their shape. Once done, take the dish out and let it cool for a few minutes. Right before serving, add fresh cilantro or parsley on top for a nice touch. For the full recipe, check out the details provided earlier. To achieve fluffy quinoa, rinse it well before cooking. Rinsing removes the bitter coating called saponin. Use a fine mesh strainer for this step. Then, cook the quinoa in the right ratio of water to quinoa. I recommend 2 cups of vegetable broth for every 1 cup of quinoa. Bring it to a boil, then simmer for 15 minutes. This way, the quinoa will be light and fluffy. When baking your stuffed peppers, timing is key. Start by covering the dish with foil for the first 25 minutes. This keeps the moisture in, helping the peppers cook evenly. After that, remove the foil and bake for an extra 10 minutes. This will make the cheese melt perfectly and the peppers tender but not mushy. For presentation, serve your stuffed peppers on a large platter. Sprinkle extra herbs like cilantro or parsley around for a fresh look. A drizzle of olive oil or a squeeze of lime juice adds brightness and flavor. As for side dishes, consider a simple green salad or some roasted vegetables. These pair well with the peppers and add color to your meal. A light white wine or sparkling water complements the dish nicely, enhancing your dining experience. For the full recipe, check out [Full Recipe]. {{image_4}} What can I use instead of black beans? You can swap in other legumes like chickpeas or kidney beans. Each offers unique flavors and textures. Chickpeas add a nutty taste, while kidney beans bring a soft bite. Both boost protein and fiber, making your meal heartier. Can I add meat to my stuffed peppers? Yes! Chicken or turkey works great. Use cooked ground meat for easy mixing. This adds a savory depth to your dish. Just remember to season the meat well for the best flavor. How can I change the spices? Explore with different spices to create new flavors. Try adding oregano for a Mediterranean twist or curry powder for a bold kick. Each spice changes the overall taste, making your stuffed peppers exciting. Can I use different veggies? Absolutely! Seasonal vegetables like zucchini, spinach, or mushrooms can enhance your filling. They add more nutrients and variety. Just chop them finely and mix them in with your quinoa and beans. For the full recipe, check out the details above. After enjoying your quinoa stuffed bell peppers, store leftovers in the fridge. Place them in an airtight container. This keeps them fresh for up to four days. If you plan to eat them later, consider freezing them. To freeze, wrap each pepper in plastic wrap. Then place them in a freezer-safe bag or container. Make sure to remove as much air as possible. Properly stored, they can last for up to three months in the freezer. When it’s time to enjoy your stuffed peppers again, you can reheat them in several ways. The oven is my favorite method. Preheat it to 350°F (175°C). Place the peppers in a baking dish and cover with foil. Bake for about 20 minutes, or until heated through. You can also use the microwave for quick reheating. Simply place a pepper on a microwave-safe plate. Cover it with a paper towel to keep moisture in. Heat it for about 2-3 minutes, checking to avoid overheating. If you prefer the stovetop, heat a skillet over medium heat and add a little water. Place the peppers in the skillet and cover. Heat for about 5-7 minutes, turning occasionally. To keep the texture nice, avoid sogginess. When reheating, do not add extra moisture or cover too tightly. This will help maintain that delightful crunch of the peppers. For the full recipe, visit the [Full Recipe]. How long do quinoa stuffed peppers last in the fridge? Quinoa stuffed peppers can last about 3 to 5 days in the fridge. Store them in an airtight container to keep them fresh. If you want to enjoy them later, just heat them up in the oven or microwave. Can I make quinoa stuffed peppers ahead of time? Yes, you can prepare quinoa stuffed peppers ahead of time. Stuff the bell peppers and store them in the fridge. Bake them when you’re ready to eat. This makes meal prep easy and convenient. What can I substitute for quinoa in this recipe? If you want to swap out quinoa, try using brown rice or couscous. Both options provide a nice texture. Just remember to adjust cooking times as needed for these ingredients. Are quinoa stuffed peppers healthy? Yes, quinoa stuffed peppers are healthy. They’re packed with protein, fiber, and vitamins. Quinoa is a complete protein, making this dish a great choice for a balanced meal. Gluten-free options: Ensuring a safe meal for all Quinoa is naturally gluten-free, so this dish is safe for gluten-sensitive people. Just check your labels for any added ingredients that might contain gluten. Vegetarian vs. vegan: Key differences in ingredients Vegetarian quinoa stuffed peppers include cheese, while vegan ones use dairy-free cheese. Both versions are delicious. Choose based on your dietary needs. Quinoa stuffed bell peppers use fresh ingredients and bold flavors for a tasty meal. First, choose colorful bell peppers and rinse the quinoa for the best taste. Use ground spices and beans to boost nutrition. Follow the steps closely for perfect results, and don’t forget to try different flavors and proteins. Store leftovers well to enjoy later. Healthy and easy, this dish fits any dinner. You can impress friends and family while eating well! So, get cooking and enjoy every bite of your delicious creation.](https://goldendishy.com/wp-content/uploads/2025/06/de4f4195-310c-4430-9b68-8374d14e079c-768x768.webp)

![- 2 cups elbow macaroni - 4 cups water - 1 teaspoon salt - 2 tablespoons unsalted butter - 1 cup sharp cheddar cheese, shredded - 1 cup Monterey Jack cheese, shredded - 1/2 cup cream cheese, softened - 1 teaspoon garlic powder - 1 teaspoon onion powder - 1/4 teaspoon black pepper - 1/4 teaspoon smoked paprika - Fresh parsley, chopped - Chives, chopped To make delicious Instant Pot mac and cheese, you need a few key ingredients. First, the elbow macaroni is your base. It holds the sauce well and cooks up perfectly. Water helps cook the pasta and creates steam. The salt adds flavor to the mix. Unsalted butter enriches the dish, making it creamy. Next, the cheese! Cheddar cheese gives that classic flavor, while Monterey Jack adds creaminess. Cream cheese helps bind everything together. For seasonings, garlic powder and onion powder bring depth. Black pepper adds a bit of heat. Smoked paprika gives a nice smoky touch. Finally, if you want to garnish, fresh parsley and chives add color and flavor. These ingredients come together to create a comforting dish that feels like a hug in a bowl. You can find the full recipe [here]. Start by adding the elbow macaroni into the Instant Pot. Next, pour in 4 cups of water. Sprinkle in 1 teaspoon of salt for flavor. Make sure all the macaroni is covered in water. Secure the lid tightly on the Instant Pot. Set the pressure release valve to the sealing position. Select the manual high-pressure setting. Adjust the timer to cook for 4 minutes. When the cooking cycle ends, do a quick pressure release. Carefully turn the valve to venting. Wait until the pressure is fully released. Open the lid slowly, being cautious of steam. Stir the noodles gently to separate any that are stuck together. Add 2 tablespoons of butter right away. Then, mix in 1 cup of sharp cheddar cheese, 1 cup of Monterey Jack cheese, and 1/2 cup of softened cream cheese. Next, add 1 teaspoon of garlic powder, 1 teaspoon of onion powder, 1/4 teaspoon of black pepper, and 1/4 teaspoon of smoked paprika. Stir well until the cheese melts into a creamy sauce. If your mac and cheese is too thick, add a splash of water or milk. Stir until it reaches your desired creamy consistency. Taste your mac and cheese and adjust the seasoning as needed. You can add a pinch more salt or pepper if you want. Serve your dish hot and enjoy the creamy comfort of this Instant Pot mac and cheese. For the full recipe, check the details above. To make your mac and cheese shine, choose a mix of cheeses. I love sharp cheddar for its bold taste and Monterey Jack for creaminess. Together, they create a rich flavor that sings. For a twist, add a bit of gouda or parmesan for depth. Preventing sticking is key. Make sure to stir the pasta before cooking. Adding a touch of oil helps too. This keeps the macaroni from clumping together in the pot. Cook in larger batches to save time. The Instant Pot can handle it! You can double the recipe easily. This way, you have leftovers for quick meals later. Just store them in the fridge. Clean-up can be quick if you act fast. Rinse the pot right after use. Soaking it for a few minutes also helps. Use a soft sponge to keep it scratch-free. For a stunning display, serve your mac and cheese in a beautiful bowl. Top it with extra cheese or crispy breadcrumbs for texture. Fresh herbs like parsley or chives add color and flavor too. Pair your dish with a simple salad or garlic bread. This makes a balanced meal that everyone will enjoy. {{image_4}} You can switch up the cheese for fun. Try using Gouda for a rich taste. It melts well and adds creaminess. Parmesan also works great. It gives a salty, nutty kick. If you're dairy-free, nut cheese is a good choice. It can make your dish creamy while keeping it plant-based. Want to make your mac and cheese more exciting? Add veggies! Broccoli or spinach mixes in nicely. They boost both flavor and nutrition. You can also throw in proteins like chicken or bacon. These ingredients add heartiness and make the dish more filling. If you like heat, spice it up! Add jalapeños for a fresh kick. Hot sauce can also bring the heat. Another fun idea is using smoky chipotle. It gives a deep, smoky flavor that pairs well with cheese. These spicy twists can take your mac and cheese to the next level. For the full recipe, check out the instructions above. Enjoy creating your perfect bowl of mac and cheese! After you make your Instant Pot mac and cheese, let it cool down first. This helps keep the creamy texture. Once cooled, place it in an airtight container. I like to use glass containers for easy reheating. Store it in the fridge for up to three days for the best taste. When it’s time to enjoy those leftovers, you can reheat them in two ways. The microwave is quick and easy. Just place a portion in a bowl and cover it. Heat for one minute, stir, and heat again if needed. The stovetop method keeps the texture nice. Add a splash of milk to a pan, stir in the mac and cheese, and heat on medium until hot. You can freeze mac and cheese for later! Let it cool completely, then spoon it into freezer-safe bags. Press out as much air as possible before sealing. It can stay fresh for about three months. To thaw, move it to the fridge overnight. After thawing, reheat it using the stovetop method for a creamy finish. To make Instant Pot Mac and Cheese, you start by adding elbow macaroni to the pot. Pour in water and add salt. Then, secure the lid and cook on high pressure for 4 minutes. After that, release the pressure quickly. Open the lid and stir the pasta. Add butter and mix in your cheeses. Finally, stir in the seasonings until smooth. You can find the full recipe for more details. Yes, you can use gluten-free macaroni. Just substitute regular pasta with gluten-free options. The cooking time may stay the same, but check the package for specific instructions. Some gluten-free pasta might need a little less time, so watch closely. This way, you can enjoy a creamy dish without gluten. If your mac and cheese is too thick, don’t worry! You can fix it easily. Add a splash of water or milk to the pot. Stir well until it reaches your desired creaminess. If it still seems thick, add a bit more liquid. This will help create that perfect velvety texture. You learned how to make Instant Pot mac and cheese with ease. We covered ingredients, cooking steps, and tips for perfect flavor. You can customize your dish with different cheeses and add-ins. Remember to store leftovers properly to enjoy later. Now it’s your turn to create a creamy, cheesy delight. Experiment with flavors and share your results! Enjoy your cooking journey.](https://goldendishy.com/wp-content/uploads/2025/07/fbbf4859-6ee8-4460-a645-018ee95cc89f-768x768.webp)
