Cheesy Cauliflower Gratin Creamy and Flavorful Dish

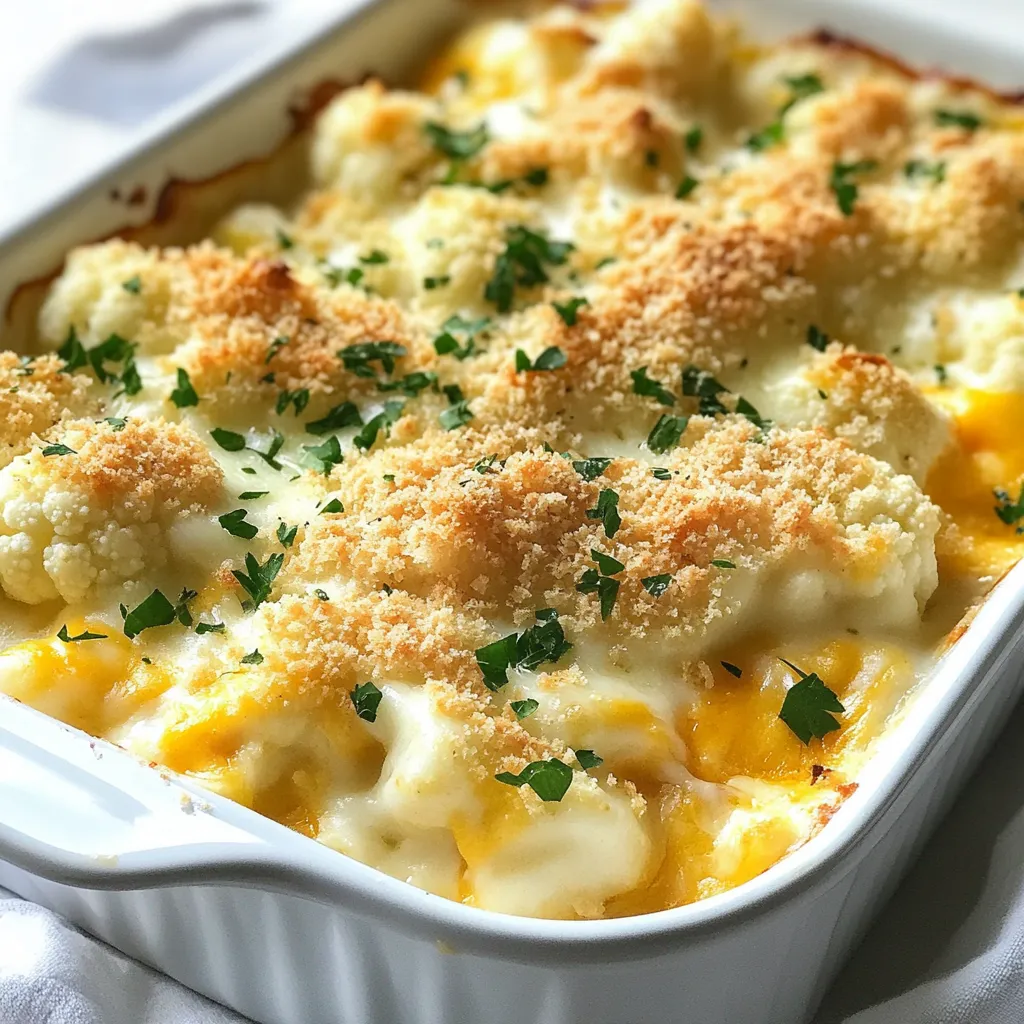
If you love creamy, cheesy dishes, you’ll adore this Cheesy Cauliflower Gratin. It’s a perfect blend of tender cauliflower smothered in rich cheddar and parmesan cheese. With just a few simple ingredients and easy steps, you’ll whip up a dish that’s both comforting and delicious. Let’s dive into this flavorful recipe that will impress your family and friends, and maybe even make cauliflower a favorite!
Why I Love This Recipe
- Comforting Dish: This cheesy cauliflower gratin is the ultimate comfort food, combining creamy cheese sauce with tender cauliflower for a satisfying meal.
- Easy to Prepare: With straightforward steps and simple ingredients, this recipe is perfect for both beginner and experienced cooks alike.
- Versatile Ingredients: Feel free to customize the cheese blend or add other vegetables, making it a flexible dish for any occasion.
- Impressive Presentation: The golden, bubbly topping and vibrant green parsley garnish create an eye-catching dish that’s great for entertaining.
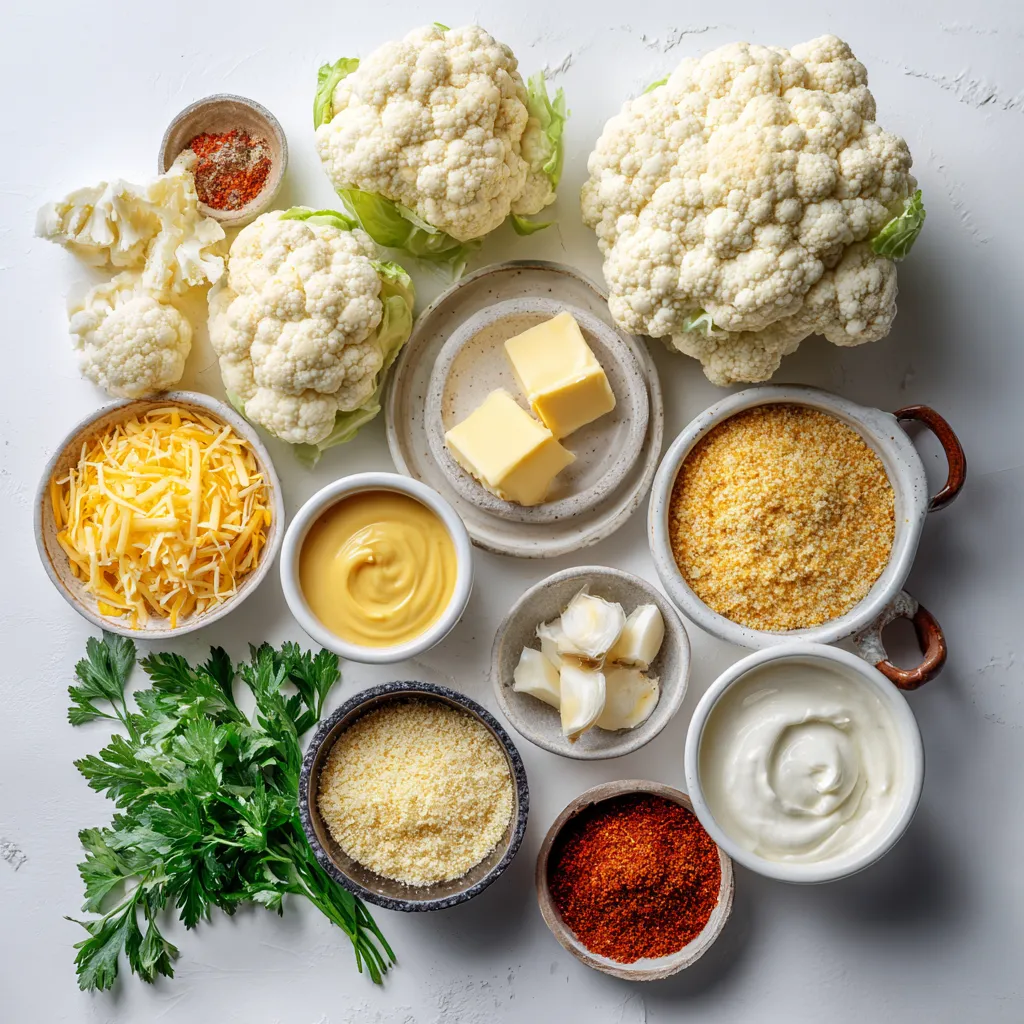
Ingredients
Main Ingredients
– 1 medium head of cauliflower, cleaned and cut into bite-sized florets
– 2 cups sharp cheddar cheese, shredded
– 1 cup Parmesan cheese, grated
– 1 cup heavy cream
Seasonings and Extras
– 2 cloves garlic, minced
– 1 teaspoon Dijon mustard
– 1 teaspoon smoked paprika
– ½ teaspoon salt
– ¼ teaspoon freshly cracked black pepper
– ½ cup breadcrumbs (optional, for a crunchy topping)
Garnish
– Fresh parsley, chopped
In this dish, cauliflower shines as the star. The cheese brings a rich taste that makes it special. I love using sharp cheddar; it adds that tangy kick. Parmesan also gives depth, making the flavor pop. Heavy cream makes everything creamy and dreamy.
For seasonings, garlic adds a nice warmth. Dijon mustard gives a little zing, and smoked paprika adds a hint of smokiness. Salt and pepper balance all the flavors together. If you want some crunch, sprinkle breadcrumbs on top before baking.
Finally, fresh parsley is a must for garnish. It adds color and freshness to the dish. When you serve this gratin, the blend of creamy cheese and tender cauliflower will impress everyone.

Step-by-Step Instructions
Preparation Steps
1. Preheat the oven: Start by preheating your oven to 375°F (190°C). This step ensures a perfect bake for your gratin.
2. Blanch the cauliflower: Bring a large pot of salted water to a boil. Once boiling, add your cauliflower florets. Blanch them for about 3-4 minutes. You want them tender but still crisp. After blanching, drain the florets in a colander and set them aside.
Sauce Preparation
1. Make the cheese sauce: In a medium saucepan, melt 2 tablespoons of unsalted butter over medium heat. Once it’s melted, add 2 cloves of minced garlic. Sauté until the garlic is fragrant, about 1 minute.
2. Add spices and cheeses: Stir in 1 cup of heavy cream, 1 teaspoon of Dijon mustard, 1 teaspoon of smoked paprika, ½ teaspoon of salt, and ¼ teaspoon of black pepper. Let this mixture come to a gentle simmer. Then, gradually add 2 cups of shredded sharp cheddar and half of 1 cup of grated Parmesan cheese. Stir until the cheese melts and the sauce is smooth.
Combining and Baking
1. Mix cauliflower with cheese sauce: In a large mixing bowl, combine the blanched cauliflower with the cheese sauce. Use a spatula to coat each floret.
2. Transfer to baking dish and bake: Pour the cauliflower and cheese mixture into a greased baking dish. If you like a crunchy top, sprinkle the remaining Parmesan cheese and ½ cup of breadcrumbs over the mixture. Bake in the preheated oven for 25-30 minutes. The dish is ready when the top is bubbly and golden brown.
Tips & Tricks
Perfecting the Cheese Sauce
To make the cheese sauce smooth, use low heat. This helps melt the cheese without burning it. Stir the cheese in slowly. Sharp cheddar and Parmesan blend well to create a rich flavor. Adjust the salt and pepper to your taste. You want a balance that makes the sauce shine.
Blanching the Cauliflower
Blanching makes the cauliflower tender and keeps it bright. Cook it for 3-4 minutes in boiling water. If you overcook, it turns mushy. If you want a crispier bite, try roasting the cauliflower first. It adds a nice flavor and texture to the dish.
Baking Techniques
For a golden crust, use the broiler for the last few minutes. Watch closely to avoid burning. If you like it creamier, bake for less time. Adjust the cooking time based on your personal preference. Remember, every oven heats differently, so check often.
Pro Tips
- Blanching is Key: Ensure you don’t over-blanch the cauliflower; it should remain slightly crisp to avoid becoming mushy during baking.
- Cheese Choice Matters: Opt for a sharp cheddar for a more robust flavor. Mixing different cheeses like Gruyere can elevate your gratin.
- Breadcrumbs for Crunch: For a delightful texture, consider using panko breadcrumbs instead of regular ones; they offer a lighter, crispier topping.
- Add Herbs for Freshness: Experiment with fresh herbs like thyme or chives mixed into the cheese sauce for added flavor depth.

Variations
Different Cheese Options
You can switch up the cheese in your gratin. Gouda adds a rich, smoky flavor. Mozzarella gives a great stretch and creaminess. Both create a different taste experience.
If you’re looking for non-dairy options, try using cashew cheese or almond cheese. These options can give you a nice creamy texture without dairy.
Flavor Additions
To enhance the flavor, add fresh herbs like thyme or rosemary. These herbs bring a wonderful aroma and taste. You can also mix in vegetables like broccoli for added nutrition. Broccoli pairs nicely with cauliflower and adds color to your dish.
Topping Alternatives
For a crunchy topping, try using crushed nuts or seeds. Almonds or sunflower seeds can add a delightful crunch. You can also swap breadcrumbs for cornflakes. Cornflakes will give your gratin a fun texture and a bit of sweetness.
Storage Info
How to Store
To keep your cheesy cauliflower gratin fresh, store it in the fridge. Use an airtight container. This helps keep the flavors intact. Allow the dish to cool completely before sealing it. You can also freeze it for longer storage. Use a freezer-safe container or bag. Make sure to remove as much air as possible. This will prevent freezer burn.
Reheating Guidelines
When you want to enjoy leftovers, the best way to reheat is in the oven. Preheat your oven to 350°F (175°C). Place the gratin in a baking dish. Cover it with foil to keep it moist. Bake for about 15-20 minutes. If you want a crispy top, remove the foil for the last few minutes.
To avoid sogginess, do not microwave. Microwaving may make the dish too watery. Always check that it’s heated through before serving.
Shelf Life
In the fridge, your cheesy cauliflower gratin lasts about 3 to 5 days. In the freezer, it can last up to 3 months. To know if it has gone bad, look for changes in smell or texture. If it smells off or appears slimy, it’s best to throw it out. Always trust your senses!
FAQs
Common Questions
Can I make Cheesy Cauliflower Gratin ahead of time?
Yes, you can prepare Cheesy Cauliflower Gratin in advance. Cook the dish, let it cool, then cover and store it in the fridge. Bake it when you’re ready to serve. This saves time and keeps flavors intact.
Is this recipe gluten-free?
The base recipe is gluten-free if you skip the breadcrumbs. The cheese and cauliflower are naturally gluten-free. Always check cheese labels to be sure.
Cooking and Serving
What can I serve with Cheesy Cauliflower Gratin?
Cheesy Cauliflower Gratin pairs well with roasted chicken or grilled fish. You can also serve it with a fresh salad for a light meal. The creaminess of the dish complements many proteins.
Can I use frozen cauliflower instead of fresh?
Yes, you can use frozen cauliflower. Just thaw and drain it well before using. This saves prep time, but fresh cauliflower offers a better texture.
Nutritional Information
Is Cheesy Cauliflower Gratin healthy?
Cheesy Cauliflower Gratin can be part of a healthy diet. Cauliflower is low in calories and high in fiber. However, the heavy cream and cheese add fat and calories. Enjoy in moderation.
What are the calorie counts per serving?
Each serving of Cheesy Cauliflower Gratin has about 300-350 calories. This can vary based on cheese and cream brands. Check specific labels for precise counts.
This blog post detailed how to make Cheesy Cauliflower Gratin. We covered the main ingredients like cauliflower, cheeses, and cream. We broke down steps from preparation to baking. I shared tips for a smooth cheese sauce and a golden crust. Variations for different cheese and toppings can fit any taste.
In closing, you can adjust this recipe easily. Enjoy experimenting with flavors and toppings. Happy cookin

Cheesy Cauliflower Gratin
Ingredients
- 1 medium head cauliflower, cleaned and cut into bite-sized florets
- 2 cups sharp cheddar cheese, shredded
- 1 cup Parmesan cheese, grated
- 1 cup heavy cream
- 2 tablespoons unsalted butter
- 2 cloves garlic, minced
- 1 teaspoon Dijon mustard
- 1 teaspoon smoked paprika
- 0.5 teaspoon salt
- 0.25 teaspoon freshly cracked black pepper
- 0.5 cup breadcrumbs (optional, for a crunchy topping)
- 1 tablespoon fresh parsley, chopped (for garnish)
Instructions
- Preheat the oven to 375°F (190°C).
- In a large pot, bring salted water to a boil. Add the cauliflower florets and blanch for about 3-4 minutes, or until just tender but still crisp. Drain and set aside.
- In a medium saucepan, melt the unsalted butter over medium heat. Add the minced garlic and sauté for about 1 minute until fragrant.
- Stir in the heavy cream, Dijon mustard, smoked paprika, salt, and black pepper. Allow to come to a gentle simmer before removing from heat.
- Gradually add the shredded sharp cheddar and half of the grated Parmesan cheese, stirring continuously until melted and smooth.
- In a large mixing bowl, combine the blanched cauliflower with the cheese sauce, ensuring each floret is coated.
- Pour the mixture into a greased baking dish. Sprinkle the remaining Parmesan cheese and breadcrumbs on top if desired.
- Bake for approximately 25-30 minutes until the top is bubbly and golden brown.
- Let cool for a few minutes, then garnish with freshly chopped parsley before serving.


![To make this tasty dish, gather these main items: - 1 large head of cauliflower, cut into bite-sized florets - 5 cloves of garlic, skins left on - 3 tablespoons extra virgin olive oil, divided - 1/4 cup unsweetened almond milk (or your preferred milk) - 2 tablespoons butter (or a vegan alternative) - Salt and freshly ground black pepper, to taste These ingredients form the base of the mash. The cauliflower gives the dish its creamy texture. Roasting the garlic adds a rich flavor. You can change the recipe to suit your taste. Here are some ideas: - Swap almond milk for regular milk or cream for a richer flavor. - Use ghee instead of butter for a unique twist. - Add a pinch of nutmeg for warmth. - Incorporate herbs like thyme or rosemary for added depth. These options let you make the dish your own. Feel free to get creative! Garnishing makes the dish look appealing. Here are some great choices: - Fresh chives, finely chopped, for a pop of color - A drizzle of extra virgin olive oil for richness - A sprinkle of smoked paprika for a touch of spice These garnishes enhance the flavor and presentation. They make your Roasted Garlic Cauliflower Mash shine on the table. For the full recipe, check the earlier section. To start, I preheat my oven to 400°F (200°C). This temperature works best for roasting. Next, I take one large head of cauliflower and cut it into bite-sized florets. I love using fresh cauliflower for the best flavor. On a baking sheet, I place the florets and five unpeeled cloves of garlic. Then, I drizzle two tablespoons of extra virgin olive oil over them. I sprinkle salt and black pepper generously, then toss everything together. It helps the veggies get well-coated. I spread the cauliflower and garlic in a single layer. Now, I roast them for 25 to 30 minutes. Halfway through, I gently toss them to ensure they cook evenly. I look for a nice golden brown color and tender texture when they are done. Once roasted, I let the garlic cool for a few minutes before handling it. After cooling, I squeeze the softened garlic out of its skin. I put it into a large mixing bowl with the roasted cauliflower. Then, I add a quarter cup of unsweetened almond milk, two tablespoons of butter, and the last tablespoon of olive oil. I grab a hand mixer or an immersion blender to blend the mix. I blend until it turns smooth and creamy. If I want a chunkier mash, I blend just until combined. I make sure not to overmix, as it can change the texture. Once blended, I taste the mash. If it needs more flavor, I adjust with extra salt and pepper. I love a well-seasoned mash! Now, I transfer the cauliflower mash to a serving bowl. For a fun finishing touch, I sprinkle freshly chopped chives on top. This adds color and a nice flavor. To make it look fancy, I might drizzle a bit of olive oil on top. This mash is now ready to impress! Enjoy this easy and tasty dish from the [Full Recipe]. To make the best roasted garlic cauliflower mash, follow these tips. First, use a large head of cauliflower. This gives you enough to work with. Cut the florets into even sizes. This helps them cook at the same rate. Roasting adds flavor, so don’t rush it. Allow the cauliflower to become tender and golden. When blending, don’t overmix. A few pulses will give you a nice texture. If you want it creamier, add a splash more milk. Always taste as you go. Adjust salt and pepper to your liking for the best flavor. Having the right tools makes cooking easier. Here’s what I recommend: - Baking sheet for roasting - Large mixing bowl for combining ingredients - Immersion blender or hand mixer for smoothness - Measuring cups and spoons for precise amounts - Knife and cutting board for prep These tools help you work efficiently and make the process enjoyable. Watch out for these common mistakes. First, don’t skip the roasting step. Raw cauliflower will not have the same rich taste. Second, avoid using too much liquid. It can make your mash watery. If you prefer a thicker mash, add less almond milk. Finally, remember to season well. Under-seasoning can leave your mash bland. Always taste your dish before serving. This way, you ensure it is full of flavor. For the full recipe, check the details above. Enjoy making your roasted garlic cauliflower mash! {{image_4}} You can easily make this dish dairy-free. Use almond milk or coconut milk instead of regular milk. For a buttery flavor, swap butter for vegan butter or olive oil. This keeps the mash creamy and rich without dairy. Adding flavors can elevate your mash. Fresh herbs like thyme or rosemary add a lovely touch. You can also sprinkle in garlic powder for extra garlic flavor. If you enjoy cheese, mix in some grated Parmesan for a savory kick. Get creative with how you serve this mash! Use it as a base for grilled chicken or fish. You can also serve it as a side dish with roasted vegetables. Try topping it with sautéed mushrooms or crispy bacon bits for added flavor and texture. After enjoying your roasted garlic cauliflower mash, let it cool. Place it in an airtight container. Store it in the fridge for up to 4 days. This keeps the flavor fresh and the texture nice. If you have more leftovers, freezing is a great option. Put the mash in a freezer-safe bag or container. Make sure to remove excess air. It will last for about 3 months. Label the container with the date so you can keep track. When you're ready to enjoy the mash again, reheat it gently. You can use the microwave or a stovetop. If it seems dry, add a splash of almond milk or butter. Stir it well as you heat it. This keeps it creamy and delicious. Yes, you can make Roasted Garlic Cauliflower Mash ahead of time. Prepare the mash, then let it cool. Store it in an airtight container in the fridge for up to three days. When you’re ready to eat, simply reheat it on the stove or in the microwave. You may need to add a splash of milk to bring back the creamy texture. Yes, cauliflower mash is a low-carb alternative to mashed potatoes. A cup of cooked cauliflower has about 5 grams of carbs, while a cup of mashed potatoes has around 35 grams. This makes cauliflower mash a great choice if you want to cut carbs but still enjoy a creamy side dish. Roasted Garlic Cauliflower Mash pairs well with many dishes. You can serve it with roasted chicken, grilled steak, or pan-seared fish. It also complements sautéed vegetables or a fresh salad. For a hearty meal, try it with a rich mushroom gravy or a savory sauce. The mash's creamy texture and garlic flavor enhance any main dish beautifully. Roasted Garlic Cauliflower Mash is simple and tasty. We covered its key ingredients, from cauliflower to garlic. You can customize it with optional ingredients and garnishes for more flavor. The step-by-step instructions ensure a smooth texture every time. You now have tips to avoid common mistakes. Variations allow for dairy-free or unique flavors. Storing is easy, and leftovers can even be frozen. This mash is a great low-carb option. Try it with your favorite dishes for a perfect side.](https://goldendishy.com/wp-content/uploads/2025/07/e8f9d6da-9905-472e-90b5-76f2ba9b0789-768x768.webp)


![To make a fresh Mediterranean quinoa salad, gather these key ingredients: - 1 cup quinoa, thoroughly rinsed - 2 cups vegetable broth (preferably low-sodium) - 1 bell pepper (either red or yellow), finely diced - 1 medium cucumber, diced into bite-sized pieces - 1 cup cherry tomatoes, halved - 1/4 of a medium red onion, finely chopped - 1/2 cup Kalamata olives, pitted and sliced - 1/2 cup feta cheese, crumbled - 1/4 cup fresh parsley, finely chopped - 1/4 cup extra virgin olive oil - 2 tablespoons freshly squeezed lemon juice - 1 teaspoon dried oregano - Sea salt and freshly cracked black pepper to taste These ingredients blend well together. Each one adds a unique flavor. The quinoa forms the base, while the vegetables add crunch and color. Kalamata olives give it a salty twist, and feta cheese adds creaminess. You can customize your salad with these optional add-ins: - Avocado for creaminess - Grilled chicken for protein - Chickpeas for extra fiber - Spinach or arugula for leafy greens - Sun-dried tomatoes for a tangy kick These add-ins can enhance the salad's taste and texture. Feel free to experiment with what you love! This salad is a healthy choice. It is packed with nutrients. Here’s a quick look at its benefits: - Quinoa: High in protein and fiber - Vegetables: Rich in vitamins and minerals - Olive oil: A source of healthy fats - Feta cheese: Adds calcium and flavor One serving provides a balanced mix of protein, healthy fats, and carbs. Eating this salad can support your health while satisfying your taste buds. For the full recipe, check out Mediterranean Quinoa Salad Delight! To start, rinse 1 cup of quinoa under cold water. This step removes the bitter coating. Next, combine the rinsed quinoa and 2 cups of vegetable broth in a medium saucepan. Bring this mixture to a rolling boil over medium-high heat. Once boiling, reduce the heat to a gentle simmer. Cover the saucepan and let it cook for about 15 minutes. The quinoa is ready when it absorbs all the liquid and becomes fluffy. After cooking, fluff it with a fork and transfer it to a large mixing bowl. Let it cool for a few minutes. While the quinoa cools, prepare the vegetables. Dice 1 bell pepper and 1 medium cucumber. Halve 1 cup of cherry tomatoes. Finely chop 1/4 of a medium red onion, and slice 1/2 cup of Kalamata olives. In the same large bowl with the quinoa, add all these diced vegetables along with 1/2 cup of crumbled feta cheese. Gently stir to mix everything together. For the dressing, take a separate small bowl. Whisk together 1/4 cup of extra virgin olive oil, 2 tablespoons of freshly squeezed lemon juice, and 1 teaspoon of dried oregano. Add sea salt and freshly cracked black pepper to taste. Whisk until the dressing is well combined and emulsified. Pour the dressing over the quinoa and vegetable mixture. Toss everything together until the quinoa and veggies are well coated with the dressing. Finally, fold in 1/4 cup of finely chopped fresh parsley. Be careful not to break the feta or overcrowd the grains. Cover the bowl and let the salad sit at room temperature for at least 30 minutes. This time helps the flavors blend beautifully. For the full recipe, check out the Mediterranean Quinoa Salad Delight. To cook quinoa, rinse it well in cold water. This removes bitterness. Use a ratio of 1 part quinoa to 2 parts vegetable broth. Boil the mixture, then reduce the heat to simmer. Cover and cook for about 15 minutes. When done, fluff it gently with a fork. Let it cool before mixing it with other ingredients. To boost flavors, add fresh herbs like basil or mint. You can also toss in some garlic or lemon zest for a zing. Experiment with different olives or cheese types. Each will give a unique twist. Don't forget to season with salt and pepper to taste. Serve the salad in a large bowl for sharing. For individual servings, use small plates. Garnish with lemon wedges and extra parsley for color. A drizzle of olive oil on top adds shine and flavor. You can also pair it with grilled chicken or fish for a complete meal. Find the full recipe in the article to enjoy a fresh and tasty meal. {{image_4}} You can easily boost the protein in your Mediterranean quinoa salad. Adding cooked chicken gives a hearty touch. Simply grill or roast chicken breasts, then slice them up and mix them in. If you prefer a meatless option, chickpeas work great. Use canned chickpeas for quick prep. Rinse and drain them before adding. While the olive oil and lemon dressing is tasty, you can try other dressings too. A balsamic vinaigrette adds a sweet tang. For a creamy twist, mix Greek yogurt with lemon juice and herbs. This will make the salad richer and even more satisfying. Swap in seasonal veggies for fresh flavor. In the spring, add sweet peas or asparagus. In summer, try zucchini or fresh corn. Autumn brings squash or roasted root vegetables. Winter is great for kale or Brussels sprouts. These swaps keep your salad exciting and varied all year round. Feel free to check the Full Recipe for more details! After enjoying your Mediterranean quinoa salad, store leftovers in the fridge. Place the salad in a bowl and cover it tightly with plastic wrap or a lid. This helps keep the salad fresh and tasty. If you want to save some for later, portion it out into meal prep containers. When storing your salad, use airtight containers. Glass containers work great because they don't stain or retain odors. If you prefer plastic, choose BPA-free containers. Ensure they are deep enough to hold the salad without squishing it. If you have a dressing, keep it separate until you are ready to eat to avoid sogginess. Your Mediterranean quinoa salad will last in the fridge for about 3 to 5 days. If you notice any change in smell or color, it’s best to toss it out. Reheating is not recommended for salads with fresh veggies. Instead, enjoy the salad cold or at room temperature. If you want to warm it up, heat the quinoa-only portion in a microwave for about 30 seconds, but avoid reheating the veggies and feta. For the full recipe, check [Full Recipe]. Quinoa is a tiny seed rich in protein, fiber, and vitamins. It is gluten-free and very nutritious. It helps in building muscles and keeps you full longer. Quinoa contains all nine essential amino acids, making it a complete protein. This is great for vegans and vegetarians. It also has antioxidants that help fight inflammation. Eating quinoa may support heart health and improve digestion. Yes, you can make this salad ahead of time. It tastes even better after sitting for a few hours. Just keep it in the fridge for up to three days. The flavors meld together nicely. If you add the dressing later, it stays fresh longer. Just remember to mix it before serving to spread the flavors. To make this salad vegan, skip the feta cheese. You can use avocado instead for creaminess. You can also add extra olives or nuts for texture. The dressing is already vegan with olive oil and lemon juice. This way, you keep it tasty without any animal products. This salad pairs well with many dishes. You can serve it with grilled chicken or fish for protein. It also goes nicely with roasted vegetables or hummus. For a lighter meal, enjoy it with pita bread. This salad is great as a side or a main dish. The Mediterranean quinoa salad is a tasty and healthy dish. We covered key ingredients, from quinoa and fresh veggies to possible add-ins. I shared easy steps for preparing the salad and tips for cooking quinoa just right. You learned about variations and how to store leftovers properly. Remember, this salad is very flexible; you can change the protein and dressing as you like. Enjoy this dish for its flavor and nutrition. It’s simple, refreshing, and great for any meal!](https://goldendishy.com/wp-content/uploads/2025/06/0bb42d2e-6f0a-4b63-945d-06b8684c6b2f-768x768.webp)