Cheesy Cauliflower Bake Tasty and Simple Recipe

If you’re craving comfort food that’s simple and cheesy, you’re in the right place! My Cheesy Cauliflower Bake is a delicious twist on a classic dish. This recipe is loaded with flavor, yet easy to make. Whether you’re a seasoned cook or a beginner, I’ll guide you step by step. Let’s dive into this tasty journey that will surely impress your family and friends!
Ingredients
Main Ingredients for Cheesy Cauliflower Bake
This dish shines with just a few key ingredients. You will need:
– 1 large head of cauliflower, cut into florets
– 1 cup shredded cheddar cheese
– 1 cup shredded mozzarella cheese
– 1/2 cup cream cheese, softened
– 1/2 cup sour cream
– 1/4 cup grated Parmesan cheese
– 1/4 cup milk
– 2 cloves garlic, minced
– 1 teaspoon onion powder
– 1 teaspoon paprika
– Salt and pepper to taste
These ingredients create a creamy, cheesy base that makes the cauliflower taste amazing.
Optional Ingredients for Enhanced Flavor
You can add other flavors to make this dish unique. Consider these options:
– Cooked bacon bits for a savory crunch
– Chopped green onions for a fresh note
– Spinach or kale for extra greens
– Crushed red pepper for a bit of heat
These extras can transform your cheesy cauliflower bake into something special.
Suggested Garnishes for Presentation
Garnishing enhances the dish’s look and taste. Try these options:
– Fresh parsley, chopped
– Chives, finely sliced
– A sprinkle of paprika for color
– A drizzle of olive oil for shine
These garnishes not only make your bake pretty but also add more flavor.
Step-by-Step Instructions
Preheat and Prepare the Oven
You start by preheating your oven to 375°F (190°C). This helps the dish cook evenly. While it heats, grab a baking dish. Lightly grease it with non-stick spray. You can also use a little olive oil. This step keeps your bake from sticking.
Blanching Cauliflower: A Quick Guide
Now it’s time for the cauliflower! Fill a large pot with water and add a pinch of salt. Bring this water to a boil. Once boiling, gently place the cauliflower florets in the pot. Cook them for about 5 minutes. You want them tender but still crisp. After that, drain them well and set them aside.
Making the Creamy Mixture
In a medium mixing bowl, gather your creamy ingredients. Add softened cream cheese, sour cream, and milk. Then, mix in minced garlic, onion powder, paprika, salt, and pepper. Use a whisk or spatula to blend these until smooth. This mixture will bring all the flavors together.
Combining Cauliflower and Cream
Next, take your blanched cauliflower and add it to the creamy mixture. Use a spatula to gently fold the cauliflower into the cream. Make sure each floret gets coated well. This ensures every bite is creamy and cheesy.
Layering and Baking the Dish
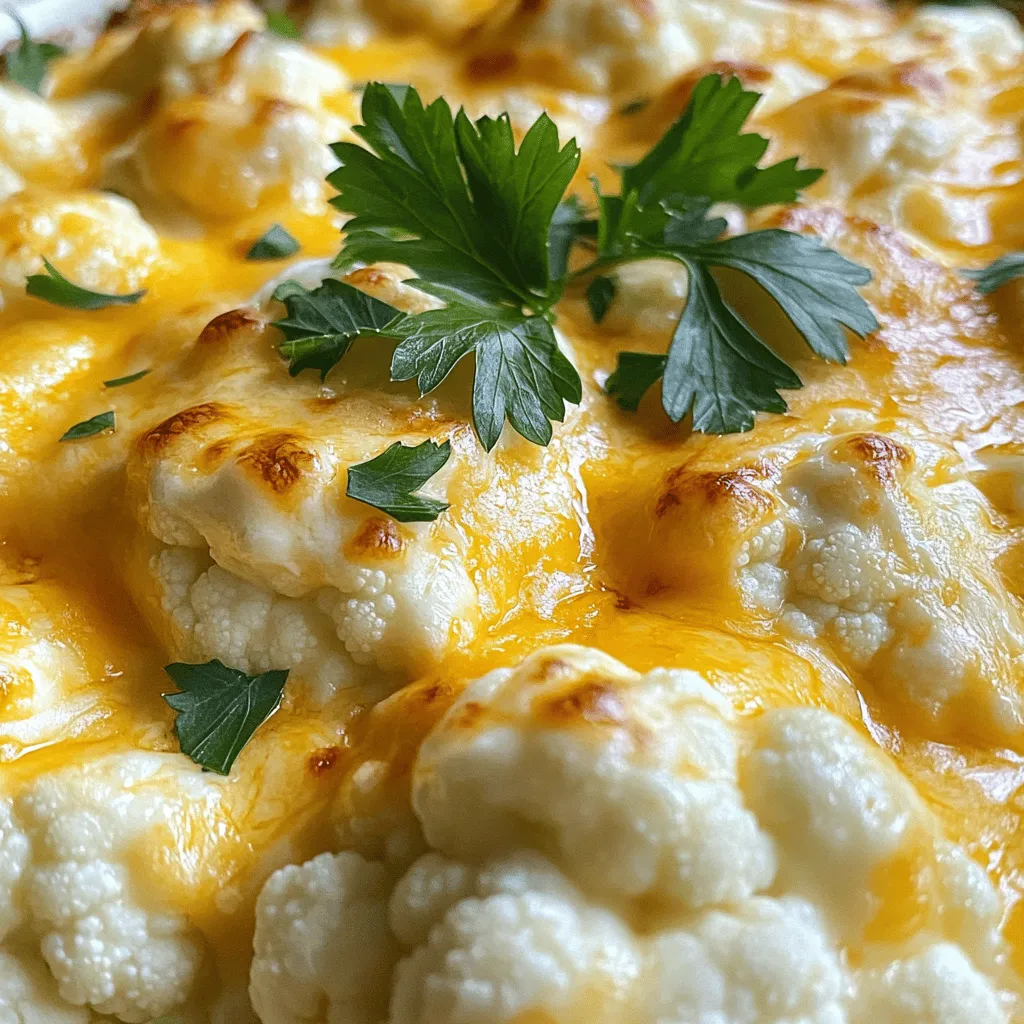
Now, spoon the cauliflower mixture into your greased baking dish. Spread it out evenly across the bottom. Then, it’s time for the cheese! Sprinkle shredded cheddar and mozzarella cheese generously on top. Finish with a light sprinkle of grated Parmesan cheese. This adds a nice flavor and texture.
Final Touches Before Serving
Once your dish is layered, place it in the preheated oven. Bake for 25-30 minutes. Watch for the cheese to bubble and turn a golden brown. When it’s done, take it out and let it sit for about 5 minutes. This helps the dish set up nicely. Before serving, garnish with freshly chopped parsley for a touch of color. Enjoy your cheesy cauliflower bake!
Tips & Tricks
Achieving the Perfect Cheese Melt
To get that perfect cheese melt, use a mix of cheeses. I like using cheddar and mozzarella. Cheddar gives a sharp flavor, while mozzarella melts beautifully. Make sure to sprinkle the cheese on top of your dish before baking. This helps it get that nice, gooey texture. You can also cover the dish with foil for the first half of baking to keep the heat in. Remove the foil later to let it brown.
Adjusting Consistency of the Cream Mixture
If your cream mixture feels too thick, add a little more milk. Start with one tablespoon at a time. Mix it in and check the texture. You want it creamy, not runny. If it is too thin, add a bit more cream cheese. This balance helps coat the cauliflower well. A good sauce will make each bite rich and flavorful.
Avoiding Overcooked Cauliflower
To keep your cauliflower crisp, blanch it for only five minutes. This step brightens the color and makes it tender but not mushy. After blanching, drain it well to remove excess water. If you overcook the cauliflower, it may turn soft in the bake. Aim for that perfect bite that complements the creamy sauce. Following these tips ensures a great texture in every serving.

Variations
Adding Protein: Chicken or Bacon Options
You can easily add protein to your cheesy cauliflower bake. Chicken or bacon works great. For chicken, use cooked, shredded chicken. Mix it with the cauliflower before baking. This adds flavor and makes the dish heartier. Bacon adds a smoky touch. Cook bacon until crispy, chop it, and sprinkle it on top before baking. You get a nice crunch and rich taste.
Incorporating Different Cheeses
Experimenting with different cheeses can change the whole dish. Try adding gouda for a smoky flavor or pepper jack for some heat. You can also use feta for a tangy kick. Just remember to keep the amount the same as the original cheese in the recipe. Mixing cheeses can make your cheesy cauliflower bake even more delightful.
Dairy-Free Alternatives
If you need a dairy-free option, it’s simple to swap some ingredients. Use almond milk or coconut milk instead of regular milk. For cream cheese, look for dairy-free cream cheese. There are many great brands out there. Nutritional yeast can replace cheese for a cheesy flavor without dairy. These changes make the dish friendly for everyone while keeping it tasty.
Storage Info
Best Practices for Storing Leftovers
After making your cheesy cauliflower bake, let it cool first. Once cool, transfer leftovers to an airtight container. This keeps the dish fresh. Store it in the fridge for up to three days. If you want to keep it longer, freezing is a great option.
Reheating Suggestions
To reheat, use an oven for best results. Preheat your oven to 350°F (175°C). Cover the dish with foil to prevent it from drying out. Heat for about 15-20 minutes. You can also heat it in the microwave, but it may not be as crispy.
Freezing the Cheesy Cauliflower Bake
You can freeze this dish before or after baking. If you freeze before baking, wrap it tightly in plastic wrap. Then place it in a freezer bag. If you bake it first, let it cool completely. Then, follow the same wrapping method. It can last up to three months in the freezer. Just remember to label it! When ready to eat, thaw it in the fridge overnight and bake as usual.
FAQs
Can I use frozen cauliflower for this recipe?
Yes, you can use frozen cauliflower. Just thaw it and drain excess water. This helps avoid a soggy bake. Frozen cauliflower is convenient and works well in the dish.
Is there a way to make it spicier?
Absolutely! To add some heat, mix in red pepper flakes or diced jalapeños. You can also use pepper jack cheese instead of cheddar. This gives a nice kick without overpowering the dish.
How long does the cheesy cauliflower bake last in the fridge?
The cheesy cauliflower bake lasts about 3 to 5 days in the fridge. Make sure to store it in a sealed container. This keeps it fresh and ready for quick meals or snacks.
What can I serve with cheesy cauliflower bake?
You can pair it with grilled chicken or a fresh salad. It also goes well with roasted veggies or a light soup. This makes a great side dish for any meal.
Can I prepare this dish in advance?
Yes, you can prepare it a day ahead. Just follow the steps but stop before baking. Cover it tightly and store it in the fridge. When ready, just bake it as directed.
Cheesy cauliflower bake combines simple steps with tasty ingredients. You learned how to prep and cook it perfectly. Use fresh or frozen cauliflower, and try different cheeses for variety. Store leftovers well for later enjoyment.
This dish is warm and filling, enhancing any meal. Enjoy this versatile recipe and make it your own!


![- 12 oz fettuccine or pappardelle pasta - 2 cups butternut squash, peeled and cubed - 1 tablespoon olive oil The base of this dish is fettuccine or pappardelle pasta. I love these shapes as they hold the creamy sauce well. You will also need fresh butternut squash. It gives the dish a warm color and sweet flavor. Using olive oil helps with roasting and adds richness to the pasta. - 1 small onion, diced - 2 cloves garlic, minced - 1 teaspoon freshly grated nutmeg Onions and garlic add depth to the sauce. Dicing the onion makes it cook evenly. Minced garlic gives a punch of flavor. Nutmeg brings warmth and a hint of spice, making the dish cozy and inviting. - 1 cup vegetable broth - 1 cup coconut milk (or heavy cream for a non-vegan option) - ½ cup grated Parmesan cheese (optional) For the sauce, you need vegetable broth for a savory base. Coconut milk adds creaminess and a hint of sweetness. If you prefer, heavy cream works too. Adding Parmesan cheese can enhance the flavor, but it's optional. - Salt and freshly cracked pepper to taste - Fresh sage leaves for garnish Season with salt and cracked pepper to bring everything together. Fresh sage leaves add a lovely touch. They not only look nice but also add an aromatic flavor that complements the dish well. These ingredients create a lovely balance of flavors in the creamy butternut squash pasta. For the full recipe, check out the detailed instructions to make this delicious meal. - Preheat your oven to 400°F (200°C). - Toss the cubed butternut squash in olive oil, salt, and pepper. - Spread the squash on a baking sheet. Roast for 20-25 minutes. The squash should be tender and have a light caramel color. - Bring a large pot of salted water to a boil. - Add the pasta and cook it as per package instructions. - Before draining, reserve 1 cup of the pasta water. This helps adjust your sauce later. - Heat olive oil in a large skillet over medium heat. - Add diced onion and sauté until soft, about 5 minutes. - Stir in minced garlic and cook for about 1 minute. - Blend the roasted squash with the sautéed onion, garlic, vegetable broth, and coconut milk. Use an immersion blender or a regular blender. - Return the blended sauce to the skillet and heat on low. - Add the cooked pasta and gradually mix in the reserved pasta water. - Stir well until the pasta is coated with the sauce. - If you like, stir in the Parmesan cheese. - Taste and adjust seasoning with salt and pepper as needed. - Plate the pasta in shallow bowls for a nice look. - Garnish with fresh sage leaves and drizzle a little olive oil on top. For a detailed guide, check out the Full Recipe. Enjoy your creamy butternut squash pasta! To get a creamy consistency, blend the roasted butternut squash well. You want it smooth. Use an immersion blender for easy mixing. If it’s too thick, add a splash of pasta water. This helps the sauce cling to the noodles. Want to add more flavor? Try spices like cinnamon or a pinch of chili powder. Fresh herbs, such as thyme or rosemary, can boost taste too. You can also add veggies like spinach or kale for added nutrition. They cook quickly and blend well with the sauce. Pair creamy butternut squash pasta with a simple salad. A mix of greens with a light vinaigrette works well. For drinks, a glass of white wine like Sauvignon Blanc complements the dish nicely. If you prefer non-alcoholic options, try sparkling water with a slice of lemon. These sides enhance the meal and make it even more enjoyable. For the full recipe, check out [Full Recipe]. {{image_4}} You can easily adjust creamy butternut squash pasta to fit different diets. For a vegan option, swap heavy cream with coconut milk and skip the cheese. This change still gives you a creamy sauce that tastes great. If you need gluten-free pasta, use rice or corn-based noodles. These options keep the dish light and tasty. Experimenting with different ingredients can make this dish exciting. Instead of butternut squash, try using acorn or delicata squash. Each type has its unique flavor and texture. For cheese, you can use feta for a tangy twist or goat cheese for a creamy finish. These swaps let you create new flavor combinations that keep things fresh. To make this dish more seasonal, add roasted vegetables like Brussels sprouts or carrots. This not only enhances the flavor but also adds color. Making creamy butternut squash pasta in fall is perfect. You can enjoy the warmth of the season with every bite. Try using spices like cinnamon or cloves for a cozy feel. For the full recipe, check out the complete guide and enjoy the rich flavors! To store leftover creamy butternut squash pasta, let it cool first. Then, place it in an airtight container. Glass or BPA-free plastic containers work best. Make sure to seal them tightly to keep the air out. This helps keep the pasta fresh and tasty. Store the container in the fridge for up to four days. Yes, you can freeze this dish! To do this, use a freezer-safe container. Leave some space at the top for expansion. It is best to freeze the pasta without the cheese added. This helps keep the texture right. When you are ready to eat, move the container to the fridge to thaw overnight. To reheat, use a skillet over low heat. Add a splash of vegetable broth or water to help it warm up evenly. In the fridge, creamy butternut squash pasta lasts for about four days. After that, the taste and quality may drop. Always check for signs of spoilage. If the pasta smells sour or has a strange texture, it’s best to throw it away. Enjoy your creamy butternut squash pasta fresh! For the full recipe, visit [Full Recipe]. It takes about 40 minutes to make creamy butternut squash pasta. The prep time is 10 minutes. Cooking the dish takes about 30 minutes. You will spend 20-25 minutes roasting the squash. Boiling the pasta adds another 10-12 minutes. This dish is quick and easy for a weeknight meal! Yes, you can use many types of pasta. Fettuccine and pappardelle work well for this sauce. You can also try penne or rigatoni for a fun twist. Each shape holds the sauce differently, so feel free to experiment! Absolutely! To make it nut-free, use coconut milk instead of cream. If you want a non-vegan option, use heavy cream instead. You can skip any nuts in the garnish. This keeps the dish creamy and delicious without nuts. You can serve this dish with many sides. A crisp green salad pairs well. Try a side of garlic bread for extra comfort. For dessert, pumpkin pie or apple crisp can be great choices. These options enhance the cozy vibe of the meal. To reheat, use a skillet over low heat. Add a splash of water or broth to the pasta. This helps keep the sauce creamy. Stir until heated through. You can also use the microwave, but stir halfway for even heating. Enjoy your leftovers just as much! This creamy butternut squash pasta combines hearty flavors and texture. We roasted the squash and blended it with garlic and onion to create a rich sauce. You learned how to make it creamy, adjust seasoning, and even swap ingredients. In the end, this dish is versatile and perfect for any meal. Enjoy experimenting with flavors and sharing this delightful recipe with friends and family.](https://goldendishy.com/wp-content/uploads/2025/07/000431ad-92db-4f90-88d6-bb841745a08c-768x768.webp)


. - Heat your skillet over medium heat. - Add the unsalted butter and let it melt. - Once melted, watch for it to bubble gently. - Next, add the minced garlic. - Sauté the garlic for about one minute. - Stir often until it smells great and turns lightly golden. - Now, add the peeled and deveined shrimp to the skillet. - Season the shrimp with salt and pepper. - If you like spice, sprinkle in some red pepper flakes. - Cook the shrimp for 2-3 minutes on one side. - Flip the shrimp to cook the other side evenly. - Add the lemon zest and juice as they cook. - Keep cooking until the shrimp are opaque. - Remove the skillet from the heat. - Stir in the chopped parsley for a fresh taste. - Serve the shrimp over warm pasta or fluffy rice. - Drizzle the leftover lemon-garlic butter sauce on top for extra flavor. - For a lovely presentation, you can garnish with lemon wedges. For more details, check the Full Recipe. - Achieving the perfect shrimp texture: To get tender shrimp, avoid overcooking. Cook them just until they turn pink. This usually takes about 2-3 minutes per side. - Best practices for sautéing garlic: Start with a hot skillet and melted butter. Add minced garlic and stir for about 1 minute. Keep an eye on it so it doesn’t burn; burnt garlic tastes bitter. - Presentation ideas for a beautiful dish: Serve the shrimp in shallow bowls to make it look elegant. Add a sprinkle of parsley on top for color. Include lemon wedges on the side for a fresh touch. - Pairing options with side dishes: Lemon garlic butter shrimp goes well with cooked pasta or fluffy rice. You can also serve it with a side salad for a light meal. - Additional herbs or spices to try: Consider adding fresh basil or thyme for extra flavor. These herbs pair well with lemon and shrimp. - Adjusting spice levels with red pepper flakes: If you like heat, add more red pepper flakes. Start with a teaspoon and adjust to your taste. This will make your dish more exciting! For more details, check the Full Recipe. {{image_4}} You can change the seafood in this recipe. Try scallops or even crab. These swaps add new tastes while keeping the dish simple. If you want a healthier fat, swap butter for olive oil. Olive oil works well and gives a light, fresh flavor. To mix things up, add other citrus flavors. Lime or orange juice can brighten the dish. You can also infuse the recipe with herbs. Try basil or thyme for a different twist. These herbs can make the dish feel more seasonal. If you need a gluten-free option, serve the shrimp over quinoa or zucchini noodles. Both are great gluten-free choices. For a low-calorie meal, cut back on the butter. You can use less or replace it with vegetable broth. This keeps the dish tasty but lighter. After enjoying your lemon garlic butter shrimp, store any leftovers in the fridge. Use an airtight container to keep them fresh. These shrimp will stay good for about 2-3 days. Always check for freshness before eating. To freeze lemon garlic butter shrimp, let them cool completely first. Place them in a freezer-safe bag, removing as much air as possible. They can last for about 2 months in the freezer. When you're ready to eat, thaw the shrimp in the fridge overnight. Reheat them gently in a skillet over low heat. This keeps them tender and tasty. Always ensure your shrimp is safe to eat after storage. Check for any off smells or changes in color. If the shrimp look slimy or smell bad, it’s best to discard them. Trust your senses to keep your meals safe and enjoyable. Cook shrimp for 4-6 minutes. They cook quickly. In a hot skillet, shrimp turn pink when done. Avoid overcooking; it makes them tough. Yes, you can use frozen shrimp. Thaw them first for best results. Place them in cold water for about 15 minutes. This way, they cook evenly and taste fresh. I love serving lemon garlic butter shrimp with: - Cooked pasta - Fluffy rice - Fresh salad - Garlic bread These sides balance the rich flavors well. Check for color and texture. Cooked shrimp turn pink and opaque. They should feel firm but not hard. When in doubt, cut one open. It should be white inside, not translucent. You’ve learned how to make lemon garlic butter shrimp. We covered essential ingredients, easy steps, tips for cooking, and variations to try. Remember to adjust flavors to your taste and pair with your favorite sides. Store leftovers safely for later enjoyment. Cooking shrimp can be simple and satisfying. Enjoy every bite, and don't hesitate to experiment. Whether for a cozy night in or impressing guests, this dish shines every time. Let your kitchen be a place of fun and flavor!](https://goldendishy.com/wp-content/uploads/2025/06/8ad1771e-7d26-4dd4-879b-9e464bbb0647-768x768.webp)