
Are you ready to make a cheesy cauliflower bake that is truly irresistible? This creamy dish combines fresh cauliflower with rich cheddar and a blend of flavorful seasonings. It’s simple to prepare and perfect for any meal. Whether you want a comforting side or a tasty main, this recipe fits the bill. Let’s dive into the details and get cooking!
Why I Love This Recipe
- Comfort Food: This cheesy cauliflower bake is the ultimate comfort food, combining creamy textures with the wholesome goodness of cauliflower.
- Easy to Prepare: With simple ingredients and straightforward instructions, this recipe is perfect for both beginner and experienced cooks.
- Customizable: You can easily adapt the recipe to include your favorite seasonings or add-ins, making it a versatile dish for any occasion.
- Family-Friendly: This bake is a hit with both kids and adults, making it a great way to sneak in some veggies without any complaints!
Ingredients
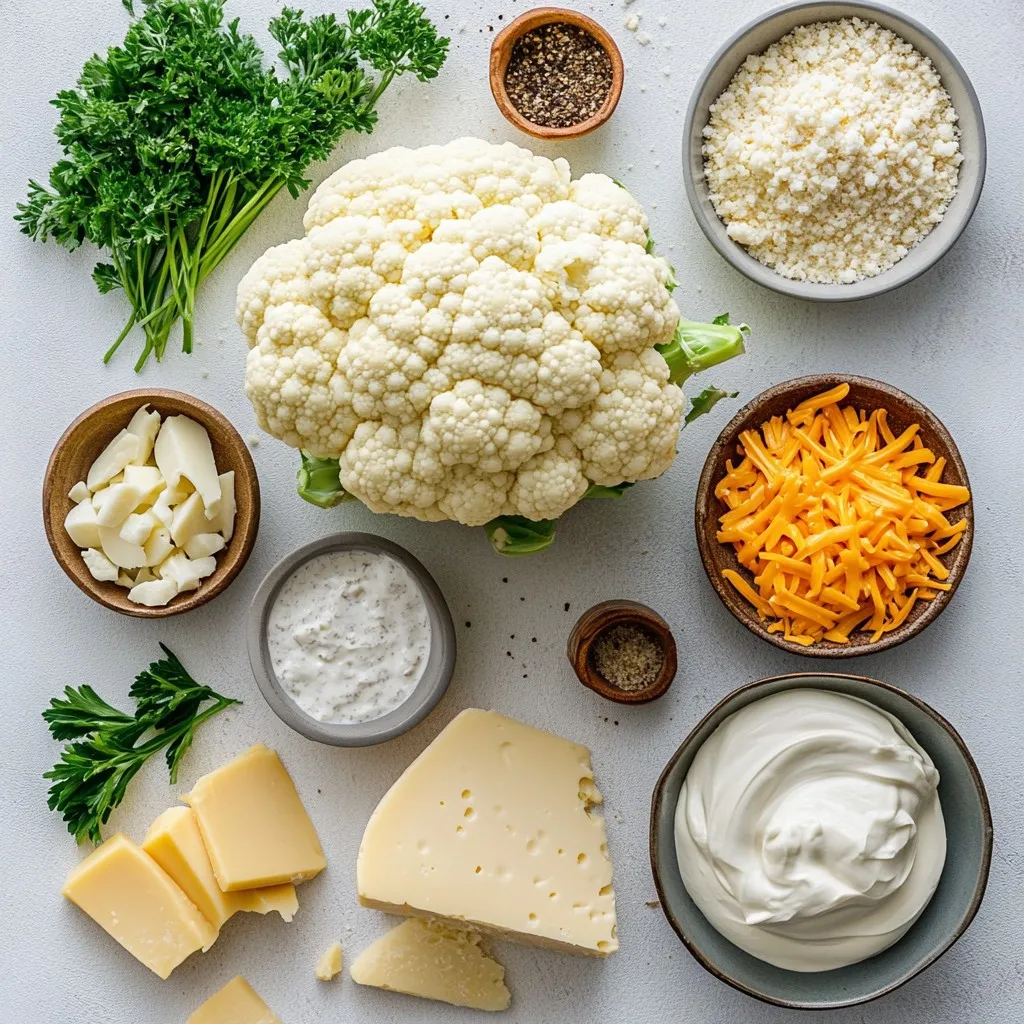
Main Ingredients
– 1 large head of cauliflower, cut into bite-sized florets
– 1 cup shredded cheddar cheese, divided
– 1/2 cup cream cheese, softened to room temperature
– 1/4 cup sour cream
– 1/2 cup milk (whole or low-fat)
The main star of this dish is the cauliflower. It gives a satisfying bite and absorbs the creamy mix well. I love using fresh cauliflower florets. They add a nice texture to the bake. The cheddar cheese adds a rich flavor. It melts beautifully, making every bite gooey. Cream cheese and sour cream create a smooth, creamy base. This mix makes the bake rich and comforting.
Seasonings and Extras
– 1 teaspoon garlic powder
– 1 teaspoon onion powder
– 1/2 teaspoon smoked paprika
– Salt and black pepper to taste
– 1/2 cup breadcrumbs (optional, for a crispy topping)
Seasonings are key to flavor. Garlic powder and onion powder give a savory kick. Smoked paprika adds depth and warmth. Don’t forget salt and black pepper to bring everything together. If you want crunch, breadcrumbs are a great choice. They give the top a golden crust that contrasts with the creamy inside.
Garnish
– Fresh parsley, finely chopped
Garnish is not just for looks. Fresh parsley adds a pop of color and a fresh taste. It brightens up the dish and makes it more inviting. I recommend adding it just before serving. This simple touch elevates your cheesy cauliflower bake and makes it feel special.
Step-by-Step Instructions
Preparation Steps
– Preheat the oven: Set your oven to 375°F (190°C). This helps the dish cook evenly.
– Boil the cauliflower: Fill a large pot with water. Add salt and bring it to a boil. Carefully add the cauliflower florets. Cook for about 5-7 minutes. You want them tender but still firm. Drain them well and set aside.
Mixing the Cream Mixture
– Combine cream cheese, sour cream, and milk: In a medium bowl, mix the softened cream cheese, sour cream, and milk. Use a whisk to blend until smooth and creamy.
– Stir in seasonings: Add garlic powder, onion powder, smoked paprika, salt, and black pepper. Mix until all spices are evenly mixed in.
Assembly and Baking
– Combine cauliflower with cream mixture: Gently fold the cooked cauliflower into the cream mixture. Make sure each floret is well coated.
– Add cheese and optional breadcrumb topping: Pour the cauliflower and cream mix into a greased baking dish. Sprinkle half of the shredded cheddar cheese on top. Add the rest for extra cheesiness.
– Bake until golden brown: Place the dish in the preheated oven. Bake for 20-25 minutes. Look for the cheese to be melted, bubbly, and golden brown.
Tips & Tricks
Perfecting the Dish
To make the best cheesy cauliflower bake, cook the cauliflower just right. Boil it for 5-7 minutes. Check it often. You want it tender but still firm. Overcooking makes it mushy.
Next, taste your seasoning! Start with the recipe’s amounts. Adjust salt and pepper if needed. A little more garlic powder or smoked paprika can add depth. Make it your own!
Serving Suggestions
Pair this bake with a fresh salad or roasted veggies. The crunch of a salad balances the creamy bake. You can also serve it with grilled chicken for protein.
For an attractive dish, garnish it with fresh parsley. This adds color and flavor. Serve it right in the baking dish for a cozy feel. Everyone loves a dish that looks inviting!
Time-Saving Tips
Want to save time? Prep the cauliflower a day ahead. Cut it into florets and store in the fridge. You can also mix the cream sauce in advance. Just keep it covered.
When ready to bake, combine everything and pop it in the oven. This makes dinner easy and quick!
Pro Tips
- Choose the Right Cauliflower: Opt for a large head of cauliflower that feels heavy for its size and has tightly packed florets. This ensures freshness and better texture in your bake.
- Customize the Cheese: While cheddar is classic, feel free to mix in other cheeses like Gruyère or mozzarella for a unique flavor profile that enhances creaminess.
- Breadcrumb Variations: For a twist on the crispy topping, consider adding herbs or grated Parmesan to the breadcrumbs before sprinkling them on top for extra flavor.
- Rest Before Serving: Allow the bake to sit for about 5 minutes after removing it from the oven. This helps the layers set, making it easier to serve and enjoy!
Variations
Add-Ins for Extra Flavor
You can make your cheesy cauliflower bake even better by adding more flavors. Try mixing in some fresh or cooked vegetables. Broccoli, spinach, or bell peppers work well. These veggies not only add color but also boost nutrition.
If you want protein, consider adding cooked chicken or crispy bacon. Both options give the dish a hearty touch. Just chop them into small pieces and fold them into the creamy mixture before baking.
Alternate Cheese Choices
Cheese is the star of this dish. But you can switch it up! Instead of cheddar, use mozzarella or gouda for a different taste. Each cheese brings a unique flavor and melt.
For a plant-based option, try vegan cheese. Many brands offer great alternatives that melt well. Just look for one that fits your taste. This way, everyone can enjoy the bake!
Healthier Options
You can make this dish lighter without losing taste. Use low-fat cream cheese and milk. These swaps cut calories but keep the creaminess.
For the topping, choose gluten-free breadcrumbs if you need a gluten-free dish. This way, you can enjoy the crunch without worry. These small changes help you enjoy your cheesy cauliflower bake while staying healthy!
Storage Info
Storing Leftovers
To keep your cheesy cauliflower bake fresh, place it in an airtight container. This method helps trap moisture and flavor. You can store it in the fridge for about three to four days. If you want to keep it longer, consider freezing it.
Reheating Instructions
When you are ready to enjoy leftovers, the best way to reheat is in the oven. Preheat your oven to 350°F (175°C). Place the bake in an oven-safe dish, cover it with foil, and warm it for about 15-20 minutes. This method keeps the texture nice and creamy. If you want to freeze it, wrap it tightly in plastic wrap and aluminum foil. It can last up to three months in the freezer.
Serving Cold
You can serve cheesy cauliflower bake cold, but it’s best warm. Cold leftovers may taste different. The cheese won’t have that lovely melt. If you want to try it cold, pair it with a fresh salad for a nice contrast.
FAQs
Common Questions
How long to bake cheesy cauliflower bake?
You should bake the cheesy cauliflower bake for 20 to 25 minutes. This time allows the cheese to melt and bubble. Look for a golden brown top to know it’s ready.
Can I use frozen cauliflower?
Yes, you can use frozen cauliflower. Just make sure to thaw it first. Drain any excess water to avoid a soggy dish.
Nutritional Information
Is cheesy cauliflower bake healthy?
Cheesy cauliflower bake can be healthy. It uses cauliflower, which is low in carbs and high in fiber. The dish contains cheese and cream, so enjoy in moderation.
What are the calorie counts?
A serving of cheesy cauliflower bake has about 250 calories. This can vary based on ingredients used, like cheese and cream amounts.
Making it Ahead of Time
Can you prep cheesy cauliflower bake in advance?
Yes, you can prep it ahead. Assemble the dish and cover it. Store it in the fridge for up to 24 hours before baking.
How to adjust cooking time if made ahead?
If you prep it ahead, add about 10 minutes to the baking time. Bake until heated through and the cheese is bubbly.
This blog post covers how to make a delicious cheesy cauliflower bake. We explored key ingredients, like cauliflower, cheddar, and cream cheese. I shared step-by-step cooking instructions and offered tips for perfecting the dish. Variations can enhance flavor, and I explained storage options to keep leftovers fresh.
In closing, this recipe is fun and flexible. You can adjust it to fit your taste and needs. Enjoy making and sharing this tasty dish—it’s sure to impress everyon


