Cauliflower Fried Rice Healthy and Quick Recipe

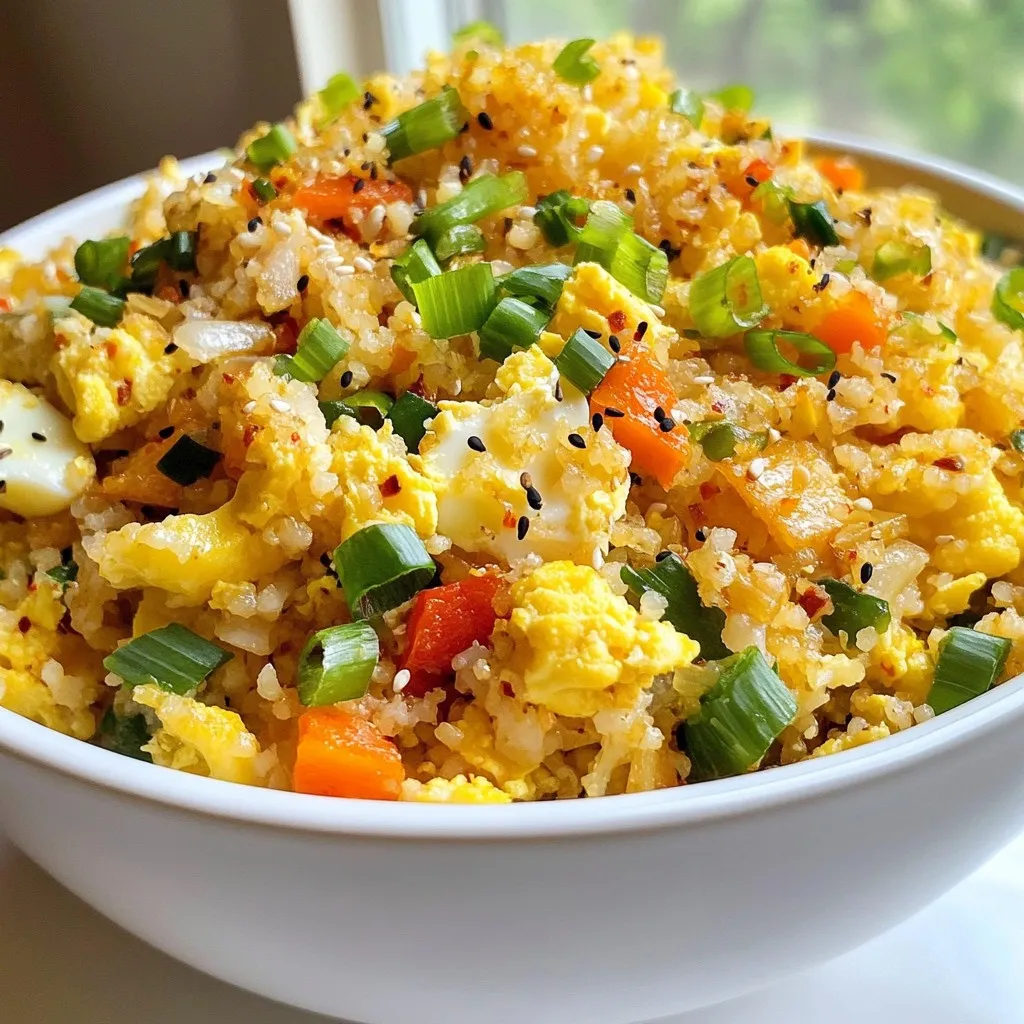
Looking for a healthy meal that cooks up quickly? Cauliflower Fried Rice is your answer! This recipe is packed with nutrients and flavor, making it a perfect choice for lunch or dinner. I’ll guide you through easy steps and share tips to avoid common mistakes. Let’s turn simple ingredients into a delicious dish that satisfies both your taste buds and your health goals. Ready to get started?
Why I Love This Recipe
- Healthy Alternative: This recipe uses cauliflower instead of traditional rice, making it a low-carb and nutrient-rich option.
- Quick and Easy:
- Customizable: You can easily swap in your favorite vegetables or proteins, making it versatile for any taste preference.
- Flavor Packed: The combination of sesame oil, soy sauce, and fresh ginger adds a delicious depth of flavor to the dish.
Ingredients
List of Ingredients
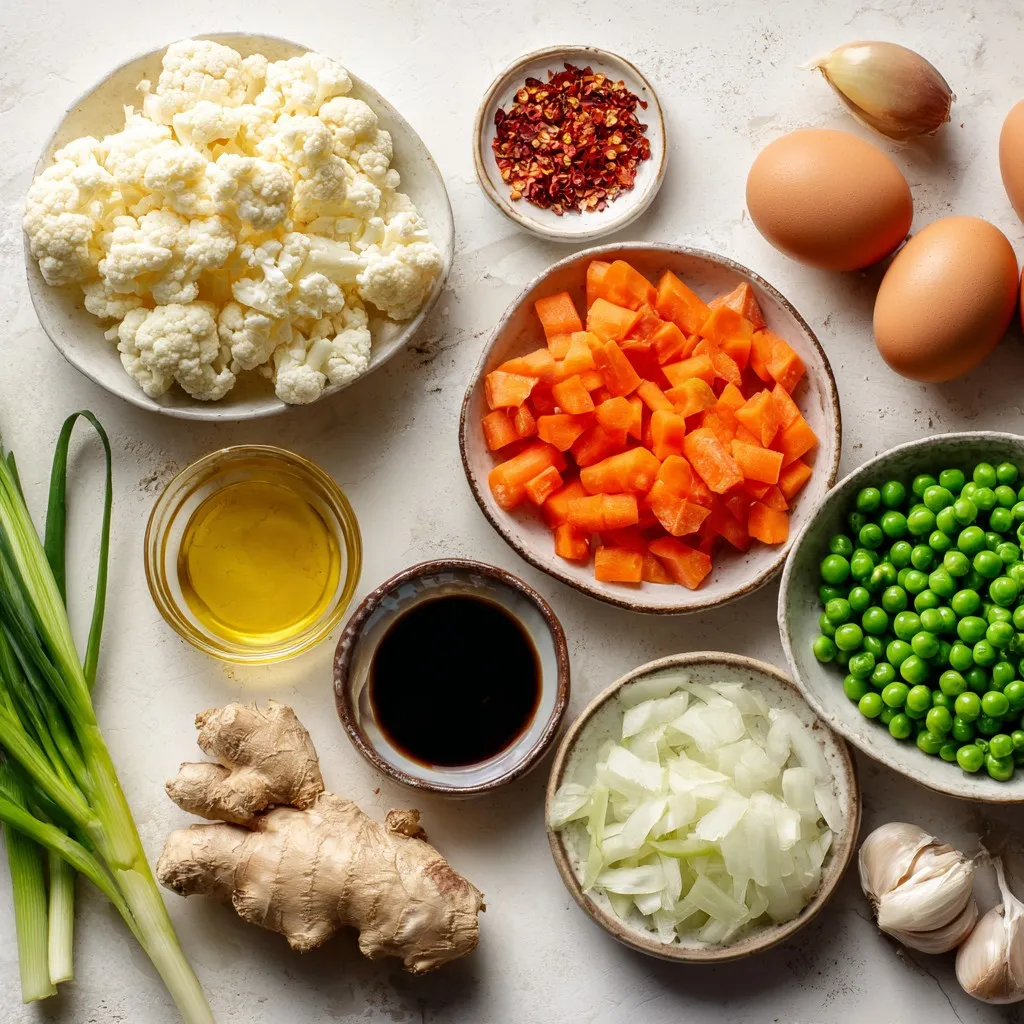
– 1 medium head of cauliflower
– 1 medium onion
– 2 cloves garlic
– 1 tablespoon fresh ginger
– 1 cup mixed vegetables (carrots, peas, bell peppers)
– 2 large eggs
– 2 tablespoons soy sauce
– 2 tablespoons sesame oil
– Salt and black pepper to taste
– Optional: 1 teaspoon chili flakes
– Optional garnishes: green onions, sesame seeds
The first ingredient is cauliflower. It gives the dish a great texture. You will need one medium head. Grate or pulse it until it looks like rice. This is key for your fried rice.
Next, you need aromatics. Use one medium onion, two cloves of garlic, and one tablespoon of fresh ginger. These will add tons of flavor. Dice the onion and mince the garlic and ginger finely.
For the mixed vegetables, aim for one cup. You can use carrots, peas, and bell peppers. Chop them into small pieces. Frozen veggies work well too.
You will also need two large eggs. Beat them lightly in a bowl. They will add richness and protein to the dish.
Seasonings are important. Use two tablespoons of soy sauce. If you want a healthier option, use coconut aminos. Add salt and black pepper to taste. For some heat, add one teaspoon of chili flakes.
Lastly, you can garnish your dish. Use sliced green onions and sesame seeds for a nice touch. This makes your dish look even better!

Step-by-Step Instructions
Preparation of Cauliflower Rice
To start, take a medium head of cauliflower. Remove the leaves and core. Cut it into smaller florets. Now, place these florets in a food processor. Pulse them until they look like rice grains. This step gives you about 4 cups of cauliflower rice. It’s a simple way to make a healthy base for your dish.
Cooking the Aromatics
Next, grab a large skillet or wok. Heat 2 tablespoons of sesame oil over medium heat. Once the oil shimmers, add the finely diced onion and minced garlic. Sauté these for about 2 to 3 minutes. You want the onion to be soft and clear. Stir often to avoid burning the garlic.
Incorporating Vegetables and Eggs
Now, it’s time to add flavor. Toss in 1 cup of mixed vegetables. This could be carrots, peas, or bell peppers. Keep sautéing for another 3 to 4 minutes. Let them soften and blend with the onion and garlic. Then, push the veggie mix to one side of the skillet. Pour 2 beaten eggs into the empty space. Scramble the eggs gently for about 1 to 2 minutes. Cook them until they are fully set.
Combining and Cooking the Cauliflower Rice
Mix the cauliflower rice into your skillet. Stir everything together well. Cook for about 5 to 7 minutes. You want the cauliflower to be tender but not mushy. Stir occasionally to ensure even cooking.
Seasoning the Dish
Now, let’s season it up! Pour in 2 tablespoons of soy sauce. You can use coconut aminos for a healthier choice. Add in the grated ginger, salt, black pepper, and chili flakes if you want heat. Stir well to coat all the ingredients with flavor. Adjust the taste to your liking.
Finishing Touches
Finally, toss in the sliced green onions. Let them cook for another 1 to 2 minutes. This will make them soft but still fresh. Taste the dish one last time and adjust the seasoning if needed. Now, you’re ready to serve your vibrant cauliflower fried rice!
Tips & Tricks
Perfecting the Cauliflower Rice
To avoid mushiness, you must manage your cooking time carefully. Cauliflower rice cooks quickly. If you overcook it, you’ll end up with a soggy mess. When you add it to the skillet, aim for 5-7 minutes of cooking. Stir often, but don’t let it sit too long.
The best way to grate cauliflower is with a food processor. It saves time and ensures even pieces. If you don’t have a food processor, you can use a box grater. Just be careful and watch your fingers!
Managing Flavors
Balancing seasonings can make or break your dish. Start with soy sauce, ginger, and garlic. Taste along the way. Adjust salt and pepper as needed. If you love spice, consider adding chili flakes. They give the fried rice a nice kick. Just sprinkle a little at first, then add more if you want more heat.
Cooking Techniques
I recommend using a large skillet or a wok. A wide surface helps the cauliflower rice cook evenly. Heat the skillet well before adding any ingredients. This prevents sticking and helps with browning.
Cooking times vary for different vegetables. For soft veggies like peas, add them early. For crunchier ones like bell peppers, add them later in the cooking process. This way, all ingredients maintain their texture and taste.
Pro Tips
- Choose Fresh Cauliflower: Select a cauliflower head that is firm and free from dark spots to ensure maximum freshness and flavor in your fried rice.
- Properly Pulse Cauliflower: Be careful not to over-process the cauliflower in the food processor; it should resemble rice grains, not puree, to maintain the right texture.
- Customize Vegetables: Feel free to incorporate your favorite vegetables or whatever you have on hand; zucchini, broccoli, or corn can also work wonderfully.
- Control Heat Level: Adjust the amount of chili flakes according to your spice preference, or omit them altogether for a milder version.

Variations
Protein Additions
You can add protein to your cauliflower fried rice for extra flavor and nutrition. Options include chicken, shrimp, or tofu.
– Chicken: Use cooked, shredded chicken. Add it after cooking the vegetables. Stir it in well.
– Shrimp: Use peeled shrimp. Cook them in the skillet for 2-3 minutes before adding the eggs.
– Tofu: Choose firm tofu. Dice and cook it until golden before mixing it with the vegetables.
Adding any of these proteins makes your dish hearty and satisfying.
Vegetable Alternatives
Switching up the veggies keeps your fried rice fresh and exciting. Use seasonal vegetables for the best taste.
– Seasonal choices: Consider zucchini, asparagus, or bell peppers. These add color and crunch.
– Substitutes: If you don’t have mixed veggies, try corn or broccoli. Both work well and taste great.
These alternatives help you customize your meal to what you have on hand.
Different Cuisine Inspirations
You can take cauliflower fried rice in many directions. Here are a few ideas for flavors.
– Asian-inspired add-ins: Add bok choy or shiitake mushrooms for a bold twist. A splash of rice vinegar can brighten the dish.
– Fusion ideas: Mix in taco seasoning and black beans for a Mexican flair. Top with avocado for added creaminess.
These variations provide fun ways to keep your meals interesting and tasty.
Storage Info
Storing Leftovers
To keep your cauliflower fried rice fresh, refrigerate it right away. Place it in an airtight container. This helps it stay crisp and tasty. Aim to eat your leftovers within 3 to 4 days for the best flavor.
Reheating Techniques
When it comes to reheating, you have a few options. The microwave is quick, but it may make the rice soggy. Instead, I suggest using a skillet. Heat a little oil over medium heat, then add the rice. Stir it often until it’s hot. This keeps it crispy and delicious.
Freezing Cauliflower Fried Rice
If you want to save some for later, freezing works well. Let the fried rice cool completely. Then, transfer it to a freezer-safe bag. Squeeze out the air and seal it tightly. This will keep it fresh for up to three months.
When you’re ready to eat, thaw it overnight in the fridge. Reheat it in a skillet to bring back the texture. Enjoy your tasty meal anytime!
FAQs
What is Cauliflower Fried Rice?
Cauliflower fried rice is a healthy, low-carb take on traditional fried rice. Instead of rice, we use grated cauliflower. This dish is packed with vitamins and minerals. Cauliflower is high in fiber and low in calories, making it great for weight loss. The colorful veggies add more nutrients. You can tailor the flavors with spices and sauces, making each batch unique.
How long does cauliflower fried rice last in the fridge?
Cauliflower fried rice can last up to four days in the fridge. Store it in an airtight container. This helps keep it fresh and prevents any odors from other foods. Always let it cool before sealing. If you want it to last longer, consider freezing it.
Can I make cauliflower fried rice ahead of time?
Yes, you can make cauliflower fried rice ahead of time. It’s perfect for meal prep. Cook a big batch on the weekend and store it in the fridge. Portion it out for easy lunches. Just reheat when you’re ready to eat. This saves time during busy weekdays.
Is cauliflower fried rice gluten-free?
Yes, cauliflower fried rice is naturally gluten-free. However, check your soy sauce. Regular soy sauce contains gluten. You can use coconut aminos instead. It has a similar flavor and is gluten-free. This allows everyone to enjoy the dish, even those with gluten sensitivities.
Can this dish be made vegan?
Yes, you can easily make cauliflower fried rice vegan. Simply leave out the eggs. Instead, add tofu or chickpeas for protein. You can also use nutritional yeast for a cheesy flavor. This way, you keep the dish hearty and satisfying without animal products.
Cauliflower fried rice is a healthy and tasty dish that anyone can make. We covered all the essential steps, from prepping the cauliflower to incorporating delicious seasonings. With tips for perfect texture and flavor, you’ll enjoy every bite. You also have options to customize your dish with proteins and seasonal veggies. Remember, storing and reheating leftovers properly ensures your meal stays fresh and delicious. Try this dish and get creative with your own variations. It’s a fun way to enjoy healthy eatin

Crispy Cauliflower Fried Rice
Ingredients
- 1 medium head cauliflower, grated or pulsed into rice-sized pieces
- 2 tablespoons sesame oil
- 1 medium onion, finely diced
- 2 cloves garlic, minced
- 1 cup mixed vegetables (such as finely diced carrots, peas, and bell peppers)
- 2 large eggs, lightly beaten
- 3 stalks green onions, thinly sliced
- 2 tablespoons soy sauce (or coconut aminos)
- 1 tablespoon fresh ginger, grated
- to taste salt and black pepper
- 1 teaspoon chili flakes (optional)
Instructions
- Prepare the Cauliflower: Begin by removing the leaves and core from the cauliflower head. Break it into smaller florets, then place them into a food processor. Pulse until the cauliflower resembles grains of rice. This should yield about 4 cups of cauliflower rice. Set aside for later use.
- Cook the Aromatics: In a large skillet or wok, heat the sesame oil over medium heat. Once the oil is shimmering, add the diced onion and minced garlic. Sauté for about 2-3 minutes, or until the onion becomes soft and translucent, stirring frequently to prevent burning.
- Add Mixed Vegetables: Incorporate the mixed vegetables into the skillet. Continue to sauté for an additional 3-4 minutes, allowing the vegetables to soften and meld with the aromatic base.
- Scramble the Eggs: Create a space in the skillet by pushing the vegetable mixture to one side. Pour the beaten eggs into the empty side and gently stir until they begin to set, cooking for about 1-2 minutes until fully scrambled and cooked through.
- Combine Cauliflower Rice: Add the prepared cauliflower rice to the skillet, mixing everything together to ensure even distribution. Cook for 5-7 minutes, stirring occasionally, until the cauliflower is tender but still has a bit of texture. Avoid overcooking to prevent it from becoming mushy.
- Season: Pour in the soy sauce and add the grated ginger along with salt, pepper, and chili flakes if you're opting for heat. Stir well to ensure all ingredients are coated with the seasoning and flavors are well combined.
- Finish with Green Onions: Toss in the sliced green onions, allowing them to cook for an additional 1-2 minutes, just to soften slightly. Taste the mixture and adjust seasoning if needed before removing from heat.
- Serve: Serve your vibrant cauliflower fried rice hot, either in bowls or on plates. For an appealing presentation, consider garnishing with an extra sprinkle of sliced green onion or sesame seeds.


![For this tasty dish, you need some key items: - 2 medium eggplants, sliced into ¼-inch rounds - 1 teaspoon salt (for sweating the eggplant) - 1 cup all-purpose flour - 3 large eggs, beaten - 2 cups breadcrumbs (whole wheat adds a nutty touch) - 3 cups marinara sauce (store-bought or homemade) - 2 cups shredded mozzarella cheese - 1 cup grated Parmesan cheese - 2 tablespoons fresh basil, chopped (plus extra for garnish) - 1 teaspoon garlic powder - Olive oil for frying These ingredients form the heart of your eggplant parmesan. The eggplant brings a rich texture, while the cheeses add creaminess. Besides the main ingredients, consider these seasonings: - Fresh basil adds a fragrant touch. - Oregano gives a hint of earthiness. - Red pepper flakes can add some heat. These seasonings will elevate your dish. Feel free to experiment! If you want to mix it up, try these cheese alternatives: - Provolone for a different flavor. - Goat cheese for creaminess and tang. - Vegan cheese for a plant-based version. These options can change the taste while keeping it delicious. Feel free to swap cheeses based on your preference! For the full recipe, check out the detailed instructions. Start with the eggplant. Slice it into ¼-inch rounds. Sprinkle salt on the slices. This helps to draw out moisture and bitterness. Put the slices in a colander for about 30 minutes. After that, rinse them under cold water. Use paper towels to pat them dry. Now, let’s set up your breading station. You need three shallow dishes. Fill one with flour, the second with beaten eggs, and the third with breadcrumbs mixed with garlic powder. Organizing these dishes makes the breading easy. It’s time to bread the eggplant. Take a slice and coat it in flour first. Shake off any extra flour. Next, dip it into the eggs. Make sure it is fully covered. After that, roll it in the breadcrumb mix until it is well-coated. Place the breaded slices on a plate. Heat olive oil in a large skillet over medium heat. You want enough oil to cover the bottom of the pan. Fry the eggplant slices in batches. Cook each side until golden brown, which takes about 3-4 minutes. Once cooked, put them on a paper towel-lined plate to drain any excess oil. To assemble, spread a thin layer of marinara sauce in a large baking dish. Layer half of the fried eggplant slices on the sauce. Sprinkle a third of the mozzarella and half of the Parmesan cheese on top. Add another layer of marinara sauce. Repeat these layers with the remaining eggplant, mozzarella, and Parmesan. Don’t forget the chopped basil between the layers. Cover the dish with aluminum foil. Place it in your preheated oven at 375°F (190°C). Bake for about 25 minutes. After that, carefully remove the foil. Bake uncovered for another 15 minutes. This will make the top bubbly and golden brown. Let the dish cool for a few minutes before slicing. Serve it hot and garnish with fresh basil. Enjoy your cheesy eggplant delight. For the full recipe, check out the details above. To get the best flavor, start with fresh eggplants. Look for shiny, firm ones. Salt helps to draw out moisture and bitterness. After sweating the eggplant, rinse it well. This step makes your dish taste better. Use a good marinara sauce. Homemade sauce adds depth, but store-bought works too. Mixing cheeses also boosts flavor. Try a blend of mozzarella and Parmesan for a creamy texture. One common mistake is skipping the sweating step. This can lead to a soggy dish. Also, don’t rush the frying process. Cook eggplant slices until they are golden brown. If you overcrowd the pan, they won’t fry evenly. Another pitfall is not letting the dish rest after baking. Allow it to cool for a few minutes. This helps the layers set nicely. Serve your Easy Eggplant Parmesan hot from the oven. Garnish with fresh basil for a pop of color. A side salad complements this dish well. You can also serve it with crusty bread. For a twist, pair it with a light red wine. This adds a nice touch to your meal. If you want leftovers, try layering it in a sandwich for lunch the next day. Enjoy your cheesy eggplant delight! {{image_4}} You can make Easy Eggplant Parmesan even more veggie-friendly. Try adding layers of sautéed mushrooms or spinach. Both add flavor and nutrients. You can also swap out eggplant for zucchini or butternut squash. These alternatives taste great and keep the dish fresh and exciting. If you need a gluten-free version, use gluten-free breadcrumbs. You can also use crushed rice cereal or ground almonds. These options still give that crunchy texture without the gluten. Just ensure your marinara sauce is gluten-free, too. Get creative with your toppings! You can add roasted red peppers or artichoke hearts for extra flavor. For a spicy kick, sprinkle some red pepper flakes on top before baking. If you love herbs, consider adding fresh oregano or thyme. These small changes can make a big difference in taste. For the full recipe, check out the [Full Recipe]. To keep your Easy Eggplant Parmesan fresh, let it cool first. Then, transfer it to an airtight container. You can store it in the fridge for up to three days. If you have many leftovers, consider dividing them into smaller portions. This way, you can easily grab a serving when you're hungry. When it's time to enjoy your leftovers, reheating properly is key. For the best results, use the oven. Preheat it to 350°F (175°C). Place the eggplant in an oven-safe dish. Cover it with foil to keep it moist. Heat for about 20 minutes or until it's hot. You can also microwave it, but the oven gives a better texture. If you want to save your Easy Eggplant Parmesan for later, freezing is a great option. First, let it cool completely. Then, wrap it tightly in plastic wrap and foil. This helps prevent freezer burn. You can freeze it for up to three months. When ready to eat, thaw it overnight in the fridge before reheating. Enjoy your delicious meal anytime! You can use crushed crackers or ground oats instead of breadcrumbs. Both options add a nice crunch. If you want a gluten-free choice, use almond flour or gluten-free breadcrumbs. These alternatives work well and keep the dish tasty. Yes, you can prepare this dish a day ahead. Just follow the recipe steps but stop before baking. Cover the dish and store it in the fridge. When you are ready, bake it straight from the fridge. This saves time and still tastes great! The eggplant is cooked when it is soft and golden brown. If you press it gently, it should feel tender. Look for a bubbly top with a nice golden color. This means it’s ready to serve and enjoy! Absolutely! You can mix cheeses like provolone or fontina for added flavor. If you want it to be creamier, try adding ricotta. Just remember to balance the flavors to keep it delicious. For the best taste, use a blend of cheeses. This blog post covered the key ingredients and steps for easy eggplant parmesan. You learned about preparation, seasoning, and cooking methods. I shared tips to avoid common mistakes and offered serving suggestions. We discussed variations for different diets and how to store leftovers. Eggplant parmesan is simple and delicious. You can customize it to fit your taste. Enjoy making this dish with confidence!](https://goldendishy.com/wp-content/uploads/2025/06/85579090-c8c1-4217-8fdf-70085deda6dc-768x768.webp)

![To make Avocado Lime Crema Tacos, you need some fresh and simple ingredients. Here’s what you will need: - Fresh produce: - 2 ripe avocados - 1 cup cherry tomatoes, halved - 1 cup shredded red cabbage - 1/2 cup fresh cilantro leaves, roughly chopped - Pantry staples: - 8 small corn tortillas - 1/2 cup Greek yogurt - 2 tablespoons fresh lime juice - Zest of 1 lime - 1 clove garlic, finely minced - 1/4 teaspoon ground cumin - Sea salt, to taste - Optional toppings: - Sliced jalapeños - Radish slices - Crumbled feta cheese When you gather these ingredients, aim for ripe avocados. They will make your crema smooth and creamy. Fresh cilantro adds a burst of flavor to the tacos. You can also adjust the optional toppings based on your taste. If you want more heat, add jalapeños. For a crunchy touch, sprinkle some radish slices. You can find the full recipe in the article for detailed steps. Enjoy the fresh tastes of these tacos! To start, grab your food processor. Add the ripe avocados, Greek yogurt, fresh lime juice, lime zest, minced garlic, ground cumin, and a pinch of sea salt. Blend it all together until smooth and creamy. If it seems too thick, add a bit more lime juice. Taste it and adjust the salt or lime juice to your liking. A little extra zing can really elevate the flavor! Use a non-stick skillet for this step. Heat it over medium heat. Toast each corn tortilla for about 30 seconds on one side. Flip it and toast for another 30 seconds. The tortillas should feel warm and soft. Once done, stack them and wrap them in a clean kitchen towel to keep them warm. This keeps them from getting dry. Now, take a warm tortilla and spread a generous dollop of your avocado lime crema right in the center. Next, add a handful of shredded red cabbage for crunch. Layer on some halved cherry tomatoes for a fresh bite. Finally, sprinkle chopped fresh cilantro on top for a burst of flavor. For a fun twist, try adding some sliced jalapeños for heat, radish slices for crunch, or crumbled feta cheese for a savory touch. Serve your tacos right away. Enjoy them while they are fresh and bursting with flavor! Remember, you can find the full recipe [here]. You can switch up the base in your crema. Try sour cream or Greek yogurt for a tangy twist. If you want a dairy-free option, use silken tofu or cashew cream. For extra flavor, add herbs like cilantro or dill. You can also mix in spices such as smoked paprika or chipotle for a smoky kick. To balance flavors, add a mix of textures. Use crunchy cabbage, juicy tomatoes, and creamy crema. These layers make each bite exciting. To avoid tearing the tortillas, warm them first. Heat them in a skillet for about 30 seconds on each side. This softens them, making them easier to fold without breaking. Pair your tacos with simple sides. A fresh salad or rice works well. You might also enjoy them with a light drink like agua fresca or sparkling water. For garnishes, lime wedges and extra cilantro make your tacos look vibrant and fresh. These touches enhance both taste and presentation. For the Full Recipe, refer to the earlier section. {{image_4}} For a tasty vegetarian or vegan taco, swap Greek yogurt for cashew cream or coconut yogurt. Both options keep the creamy texture and flavor. You can also add black beans or roasted chickpeas for protein. These legumes add a nice texture and a mild flavor. Toss in some grilled zucchini or bell peppers for extra color and taste. Fresh herbs like mint or basil can bring a surprise twist. If you want to add protein, consider grilled chicken or shrimp. Marinate chicken in lime juice, garlic, and cumin for at least 30 minutes before grilling. For shrimp, a quick toss with olive oil and lime juice works well. Both options cook fast, making them easy to prepare. You could also try seared steak or fish for a heartier bite. Just remember to let the meat rest before slicing to keep it juicy. Tacos can take on many flavors based on where you are. In Mexico, you might find tacos with carne asada, topped with fresh cilantro and onions. In California, fish tacos with mango salsa are popular. Seasonal ingredients can also add a fresh touch. In summer, add sweet corn or peaches. In fall, roasted butternut squash or cranberries can provide a warm, cozy vibe. Each variation opens a new door to flavor! For full recipe details, check out the [Full Recipe]. You can store leftover tacos in different ways. If you have assembled tacos, wrap them in foil or plastic wrap. This keeps them fresh for a short time. Unassembled tacos store better. Keep the tortillas, crema, and toppings separate. Use airtight containers for each. This helps keep everything fresh. - Assembled Tacos: Wrap well in foil or plastic wrap. - Unassembled Tacos: Store tortillas, crema, and toppings in airtight containers. Store everything in the fridge. Consume within two days for best taste. To reheat tortillas, use a skillet. Heat it on medium for a few minutes. Place the tortilla for about 15 seconds on each side. This warms them without losing their texture. For the crema, avoid reheating. Instead, store it in the fridge. Use it cold or at room temperature. This keeps the fresh flavor. - Tortilla Method: Heat on medium in a skillet for 15 seconds per side. - Crema Storage: Keep it cold or at room temperature. These simple steps ensure your Avocado Lime Crema Tacos stay delicious! You can add heat with sliced jalapeños. Place them on top of the crema. For more heat, use hot sauce. A few drops can spice things up without being too much. Try different hot sauces to find your favorite flavor. This small change can make your tacos zing! Yes, you can make the crema ahead of time. Store it in an airtight container in the fridge. It stays fresh for about two days. To keep the color bright, add a little extra lime juice. Stir before using to bring back its smooth texture. If you can't find corn tortillas, use flour tortillas instead. They are soft and easy to fold. You can also use lettuce leaves for a low-carb option. For gluten-free diets, look for rice or almond flour tortillas. Each option gives a unique taste to your tacos. Yes, this recipe is great for meal prep. You can prepare the crema and store it in the fridge. Warm the tortillas before serving. Assemble the tacos just before eating to keep everything fresh. This way, you have tasty meals ready for the week with little effort. For the full recipe, check out the details above! In this article, we explored how to make tasty Avocado Lime Crema Tacos. We covered the essential ingredients, step-by-step instructions, and helpful tips for perfecting your taco assembly. You can easily customize your crema and taco fillings to suit your taste. Remember, you can prepare these tacos in advance and store leftovers for later enjoyment. Embrace these ideas to make your taco nights fun and delicious! With a little practice, you’ll impress family and friends with your new skills. Enjoy every bite!](https://goldendishy.com/wp-content/uploads/2025/07/f06e457d-602e-41ec-b362-5499d4ba2f55-768x768.webp)
