Caramel Apple Blondie Cheesecake Tasty Dessert Delight

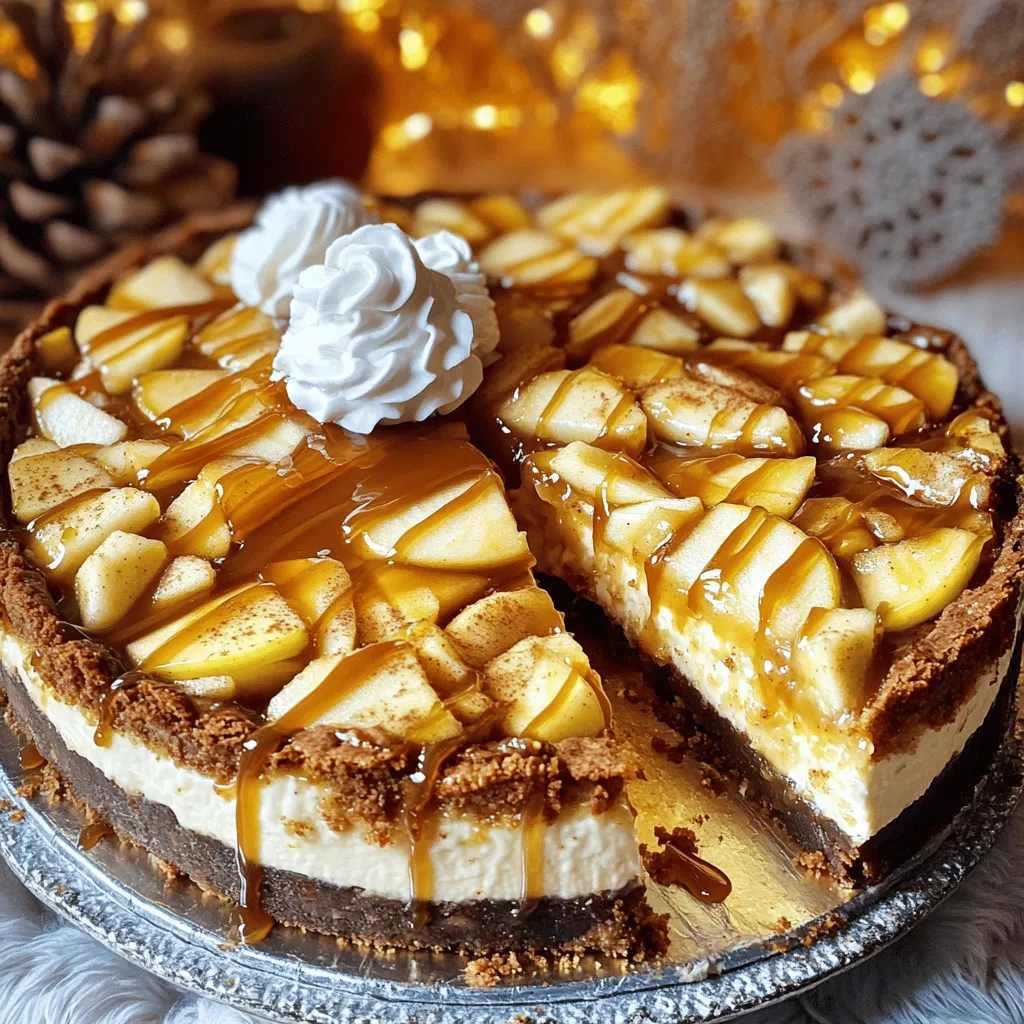
Are you ready to treat yourself to a dessert that combines flavors you love? This Caramel Apple Blondie Cheesecake is a warm hug for your taste buds. Picture a soft blondie base topped with creamy cheesecake, all swirled with rich caramel and spiced apples. Whether you’re hosting a gathering or enjoying a cozy night in, this sweet delight is sure to impress. Let’s dive into this tasty recipe that you won’t want to miss!
Ingredients
Main Ingredients
– 1 cup unsalted butter, melted
– 1 cup packed brown sugar
– 1 cup granulated sugar
– 2 large eggs (room temperature)
– 2 teaspoons vanilla extract
– 2 cups all-purpose flour
– 1 teaspoon baking powder
– 1/2 teaspoon baking soda
– 1/2 teaspoon salt
– 1 cup diced apples (peeled and cored)
– 1 teaspoon ground cinnamon
Cheesecake Ingredients
– 2 (8 oz) packages cream cheese (softened)
– 1/2 cup granulated sugar
– 1 teaspoon vanilla extract
– 2 large eggs (room temperature)
– 1 cup caramel sauce (store-bought or homemade)
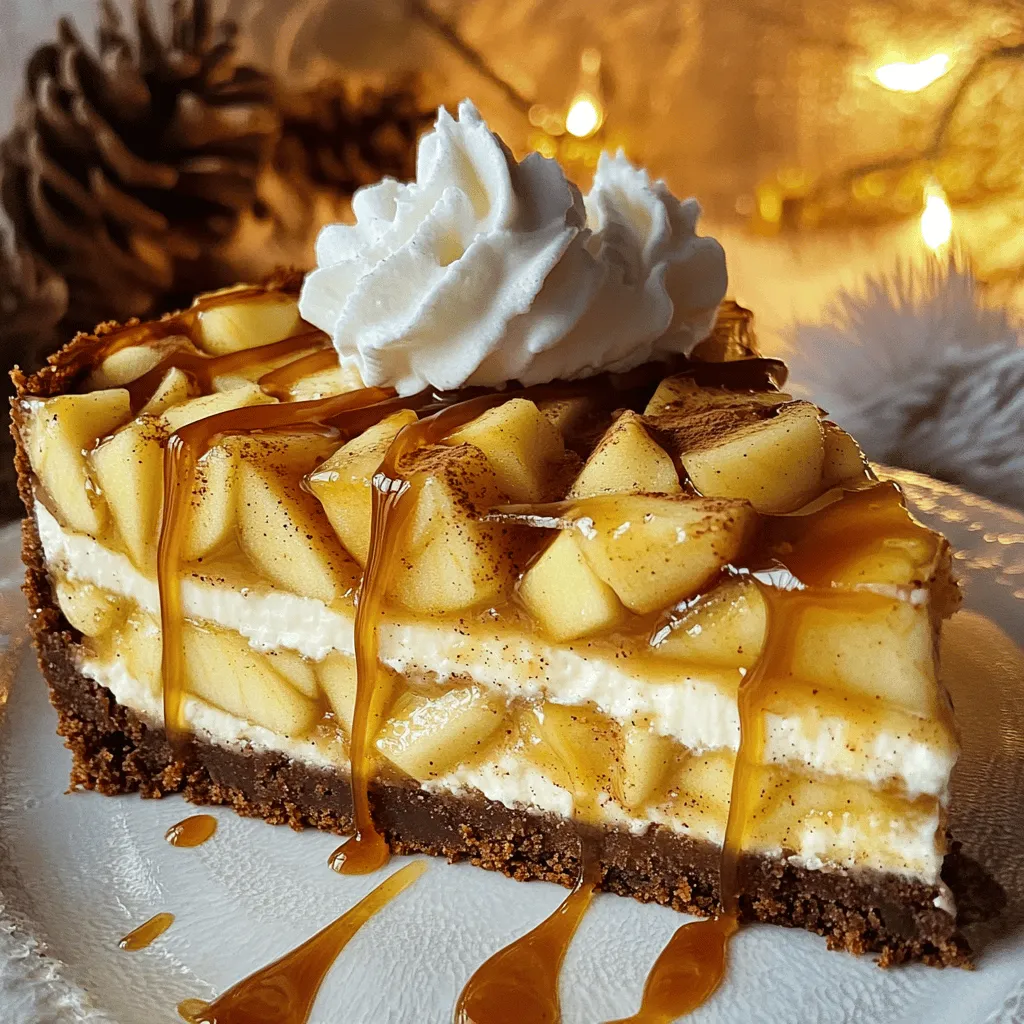
The ingredients for Caramel Apple Blondie Cheesecake are simple yet tasty. The main layer uses melted butter, both brown and granulated sugar, and fresh apples. These ingredients create a delicious base. The apples add moisture and a lovely flavor.
For the cheesecake layer, you need cream cheese, sugar, and eggs. This mix gives a rich and creamy texture. The caramel sauce is key for that sweet finish. You can use store-bought caramel or make your own.
Using room temperature eggs and cream cheese helps everything mix well. It prevents lumps and makes a smooth batter. The apples should be peeled and diced for even cooking and easy bites. Ground cinnamon adds warmth that pairs perfectly with caramel and apples.
Gather these ingredients, and you can start creating a dessert that impresses everyone.
Step-by-Step Instructions
Preparing the Blondie Base
1. Preheat your oven to 350°F (175°C). Grease and line a 9-inch springform pan.
2. In a large bowl, mix melted butter, brown sugar, and granulated sugar until smooth.
3. Add eggs and vanilla extract. Beat until creamy and blended.
4. In another bowl, whisk together flour, baking powder, baking soda, and salt. Fold this into the wet mixture gently.
Incorporating Apples and Cinnamon
1. Carefully fold in diced apples and ground cinnamon into the batter.
2. Spread half of this blondie batter evenly in the prepared pan.
Making the Cheesecake Layer
1. In a new bowl, beat cream cheese with granulated sugar and vanilla until smooth.
2. Add eggs one at a time, mixing well after each addition.
3. Pour this cheesecake mixture over the blondie base in the pan.
Swirling and Baking
1. Drizzle half of the caramel sauce over the cheesecake layer. Swirl it gently with a knife.
2. Spoon the remaining blondie batter on top. Drizzle the rest of the caramel sauce and swirl again if you like.
3. Bake for 45-50 minutes. Check for golden edges and a slightly jiggly center.
Cooling and Serving
1. Let the cheesecake cool at room temperature for about an hour.
2. Then, refrigerate for at least 4 hours.
3. Before serving, drizzle more caramel sauce on top for extra sweetness.
Tips & Tricks
Perfecting the Cheesecake Texture
Using room temperature ingredients is key. It helps mix everything smoothly. Cold cream cheese may cause lumps. Let your eggs and cream cheese sit out for about 30 minutes before use.
To prevent cracks while baking, avoid overmixing the batter. Overmixing adds air, which causes cracks as it cools. Another tip is to bake in a water bath. This helps control the temperature and keeps moisture in the oven.
Enhancing Flavor Profiles
Adding spices can elevate your cheesecake. Consider using nutmeg or ginger for warmth. A pinch of allspice can also give a nice kick.
You can switch the apples for other fruits too. Pears or peaches work well for different textures. Diced nuts like walnuts or pecans can also add a nice crunch.
Presentation Enhancements
Garnishing makes your dessert look special. Thinly sliced apples on top add color. A light dusting of cinnamon gives a warm touch.
For serving, place slices on dessert plates. Top each slice with whipped cream and a drizzle of caramel. This adds appeal and makes each bite even better!

Variations
Flavor Variations
You can change this dessert in fun ways. Try adding nuts for crunch. Walnuts or pecans work well. You can also mix in chocolate chips for a sweet twist. For a seasonal touch, swap apples with pears or berries. Each fruit adds a unique flavor that brightens your cheesecake.
Dietary Modifications
If you need a gluten-free version, use almond or oat flour instead of all-purpose flour. This keeps the dessert tasty without gluten. For a dairy-free option, substitute the cream cheese with a dairy-free alternative. Look for products made from cashews or tofu. These swaps let everyone enjoy this dessert.
Serving Suggestions
Pair this cheesecake with a hot drink, like coffee or tea. The warmth of the drink balances the sweetness. For gatherings, serve slices on colorful plates. Add whipped cream and a sprinkle of cinnamon on top. You can even place thin apple slices beside each piece for a pretty display.
Storage Info
Refrigeration Guidelines
To store leftovers, let the cheesecake cool completely. Once cool, cover it tightly with plastic wrap or aluminum foil. You can also use an airtight container. This helps keep the cheesecake fresh. Store it in the fridge for up to five days. If you have a slice left, just grab it and enjoy it cold!
Freezing Instructions
You can freeze this cheesecake too! First, let it cool completely in the fridge. Next, wrap it tightly in plastic wrap. Then, place it in a freezer-safe container or bag. This will help prevent freezer burn. When you’re ready to eat it, thaw the cheesecake in the fridge overnight. This keeps it tasty and fresh.
Shelf Life
This cheesecake will stay fresh for about five days in the fridge. If frozen, it can last for about three months. Just remember to check for any signs of spoilage before eating. If it looks or smells off, it’s best to toss it. Enjoy your dessert while it’s still fresh and delicious!
FAQs
What is Caramel Apple Blondie Cheesecake?
Caramel Apple Blondie Cheesecake is a sweet dessert that mixes blondies and cheesecake. It has a rich, buttery base with diced apples and a creamy cheesecake layer on top. The dessert is finished with a swirl of caramel sauce. This treat combines flavors from classic apple pie and cheesecake. Its origin comes from blending different desserts to create something unique.
Can I make this recipe ahead of time?
Yes, you can prepare the Caramel Apple Blondie Cheesecake ahead of time. It is best to bake it a day before you plan to serve it. After baking, let it cool for about an hour. Then, refrigerate it for at least four hours. This cooling time helps the flavors blend better. If you store it properly, it will stay fresh for up to five days in the fridge.
How do I substitute ingredients for allergies?
For allergies, you can make safe substitutions. Use gluten-free flour instead of all-purpose flour for a gluten-free option. If you need dairy-free ingredients, try using vegan cream cheese. Applesauce can replace eggs in some recipes. Make sure to check labels on all ingredients to avoid allergens.
What toppings go well with this dessert?
To enhance the dessert, add toppings like whipped cream or sliced apples. A sprinkle of cinnamon on top adds a nice touch. You can also drizzle more caramel sauce for extra sweetness. Nuts like pecans or walnuts can give a nice crunch. These toppings not only taste great but also improve the dessert’s look.
Can I use homemade caramel sauce?
Yes, you can make homemade caramel sauce. To do this, melt sugar in a pan over medium heat. Stir until it turns golden brown. Then, carefully add butter and heavy cream. Stir until smooth. Let it cool before using it in your cheesecake. Homemade caramel adds a special touch to your dessert.
How do I know when the cheesecake is done baking?
To check if the cheesecake is done baking, look for golden edges. The center should be set but still slightly jiggly. If you insert a toothpick, it should come out mostly clean. Avoid overbaking, as it can lead to cracks. Cooling it properly helps with the texture and flavor.
You now have a complete guide to making Caramel Apple Blondie Cheesecake. We’ve covered the ingredients, steps, tips, and variations to help you create this treat. Remember, room temperature ingredients make a smoother cheesecake. You can customize flavors or even adapt for dietary needs. This dessert is perfect for gatherings or a cozy night in. Enjoy baking and savoring every slice of this delicious cheesecake!


. This blog post covered how to make delicious chocolate chip scones. You learned about the key ingredients, step-by-step instructions, and tips for success. Remember, cold butter and careful mixing are key to flaky, tasty scones. Feel free to explore different flavors and variations. They can impress your friends or brighten your morning. With good storage methods, you can enjoy them later, too. Baking scones is fun, and the results are always worth it. Enjoy your baking journey and share your creations!](https://goldendishy.com/wp-content/uploads/2025/07/8341b68f-e0af-4c5e-ad3a-191f22800308-768x768.webp)

![- 1 cup cherries, pitted and chopped - 1 cup unsweetened applesauce - 1/2 cup peanut butter or almond butter - 1/2 cup honey or maple syrup - 1 teaspoon vanilla extract - 2 cups rolled oats - 1/2 cup chocolate protein powder - 1 teaspoon baking powder - 1/2 teaspoon baking soda - 1/4 teaspoon salt - 1/3 cup dark chocolate chips To make the best Cherry Chocolate Protein Muffins, you need fresh ingredients. Start with cherries. Choose ripe cherries for a sweet taste. Pitting and chopping them helps mix them into the batter easily. Next, use unsweetened applesauce. It adds moisture and replaces some fat. This keeps the muffins light and fluffy. If you prefer a nutty flavor, choose between peanut butter or almond butter. Both work well. For sweetness, you can pick honey or maple syrup. Each adds a unique flavor. Don’t forget the vanilla extract. It enhances the overall taste. Now, let’s talk about the dry ingredients. Rolled oats add texture and fiber. They also help bind the muffins. The chocolate protein powder is key for a protein boost. It makes these muffins a healthy snack. Add baking powder and baking soda for lift. This ensures your muffins rise well. Lastly, sprinkle in some salt to balance the sweetness. The dark chocolate chips are the fun part. They melt in the oven and create pockets of gooey chocolate. This makes every bite a treat! For the full recipe, check out the instructions in the next section. Enjoy every step of making these delicious muffins! 1. First, preheat your oven to 350°F (175°C). This step is key to baking muffins evenly. 2. Prepare your muffin tin by lining it with paper liners. You can also lightly grease each cup to help prevent sticking. 3. In a large mixing bowl, combine the unsweetened applesauce, your choice of nut butter, honey, and vanilla extract. Mix well with a whisk or spatula until smooth. 4. Now, it’s time to fold in the chopped cherries. Gently stir them into the wet mixture. Make sure they spread evenly throughout the batter. 5. In another bowl, whisk together the rolled oats, chocolate protein powder, baking powder, baking soda, and salt. This mix will give your muffins a nice rise. 6. Gradually add the dry mix to the wet mixture. Fold them together gently, being careful not to overmix. Overmixing can make your muffins tough. 7. Next, fold in the dark chocolate chips. Ensure they are well-distributed, so you get a chocolate burst in every bite. 8. Use a spoon or an ice cream scoop to pour the batter into the muffin tin. Fill each cup about 2/3 full to allow room for rising. 9. Bake the muffins in your preheated oven for 18-20 minutes. Check for doneness by inserting a toothpick into the center. If it comes out clean, they are ready! 10. Once baked, remove the muffins and let them cool in the tin for 5 minutes. Then, transfer them to a wire rack to cool completely. This step helps keep the texture light and fluffy. For the full recipe, check out the details above. Enjoy your delicious Cherry Chocolate Protein Muffins! To make the best Cherry Chocolate Protein Muffins, avoid overmixing the batter. Overmixing can lead to tough muffins. Mix just until the dry and wet ingredients combine. This keeps your muffins light and fluffy. Measuring ingredients accurately is also key. Use dry measuring cups for solids like oats and protein powder. For liquids, use a liquid measuring cup. This ensures you add the right amounts for great results. I love serving these muffins warm. They taste best right out of the oven. A light dusting of powdered sugar or a drizzle of melted dark chocolate adds a special touch. You can also pair them with Greek yogurt for extra protein and creaminess. For a balanced meal, enjoy these muffins with a side of fruit. Slices of banana or a handful of berries can brighten your plate and add freshness. These muffins are packed with health benefits. Protein powder offers a great source of protein. It helps build and repair muscles. This makes them perfect for post-workout snacks. Cherries are rich in antioxidants. They help fight inflammation and support heart health. Oats provide fiber, which is good for digestion. They also keep you feeling full longer, making these muffins a smart choice for any time of day. For the complete recipe, check out the [Full Recipe]. {{image_4}} You can make Cherry Chocolate Protein Muffins gluten-free by using certified gluten-free oats. Almond flour also works well here. For a vegan option, replace honey with maple syrup. Use a vegan protein powder to keep it plant-based. This way, everyone can enjoy these tasty muffins, no matter their diet. - Gluten-free: Use gluten-free oats and almond flour. - Vegan: Swap honey for maple syrup and use vegan protein powder. Spicing up your muffins can add a fun twist. Try adding 1 teaspoon of cinnamon or nutmeg to the mix. This small change can bring warmth and depth to the flavor. You might also want to mix in nuts or seeds. Chopped walnuts or sunflower seeds can add crunch and nutrition to your muffins. - Spices: Add 1 teaspoon of cinnamon or nutmeg. - Nuts or seeds: Incorporate chopped walnuts or sunflower seeds. You can customize these muffins with fruits that are in season. In summer, try adding blueberries or peaches. In fall, diced apples or pumpkin puree would be delightful. Different types of chocolate can also change the taste. Dark chocolate, milk chocolate, or even white chocolate can make the muffins exciting and unique. - Seasonal fruits: Use blueberries in summer or apples in fall. - Chocolate types: Experiment with dark, milk, or white chocolate. To keep your Cherry Chocolate Protein Muffins fresh, follow these simple steps: - Allow the muffins to cool completely before storage. - Use an airtight container to maintain moisture. - Place parchment paper between layers to avoid sticking. I find that glass containers work best because they help keep the muffins soft and fresh. Freezing muffins is a great way to enjoy them later. Here’s how to do it: - Allow the muffins to cool fully. - Wrap each muffin in plastic wrap or aluminum foil, then place them in a freezer bag. - Label the bag with the date for easy tracking. When you’re ready to eat, thaw the muffins by leaving them out at room temperature. For quicker results, pop them in the microwave for about 20 seconds. This method keeps them moist and tasty. Cherry Chocolate Protein Muffins can last: - At room temperature: 3 to 4 days in an airtight container. - In the fridge: 1 week if stored properly. This means you can enjoy these muffins without worry for several days! Remember to check for freshness before eating. Enjoy your delicious snacks! Can I make these muffins ahead of time? Yes, you can make these muffins ahead of time. They store well for a few days. Just make sure to keep them in an airtight container. You can also freeze them for longer storage. What can I use instead of protein powder? If you don't have protein powder, you can use ground oats or almond flour. This will change the texture a bit but keeps the muffins tasty. You might need to adjust the liquid in the recipe. How can I reduce sugar in the recipe? To cut down on sugar, use less honey or maple syrup. You can also swap in a sugar substitute like stevia. This will help keep the sweetness but lower the sugar content. Is it possible to use fresh cherries instead of frozen? Yes, fresh cherries work great too! Just chop them up and remove the pits. Fresh cherries can add a nice burst of flavor. They may make the muffins a bit moister, so keep an eye on baking time. What is the protein content per muffin? Each muffin has about 7 grams of protein. This comes mainly from the protein powder and nut butter. It makes a healthy snack or breakfast option. Are these muffins suitable for kids? Absolutely! These muffins are great for kids. They are tasty and packed with nutrients. Plus, the chocolate bits make them fun to eat. In this article, we explored how to make delicious Cherry Chocolate Protein Muffins. We covered ingredients, step-by-step instructions, and tips for perfecting the recipe. You learned how to store these muffins and adapt them for different diets. These muffins are not just tasty; they offer health benefits too. Experiment with flavors and enjoy them as snacks or meals. Now, grab your ingredients and start baking your own batch today!](https://goldendishy.com/wp-content/uploads/2025/07/bcf12119-4bc4-4824-810e-f617231ac2e7-768x768.webp)