Buffalo Chicken Dip Creamy and Flavorful Delight
![- 2 cups shredded cooked chicken - 1 (8 oz) package of cream cheese - 1/2 cup buffalo sauce - 1/2 cup ranch dressing For buffalo chicken dip, the main ingredients create a creamy and rich base. Shredded cooked chicken gives it that hearty texture. You can use rotisserie chicken to save time. Cream cheese adds smoothness, while buffalo sauce brings the heat. Ranch dressing balances the flavors and adds a nice creaminess. - 1/2 cup crumbled blue cheese - 1 green onion for garnish - Tortilla chips or celery sticks for serving Optional ingredients enhance the dip. Crumbled blue cheese adds a bold taste that many love. It pairs well with the spicy buffalo flavor. A sprinkle of green onion on top looks great and adds freshness. For serving, I recommend crunchy tortilla chips or crisp celery sticks. They both complement the dip's rich and creamy texture. Always remember to adjust the buffalo sauce to match your spice preference. You can find the full recipe in the section above for more detailed steps! 1. First, preheat your oven to 350°F (175°C). This helps the dip cook evenly. 2. In a large bowl, combine the shredded chicken, cream cheese, buffalo sauce, and ranch dressing. Mix until smooth. 1. Now, gently fold in the shredded cheddar cheese and blue cheese, if you use it. This adds great flavor and creaminess. 2. Next, transfer the chicken mixture to a baking dish. Spread it evenly with a spatula. 3. Bake the dip for 20-25 minutes. Look for bubbling edges and a slightly golden top. 1. When your dip is done, take it out and garnish with sliced green onions. This adds freshness. 2. Serve it warm with tortilla chips or celery sticks. Enjoy this creamy and flavorful delight! For the full recipe, check out the details above. Adjusting buffalo sauce is key for your dip. If you love heat, add more buffalo sauce. If you prefer mild dishes, use less. Start small and taste as you go. You can always add more but can’t take it out. If you want a cream cheese alternative, try Greek yogurt. It gives a nice tang and cuts some fat. You can also use vegan cream cheese for a plant-based option. This keeps the dip creamy without dairy. To get the perfect crust, bake your dip until it’s bubbly and golden. This usually takes about 20-25 minutes at 350°F. You want the edges to have a light brown color. This shows the dip is ready and adds flavor. For a crispy top, use a broiler after baking. Set your oven to broil and watch closely. Just a few minutes under the broiler can give your dip a nice crunch. Be careful not to burn it! When serving at parties, focus on presentation. Put the dip in the center of a colorful platter. Surround it with chips and celery sticks. This makes it look inviting and fun. For drinks, consider pairing it with light beers or sparkling water. The lightness balances the richness of the dip. You can also serve it with a side of fresh veggies for a nice crunch. {{image_4}} You can make buffalo chicken dip healthier with just a few swaps. - Low-fat cream cheese options: Use low-fat cream cheese. It cuts fat and calories but keeps the creaminess. - Using Greek yogurt instead of ranch dressing: Greek yogurt adds a tangy taste and protein. It's a great way to lower calories while keeping it creamy. You might want to kick up the flavor in your dip. - Additions like diced jalapeños or hot peppers: These add heat and a fresh taste. Adjust to your spice level. - Incorporating other cheeses for unique flavors: Try mixing in mozzarella or gouda. Each cheese adds its own twist to the dip's flavor. Change how you serve your buffalo chicken dip for fun. - Buffalo chicken dip stuffed in peppers: Hollow out mini bell peppers and fill them with the dip. Bake until warm for a tasty bite. - Spinach and buffalo chicken dip combo: Mix in fresh spinach. It adds color and nutrition, making the dip even better. For the complete recipe, check out the [Full Recipe]. To keep buffalo chicken dip fresh, place it in an airtight container. This helps prevent it from drying out. Store the dip in the fridge for up to five days. You may notice the flavors deepen as it sits. Just be sure to cover it well to avoid any fridge odors. You can freeze buffalo chicken dip for longer storage. First, let the dip cool completely. Then, transfer it to a freezer-safe container. Press plastic wrap directly on the dip before sealing. It can last for up to three months in the freezer. When you're ready to enjoy it, thaw it in the fridge overnight. You have two great options to reheat buffalo chicken dip: the oven or microwave. If using the oven, preheat it to 350°F (175°C). Place the dip in an oven-safe dish and heat for about 20 minutes. Stir halfway through for even warming. If you choose the microwave, heat in 30-second intervals. This prevents hot spots and keeps the dip creamy. To maintain texture, avoid overheating. Let the dip sit for a minute after reheating. This helps the flavors come back together. Enjoy your dip warm with chips or celery sticks! Yes, you can make buffalo chicken dip ahead of time. To prepare in advance, follow these steps: - Mix the ingredients: Combine the shredded chicken, cream cheese, buffalo sauce, and ranch dressing. - Store it: Place the mixture in a baking dish, cover it with plastic wrap, and put it in the fridge. - Bake when ready: When you are ready to serve, take it out and bake it at 350°F for 20-25 minutes. This way, you save time and enjoy a warm dip at your gathering. If you want to swap ranch dressing, here are some great options: - Blue cheese dressing: This adds a tangy flavor that works well. - Greek yogurt: Use plain Greek yogurt for a healthier twist. - Caesar dressing: This offers a different but tasty flavor profile. Feel free to experiment with your favorite dressings! To kick up the spice level, try these ideas: - Extra buffalo sauce: Add more buffalo sauce to your mix. - Diced jalapeños: Mix in fresh or pickled jalapeños for heat. - Hot sauce: Drizzle hot sauce on top before serving for an extra kick. Adjust the spice to match your taste, and enjoy the heat! Buffalo chicken dip can be gluten-free, but check your ingredients. Here’s what to know: - Buffalo sauce: Most brands are gluten-free, but confirm by reading the label. - Ranch dressing: Look for gluten-free options if using store-bought. - Dipping options: Use gluten-free tortilla chips or fresh veggies for dipping. With careful choices, everyone can enjoy this dip! You now know how to make buffalo chicken dip from scratch. We covered key ingredients like chicken, cream cheese, and buffalo sauce. I shared step-by-step instructions to get delicious results. You learned tips for adjustments and variations to suit your taste. Remember, this dip is versatile; you can customize it for any gathering. Enjoy experimenting with flavors and serving styles. Your next snack night will be a hit!](https://goldendishy.com/wp-content/uploads/2025/07/99cdad4a-7337-4a60-a9b0-2f79e024797e.webp)
Are you ready to enjoy a dish that’s both creamy and bursting with flavor? Buffalo chicken dip is a crowd-pleaser that’s perfect for game days or cozy gatherings. In this post, I’ll guide you through simple steps to make this tasty treat, highlighting main ingredients and tips for serving. You’ll impress everyone with a dip that’s easy to create and hard to resist! Let’s dive into this delicious recipe!
Ingredients
Main Ingredients
– 2 cups shredded cooked chicken
– 1 (8 oz) package of cream cheese
– 1/2 cup buffalo sauce
– 1/2 cup ranch dressing
For buffalo chicken dip, the main ingredients create a creamy and rich base. Shredded cooked chicken gives it that hearty texture. You can use rotisserie chicken to save time. Cream cheese adds smoothness, while buffalo sauce brings the heat. Ranch dressing balances the flavors and adds a nice creaminess.
Optional Ingredients
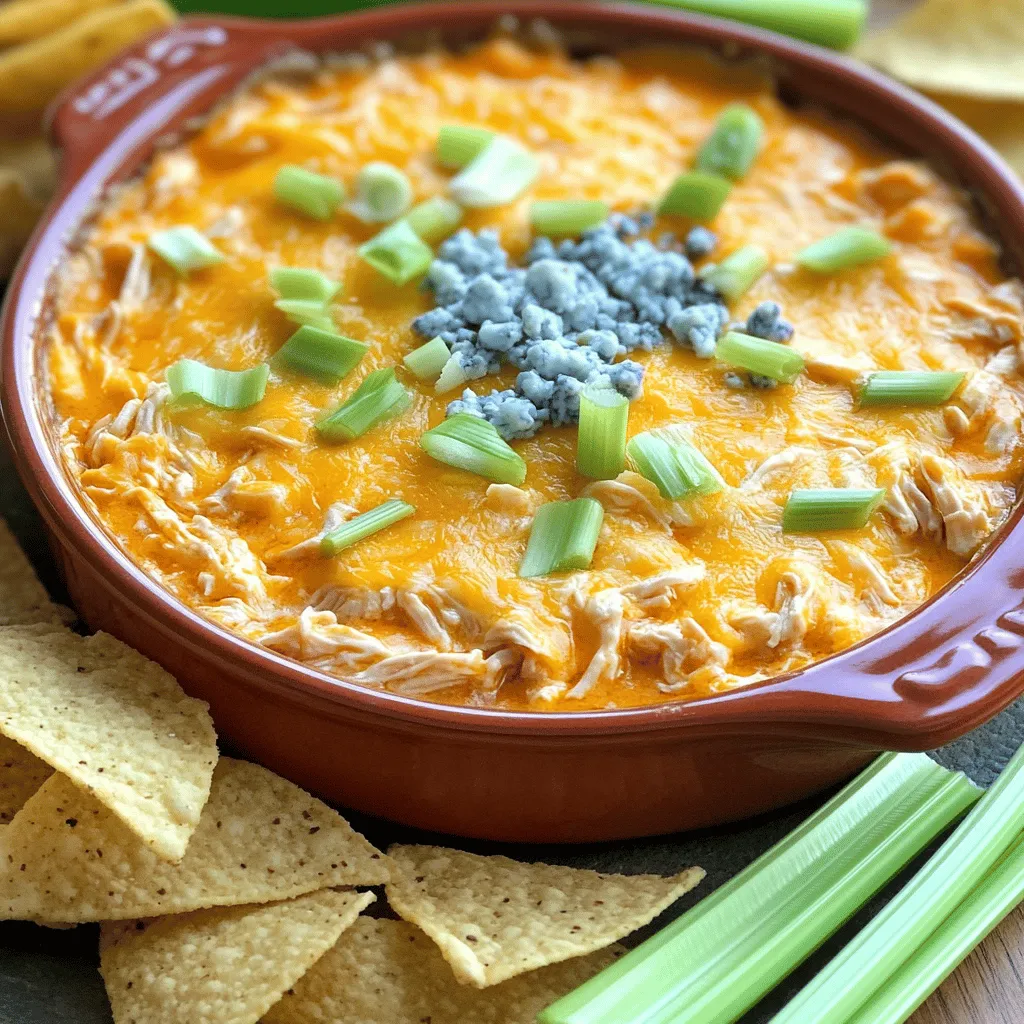
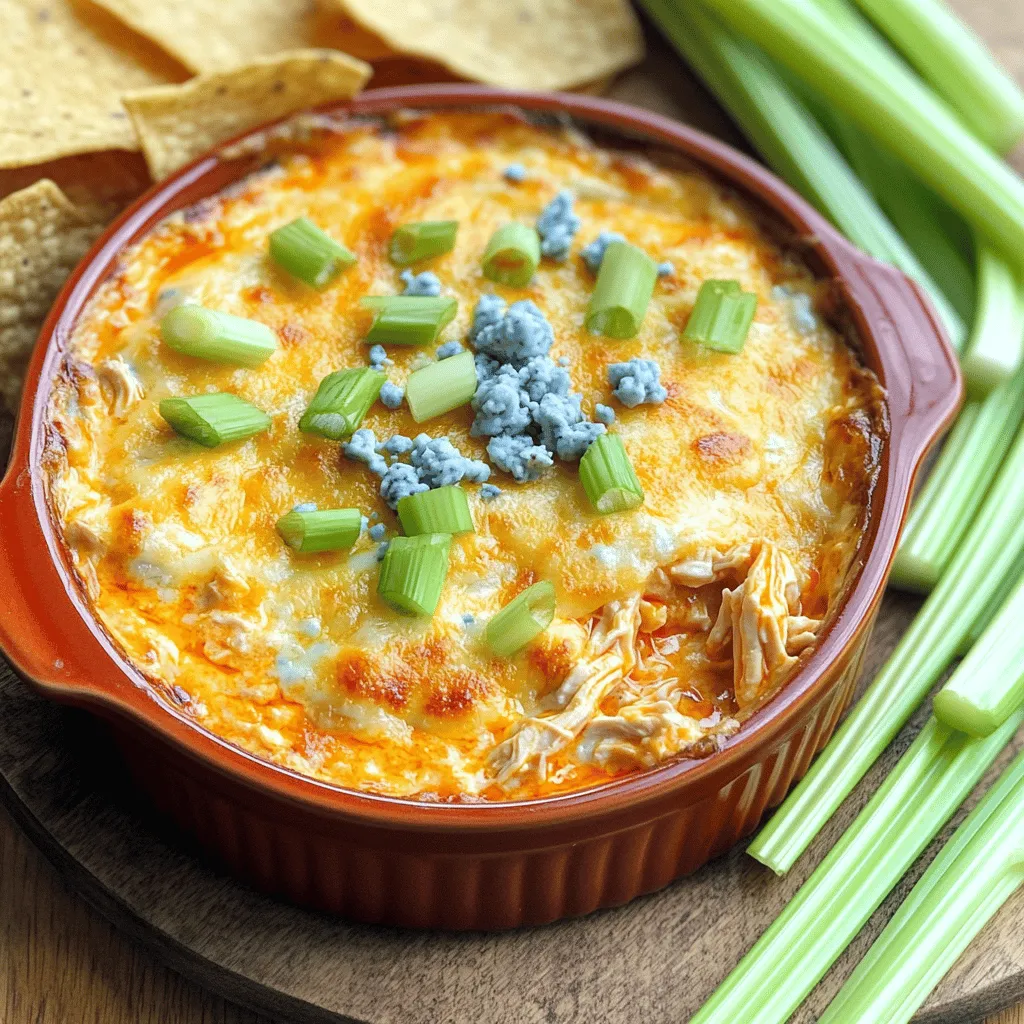
– 1/2 cup crumbled blue cheese
– 1 green onion for garnish
– Tortilla chips or celery sticks for serving
Optional ingredients enhance the dip. Crumbled blue cheese adds a bold taste that many love. It pairs well with the spicy buffalo flavor. A sprinkle of green onion on top looks great and adds freshness. For serving, I recommend crunchy tortilla chips or crisp celery sticks. They both complement the dip’s rich and creamy texture.
Always remember to adjust the buffalo sauce to match your spice preference.
Step-by-Step Instructions
Preparation Steps
1. First, preheat your oven to 350°F (175°C). This helps the dip cook evenly.
2. In a large bowl, combine the shredded chicken, cream cheese, buffalo sauce, and ranch dressing. Mix until smooth.
Mixing and Baking
1. Now, gently fold in the shredded cheddar cheese and blue cheese, if you use it. This adds great flavor and creaminess.
2. Next, transfer the chicken mixture to a baking dish. Spread it evenly with a spatula.
3. Bake the dip for 20-25 minutes. Look for bubbling edges and a slightly golden top.
Garnishing and Serving
1. When your dip is done, take it out and garnish with sliced green onions. This adds freshness.
2. Serve it warm with tortilla chips or celery sticks. Enjoy this creamy and flavorful delight!
Tips & Tricks
Ingredient Adjustments
Adjusting buffalo sauce is key for your dip. If you love heat, add more buffalo sauce. If you prefer mild dishes, use less. Start small and taste as you go. You can always add more but can’t take it out.
If you want a cream cheese alternative, try Greek yogurt. It gives a nice tang and cuts some fat. You can also use vegan cream cheese for a plant-based option. This keeps the dip creamy without dairy.
Baking Variations
To get the perfect crust, bake your dip until it’s bubbly and golden. This usually takes about 20-25 minutes at 350°F. You want the edges to have a light brown color. This shows the dip is ready and adds flavor.
For a crispy top, use a broiler after baking. Set your oven to broil and watch closely. Just a few minutes under the broiler can give your dip a nice crunch. Be careful not to burn it!
Serving Ideas
When serving at parties, focus on presentation. Put the dip in the center of a colorful platter. Surround it with chips and celery sticks. This makes it look inviting and fun.
For drinks, consider pairing it with light beers or sparkling water. The lightness balances the richness of the dip. You can also serve it with a side of fresh veggies for a nice crunch.

Variations
Healthier Alternatives
You can make buffalo chicken dip healthier with just a few swaps.
– Low-fat cream cheese options: Use low-fat cream cheese. It cuts fat and calories but keeps the creaminess.
– Using Greek yogurt instead of ranch dressing: Greek yogurt adds a tangy taste and protein. It’s a great way to lower calories while keeping it creamy.
Flavor Enhancements
You might want to kick up the flavor in your dip.
– Additions like diced jalapeños or hot peppers: These add heat and a fresh taste. Adjust to your spice level.
– Incorporating other cheeses for unique flavors: Try mixing in mozzarella or gouda. Each cheese adds its own twist to the dip’s flavor.
Serving Style Variations
Change how you serve your buffalo chicken dip for fun.
– Buffalo chicken dip stuffed in peppers: Hollow out mini bell peppers and fill them with the dip. Bake until warm for a tasty bite.
– Spinach and buffalo chicken dip combo: Mix in fresh spinach. It adds color and nutrition, making the dip even better.
Storage Info
Storing Leftovers
To keep buffalo chicken dip fresh, place it in an airtight container. This helps prevent it from drying out. Store the dip in the fridge for up to five days. You may notice the flavors deepen as it sits. Just be sure to cover it well to avoid any fridge odors.
Freezing Tips
You can freeze buffalo chicken dip for longer storage. First, let the dip cool completely. Then, transfer it to a freezer-safe container. Press plastic wrap directly on the dip before sealing. It can last for up to three months in the freezer. When you’re ready to enjoy it, thaw it in the fridge overnight.
Reheating Methods
You have two great options to reheat buffalo chicken dip: the oven or microwave. If using the oven, preheat it to 350°F (175°C). Place the dip in an oven-safe dish and heat for about 20 minutes. Stir halfway through for even warming. If you choose the microwave, heat in 30-second intervals. This prevents hot spots and keeps the dip creamy.
To maintain texture, avoid overheating. Let the dip sit for a minute after reheating. This helps the flavors come back together. Enjoy your dip warm with chips or celery sticks!
FAQs
Can I make buffalo chicken dip ahead of time?
Yes, you can make buffalo chicken dip ahead of time. To prepare in advance, follow these steps:
– Mix the ingredients: Combine the shredded chicken, cream cheese, buffalo sauce, and ranch dressing.
– Store it: Place the mixture in a baking dish, cover it with plastic wrap, and put it in the fridge.
– Bake when ready: When you are ready to serve, take it out and bake it at 350°F for 20-25 minutes.
This way, you save time and enjoy a warm dip at your gathering.
What can I use instead of ranch dressing?
If you want to swap ranch dressing, here are some great options:
– Blue cheese dressing: This adds a tangy flavor that works well.
– Greek yogurt: Use plain Greek yogurt for a healthier twist.
– Caesar dressing: This offers a different but tasty flavor profile.
Feel free to experiment with your favorite dressings!
How do I make buffalo chicken dip spicier?
To kick up the spice level, try these ideas:
– Extra buffalo sauce: Add more buffalo sauce to your mix.
– Diced jalapeños: Mix in fresh or pickled jalapeños for heat.
– Hot sauce: Drizzle hot sauce on top before serving for an extra kick.
Adjust the spice to match your taste, and enjoy the heat!
Is buffalo chicken dip gluten-free?
Buffalo chicken dip can be gluten-free, but check your ingredients. Here’s what to know:
– Buffalo sauce: Most brands are gluten-free, but confirm by reading the label.
– Ranch dressing: Look for gluten-free options if using store-bought.
– Dipping options: Use gluten-free tortilla chips or fresh veggies for dipping.
With careful choices, everyone can enjoy this dip!
You now know how to make buffalo chicken dip from scratch. We covered key ingredients like chicken, cream cheese, and buffalo sauce. I shared step-by-step instructions to get delicious results. You learned tips for adjustments and variations to suit your taste.
Remember, this dip is versatile; you can customize it for any gathering. Enjoy experimenting with flavors and serving styles. Your next snack night will be a hit!
![- 2 cups shredded cooked chicken - 1 (8 oz) package of cream cheese - 1/2 cup buffalo sauce - 1/2 cup ranch dressing For buffalo chicken dip, the main ingredients create a creamy and rich base. Shredded cooked chicken gives it that hearty texture. You can use rotisserie chicken to save time. Cream cheese adds smoothness, while buffalo sauce brings the heat. Ranch dressing balances the flavors and adds a nice creaminess. - 1/2 cup crumbled blue cheese - 1 green onion for garnish - Tortilla chips or celery sticks for serving Optional ingredients enhance the dip. Crumbled blue cheese adds a bold taste that many love. It pairs well with the spicy buffalo flavor. A sprinkle of green onion on top looks great and adds freshness. For serving, I recommend crunchy tortilla chips or crisp celery sticks. They both complement the dip's rich and creamy texture. Always remember to adjust the buffalo sauce to match your spice preference. You can find the full recipe in the section above for more detailed steps! 1. First, preheat your oven to 350°F (175°C). This helps the dip cook evenly. 2. In a large bowl, combine the shredded chicken, cream cheese, buffalo sauce, and ranch dressing. Mix until smooth. 1. Now, gently fold in the shredded cheddar cheese and blue cheese, if you use it. This adds great flavor and creaminess. 2. Next, transfer the chicken mixture to a baking dish. Spread it evenly with a spatula. 3. Bake the dip for 20-25 minutes. Look for bubbling edges and a slightly golden top. 1. When your dip is done, take it out and garnish with sliced green onions. This adds freshness. 2. Serve it warm with tortilla chips or celery sticks. Enjoy this creamy and flavorful delight! For the full recipe, check out the details above. Adjusting buffalo sauce is key for your dip. If you love heat, add more buffalo sauce. If you prefer mild dishes, use less. Start small and taste as you go. You can always add more but can’t take it out. If you want a cream cheese alternative, try Greek yogurt. It gives a nice tang and cuts some fat. You can also use vegan cream cheese for a plant-based option. This keeps the dip creamy without dairy. To get the perfect crust, bake your dip until it’s bubbly and golden. This usually takes about 20-25 minutes at 350°F. You want the edges to have a light brown color. This shows the dip is ready and adds flavor. For a crispy top, use a broiler after baking. Set your oven to broil and watch closely. Just a few minutes under the broiler can give your dip a nice crunch. Be careful not to burn it! When serving at parties, focus on presentation. Put the dip in the center of a colorful platter. Surround it with chips and celery sticks. This makes it look inviting and fun. For drinks, consider pairing it with light beers or sparkling water. The lightness balances the richness of the dip. You can also serve it with a side of fresh veggies for a nice crunch. {{image_4}} You can make buffalo chicken dip healthier with just a few swaps. - Low-fat cream cheese options: Use low-fat cream cheese. It cuts fat and calories but keeps the creaminess. - Using Greek yogurt instead of ranch dressing: Greek yogurt adds a tangy taste and protein. It's a great way to lower calories while keeping it creamy. You might want to kick up the flavor in your dip. - Additions like diced jalapeños or hot peppers: These add heat and a fresh taste. Adjust to your spice level. - Incorporating other cheeses for unique flavors: Try mixing in mozzarella or gouda. Each cheese adds its own twist to the dip's flavor. Change how you serve your buffalo chicken dip for fun. - Buffalo chicken dip stuffed in peppers: Hollow out mini bell peppers and fill them with the dip. Bake until warm for a tasty bite. - Spinach and buffalo chicken dip combo: Mix in fresh spinach. It adds color and nutrition, making the dip even better. For the complete recipe, check out the [Full Recipe]. To keep buffalo chicken dip fresh, place it in an airtight container. This helps prevent it from drying out. Store the dip in the fridge for up to five days. You may notice the flavors deepen as it sits. Just be sure to cover it well to avoid any fridge odors. You can freeze buffalo chicken dip for longer storage. First, let the dip cool completely. Then, transfer it to a freezer-safe container. Press plastic wrap directly on the dip before sealing. It can last for up to three months in the freezer. When you're ready to enjoy it, thaw it in the fridge overnight. You have two great options to reheat buffalo chicken dip: the oven or microwave. If using the oven, preheat it to 350°F (175°C). Place the dip in an oven-safe dish and heat for about 20 minutes. Stir halfway through for even warming. If you choose the microwave, heat in 30-second intervals. This prevents hot spots and keeps the dip creamy. To maintain texture, avoid overheating. Let the dip sit for a minute after reheating. This helps the flavors come back together. Enjoy your dip warm with chips or celery sticks! Yes, you can make buffalo chicken dip ahead of time. To prepare in advance, follow these steps: - Mix the ingredients: Combine the shredded chicken, cream cheese, buffalo sauce, and ranch dressing. - Store it: Place the mixture in a baking dish, cover it with plastic wrap, and put it in the fridge. - Bake when ready: When you are ready to serve, take it out and bake it at 350°F for 20-25 minutes. This way, you save time and enjoy a warm dip at your gathering. If you want to swap ranch dressing, here are some great options: - Blue cheese dressing: This adds a tangy flavor that works well. - Greek yogurt: Use plain Greek yogurt for a healthier twist. - Caesar dressing: This offers a different but tasty flavor profile. Feel free to experiment with your favorite dressings! To kick up the spice level, try these ideas: - Extra buffalo sauce: Add more buffalo sauce to your mix. - Diced jalapeños: Mix in fresh or pickled jalapeños for heat. - Hot sauce: Drizzle hot sauce on top before serving for an extra kick. Adjust the spice to match your taste, and enjoy the heat! Buffalo chicken dip can be gluten-free, but check your ingredients. Here’s what to know: - Buffalo sauce: Most brands are gluten-free, but confirm by reading the label. - Ranch dressing: Look for gluten-free options if using store-bought. - Dipping options: Use gluten-free tortilla chips or fresh veggies for dipping. With careful choices, everyone can enjoy this dip! You now know how to make buffalo chicken dip from scratch. We covered key ingredients like chicken, cream cheese, and buffalo sauce. I shared step-by-step instructions to get delicious results. You learned tips for adjustments and variations to suit your taste. Remember, this dip is versatile; you can customize it for any gathering. Enjoy experimenting with flavors and serving styles. Your next snack night will be a hit!](https://goldendishy.com/wp-content/uploads/2025/07/99cdad4a-7337-4a60-a9b0-2f79e024797e-300x300.webp)

![- 2 cans (15 oz each) chickpeas, thoroughly drained and rinsed - 2 tablespoons extra virgin olive oil - 1 tablespoon smoked paprika - 1 teaspoon cayenne pepper - 1 teaspoon garlic powder - 1 teaspoon onion powder - 1 teaspoon ground cumin - Salt, to taste - Fresh cilantro for garnish (optional) Chickpeas are the star of this recipe. They are high in protein and fiber, making them a healthy choice. Each can of chickpeas gives you a great base for a crispy snack. Now, let's break down the other ingredients. Extra virgin olive oil adds healthy fats, helping the spices stick. Smoked paprika gives a deep flavor, while cayenne pepper adds heat. Garlic and onion powders give a nice aroma and a touch of sweetness. Ground cumin brings an earthy taste that balances the spices. You can adjust the salt to your liking. Fresh cilantro is optional but adds a fresh touch. Chickpeas are packed with nutrients. One serving has about 120 calories. They provide around 6 grams of protein and 2 grams of fat. You also get about 20 grams of carbs and 5 grams of fiber. Chickpeas support heart health, help with digestion, and can aid in weight management. They are a smart choice for a snack or a meal. They fit well into many diets, too! For the full recipe, check out [Full Recipe]. Start by preheating your oven to 400°F (200°C). This step is key for making the chickpeas crispy. Use a baking sheet lined with parchment paper. This helps with easy cleanup and ensures the chickpeas do not stick. Next, rinse the chickpeas under cold water. Drain them well, then pat them dry with a clean paper towel. This step is very important. Removing moisture makes the chickpeas crispier when roasting. In a large bowl, mix the drained chickpeas with olive oil and spices. Use smoked paprika, cayenne pepper, garlic powder, onion powder, ground cumin, and a pinch of salt. Toss gently so every chickpea gets coated in the spice mix. Even coverage is vital for that great flavor. Spread the seasoned chickpeas on the baking sheet in a single layer. This helps them roast evenly. Place the sheet in the oven and roast for about 25-30 minutes. Shake the pan halfway through to promote even cooking. Watch them closely near the end to avoid burning. Once they are golden and crispy, take the chickpeas out. Let them cool on the baking sheet for a few minutes. They will continue to crisp up as they cool. For a fresh touch, sprinkle chopped cilantro on top before serving. Enjoy them as a snack or use them as a topping on salads. For the full recipe, check the ingredient list above. To make your spicy roasted chickpeas super crispy, dry them well. After draining, rinse them under cold water. Then, pat them dry with a paper towel. This step is vital! Any leftover moisture will make them soggy. Spread the chickpeas in a single layer on your baking sheet. This helps them cook evenly. If they overlap, they won’t get as crisp. Adjusting the spice levels is easy. If you want more heat, add more cayenne pepper. For less spice, reduce the amount or skip it. You can also experiment with other spices! Try adding chili powder or even a dash of curry powder for a fun twist. Taste the mix before roasting to find your perfect balance. Store any leftover roasted chickpeas in an airtight container. Keep them at room temperature for up to three days. If they get soft, re-crisp them in the oven for a few minutes. This restores their crunch. Enjoy them as a snack or toss them on salads. For the full recipe, check out the original source. {{image_4}} You can change the flavor of spicy roasted chickpeas easily. Try adding different spices or herbs. Here are some great ideas: - Cumin: Boost the earthy flavor. - Chili powder: Add more heat. - Turmeric: For a warm, golden color. - Herbs: Experiment with thyme or rosemary for fresh notes. For a sweet twist, mix in a little cinnamon and honey. Toss your roasted chickpeas with a bit of honey after cooking. The sweetness pairs well with spice. It creates a tasty snack that balances flavors. Spicy roasted chickpeas work well with many dishes. They are great as a snack on their own. You can also add them to salads or grain bowls for extra crunch. - Salads: Sprinkle them over leafy greens. They add texture and flavor. - Bowls: Use them in grain bowls for a hearty meal. - Snacking: Serve them in a bowl at parties for a fun treat. Feel free to mix them into soups for added richness. The crispy texture enhances warm dishes too. Get creative and enjoy these versatile little gems! For the full recipe, check the earlier section. To keep your spicy roasted chickpeas fresh, place them in an airtight container. This helps lock in their crunch. You can store them on the counter for up to three days. For longer storage, try the fridge, where they can last up to a week. However, they might lose some crispness in the fridge. If you want to save them for later, consider freezing them. In the freezer, they can last for about three months. Just remember to let them cool completely before storing. When you’re ready to enjoy leftovers, the best way to reheat them is in the oven. Preheat your oven to 375°F (190°C). Spread the chickpeas on a baking sheet in a single layer. Heat them for about 10 minutes. This method helps restore their crunch and flavor. You can also use an air fryer for quick reheating. Set it to 350°F (175°C) and heat for five to seven minutes. Both methods keep your chickpeas crispy and tasty! If you can't use chickpeas, try these options: - Canned white beans: They are creamy and mild in taste. - Edamame: These young soybeans add a nice crunch. - Lentils: Cooked lentils can work, but they won’t be as crunchy. - Roasted pumpkin seeds: They give a great crunch and are nutty. These alternatives are great for those with dietary restrictions or different tastes. Yes, you can easily adapt this recipe for an air fryer. Here’s how: - Preheat your air fryer to 400°F (200°C). - Follow the same steps to season your chickpeas. - Place them in the air fryer basket in a single layer. - Cook for about 15 to 20 minutes, shaking the basket halfway. This method gives you extra crispiness while saving time. The spice level of spicy roasted chickpeas is adjustable. The cayenne pepper in the recipe gives a kick, but you can change it. - For mild: Use less or skip the cayenne. - For extra spicy: Add more cayenne or include chili powder. Taste as you go to find your perfect heat! Yes, spicy roasted chickpeas are naturally gluten-free. Chickpeas do not contain gluten, making them a safe choice for those with gluten sensitivities. Always check your spice labels to ensure no gluten-containing ingredients are added. Enjoy these snacks worry-free! For the full recipe, visit the Spicy Roasted Chickpeas section. This blog post covered how to make spicy roasted chickpeas. We went through the ingredients, detailed the steps, and shared tips for perfecting your snack. Chickpeas are healthy, tasty, and easy to customize. You can adjust spices or enjoy them sweet. Whether you serve them in salads or as a snack, there are many ways to enjoy them. With proper storage, your leftovers will stay fresh. Get ready to impress with this simple recipe!](https://goldendishy.com/wp-content/uploads/2025/07/52a5824a-88a4-4b76-bbe8-61087731f54f-768x768.webp)
![- 1 bunch of fresh asparagus, trimmed (about 16-20 spears) - 1 cup freshly grated Parmesan cheese - 1/2 cup panko breadcrumbs - 3 cloves garlic, finely minced - 1 teaspoon garlic powder - 1/2 teaspoon fine sea salt - 1/4 teaspoon freshly ground black pepper - 2 large eggs, lightly beaten - 2 tablespoons extra virgin olive oil - 1 tablespoon fresh parsley, finely chopped For the best flavor, choose fresh asparagus that is bright green with firm stalks. Look for Parmesan cheese that you grate yourself. Pre-grated cheese often lacks the rich taste you want. When selecting panko breadcrumbs, ensure they are light and airy for that perfect crunch. It’s important to use fresh garlic for the best taste. Always measure your ingredients accurately for consistent results. Each serving of Garlic Parmesan Asparagus Fries offers a tasty balance of nutrients. These fries are low in calories and high in vitamins A and C. They provide healthy fats from olive oil and protein from eggs and cheese. One serving typically contains around 200 calories, 10g of protein, and 15g of fat. This makes them a healthier alternative to regular fries. Enjoy them guilt-free as a snack or side dish! To make Garlic Parmesan Asparagus Fries, start by gathering your ingredients. You will need fresh asparagus, Parmesan cheese, panko breadcrumbs, garlic, eggs, and olive oil. Next, preheat your oven to 425°F (220°C) and line a baking sheet with parchment paper for easy cleanup. In a shallow bowl, mix the panko breadcrumbs, grated Parmesan cheese, minced garlic, garlic powder, sea salt, and black pepper. Stir well to combine all the flavors. In another bowl, beat the eggs until they are smooth and a bit frothy. Now, take each asparagus spear and dip it in the egg mixture. Make sure to coat it well, but let any extra egg drip off. Then, roll the asparagus in the breadcrumb mix, pressing gently to ensure an even coat. Place the coated spears on your prepared baking sheet in a single layer. Drizzle the olive oil over the asparagus. This helps them get that nice crispy texture as they bake. Place the baking sheet in your oven. Bake the asparagus fries for about 15 to 20 minutes. Keep checking until they are fork-tender and the coating is a beautiful golden brown. Once done, take the baking sheet out of the oven. Let the fries cool for a few minutes. This step is important as it helps them crisp up even more. For a lovely presentation, serve your Garlic Parmesan Asparagus Fries on a long platter. Add a small bowl of marinara sauce or garlic aioli for dipping. This adds a tasty twist that everyone will love. Finally, sprinkle some fresh parsley on top for a touch of color and flavor. For the full recipe and more details, check out the [Full Recipe]. To get your Garlic Parmesan Asparagus Fries crispy, follow a few steps. First, use fresh asparagus. The fresher, the better! Next, coat each spear well with the egg and breadcrumb mixture. This helps the coating stick. Press the breadcrumbs onto the asparagus for a nice layer. Finally, drizzle olive oil over the fries. This adds flavor and aids crispiness. I’ve seen a few common mistakes in the kitchen. One is overcrowding the baking sheet. It causes steaming, making your fries soggy. Arrange the asparagus in a single layer. Another mistake is not preheating the oven. A hot oven ensures that the fries cook evenly. Lastly, don’t skip the panko breadcrumbs. They give the perfect crunch. Garnishing adds fun to your dish. Try these ideas to elevate your fries! First, sprinkle more parsley for color. You can also add lemon zest for a fresh taste. If you like heat, sprinkle some red pepper flakes on top. For a dip, serve marinara sauce or a creamy garlic aioli. These little touches make your Garlic Parmesan Asparagus Fries stand out. For the full recipe, check out the earlier section. {{image_4}} You can easily make these fries vegan. Instead of eggs, use a flax egg. Mix one tablespoon of ground flaxseed with three tablespoons of water. Let it sit for a few minutes to thicken. This mixture works great to bind the panko and cheese. For cheese, try using a vegan Parmesan. It adds flavor without dairy. This way, everyone can enjoy these tasty fries! To make Garlic Parmesan Asparagus Fries gluten-free, swap regular breadcrumbs for gluten-free panko. You can also use crushed nuts or almond flour. Both options give a nice crunch. Just ensure all your ingredients are gluten-free. This way, you can enjoy these fries without worry. Want to spice things up? Add some cayenne pepper or chili flakes to the breadcrumb mixture. This gives your fries a nice kick. You can also mix in some dried herbs like oregano or thyme. Fresh herbs like rosemary can add an amazing flavor too. Feel free to experiment and find your favorite taste! For the full recipe, check out the detailed instructions above. You can store leftover Garlic Parmesan Asparagus Fries in the fridge. Use an airtight container. They will stay fresh for up to three days. Make sure the fries are cool before sealing the container. This helps keep them crisp. To reheat, use an oven or air fryer. Preheat the oven to 350°F (175°C). Place the fries on a baking sheet. Heat for about 10 minutes. This keeps them crispy. Avoid using the microwave, as it makes them soggy. You can freeze these fries for later use. First, let them cool completely. Then, place them in a freezer-safe bag. Remove as much air as possible. They can last for up to three months. When ready to eat, bake from frozen at 425°F (220°C) for 20-25 minutes. Enjoy the crunch just like fresh! To make Garlic Parmesan Asparagus Fries, you start by preheating your oven to 425°F (220°C). Next, line a baking sheet with parchment paper. This helps with easy cleanup. Combine panko breadcrumbs, grated Parmesan cheese, minced garlic, garlic powder, sea salt, and black pepper in a shallow bowl. Mix them well. In another bowl, beat two eggs until they look frothy. Dip each asparagus spear into the eggs, letting the excess drip off. Roll them in the breadcrumb mix, ensuring they are coated evenly. Place the spears on the baking sheet in one layer. Drizzle olive oil on top. Bake for 15-20 minutes until crispy and golden. Finally, sprinkle fresh parsley on top for a nice finish. For the full recipe, check out the detailed instructions above. Yes, you can use frozen asparagus, but it may not be as crisp. Frozen asparagus tends to have more moisture. This can lead to soggy fries. If you use frozen asparagus, thaw and drain it well before coating. Pat it dry with a paper towel to remove excess water. This step helps keep the fries crispy when baked. If you need a substitute for Parmesan cheese, try nutritional yeast for a vegan option. It has a cheesy flavor and works well in this recipe. Grated Pecorino Romano offers a similar taste, though it is saltier. If you want a milder cheese, use grated mozzarella. Just remember, the flavor may change with these swaps, but they will still be tasty! This guide covers all you need for perfect Garlic Parmesan Asparagus Fries. We explored key ingredients, measurements, and nutrition. I provided step-by-step instructions to help you bake and serve. Plus, we shared tips for crispiness, mistakes to watch for, and fun garnishing ideas. In the end, try out variations like vegan or gluten-free. Proper storage can keep your fries fresh and tasty. With these insights, you can make delicious fries every time. Enjoy experimenting and sharing these yummy treats!](https://goldendishy.com/wp-content/uploads/2025/07/ccbce488-a3dc-4dce-b527-37d827ece95a-768x768.webp)
![- 1 lb boneless, skinless chicken thighs, cut into 1-inch pieces - 1/4 cup honey - 2 tablespoons Sriracha sauce - 2 tablespoons soy sauce - 1 tablespoon sesame oil - 2 cloves garlic, minced - 1 teaspoon fresh ginger, grated - Salt and pepper, to taste - 1 red bell pepper, cut into 1-inch pieces - 1 yellow bell pepper, cut into 1-inch pieces - 1 medium red onion, cut into chunks - Wooden or metal skewers The chicken thighs make this dish juicy and flavorful. The honey gives a sweet touch, while the Sriracha brings the heat. Soy sauce adds depth, and sesame oil lends a nutty flavor. Garlic and ginger enhance the marinade, making it aromatic and fresh. The colorful bell peppers and onion not only taste great but also add visual appeal. - Sesame seeds for garnish - Chopped scallions for serving You can use sesame seeds or scallions to spruce up your dish. They add extra crunch and freshness. If you want to change things up, try adding pineapple or zucchini to your skewers. You can also swap chicken for shrimp or firm tofu for a different taste. If you want to adjust the heat, add more or less Sriracha. You can mix in some fruit juice for a fruity twist. Make sure to check your pantry for alternatives, like honey substitutes or low-sodium soy sauce. To start, you need to make the marinade. In a medium bowl, mix together the honey, Sriracha sauce, soy sauce, and sesame oil. Then, add the minced garlic, grated ginger, salt, and pepper. Whisk all the ingredients until they blend well. Next, add the chicken pieces and stir gently. Make sure every piece gets coated. Cover the bowl with plastic wrap and place it in the fridge. Let the chicken marinate for at least 30 minutes. For more flavor, you can leave it marinating for up to 2 hours. If you use wooden skewers, soak them in water for at least 30 minutes. This step stops them from burning on the grill. While they soak, preheat your grill or grill pan to medium-high heat. When you are ready, take the marinated chicken out of the fridge. Start threading the chicken pieces onto the skewers. Alternate with chunks of red and yellow bell peppers and red onion. This adds color and flavor to your skewers. Now it’s time to grill! Place the skewers carefully on your preheated grill. Grill them for about 10 to 12 minutes. Be sure to turn them every few minutes. This helps them cook evenly. You want the chicken to reach an internal temperature of 165°F (75°C). Look for nice grill marks on the chicken. During the last few minutes, brush the skewers with any leftover marinade. This adds a tasty glaze. Once done, take the skewers off the grill. Let them rest for a couple of minutes before serving. For the full recipe, check out the details above. To make the best Honey Sriracha Chicken Skewers, you need balance. Sweetness from honey meets the heat of Sriracha. You can change the spice level by adding more or less Sriracha. I like to use fresh ingredients whenever possible. Fresh garlic and ginger make a big difference. For marinating, let the chicken sit in the sauce for at least 30 minutes. If you have time, go for 2 hours. This helps the flavors soak in well. Use a reliable grill for even cooking. I prefer a gas grill because it heats up fast. If you use wooden skewers, soak them in water for 30 minutes. This stops them from burning. Avoid common mistakes like overcrowding the grill. Give each skewer space to cook properly. It helps to turn them every few minutes to get nice grill marks. To enhance your meal, pair these skewers with rice or a fresh salad. A cool dip like yogurt sauce works well too. As for drinks, iced tea or a light beer are great choices. For gatherings, serve the skewers on a nice platter. A sprinkle of sesame seeds and chopped scallions adds flair. Follow the Full Recipe for complete details on making these amazing skewers! {{image_4}} You can change the proteins in this recipe. For a different taste, try pork or beef. Both meats work well with the honey Sriracha sauce. If you prefer vegetarian options, use firm tofu or tempeh. These options soak up flavors nicely. For seafood lovers, shrimp or salmon can be great choices. They cook quickly and pair well with the sauce. You can adjust the spice level to suit your taste. If you want less heat, use less Sriracha. For more heat, add extra Sriracha or some chili flakes. You can also add fruity components like pineapple or mango. This adds a sweet twist to the dish. Don't be afraid to experiment with different sauces too. Try teriyaki or peanut sauce for a fresh take. Mix up the skewers by adding different vegetables. Zucchini, mushrooms, or cherry tomatoes can add flavor and color. You might also serve the skewers in wraps or sandwiches. Use lettuce or pita bread for a fun meal. Another idea is to use the skewers as a salad topping. Just slice them and place them on your favorite greens. For the full recipe, check out the Honey Sriracha Chicken Skewers section. To keep your Honey Sriracha Chicken Skewers fresh, store them in the fridge. Place leftovers in an airtight container. They stay good for up to three days. If you want to store them longer, freezing is a great option. Wrap the skewers in plastic wrap and then in foil. They can last for up to three months in the freezer. When you are ready to eat, thaw the skewers in the fridge overnight. To reheat, place them in the oven at 350°F (175°C) for about 15 minutes. You can also use a microwave. Just make sure to cover them to prevent drying out. Meal prepping helps save time during busy weeks. You can marinate the chicken in advance. This makes cooking quick and easy. Portion out the skewers into individual servings. This way, you have ready-to-go meals. You can also use leftovers in stir-fries or salads. Shred the chicken and add it to a wrap for a tasty lunch. Fresh ingredients have a shorter shelf life than dried ones. Always check expiration dates on your sauces and oils. Honey and Sriracha last a long time, but garlic and ginger spoil faster. Look for signs of spoilage like mold or bad smells. If you buy bell peppers, use them within a week for the best flavor. Proper storage helps keep your ingredients fresh longer. You should marinate the chicken for at least 30 minutes. This allows the chicken to soak up the flavors. If you have time, marinate it for up to 2 hours. This longer time gives a stronger taste and makes the chicken juicier. Just remember to keep it in the fridge while it marinates. Yes, you can use either wooden or metal skewers. Wooden skewers are usually cheaper and easy to find. Just soak them in water for 30 minutes before grilling. This helps stop them from burning. Metal skewers are more durable and reusable. They also heat up quickly, helping to cook the food evenly. You can serve these skewers with a variety of side dishes. Rice is a great option; it soaks up the sauce well. Grilled vegetables add color and flavor. A fresh salad can balance the heat too. For drinks, try iced tea or a light beer. They complement the sweet and spicy flavors nicely. Yes, you can cook the skewers in the oven. Preheat your oven to 400°F (200°C). Place the skewers on a baking sheet lined with foil. Bake them for about 15-20 minutes. Turn them halfway through to cook evenly. Check the chicken's temperature; it should reach 165°F (75°C) for safety. If you don’t have Sriracha, you can use other hot sauces. Look for sauces with a similar flavor profile. Hot chili sauce or a mix of chili powder and honey can work too. You can also try making your own by mixing red pepper flakes with a little vinegar and honey for a sweet heat. For the complete recipe, check out the [Full Recipe]. In this blog post, we explored how to make delicious chicken skewers. We covered key ingredients, including chicken thighs and marinade components. I shared step-by-step instructions on marinating, preparing, and grilling your skewers for perfect flavor. We also discussed tips to enhance your dish and variations for different tastes. Now, with this knowledge, you can create your own tasty skewers. Experiment with flavors and ingredients. Enjoy sharing your creations with family and friends!](https://goldendishy.com/wp-content/uploads/2025/06/16598c59-d7e9-4d3b-953e-ae03d4ffffdf-768x768.webp)


