BBQ Chicken Stuffed Zucchini Flavor-Packed Delight

Looking for a fun and tasty twist on dinner? BBQ Chicken Stuffed Zucchini is a flavor-packed delight! This dish combines juicy BBQ chicken with fresh zucchini for a meal that’s healthy and satisfying. I’ll guide you through each step, from gathering ingredients to tips for perfecting your dish. Get ready to impress your family with this simple recipe that’s sure to become a weeknight favorite!
Why I Love This Recipe
- Healthy and Hearty: This recipe combines nutritious zucchini with protein-packed chicken and wholesome beans, making it a satisfying meal.
- Quick and Convenient: With just 15 minutes of prep time, this dish is perfect for busy weeknights or last-minute gatherings.
- Customizable Flavors: You can easily switch up the BBQ sauce or add your favorite veggies to personalize the taste to your liking.
- Visually Appealing: The colorful presentation of the stuffed zucchinis will impress your guests and make for a delightful dining experience.
Ingredients
List of Ingredients
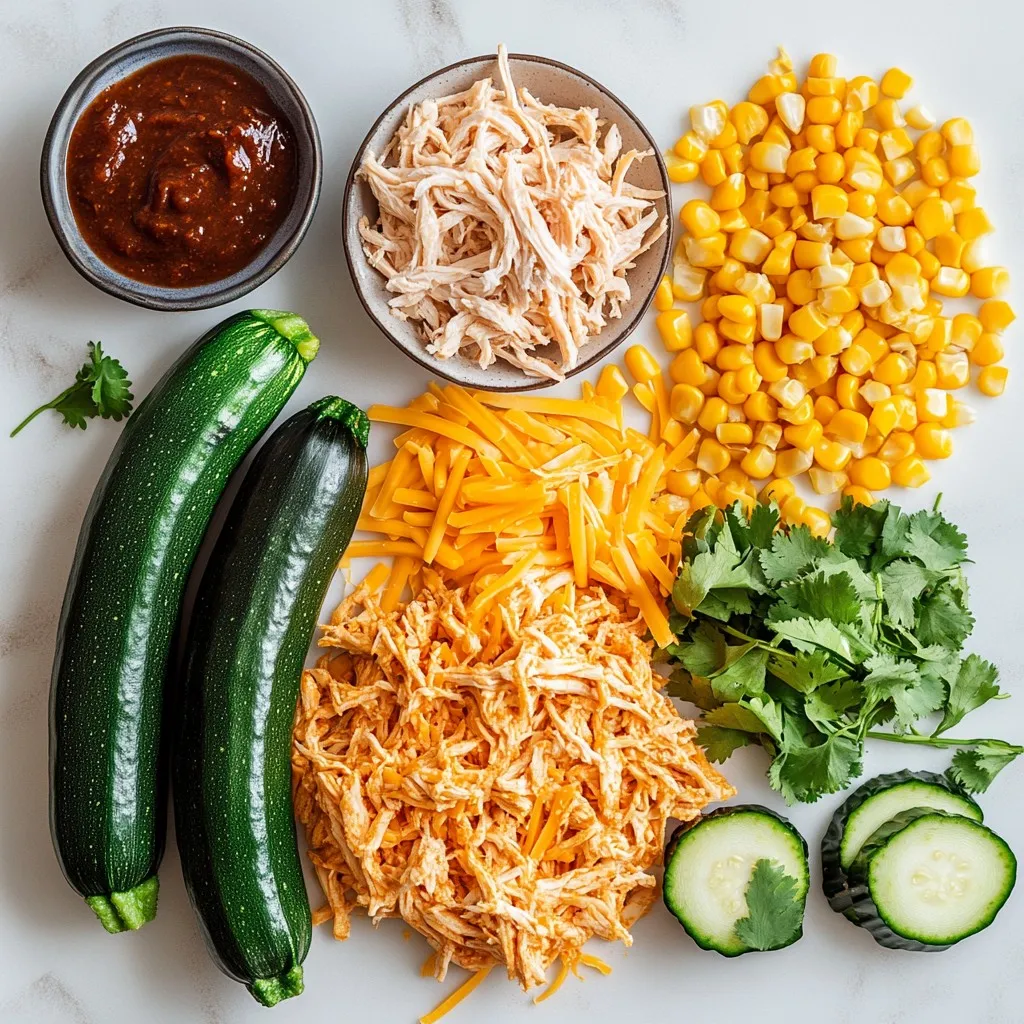
To make BBQ Chicken Stuffed Zucchini, you need:
– 4 medium zucchinis
– 2 cups cooked chicken, shredded
– 1 cup savory BBQ sauce
– 1 cup sweet corn kernels
– 1 cup black beans, rinsed and drained
– 1 cup shredded cheese
– 1/2 teaspoon garlic powder
– 1/2 teaspoon onion powder
– Salt and pepper to taste
– Fresh cilantro, chopped
These ingredients come together for a tasty dish. The zucchinis serve as the perfect base for the filling. The chicken and BBQ sauce create a rich and tangy flavor. Corn and black beans add texture and nutrition. Finally, cheese brings a nice creaminess to every bite.
Optional Ingredients for Customization
You can make this dish your own! Here are some optional ingredients:
– Diced bell peppers for crunch
– Jalapeños for a spicy kick
– Different cheese types like mozzarella or pepper jack
– Avocado slices for creaminess
– Sliced green onions for a fresh touch
These options let you tailor the recipe to your taste. Feel free to mix and match to create your perfect stuffed zucchini!
Recommended BBQ Sauce Brands
Choosing the right BBQ sauce can enhance your dish. Here are some brands I recommend:
– Sweet Baby Ray’s for a classic taste
– Stubb’s for a smoky flavor
– Trader Joe’s BBQ Sauce for a unique twist
– Kansas City BBQ Sauce for a sweeter option
Each brand offers a different flavor profile. Pick one that you enjoy, and your stuffed zucchinis will taste amazing!

Step-by-Step Instructions
Prepping the Zucchini
Start by preheating your oven to 375°F (190°C). This heat will help cook the zucchini just right. Next, take the zucchinis and slice them in half from top to bottom. Use a spoon to scoop out the seeds. Make a nice space for the filling. Place the zucchini halves cut side up on a non-stick baking sheet.
Making the BBQ Chicken Filling
In a big mixing bowl, combine the shredded chicken with your favorite BBQ sauce. Add in the sweet corn and rinsed black beans. For flavor, mix in garlic powder, onion powder, salt, and pepper. Stir well until everything is coated in that tasty BBQ sauce. This filling is where the magic happens!
Baking the Stuffed Zucchini
Now it’s time to fill the zucchini. Spoon the BBQ chicken mixture into each hollowed zucchini half. Pack it lightly for a perfect fit. Next, sprinkle the shredded cheese on top of each one. This cheese will melt and create a delicious crust. Place the baking sheet in the oven and bake for about 25-30 minutes. You’ll know they’re ready when the zucchinis are soft and the cheese is melted and bubbly. Once done, let them cool for a bit before serving. Garnish with fresh chopped cilantro for a pop of color. Enjoy your flavor-packed BBQ chicken stuffed zucchini!
Tips & Tricks
Perfecting Your BBQ Sauce Combination
Choose a BBQ sauce that you love. Sweet, spicy, or tangy sauces work well. I enjoy a blend of sweet and smoky for a rich flavor. Always taste the sauce before mixing it in. Adjust the sauce with spices if you want more heat or sweetness. Mixing sauces can create a unique taste just for you.
Achieving the Ideal Cheese Melt
For the best cheese melt, use freshly shredded cheese. Pre-shredded cheese often has additives that prevent melting well. Cheddar is a great choice, but try mozzarella or a blend for variety. Spread the cheese evenly to cover all the filling. This helps it melt uniformly, creating a delicious, gooey top.
Tools and Equipment for Easy Preparation
You’ll need a few simple tools for this recipe. A sharp knife helps cut the zucchini smoothly. A spoon is perfect for scooping out the seeds. Use a large mixing bowl for combining your filling. A baking sheet lined with parchment paper makes cleanup easy. Lastly, an oven mitt will keep you safe when handling hot dishes.
Pro Tips
- Choose the Right Zucchini: Select medium-sized zucchinis that are firm and have a vibrant green color for the best texture and flavor.
- Experiment with BBQ Sauces: Don’t hesitate to try different BBQ sauces, such as spicy, smoky, or even fruity variations, to elevate the flavor profile of your dish.
- Make Ahead: Prepare the stuffed zucchinis ahead of time and store them in the refrigerator. Bake them just before serving for a quick and easy meal.
- Customize Fillings: Feel free to add other ingredients like diced bell peppers or jalapeños for additional texture and heat, making the dish your own.

Variations
Vegetarian Substitute Ideas
If you want a veggie twist, skip the chicken. Use a mix of sautéed mushrooms, bell peppers, and onions instead. This gives you a hearty filling while keeping it plant-based. You can also use lentils or chickpeas for added protein. Both options bring great taste and texture.
Alternative Proteins for the Filling
You can swap chicken for other proteins. Try shredded pork or ground turkey for a new flavor. Tofu crumbles also work well if you want a vegan option. Just make sure to add your favorite BBQ sauce to keep it tasty. It’s all about finding what you love!
Flavor Enhancements and Add-ins
To make your dish even better, consider adding spices. A pinch of smoked paprika gives a nice kick. You can also mix in diced jalapeños for heat or fresh herbs like basil for freshness. Don’t forget about toppings! A sprinkle of green onions or a dollop of sour cream can add extra flavor. Experiment with what you have on hand and enjoy!
Storage Info
Storing Leftovers
Store any leftover BBQ chicken stuffed zucchini in an airtight container. Keep it in the fridge. It will stay fresh for about 3 to 4 days. If you want to keep it longer, consider freezing.
Reheating Instructions
To reheat, preheat your oven to 350°F (175°C). Place the stuffed zucchini on a baking sheet. Cover them with foil to keep them moist. Heat for about 15-20 minutes or until warm. You can also use a microwave. Heat for 1-2 minutes, checking in between.
Freezing Options for Meal Prep
To freeze, wrap each stuffed zucchini tightly in plastic wrap. Then, place them in a freezer bag. They can last up to 2-3 months in the freezer. When ready to eat, thaw in the fridge overnight. Reheat as mentioned above for best results.
FAQs
How do I choose the right zucchini?
Choose zucchinis that are firm and smooth. Look for ones that are bright green. Avoid zucchinis with soft spots or blemishes. Smaller zucchinis often taste sweeter and are more tender. Aim for medium-sized zucchinis for this recipe, as they hold the filling well.
Can I use rotisserie chicken for this recipe?
Yes, rotisserie chicken works great for this dish. It saves time and adds flavor. Just shred the chicken before mixing it with the BBQ sauce. This option makes the recipe even quicker, perfect for busy days.
What are some side dishes to serve with BBQ Chicken Stuffed Zucchini?
Serve your stuffed zucchini with a fresh salad for a light meal. Cornbread pairs well too, adding a nice touch of sweetness. You could also serve roasted vegetables for added flavor and texture. Try a simple coleslaw to bring in some crunch. These sides complement the savory stuffed zucchini perfectly!
This blog post covered everything you need for BBQ Chicken Stuffed Zucchini. We explored key ingredients, outlined step-by-step instructions, and shared helpful tips. You learned about variations, storage, and common questions.
Enjoy making this dish, and feel free to experiment with flavors and sides. This recipe offers a tasty way to combine health and flavor, making dinner fun. Dive in and savor each bit

BBQ Chicken Stuffed Zucchini Delight
Ingredients
- 4 medium zucchinis
- 2 cups cooked chicken, shredded
- 1 cup savory BBQ sauce
- 1 cup sweet corn kernels
- 1 cup black beans, rinsed and drained
- 1 cup shredded cheese
- 0.5 teaspoon garlic powder
- 0.5 teaspoon onion powder
- to taste salt and pepper
- as needed fresh cilantro, chopped
Instructions
- Begin by preheating your oven to 375°F (190°C) to prepare for baking.
- Carefully slice the zucchinis in half lengthwise, then use a spoon to scoop out the seeds, creating a cozy cavity for your savory filling. Arrange the zucchini halves, cut side up, on a non-stick baking sheet.
- In a spacious mixing bowl, combine the shredded chicken and your chosen BBQ sauce. Add the corn, black beans, garlic powder, onion powder, salt, and pepper. Stir this mixture until every ingredient is well-coated in the tangy BBQ sauce.
- Generously spoon the BBQ chicken mixture into each hollowed zucchini half, packing it lightly to ensure they are filled perfectly.
- Sprinkle the shredded cheese evenly on top of each filled zucchini, allowing the cheese to melt delightfully during baking.
- Place the baking sheet in the oven and bake for approximately 25-30 minutes. You’ll know they’re ready when the zucchinis are tender and the cheese is beautifully melted and bubbly.
- Once baked, remove the zucchinis from the oven and let them cool slightly for easier handling before serving.
- Just before serving, garnish each stuffed zucchini with a sprinkle of fresh chopped cilantro for a touch of color and flavor enhancement.


![- 4 large bell peppers (any vibrant color) - 1 cup quinoa, thoroughly rinsed and drained - 2 cups vegetable broth - 1 can (15 oz) black beans, well rinsed and drained - 1 cup corn (fresh, frozen, or canned, drained) - 1 cup cherry tomatoes, halved - 1 teaspoon ground cumin - 1 teaspoon smoked paprika - 1 teaspoon garlic powder - Salt and freshly cracked black pepper to taste - 1 tablespoon extra virgin olive oil - ½ cup shredded cheddar cheese (optional but recommended) - Fresh cilantro or parsley, finely chopped for garnish - Additional vegetables (e.g., zucchini, mushrooms) - Spices and herbs (e.g., oregano, chili powder) When making stuffed bell pepper boats, you have many options. I love using colorful bell peppers. They add a fun look to your dish. Choose ones that are firm and bright. For the filling, I use quinoa. It’s not only healthy but also tasty. Rinse it well before cooking. The vegetable broth adds flavor and makes it rich. Black beans are another great choice. They are filling and packed with protein. Rinse them well too, to get rid of extra salt. Corn brings sweetness to the dish. You can use fresh, frozen, or canned corn. Cherry tomatoes add a nice juicy burst. Spices like cumin and paprika give depth. Garlic powder adds that warm flavor we all love. Don’t forget to season with salt and pepper to make it pop. Finally, I drizzle olive oil on the filling. It helps everything blend together. If you love cheese, add some cheddar on top for creaminess. Feel free to customize your stuffed peppers with optional add-ins. You can mix in other veggies like zucchini or mushrooms. Extra spices can make a big impact too. This recipe is flexible. You can adjust it to fit your taste. Explore and have fun with your stuffed bell pepper boats! For the complete guide, check out the Full Recipe I have shared. - Preheat the oven to 375°F (190°C). - Prepare the bell peppers by cutting off their tops. Carefully remove the seeds and membranes. Make sure they sit upright in a baking dish. - Combine 1 cup of quinoa and 2 cups of vegetable broth in a saucepan. - Bring this mix to a boil, then reduce the heat to low. Cover the pot and let it simmer. Cook for about 15 minutes or until the quinoa is fluffy and the broth has absorbed. - In a large mixing bowl, combine the cooked quinoa with one can of black beans, one cup of corn, and spices. - Add 1 teaspoon of ground cumin, 1 teaspoon of smoked paprika, and 1 teaspoon of garlic powder. Season with salt and black pepper. - Drizzle 1 tablespoon of olive oil over the mixture. Stir until everything is well blended. - Carefully spoon the filling into each prepared bell pepper. Press it down gently to pack it in. - If you like, top each stuffed pepper with ½ cup of shredded cheddar cheese for added flavor. - Pour a little water into the bottom of the baking dish. Cover the dish with aluminum foil. This helps keep the peppers moist. - Bake the stuffed peppers in the preheated oven for 25-30 minutes. Check for doneness; they should be fork-tender. Enjoy your delicious Stuffed Bell Pepper Boats with vibrant colors and flavors! For the full recipe, please refer back to the recipe section. To start, cutting bell peppers right matters. Slice off the tops using a sharp knife. Be careful not to cut too deep. Next, remove the seeds and white membranes inside. A small spoon works great for this. Rinse the peppers under cold water to clean them. For even cooking, place your stuffed peppers tightly in the baking dish. This helps them cook at the same rate. Mixing flavors is key, too. Use spices like cumin and smoked paprika to boost taste. You can taste the filling before you stuff the peppers. Adjust the salt and pepper as needed. Serving your stuffed bell pepper boats can be fun. Use a colorful platter to catch the eye. Arrange the peppers upright, showing off their filling. You can add a wedge of lime on the side for a fresh touch. A sprinkle of chopped cilantro or parsley adds color and flavor. You can prepare stuffed peppers ahead of time. Stuff them and cover with foil. Store them in the fridge for up to a day. This makes meal prep easy for busy nights. For sides, consider a fresh salad or crusty bread. You can also pair them with rice or quinoa for a filling meal. These peppers are great for family dinners or potlucks. For the full recipe, check out Stuffed Bell Pepper Boats. {{image_4}} You can easily make this dish vegetarian. Substituting quinoa with rice or couscous works well. Rice gives a nice texture, while couscous cooks faster. Both options taste great in these stuffed bell pepper boats. Adding different vegetables also boosts flavor and nutrition. Try diced zucchini, mushrooms, or spinach. These veggies add color and crunch. You can mix and match to fit your taste. Want to add meat? Ground turkey or beef makes a hearty filling. Just cook the meat before adding it to the quinoa mixture. This step ensures the meat is safe to eat. When adding meat, adjust the spices. You might want to use more cumin or paprika. This adjustment gives the dish a richer taste. Cheese can take your stuffed peppers to the next level. Mozzarella or feta are great choices. Mozzarella melts beautifully, while feta adds a tangy twist. For even more flavor, add layers of salsa or sauce. It keeps the filling moist and adds a kick. You can also drizzle some sauce on top before baking. This extra step makes the dish even more delicious. Check out the [Full Recipe] for all the details! To keep your stuffed bell pepper boats fresh, store them in an airtight container. This helps lock in moisture and flavor. You can keep them in the fridge for about 3 to 4 days. If you want to save them for later, allow them to cool completely before storing. You can freeze stuffed peppers both before and after baking. If you freeze them before cooking, wrap them tightly in plastic wrap and then in aluminum foil. This keeps out air and prevents freezer burn. If you choose to freeze them after baking, let them cool first. Then, place them in a freezer-safe container. They will stay good for up to 3 months. To reheat your stuffed peppers, the oven works best. Preheat it to 350°F (175°C). Place the peppers in a baking dish and cover with foil. Bake for about 20 to 25 minutes until heated through. You can also use a microwave if you're in a hurry. Just place one pepper on a plate and heat for 2 to 3 minutes. This method may make them a bit softer, but they'll still taste great! To make stuffed bell peppers in advance, prepare the filling first. Cook the quinoa and mix it with your beans, corn, and spices. Once mixed, stuff each bell pepper with the filling. You can store them in the fridge for up to two days before baking. Cover them tightly to keep them fresh. When ready to bake, just pop them into the oven. This saves you time and effort on busy nights. Yes, you can use other types of peppers! Try using poblano, Anaheim, or even jalapeño peppers. Each type adds a unique flavor and spice level. Poblano peppers are mild and have a rich taste. They also hold a good amount of filling. If you like a bit of heat, jalapeños are a great choice. Just remember to adjust the cooking time if your peppers are smaller. Stuffed bell pepper boats pair well with many side dishes. Some great options include a fresh green salad, roasted vegetables, or rice. You can also serve them with a side of guacamole or salsa for added flavor. If you want something warm, consider serving bread or cornbread. These sides complement the flavors and make for a complete meal. To adjust the spice level, you can add or reduce spices. For less heat, skip the cumin and paprika. If you want more flavor, add some chili powder or crushed red pepper. You can also mix in diced jalapeños or hot sauce. Start with a little and taste as you go. This way, you can find the perfect balance for your taste. Yes, this dish can be gluten-free! The main ingredients, like quinoa and beans, are naturally gluten-free. Just be sure to check that your vegetable broth is gluten-free as well. If you add other ingredients, like sauces or spices, check their labels. This way, you can enjoy a safe and tasty meal. Stuffed bell peppers are simple and fun to make. We covered the key ingredients and steps to prepare them. You learned how to customize flavors and presentation. Remember, you can use different spices, grains, or veggies. These peppers can please everyone, regardless of diet. Enjoy your meal prep and share these tasty, healthy treats with friends and family. Happy cooking!](https://goldendishy.com/wp-content/uploads/2025/07/06b7afd9-4005-4ab6-8aaa-ba374b5d3167-768x768.webp)


. This blog post covered how to make Parmesan Herb Crusted Tilapia. You learned about key ingredients like tilapia, herbs, and panko for a crunchy topping. I shared simple steps for prep, coating, and baking. Tips for flavor and variations help you personalize the dish. Knowing the right storage and reheating methods keeps leftovers tasty. Enjoy creating this dish with fresh herbs and your favorite flavors. Cooking can be fun and rewarding!](https://goldendishy.com/wp-content/uploads/2025/08/d7b754dc-0283-4cf5-9e7a-95472ebc1437-768x768.webp)
