BBQ Chicken Stuffed Sweet Potatoes Flavorful Treat

Looking for a tasty dinner that’s easy and filling? BBQ Chicken Stuffed Sweet Potatoes are your answer! Juicy shredded chicken, sweet potatoes, and zesty BBQ sauce come together for a delicious treat. You’ll love how simple it is to make this meal that packs a flavor punch. Plus, I’ll share tips, tricks, and even healthy variations. Let’s get cooking and elevate your weeknight dinners!
Why I Love This Recipe
- Healthy and Satisfying: Sweet potatoes are packed with vitamins and fiber, making this dish a nutritious choice that keeps you full.
- Quick and Easy: This recipe can be prepared in about an hour, perfect for busy weeknights without sacrificing flavor.
- Customizable: You can easily swap out ingredients based on your preferences, such as using different BBQ sauces or adding extra veggies.
- Deliciously Comforting: The combination of BBQ chicken and melted cheese over sweet potatoes creates a comforting and mouth-watering meal.
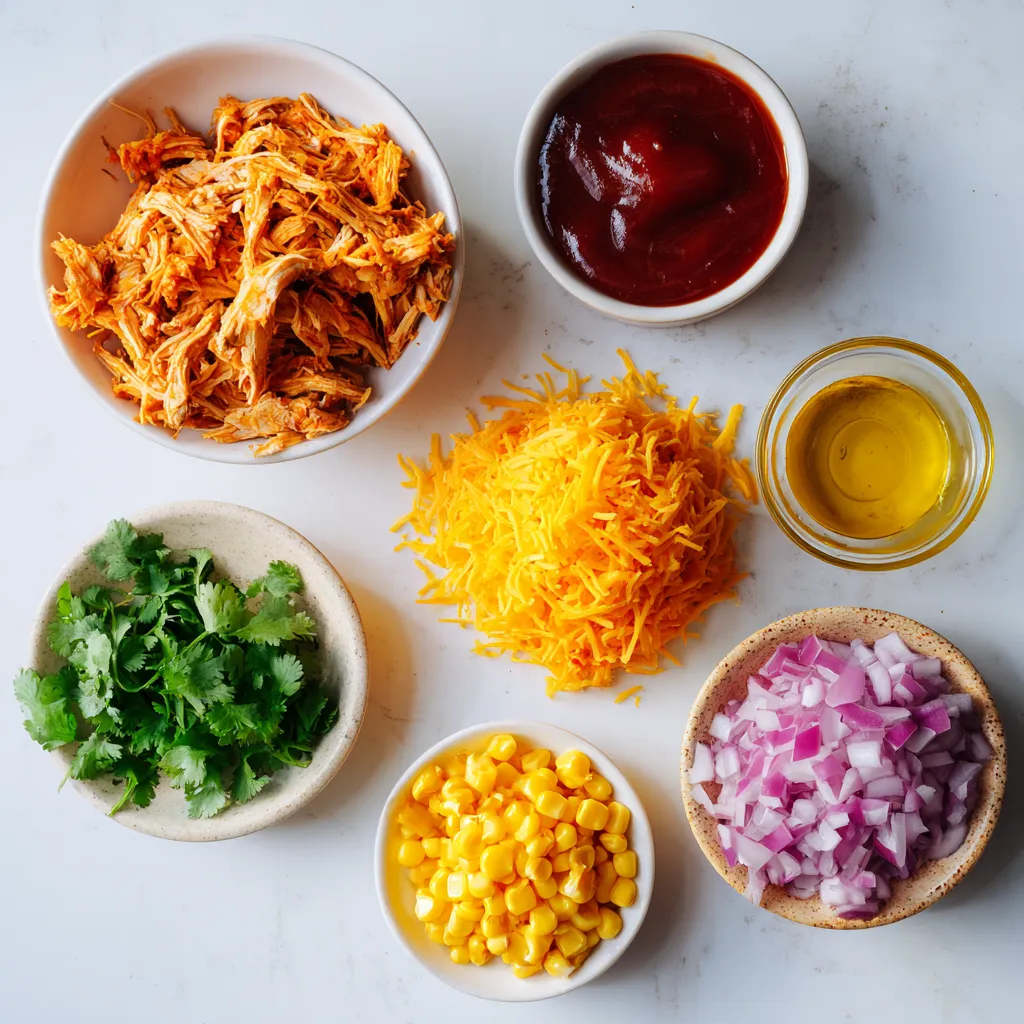
Ingredients
List of Ingredients
– Sweet potatoes
– Shredded chicken
– BBQ sauce
– Corn kernels
– Red onion
– Cheddar cheese
– Cilantro
– Seasoning (salt & pepper)
– Olive oil
To create BBQ Chicken Stuffed Sweet Potatoes, gather these simple ingredients. Sweet potatoes are the base of this dish. They add sweetness and nutrition. You will need four medium sweet potatoes.
For the filling, use shredded chicken. You can cook the chicken yourself or buy pre-cooked. Add one cup of your favorite BBQ sauce for flavor. It brings a nice tang and sweetness.
Next, add one cup of corn kernels. You can use fresh, frozen, or canned corn. If using canned, drain it first. Chopped red onion adds a nice crunch and flavor. You will need half a cup of finely chopped red onion.
To make it cheesy, use one cup of shredded cheddar cheese. It melts beautifully on top. For a fresh touch, add cilantro. You can use about a quarter cup, but it’s optional.
Don’t forget seasoning! Just a bit of salt and black pepper will enhance the taste. Lastly, drizzle some olive oil on the sweet potatoes before baking. This helps them cook well and adds flavor.

Step-by-Step Instructions
Preheat the Oven
Start by turning your oven to 400°F (200°C). This heat helps cook the sweet potatoes evenly.
Prepare the Sweet Potatoes
Rinse the sweet potatoes under cold water. Use a fork to poke holes in each potato. This prevents them from bursting while baking. Drizzle a little olive oil on top and sprinkle with salt for flavor.
Mix the BBQ Chicken Filling
In a bowl, mix the shredded chicken with your favorite BBQ sauce. Stir well to coat all the chicken pieces. The BBQ sauce adds a rich, tangy flavor that pairs perfectly with the sweet potatoes.
Sauté the Vegetables
Heat a skillet over medium heat. Add the chopped red onion and cook until it becomes soft, about 4-5 minutes. Then, toss in the corn and stir for another 2 minutes. This step brings out the sweetness of the corn and onion.
Assemble the Stuffed Sweet Potatoes
After the sweet potatoes are done baking, take them out and let them cool. Cut each potato in half lengthwise. Scoop out a little flesh from the center to make room for the filling. In a bowl, mix the BBQ chicken, sautéed corn, and onion, along with half of the cheese. Fill the potato halves with this mixture.
Bake and Serve
Sprinkle the remaining cheese on top of each stuffed potato. Place them back in the oven for 10-15 minutes until the cheese melts and bubbles. Once ready, garnish with fresh cilantro and add more salt and pepper if you like. Enjoy this tasty meal!
Tips & Tricks
Perfectly Cooked Sweet Potatoes
To cook sweet potatoes just right, choose medium-sized ones. They cook evenly and are easier to handle. Preheat your oven to 400°F (200°C) before baking. Make sure to rinse them well. Pricking holes with a fork helps steam escape. Lightly drizzle with olive oil and sprinkle a bit of salt. This adds flavor and keeps the skin nice and crispy. Bake for 45-60 minutes. Check them with a fork. If they feel soft, they are done!
Flavor Enhancements
To make your BBQ chicken filling pop, consider adding spices. A pinch of smoked paprika gives a nice depth. You can also add garlic powder for extra zest. If you like heat, try some cayenne pepper. Fresh herbs like cilantro add brightness. Mix them in right before serving. They bring freshness to every bite. Don’t forget to season well with salt and black pepper. A little goes a long way in enhancing your dish.
Cheese Melting Techniques
For perfectly melted cheese, use shredded cheddar cheese. Shredding allows it to melt evenly. When you add cheese, cover the stuffed sweet potatoes well. This helps the cheese melt and bubble nicely. Bake them for an extra 10-15 minutes until golden brown. You can also broil them for a couple of minutes at the end. Just watch closely so they don’t burn. The result will be a delicious, gooey topping that everyone will love!
Pro Tips
- Choosing the Right Sweet Potatoes: Look for sweet potatoes that are firm and free of blemishes. The skin should be smooth and have a rich color for the best flavor.
- Enhancing BBQ Flavor: For an extra kick, consider using a spicy BBQ sauce or adding a dash of cayenne pepper to the chicken mixture.
- Perfectly Melted Cheese: Broil the stuffed sweet potatoes for the last 2-3 minutes of baking to achieve a beautifully melted and slightly crispy cheese topping.
- Meal Prep Idea: These stuffed sweet potatoes can be made ahead of time and stored in the refrigerator. Simply reheat in the oven for a quick and delicious meal.

Variations
Alternative Protein Options
You can switch the chicken for other proteins. Try using shredded pork or turkey. Both pair well with BBQ sauce. For a quick meal, use rotisserie chicken. It saves time and still tastes great. You can also use shredded beef for a hearty twist. Each protein will give you a new flavor experience.
Vegetarian Adaptations
If you want a meat-free option, go for black beans or lentils. They add great texture and protein. Mix them with BBQ sauce for a tasty filling. Adding sautéed mushrooms gives a rich, umami flavor. You can also throw in chopped bell peppers for extra crunch. This way, you keep the dish filling and satisfying.
Spicy BBQ Chicken Version
To spice things up, add jalapeños or hot sauce to the BBQ chicken. This adds heat and a nice kick. You can also mix in some spicy BBQ sauce for an extra layer of flavor. Topping with pepper jack cheese gives it a creamy, spicy finish. This version is perfect for those who love bold tastes.
Storage Info
How to Store Leftovers
To store leftover BBQ chicken stuffed sweet potatoes, let them cool first. Place each potato in an airtight container. You can keep them in the fridge for up to three days. If you are sure you won’t eat them soon, consider freezing. This way, you can enjoy them later.
Reheating Instructions
When you want to eat your leftovers, the best way is to heat them in the oven. Preheat your oven to 350°F (175°C). Place the stuffed sweet potatoes on a baking tray. Heat for about 20 minutes, or until they are warm all the way through. You can also use a microwave, but the oven keeps the skin crisp.
Freezing Tips
To freeze, wrap each stuffed sweet potato in plastic wrap, then place it in a freezer-safe bag. Make sure to remove as much air as possible. They can stay in the freezer for up to three months. When you are ready to eat, thaw them in the fridge overnight before reheating.
FAQs
Can I use different types of potatoes?
Yes, you can use other potatoes. Regular russet potatoes work well. They are starchy and fluffy. You can also try Yukon golds for a buttery taste. Just keep in mind that cooking times may change. You may need to check for doneness with a fork.
How can I make this recipe ahead of time?
You can prepare this dish in steps. First, bake the sweet potatoes and cool them. Then, mix the BBQ chicken filling. You can store both in the fridge. Assemble the stuffed potatoes right before you plan to bake them. This way, they stay fresh and tasty.
What is the best BBQ sauce to use?
The best BBQ sauce is the one you like most. Choose a sauce that matches your taste. Sweet sauces pair well with sweet potatoes. Spicy sauces add a nice kick. You can even mix different sauces for a fun flavor twist.
Can I make this dish in an air fryer?
Yes, you can use an air fryer! Cook the sweet potatoes at 400°F (200°C) for about 35-45 minutes. Check them often for doneness. The air fryer makes them crispy on the outside and soft inside. Just follow the same filling steps after cooking.
Stuffed sweet potatoes are easy to make and taste great. We covered the main ingredients: sweet potatoes, chicken, BBQ sauce, and more. The step-by-step guide shows how to prepare and bake them for a tasty meal. I shared tips for perfect cooking and variations for different diets. Remember, you can store leftovers or reheat them anytime. Whether you want a quick weeknight dinner or a fun dish for guests, this recipe works. Enjoy trying it out and customizing it to your tast

BBQ Chicken Stuffed Sweet Potatoes
Ingredients
- 4 medium sweet potatoes
- 2 cups cooked chicken, shredded
- 1 cup BBQ sauce
- 1 cup corn kernels
- 0.5 cup red onion, finely chopped
- 1 cup shredded cheddar cheese
- 0.25 cup fresh cilantro, chopped
- to taste salt
- to taste black pepper
- for drizzling olive oil
Instructions
- Begin by preheating your oven to 400°F (200°C).
- Rinse the sweet potatoes under cold water to clean them thoroughly. Using a fork, pierce each potato several times to create steam vents. Lightly drizzle with olive oil and sprinkle with a touch of salt to enhance flavor.
- Arrange the sweet potatoes on a baking sheet and place them in the oven. Bake for approximately 45-60 minutes, or until they are tender when tested with a fork.
- Meanwhile, in a medium mixing bowl, combine the shredded chicken and BBQ sauce, stirring to ensure the chicken is evenly coated in the sauce.
- In a skillet over medium heat, add the finely chopped red onion and sauté until they turn translucent, roughly 4-5 minutes. Incorporate the corn into the skillet and heat it through for about 2 minutes, stirring occasionally.
- Once the sweet potatoes are done baking, carefully remove them from the oven and allow them to cool for a few minutes. Cut each potato in half lengthwise and scoop out a small portion of the flesh from the center, creating a small boat to hold the filling, while keeping a border of potato intact.
- In a large mixing bowl, combine the BBQ chicken mixture with the sautéed corn and onion, as well as half of the shredded cheddar cheese. Mix thoroughly until everything is well incorporated.
- Generously fill each sweet potato half with the BBQ chicken filling, making sure to pack it in well.
- Sprinkle the remaining shredded cheese evenly over the top of each stuffed sweet potato.
- Place the stuffed sweet potatoes back in the oven for an additional 10-15 minutes, or until the cheese is melted, bubbly, and begins to turn golden brown.
- After baking, remove the stuffed sweet potatoes from the oven and garnish them with fresh cilantro, seasoning with additional salt and black pepper to taste, if desired.


![- 2 boneless, skinless chicken breasts - 1 teaspoon garlic powder - 1 teaspoon smoked paprika - 1 teaspoon dried oregano - Salt and freshly ground black pepper to taste - 1 tablespoon extra-virgin olive oil - 1 cup cooked quinoa or couscous - 1 cucumber, finely diced - 1 cup cherry tomatoes, halved - 1/2 red onion, paper-thin sliced - 1 cup creamy Greek yogurt - 2 tablespoons fresh dill, finely chopped - 1 tablespoon fresh lemon juice - Crisp lettuce leaves for serving - Medium-sized mixing bowl - Grill or grill pan - Spatula or tongs - Knife and cutting board - Serving bowls This simple list of ingredients and tools sets you up for a tasty meal. You can find the full recipe to guide you through each step. Start by making a simple rub. In a bowl, mix garlic powder, smoked paprika, dried oregano, salt, and pepper. Add olive oil to this mix. Rub it all over the chicken breasts. Make sure they are well-coated. For the best taste, let the chicken marinate for at least 30 minutes. If you have time, let it sit in the fridge overnight. This will make the chicken super tasty. While the chicken marinates, let’s make the tzatziki sauce. In a clean bowl, combine Greek yogurt, finely diced cucumber, chopped dill, and lemon juice. Stir well until everything blends nicely. Add a pinch of salt and pepper to taste. Set this aside. Letting it sit helps the flavors come together. Preheat your grill or grill pan to medium heat. Once it’s hot, place the marinated chicken breasts on the grill. Cook them for about 5-6 minutes on each side. You want the chicken to reach an internal temperature of 165°F (75°C). After grilling, take the chicken off the heat. Let it rest for about 5 minutes. This helps keep it juicy. After resting, slice the chicken into bite-sized pieces. Grab your serving bowls and start building your dish. Begin with a layer of cooked quinoa or couscous at the bottom. This will be the base of your bowl. Next, add the grilled chicken pieces on top of the quinoa. Then, layer on the diced cucumber, halved cherry tomatoes, and thinly sliced red onion. This adds a pop of color and flavor. Finally, drizzle the tzatziki sauce generously over everything. This brings a creamy contrast. If you like, add a handful of crisp lettuce leaves on top. This gives an extra crunch. Serve your Chicken Tzatziki Bowls in bright plates. It makes the dish look inviting. For a final touch, sprinkle some fresh dill on top and add a lemon wedge for extra zest. Enjoy your meal! To grill chicken that is juicy and flavorful, follow these tips: - Marinate Well: Use the spice rub with garlic powder, smoked paprika, and oregano. Let the chicken sit for at least 30 minutes. For best results, marinate overnight. - Use Medium Heat: Preheat your grill to a medium setting. This helps cook the chicken evenly without burning it. - Check Temperature: Use a meat thermometer to ensure the chicken reaches 165°F (75°C). This keeps it safe to eat. - Rest the Chicken: After grilling, let the chicken rest for 5 minutes. This keeps the juices inside. You can make tzatziki in different ways to suit your taste: - Add Spice: Mix in a pinch of cayenne or red pepper flakes for heat. - Use Different Herbs: Swap dill with mint or parsley for a fresh twist. - Try Other Veggies: Add grated carrots or chopped bell peppers for extra crunch. Presentation makes your Chicken Tzatziki Bowls shine. Here are some ideas: - Choose Colorful Bowls: Use deep plates to highlight the bright ingredients. - Layer Thoughtfully: Start with quinoa or couscous, then add chicken, veggies, and a drizzle of tzatziki. - Garnish: Add a sprinkle of fresh dill or a lemon wedge for a burst of color. These tips will help you create a delicious and beautiful meal that impresses everyone. For the complete recipe, check [Full Recipe]. {{image_4}} If you want a vegetarian twist, try using tofu or chickpeas. Tofu absorbs flavors well. Press and marinate it like the chicken. Cut it into cubes and grill or sauté until golden. Chickpeas also work great. Use canned or cooked chickpeas. Toss them in the same spices and roast in the oven. Both options are rich in protein and add a nice texture. You can swap grains in your Chicken Tzatziki Bowls for variety. Quinoa is high in protein and gluten-free. Couscous cooks quickly and is light on your stomach. Brown rice is hearty and adds fiber. Each grain brings a unique taste and texture. Try different grains each time for a fun twist! Add more fresh veggies to your bowl for color and crunch. Sliced bell peppers bring sweetness and crunch. Shredded carrots add a bright pop and extra nutrition. You can also use radishes for a peppery kick. Mix and match your favorites! This makes each bowl unique, fresh, and delicious. For the full recipe, check out the complete guide. After enjoying your Chicken Tzatziki Bowls, store leftovers in airtight containers. This keeps the chicken juicy and the veggies fresh. Place the chicken and veggies in one container. Store the tzatziki sauce in another. This helps prevent sogginess. You can keep the leftovers in the fridge for up to three days. To reheat the chicken, use a microwave or a skillet. If using a microwave, cover the chicken with a damp paper towel. This keeps moisture in and prevents it from drying out. Heat it for 30 seconds, check, and repeat if needed. If using a skillet, heat on low. Add a splash of water to keep it juicy. Cook until warmed through, about 3-4 minutes. Store your tzatziki sauce in a sealed container in the fridge. It stays fresh for about four days. If you notice extra water on top, just drain it off. Stir the sauce well before using it again. This keeps all the flavors mixed and tasty. For longer storage, you can freeze tzatziki in ice cube trays. Once frozen, transfer the cubes to a freezer bag. This way, you can enjoy it later in your Chicken Tzatziki Bowls or other dishes. If you don't have Greek yogurt, you can use regular yogurt. You can also try sour cream. Both will give a creamy texture, but they may taste a bit different. For a dairy-free option, use coconut yogurt or a blended cashew cream. These options keep the dish rich and tasty. You can marinate the chicken for at least 30 minutes. For better flavor, marinate it overnight. This gives the spices time to soak in. The longer, the better! Just keep it in the fridge to stay safe. Yes, you can make this dish ahead of time. Prepare the chicken and tzatziki sauce a day before. Store them in separate containers in the fridge. When you're ready to eat, just grill the chicken and assemble your bowls. It saves time and tastes fresh! Chicken Tzatziki Bowls taste great with various sides. Try a simple Greek salad with tomatoes and olives. Pita bread with hummus is also a good match. You can add roasted veggies or a light soup for extra flavor and nutrition. Yes, this dish is gluten-free if you use quinoa. Couscous is not gluten-free, so skip it if needed. Always check the labels on your ingredients to be sure. Enjoy this tasty meal without worry! This blog post covered how to make tasty Chicken Tzatziki Bowls. We explored essential ingredients, step-by-step instructions, and helpful tips. I shared fun variations, storage info, and answers to common questions. Now, you can impress your friends with this easy dish. Enjoy the fresh flavors and simple steps. With practice, you’ll make perfect bowls every time. Dive in and have fun in the kitchen!](https://goldendishy.com/wp-content/uploads/2025/06/3644d9ce-b609-47a4-b270-daf6d08e9407-768x768.webp)


