BBQ Chicken French Bread Pizza Simple and Tasty Dish

Looking for a quick and fun dinner idea? BBQ Chicken French Bread Pizza is the answer! This tasty dish combines crispy bread, juicy BBQ chicken, and gooey cheese. You’ll love how easy it is to make, and I’ll share tips to make it perfect every time. Whether you’re cooking for family or a crowd, this recipe is sure to please. Let’s dive into the details and get started!
Why I Love This Recipe
- Easy Preparation: This recipe comes together in just 30 minutes, making it a perfect choice for a quick weeknight dinner.
- Flavor Packed: The combination of BBQ chicken, melted cheese, and fresh toppings creates a deliciously satisfying meal.
- Customizable: You can easily modify the toppings to suit your taste, whether adding jalapeños for heat or swapping out the cheese.
- Fun Presentation: Serving this pizza on a rustic wooden board with extra BBQ sauce for dipping makes it a hit for gatherings!
Ingredients
List of Ingredients
To make BBQ chicken French bread pizza, you will need the following items:
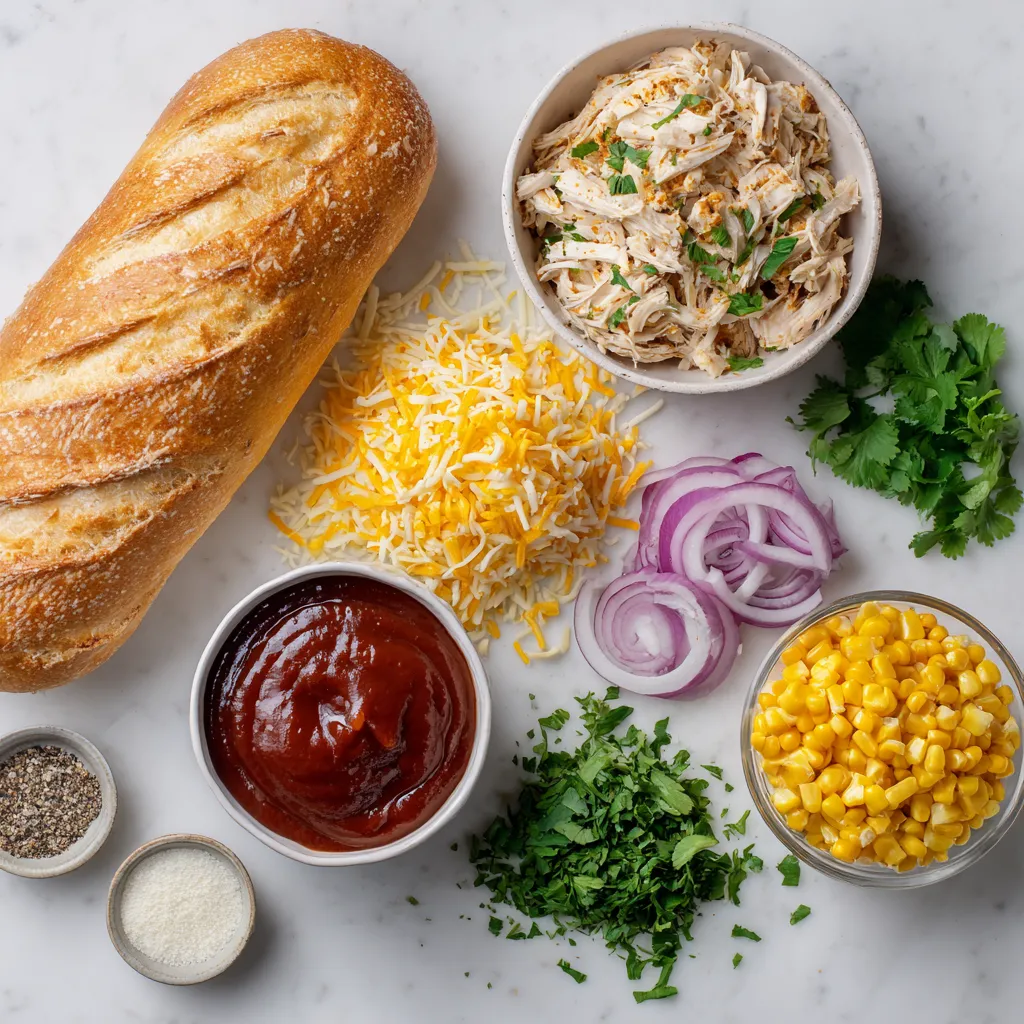
– 1 large French bread loaf
– 1 cup cooked chicken, shredded
– 1/2 cup BBQ sauce (your favorite variety)
– 1 cup shredded mozzarella cheese
– 1/2 cup red onion, thinly sliced
– 1/2 cup corn (canned or frozen, drained if canned)
– 1/4 cup fresh cilantro, chopped
– 1 teaspoon garlic powder
– Salt and freshly ground black pepper to taste
Ingredient Substitutions
You can swap some ingredients for your needs:
– French bread: Use whole grain or gluten-free bread.
– Shredded chicken: Try rotisserie chicken or canned chicken for quick meals.
– BBQ sauce: Use a spicy or sweet sauce based on your taste.
– Mozzarella cheese: Cheddar or pepper jack cheese can add a new flavor.
– Corn: You can replace it with bell peppers or jalapeños for some heat.
– Cilantro: Swap with fresh parsley or skip it if you dislike cilantro.
Recommended Brands and Varieties
For the best flavor, try these brands:
– BBQ Sauce: Sweet Baby Ray’s or Stubb’s Original.
– Mozzarella Cheese: Sargento or Galbani for rich taste.
– French Bread: La Brea Bakery for fresh, quality bread.
– Canned Corn: Del Monte or Green Giant for reliable quality.
These choices will help your BBQ chicken French bread pizza shine!

Step-by-Step Instructions
Prepping the Oven and Bread
First, heat your oven to 375°F (190°C). This helps the pizza bake perfectly. Next, take your large French bread loaf. Carefully slice it in half lengthwise. Place both halves on a baking sheet, cut sides facing up. This makes it easy to add toppings later.
Preparing the BBQ Chicken Mixture
In a mixing bowl, add 1 cup of shredded chicken. Pour in 1/2 cup of your favorite BBQ sauce. Sprinkle 1 teaspoon of garlic powder, plus a pinch of salt and pepper. Mix it all well. You want the chicken to be fully coated in the sauce. This adds great flavor to your pizza.
Assembling and Baking the Pizza
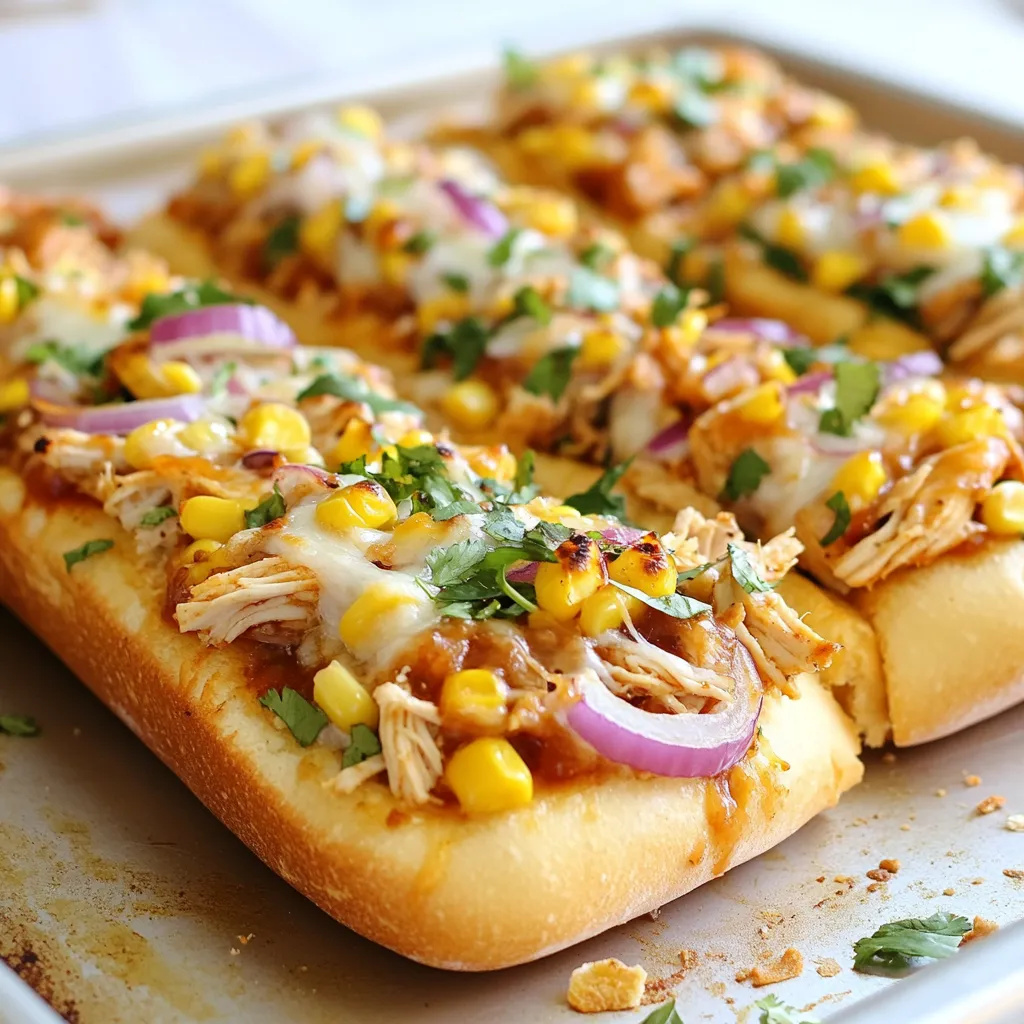
Spread the BBQ chicken mixture generously on each bread half. Use a spatula to make it even. Then, sprinkle 1 cup of shredded mozzarella cheese on top. Next, add 1/2 cup of thinly sliced red onion and 1/2 cup of corn. This adds texture and taste.
Now, place the baking sheet in the oven. Bake for 15-20 minutes. Keep an eye on it! You want the cheese to melt and turn golden brown. Once you take it out, let it cool for a few minutes. Finally, garnish with 1/4 cup of chopped cilantro. Slice into pieces and enjoy your BBQ chicken French bread pizza!
Tips & Tricks
Achieving the Perfect Crispiness
To get your pizza nice and crispy, start by using a fresh French bread loaf. Slice it in half lengthwise. This gives more surface area for crisping. Place the bread cut side up on a baking sheet. Bake it for a few minutes before adding toppings. This step helps to dry the bread slightly. A little toast before you add the toppings makes a big difference.
Flavor Enhancements and Add-ins
You can make this dish even tastier with some simple add-ins. Try adding sliced jalapeños for a spicy kick. Fresh bell peppers add color and crunch. You can also mix in some black beans for extra protein. For a unique twist, swap the mozzarella with pepper jack cheese. Just be sure to keep the BBQ sauce balanced with these flavors.
Common Mistakes to Avoid
One common mistake is using too much sauce. You want flavor, not soggy bread. Stick to about half a cup of BBQ sauce for the chicken. Another mistake is overbaking. Keep an eye on the cheese. Once it’s melted and bubbly, it’s time to take it out. Letting it bake too long can dry out the bread. Lastly, don’t skip the fresh cilantro. It adds a bright flavor that really enhances the dish!
Pro Tips
- Use Fresh Ingredients: When possible, opt for fresh cilantro and high-quality BBQ sauce to elevate the flavors of your pizza.
- Customize Your Toppings: Feel free to add other toppings like bell peppers or jalapeños to give your pizza a unique twist.
- Monitor Cheese Melting: Keep an eye on the pizza in the oven; the cheese should be bubbly and golden but not burnt.
- Let It Rest: Allow the pizza to cool for a few minutes after baking to make slicing easier and avoid burns.

Variations
Vegetarian BBQ French Bread Pizza
You can easily make a vegetarian version. Start by swapping the chicken for veggies. Use bell peppers, mushrooms, and zucchini. Chop them small and sauté them in olive oil. Mix these veggies with BBQ sauce, garlic powder, salt, and pepper. Spread this mix on your bread. Top with cheese and bake as usual. This gives you a tasty, meat-free meal.
Spicy BBQ Chicken French Bread Pizza
Want a kick? Add heat to your BBQ chicken pizza. Use spicy BBQ sauce or mix in some crushed red pepper flakes. You can also add fresh jalapeños or diced chipotle peppers. These will spice things up and give a nice smokiness. Spread the spicy chicken mix on your loaf, add cheese, and bake. The result will be a fiery treat.
Alternative Toppings and Cheese Options
Get creative with toppings! You can replace mozzarella cheese with cheddar or pepper jack. These add unique flavors. Try adding fresh spinach or arugula on top for a fresh taste. Pineapple gives a sweet twist, while black olives add some saltiness. Mix and match based on what you love. The options are endless, making each pizza unique and fun!
Storage Info
How to Store Leftovers
To store your BBQ chicken French bread pizza, first let it cool. Then, wrap each piece tightly in plastic wrap. You can also use aluminum foil. Place the wrapped pizza in a container. This keeps it fresh for up to three days in the fridge.
Reheating Instructions
When you’re ready to enjoy leftovers, preheat your oven to 350°F (175°C). Place the pizza on a baking sheet. Heat for about 10-15 minutes. This keeps the bread crispy and the cheese melty. Avoid using the microwave, as it makes the pizza soggy.
Freezing Pizza for Future Meals
To freeze your BBQ chicken pizza, wrap each slice tightly in plastic wrap. Then, place the slices in a freezer bag. Make sure to remove as much air as possible. You can freeze the pizza for up to two months. When you’re ready to eat, thaw it in the fridge overnight. Then, reheat as described above for the best taste.
FAQs
Can I use gluten-free French bread?
Yes, you can use gluten-free French bread. Many brands offer gluten-free options. Choose a loaf that has a good texture. Your BBQ chicken pizza will still taste great!
What can I serve with BBQ chicken French bread pizza?
I love to serve this pizza with a fresh salad. A simple green salad works well. You can also add some crunchy veggies like carrots or cucumbers. Chips or fries make a fun side too. A cold drink, like lemonade, pairs perfectly.
How long does it take to bake different types of bread?
Baking time varies by bread type. French bread usually takes about 15-20 minutes. A thicker bread may need longer, around 25-30 minutes. Always check for a golden crust and melted cheese for the best results.
We covered all you need to create BBQ chicken French bread pizza. We talked about key ingredients, step-by-step instructions, and tips for a perfect dish. You can try tasty variations and learn how to store leftovers. Remember, making this pizza at home is fun and easy. Don’t hesitate to experiment with flavors. Enjoy your cooking journey and share this recipe with friends. Good food brings people togethe

BBQ Chicken French Bread Pizza Delight
Ingredients
- 1 large loaf French bread
- 1 cup cooked chicken, shredded
- 1/2 cup BBQ sauce
- 1 cup shredded mozzarella cheese
- 1/2 cup red onion, thinly sliced
- 1/2 cup corn
- 1/4 cup fresh cilantro, chopped
- 1 teaspoon garlic powder
- to taste salt
- to taste freshly ground black pepper
Instructions
- Begin by preheating your oven to 375°F (190°C) to ensure it's ready for baking.
- Carefully slice the French bread loaf in half lengthwise, then place the two halves on a baking sheet with the cut sides facing upwards.
- In a mixing bowl, combine the shredded chicken with the BBQ sauce, garlic powder, and a pinch of salt and pepper. Stir until everything is well coated and the mixture is evenly combined.
- Using a spatula or the back of a spoon, spread the BBQ chicken mixture generously over the surface of each bread half, ensuring even coverage.
- Sprinkle the shredded mozzarella cheese liberally over the BBQ chicken layer, allowing for a cheesy and satisfying topping.
- Next, distribute the thinly sliced red onion and corn evenly over the cheese, adding a burst of flavor and texture to your pizza.
- Place the baking sheet in the preheated oven and bake for 15-20 minutes, or until the cheese is thoroughly melted, bubbly, and golden brown at the edges of the bread.
- Once cooked, remove the baking sheet from the oven and allow the pizzas to cool for a few minutes, making them easier to handle.
- Before serving, garnish with chopped cilantro for a fresh touch, then slice the pizza into portions and serve warm.


![- 4 large bell peppers (any vibrant color) - 1 cup quinoa, thoroughly rinsed and drained - 2 cups vegetable broth - 1 can (15 oz) black beans, well rinsed and drained - 1 cup corn (fresh, frozen, or canned, drained) - 1 cup cherry tomatoes, halved - 1 teaspoon ground cumin - 1 teaspoon smoked paprika - 1 teaspoon garlic powder - Salt and freshly cracked black pepper to taste - 1 tablespoon extra virgin olive oil - ½ cup shredded cheddar cheese (optional but recommended) - Fresh cilantro or parsley, finely chopped for garnish - Additional vegetables (e.g., zucchini, mushrooms) - Spices and herbs (e.g., oregano, chili powder) When making stuffed bell pepper boats, you have many options. I love using colorful bell peppers. They add a fun look to your dish. Choose ones that are firm and bright. For the filling, I use quinoa. It’s not only healthy but also tasty. Rinse it well before cooking. The vegetable broth adds flavor and makes it rich. Black beans are another great choice. They are filling and packed with protein. Rinse them well too, to get rid of extra salt. Corn brings sweetness to the dish. You can use fresh, frozen, or canned corn. Cherry tomatoes add a nice juicy burst. Spices like cumin and paprika give depth. Garlic powder adds that warm flavor we all love. Don’t forget to season with salt and pepper to make it pop. Finally, I drizzle olive oil on the filling. It helps everything blend together. If you love cheese, add some cheddar on top for creaminess. Feel free to customize your stuffed peppers with optional add-ins. You can mix in other veggies like zucchini or mushrooms. Extra spices can make a big impact too. This recipe is flexible. You can adjust it to fit your taste. Explore and have fun with your stuffed bell pepper boats! For the complete guide, check out the Full Recipe I have shared. - Preheat the oven to 375°F (190°C). - Prepare the bell peppers by cutting off their tops. Carefully remove the seeds and membranes. Make sure they sit upright in a baking dish. - Combine 1 cup of quinoa and 2 cups of vegetable broth in a saucepan. - Bring this mix to a boil, then reduce the heat to low. Cover the pot and let it simmer. Cook for about 15 minutes or until the quinoa is fluffy and the broth has absorbed. - In a large mixing bowl, combine the cooked quinoa with one can of black beans, one cup of corn, and spices. - Add 1 teaspoon of ground cumin, 1 teaspoon of smoked paprika, and 1 teaspoon of garlic powder. Season with salt and black pepper. - Drizzle 1 tablespoon of olive oil over the mixture. Stir until everything is well blended. - Carefully spoon the filling into each prepared bell pepper. Press it down gently to pack it in. - If you like, top each stuffed pepper with ½ cup of shredded cheddar cheese for added flavor. - Pour a little water into the bottom of the baking dish. Cover the dish with aluminum foil. This helps keep the peppers moist. - Bake the stuffed peppers in the preheated oven for 25-30 minutes. Check for doneness; they should be fork-tender. Enjoy your delicious Stuffed Bell Pepper Boats with vibrant colors and flavors! For the full recipe, please refer back to the recipe section. To start, cutting bell peppers right matters. Slice off the tops using a sharp knife. Be careful not to cut too deep. Next, remove the seeds and white membranes inside. A small spoon works great for this. Rinse the peppers under cold water to clean them. For even cooking, place your stuffed peppers tightly in the baking dish. This helps them cook at the same rate. Mixing flavors is key, too. Use spices like cumin and smoked paprika to boost taste. You can taste the filling before you stuff the peppers. Adjust the salt and pepper as needed. Serving your stuffed bell pepper boats can be fun. Use a colorful platter to catch the eye. Arrange the peppers upright, showing off their filling. You can add a wedge of lime on the side for a fresh touch. A sprinkle of chopped cilantro or parsley adds color and flavor. You can prepare stuffed peppers ahead of time. Stuff them and cover with foil. Store them in the fridge for up to a day. This makes meal prep easy for busy nights. For sides, consider a fresh salad or crusty bread. You can also pair them with rice or quinoa for a filling meal. These peppers are great for family dinners or potlucks. For the full recipe, check out Stuffed Bell Pepper Boats. {{image_4}} You can easily make this dish vegetarian. Substituting quinoa with rice or couscous works well. Rice gives a nice texture, while couscous cooks faster. Both options taste great in these stuffed bell pepper boats. Adding different vegetables also boosts flavor and nutrition. Try diced zucchini, mushrooms, or spinach. These veggies add color and crunch. You can mix and match to fit your taste. Want to add meat? Ground turkey or beef makes a hearty filling. Just cook the meat before adding it to the quinoa mixture. This step ensures the meat is safe to eat. When adding meat, adjust the spices. You might want to use more cumin or paprika. This adjustment gives the dish a richer taste. Cheese can take your stuffed peppers to the next level. Mozzarella or feta are great choices. Mozzarella melts beautifully, while feta adds a tangy twist. For even more flavor, add layers of salsa or sauce. It keeps the filling moist and adds a kick. You can also drizzle some sauce on top before baking. This extra step makes the dish even more delicious. Check out the [Full Recipe] for all the details! To keep your stuffed bell pepper boats fresh, store them in an airtight container. This helps lock in moisture and flavor. You can keep them in the fridge for about 3 to 4 days. If you want to save them for later, allow them to cool completely before storing. You can freeze stuffed peppers both before and after baking. If you freeze them before cooking, wrap them tightly in plastic wrap and then in aluminum foil. This keeps out air and prevents freezer burn. If you choose to freeze them after baking, let them cool first. Then, place them in a freezer-safe container. They will stay good for up to 3 months. To reheat your stuffed peppers, the oven works best. Preheat it to 350°F (175°C). Place the peppers in a baking dish and cover with foil. Bake for about 20 to 25 minutes until heated through. You can also use a microwave if you're in a hurry. Just place one pepper on a plate and heat for 2 to 3 minutes. This method may make them a bit softer, but they'll still taste great! To make stuffed bell peppers in advance, prepare the filling first. Cook the quinoa and mix it with your beans, corn, and spices. Once mixed, stuff each bell pepper with the filling. You can store them in the fridge for up to two days before baking. Cover them tightly to keep them fresh. When ready to bake, just pop them into the oven. This saves you time and effort on busy nights. Yes, you can use other types of peppers! Try using poblano, Anaheim, or even jalapeño peppers. Each type adds a unique flavor and spice level. Poblano peppers are mild and have a rich taste. They also hold a good amount of filling. If you like a bit of heat, jalapeños are a great choice. Just remember to adjust the cooking time if your peppers are smaller. Stuffed bell pepper boats pair well with many side dishes. Some great options include a fresh green salad, roasted vegetables, or rice. You can also serve them with a side of guacamole or salsa for added flavor. If you want something warm, consider serving bread or cornbread. These sides complement the flavors and make for a complete meal. To adjust the spice level, you can add or reduce spices. For less heat, skip the cumin and paprika. If you want more flavor, add some chili powder or crushed red pepper. You can also mix in diced jalapeños or hot sauce. Start with a little and taste as you go. This way, you can find the perfect balance for your taste. Yes, this dish can be gluten-free! The main ingredients, like quinoa and beans, are naturally gluten-free. Just be sure to check that your vegetable broth is gluten-free as well. If you add other ingredients, like sauces or spices, check their labels. This way, you can enjoy a safe and tasty meal. Stuffed bell peppers are simple and fun to make. We covered the key ingredients and steps to prepare them. You learned how to customize flavors and presentation. Remember, you can use different spices, grains, or veggies. These peppers can please everyone, regardless of diet. Enjoy your meal prep and share these tasty, healthy treats with friends and family. Happy cooking!](https://goldendishy.com/wp-content/uploads/2025/07/06b7afd9-4005-4ab6-8aaa-ba374b5d3167-768x768.webp)
. - Heat your skillet over medium heat. - Add the unsalted butter and let it melt. - Once melted, watch for it to bubble gently. - Next, add the minced garlic. - Sauté the garlic for about one minute. - Stir often until it smells great and turns lightly golden. - Now, add the peeled and deveined shrimp to the skillet. - Season the shrimp with salt and pepper. - If you like spice, sprinkle in some red pepper flakes. - Cook the shrimp for 2-3 minutes on one side. - Flip the shrimp to cook the other side evenly. - Add the lemon zest and juice as they cook. - Keep cooking until the shrimp are opaque. - Remove the skillet from the heat. - Stir in the chopped parsley for a fresh taste. - Serve the shrimp over warm pasta or fluffy rice. - Drizzle the leftover lemon-garlic butter sauce on top for extra flavor. - For a lovely presentation, you can garnish with lemon wedges. For more details, check the Full Recipe. - Achieving the perfect shrimp texture: To get tender shrimp, avoid overcooking. Cook them just until they turn pink. This usually takes about 2-3 minutes per side. - Best practices for sautéing garlic: Start with a hot skillet and melted butter. Add minced garlic and stir for about 1 minute. Keep an eye on it so it doesn’t burn; burnt garlic tastes bitter. - Presentation ideas for a beautiful dish: Serve the shrimp in shallow bowls to make it look elegant. Add a sprinkle of parsley on top for color. Include lemon wedges on the side for a fresh touch. - Pairing options with side dishes: Lemon garlic butter shrimp goes well with cooked pasta or fluffy rice. You can also serve it with a side salad for a light meal. - Additional herbs or spices to try: Consider adding fresh basil or thyme for extra flavor. These herbs pair well with lemon and shrimp. - Adjusting spice levels with red pepper flakes: If you like heat, add more red pepper flakes. Start with a teaspoon and adjust to your taste. This will make your dish more exciting! For more details, check the Full Recipe. {{image_4}} You can change the seafood in this recipe. Try scallops or even crab. These swaps add new tastes while keeping the dish simple. If you want a healthier fat, swap butter for olive oil. Olive oil works well and gives a light, fresh flavor. To mix things up, add other citrus flavors. Lime or orange juice can brighten the dish. You can also infuse the recipe with herbs. Try basil or thyme for a different twist. These herbs can make the dish feel more seasonal. If you need a gluten-free option, serve the shrimp over quinoa or zucchini noodles. Both are great gluten-free choices. For a low-calorie meal, cut back on the butter. You can use less or replace it with vegetable broth. This keeps the dish tasty but lighter. After enjoying your lemon garlic butter shrimp, store any leftovers in the fridge. Use an airtight container to keep them fresh. These shrimp will stay good for about 2-3 days. Always check for freshness before eating. To freeze lemon garlic butter shrimp, let them cool completely first. Place them in a freezer-safe bag, removing as much air as possible. They can last for about 2 months in the freezer. When you're ready to eat, thaw the shrimp in the fridge overnight. Reheat them gently in a skillet over low heat. This keeps them tender and tasty. Always ensure your shrimp is safe to eat after storage. Check for any off smells or changes in color. If the shrimp look slimy or smell bad, it’s best to discard them. Trust your senses to keep your meals safe and enjoyable. Cook shrimp for 4-6 minutes. They cook quickly. In a hot skillet, shrimp turn pink when done. Avoid overcooking; it makes them tough. Yes, you can use frozen shrimp. Thaw them first for best results. Place them in cold water for about 15 minutes. This way, they cook evenly and taste fresh. I love serving lemon garlic butter shrimp with: - Cooked pasta - Fluffy rice - Fresh salad - Garlic bread These sides balance the rich flavors well. Check for color and texture. Cooked shrimp turn pink and opaque. They should feel firm but not hard. When in doubt, cut one open. It should be white inside, not translucent. You’ve learned how to make lemon garlic butter shrimp. We covered essential ingredients, easy steps, tips for cooking, and variations to try. Remember to adjust flavors to your taste and pair with your favorite sides. Store leftovers safely for later enjoyment. Cooking shrimp can be simple and satisfying. Enjoy every bite, and don't hesitate to experiment. Whether for a cozy night in or impressing guests, this dish shines every time. Let your kitchen be a place of fun and flavor!](https://goldendishy.com/wp-content/uploads/2025/06/8ad1771e-7d26-4dd4-879b-9e464bbb0647-768x768.webp)


