Balsamic Roasted Vegetable Salad Flavorful and Fresh
![To create this vibrant salad, gather these fresh ingredients: - 1 medium zucchini, sliced into half-moons - 1 bell pepper (red or yellow for sweetness), chopped into bite-sized pieces - 1 small eggplant, diced into uniform cubes - 1 cup cherry tomatoes, halved for a burst of sweetness - 1 red onion, cut into wedges for flavor - 3 tablespoons balsamic vinegar for a tangy kick - 2 tablespoons extra-virgin olive oil for richness - 1 tablespoon honey to balance the acidity - Sea salt and freshly cracked pepper to taste - 1 teaspoon dried oregano for an aromatic touch - 1 cup mixed greens (arugula, spinach, or your favorites) - ¼ cup feta cheese, crumbled (optional, for creaminess) - Fresh basil leaves for a fragrant garnish Not all ingredients need to be set in stone. Here are some smart swaps: - Use yellow squash instead of zucchini. The texture remains similar. - Any color bell pepper works well; green adds a more bitter taste. - Swap eggplant for mushrooms for a different texture and flavor. - Try different vinegars, like red wine vinegar, if balsamic is not available. - Maple syrup can replace honey for a vegan option. - For a dairy-free choice, omit feta cheese or use a vegan alternative. Choosing the right veggies makes a big difference. Here’s how to select the best: - Look for firm zucchini with shiny, smooth skin. Avoid soft spots. - Choose bell peppers that feel heavy and have smooth skin. - For eggplant, pick ones that are shiny and feel heavy for their size. - Cherry tomatoes should be plump and free from blemishes. - Pick red onions that are firm and have a vibrant color. - Visit local farmers' markets for the freshest produce whenever possible. These small choices can bring your Balsamic Roasted Vegetable Salad to life. For the complete recipe, check the [Full Recipe]. First, set your oven to 425°F (220°C). This high heat helps the veggies roast nicely. While the oven heats, grab a large mixing bowl. Add your sliced zucchini, chopped bell pepper, diced eggplant, halved cherry tomatoes, and red onion wedges. Mix them well. This step ensures every bite is packed with flavor. Next, take a small bowl. In it, combine 3 tablespoons of balsamic vinegar, 2 tablespoons of extra-virgin olive oil, and 1 tablespoon of honey. Add a pinch of sea salt and freshly cracked pepper. Finally, mix in 1 teaspoon of dried oregano. Whisk these ingredients together until smooth. This vinaigrette will bring a tangy and sweet kick to your salad. Now, line a baking sheet with parchment paper. Spread your mixed vegetables in a single layer. Make sure they are not crowded, as this helps them roast evenly. Place the baking sheet in the oven and roast for 20-25 minutes. Stir the vegetables halfway through. This mix ensures they cook evenly and get that lovely caramelization. Once the veggies are tender and golden, take them out and let them cool for a few minutes. In a large serving bowl, add your fresh mixed greens. Then, toss in the roasted vegetables. Gently mix until the greens and vegetables blend well. If you like, sprinkle ¼ cup of crumbled feta on top. Finally, add fresh basil leaves for a fragrant touch. Enjoy your colorful and tasty salad! For the full recipe, check out the details provided above. To get the best flavor, cut your vegetables into similar sizes. This step helps them roast evenly. Place them in a single layer on the baking sheet. Crowding the pan can cause steaming instead of roasting. Stir the vegetables halfway through cooking. This simple action helps them brown nicely on all sides. Always dress your salad right before serving. This keeps the greens fresh and crunchy. Use just enough dressing to coat the veggies. A light touch prevents sogginess. When mixing, toss gently to avoid bruising the greens. If you prefer more flavor, add more balsamic vinegar or a splash of lemon juice. Fresh herbs can elevate your salad. Try adding chopped parsley or cilantro for a fresh twist. You can also add a pinch of red pepper flakes for a kick. Experiment with spices like cumin or paprika for unique flavors. These additions can make your salad truly special and memorable. {{image_4}} You can mix and match veggies to suit your taste. Try adding carrots for sweetness or broccoli for crunch. Swap in asparagus for a fresh twist. You can even use sweet potatoes for a hearty base. The options are endless! Each veggie brings its own flavor and texture. You can create a new salad every time. Want to make this salad filling? Add proteins like grilled chicken or shrimp. Chickpeas or black beans also work well for plant-based options. They boost the protein without altering the salad's great taste. If you want a creamy touch, add avocado slices. These options turn your salad into a complete meal. This salad is easy to make vegan and gluten-free. Just skip the feta cheese or use a plant-based alternative. Use gluten-free grains like quinoa for added texture. You can also mix in nuts or seeds for crunch. These simple swaps keep your salad tasty while meeting dietary needs. Enjoy the fresh flavors without worry! For the full recipe, check out the Balsamic Roasted Vegetable Salad. Store leftover Balsamic Roasted Vegetable Salad in an airtight container. Make sure the salad is cool before sealing it. This keeps the flavors fresh and prevents sogginess. Try to eat the leftovers within three days for the best taste. I recommend using glass containers for storing your salad. Glass is non-reactive and helps keep the food fresh longer. If you prefer plastic, choose BPA-free containers. Make sure they fit your salad snugly to limit air exposure. To reheat roasted vegetables, place them on a baking sheet. Heat your oven to 350°F (175°C) and roast for about 10-15 minutes. This keeps the veggies crispy and warm. You can also reheat them in a skillet over medium heat for a few minutes. Just stir often to avoid burning. If you want to add a little moisture, a splash of balsamic vinegar can help revive the flavors. Enjoy your meal! Yes, you can make this salad ahead. Roast the veggies and prepare the salad. Keep the roasted veggies and greens separate. Store them in the fridge. Mix them just before serving for the best taste and texture. Mixed greens work great with roasted veggies. I love using arugula, spinach, or kale. They add crunch and a fresh taste. You can choose any greens you enjoy. Just pick ones that won’t wilt fast. Balsamic roasted vegetables last about 3 to 5 days in the fridge. Store them in an airtight container. The flavors will deepen over time, making them even tastier. Just reheat them before serving for a warm dish. You can use frozen vegetables, but fresh is best. Frozen veggies may release more water while cooking. If using frozen, roast them a bit longer. This helps them get nice and crispy. Balsamic roasted vegetable salad is easy and fun to make. We covered the ingredients, step-by-step instructions, and tips for the best results. You can customize this salad with different veggies or proteins. Proper storage keeps leftovers fresh, and I shared FAQs to answer common questions. Try this salad for a tasty and healthy meal. Enjoy making it your own!](https://goldendishy.com/wp-content/uploads/2025/06/26f5156f-9b75-49f6-aa69-260bfc3a782d.webp)
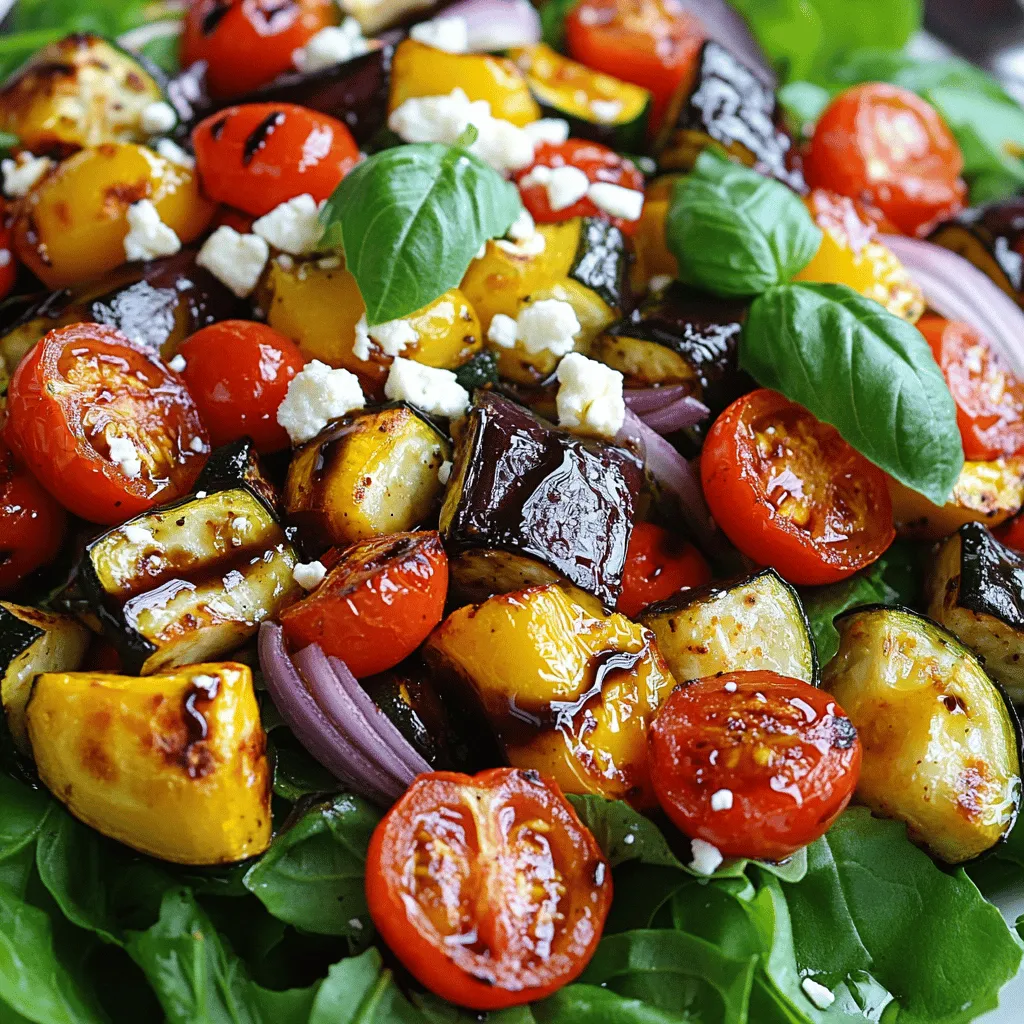
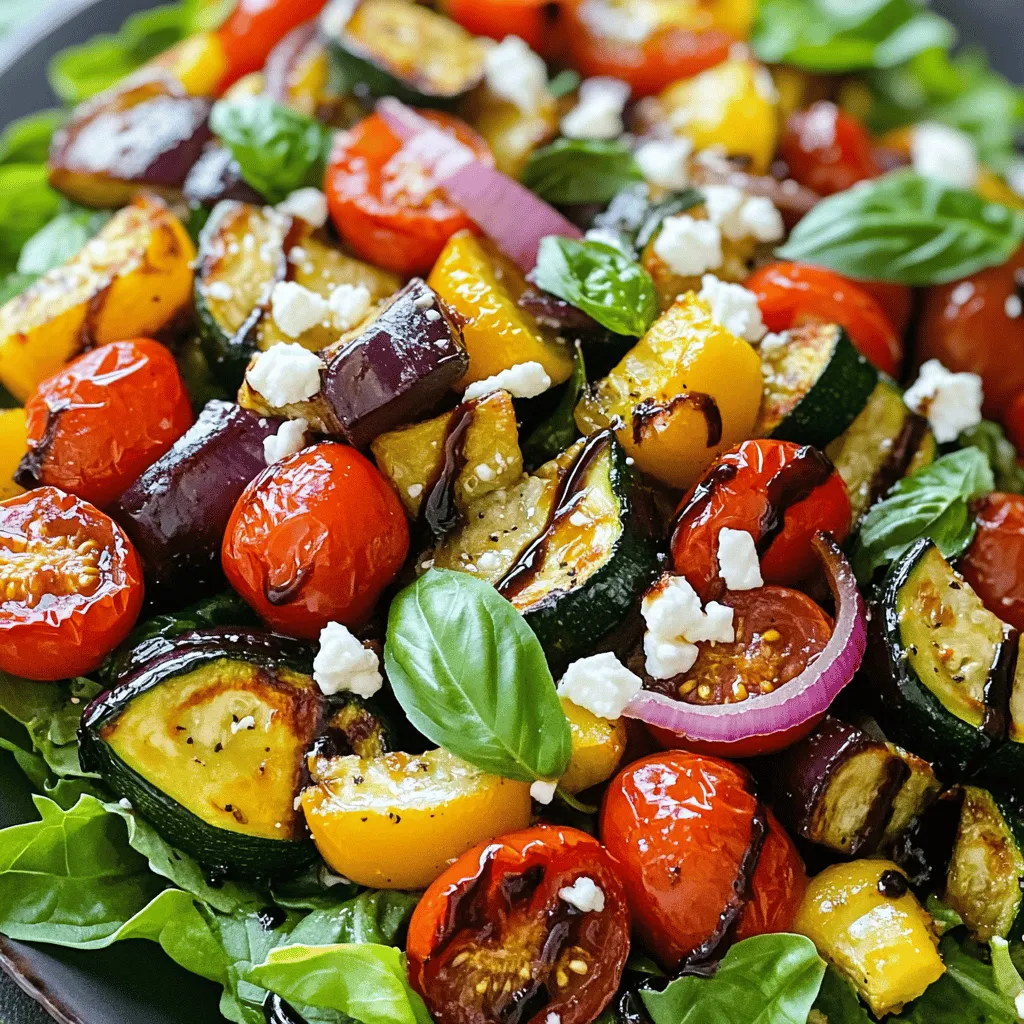
Looking for a fresh, tasty salad that’s easy to make? My Balsamic Roasted Vegetable Salad is just what you need! It combines colorful veggies with a sweet, tangy dressing. Whether you’re a busy parent, a health enthusiast, or just want to impress guests, this salad delivers. Join me as I guide you through each step, share tips on selecting fresh produce, and explore fun variations. Let’s get started!
Ingredients
Complete ingredient list for Balsamic Roasted Vegetable Salad
To create this vibrant salad, gather these fresh ingredients:
– 1 medium zucchini, sliced into half-moons
– 1 bell pepper (red or yellow for sweetness), chopped into bite-sized pieces
– 1 small eggplant, diced into uniform cubes
– 1 cup cherry tomatoes, halved for a burst of sweetness
– 1 red onion, cut into wedges for flavor
– 3 tablespoons balsamic vinegar for a tangy kick
– 2 tablespoons extra-virgin olive oil for richness
– 1 tablespoon honey to balance the acidity
– Sea salt and freshly cracked pepper to taste
– 1 teaspoon dried oregano for an aromatic touch
– 1 cup mixed greens (arugula, spinach, or your favorites)
– ¼ cup feta cheese, crumbled (optional, for creaminess)
– Fresh basil leaves for a fragrant garnish
Substitutions for specific ingredients
Not all ingredients need to be set in stone. Here are some smart swaps:
– Use yellow squash instead of zucchini. The texture remains similar.
– Any color bell pepper works well; green adds a more bitter taste.
– Swap eggplant for mushrooms for a different texture and flavor.
– Try different vinegars, like red wine vinegar, if balsamic is not available.
– Maple syrup can replace honey for a vegan option.
– For a dairy-free choice, omit feta cheese or use a vegan alternative.
Tips for selecting fresh vegetables
Choosing the right veggies makes a big difference. Here’s how to select the best:
– Look for firm zucchini with shiny, smooth skin. Avoid soft spots.
– Choose bell peppers that feel heavy and have smooth skin.
– For eggplant, pick ones that are shiny and feel heavy for their size.
– Cherry tomatoes should be plump and free from blemishes.
– Pick red onions that are firm and have a vibrant color.
– Visit local farmers’ markets for the freshest produce whenever possible.
These small choices can bring your Balsamic Roasted Vegetable Salad to life.
Step-by-Step Instructions
Preheating the oven and preparing vegetables
First, set your oven to 425°F (220°C). This high heat helps the veggies roast nicely. While the oven heats, grab a large mixing bowl. Add your sliced zucchini, chopped bell pepper, diced eggplant, halved cherry tomatoes, and red onion wedges. Mix them well. This step ensures every bite is packed with flavor.
Creating the balsamic vinaigrette
Next, take a small bowl. In it, combine 3 tablespoons of balsamic vinegar, 2 tablespoons of extra-virgin olive oil, and 1 tablespoon of honey. Add a pinch of sea salt and freshly cracked pepper. Finally, mix in 1 teaspoon of dried oregano. Whisk these ingredients together until smooth. This vinaigrette will bring a tangy and sweet kick to your salad.
Roasting the vegetables to perfection
Now, line a baking sheet with parchment paper. Spread your mixed vegetables in a single layer. Make sure they are not crowded, as this helps them roast evenly. Place the baking sheet in the oven and roast for 20-25 minutes. Stir the vegetables halfway through. This mix ensures they cook evenly and get that lovely caramelization.
Combining the salad ingredients
Once the veggies are tender and golden, take them out and let them cool for a few minutes. In a large serving bowl, add your fresh mixed greens. Then, toss in the roasted vegetables. Gently mix until the greens and vegetables blend well. If you like, sprinkle ¼ cup of crumbled feta on top. Finally, add fresh basil leaves for a fragrant touch. Enjoy your colorful and tasty salad!
Tips & Tricks
Ensuring even roasting of vegetables
To get the best flavor, cut your vegetables into similar sizes. This step helps them roast evenly. Place them in a single layer on the baking sheet. Crowding the pan can cause steaming instead of roasting. Stir the vegetables halfway through cooking. This simple action helps them brown nicely on all sides.
Best practices for dressing the salad
Always dress your salad right before serving. This keeps the greens fresh and crunchy. Use just enough dressing to coat the veggies. A light touch prevents sogginess. When mixing, toss gently to avoid bruising the greens. If you prefer more flavor, add more balsamic vinegar or a splash of lemon juice.
Enhancing flavors with additional herbs and spices
Fresh herbs can elevate your salad. Try adding chopped parsley or cilantro for a fresh twist. You can also add a pinch of red pepper flakes for a kick. Experiment with spices like cumin or paprika for unique flavors. These additions can make your salad truly special and memorable.

Variations
Alternative vegetable combinations
You can mix and match veggies to suit your taste. Try adding carrots for sweetness or broccoli for crunch. Swap in asparagus for a fresh twist. You can even use sweet potatoes for a hearty base. The options are endless! Each veggie brings its own flavor and texture. You can create a new salad every time.
Adding proteins for a heartier salad
Want to make this salad filling? Add proteins like grilled chicken or shrimp. Chickpeas or black beans also work well for plant-based options. They boost the protein without altering the salad’s great taste. If you want a creamy touch, add avocado slices. These options turn your salad into a complete meal.
Vegan and gluten-free options
This salad is easy to make vegan and gluten-free. Just skip the feta cheese or use a plant-based alternative. Use gluten-free grains like quinoa for added texture. You can also mix in nuts or seeds for crunch. These simple swaps keep your salad tasty while meeting dietary needs. Enjoy the fresh flavors without worry!
Storage Info
How to store leftovers properly
Store leftover Balsamic Roasted Vegetable Salad in an airtight container. Make sure the salad is cool before sealing it. This keeps the flavors fresh and prevents sogginess. Try to eat the leftovers within three days for the best taste.
Best container types for freshness
I recommend using glass containers for storing your salad. Glass is non-reactive and helps keep the food fresh longer. If you prefer plastic, choose BPA-free containers. Make sure they fit your salad snugly to limit air exposure.
Tips for reheating roasted vegetables
To reheat roasted vegetables, place them on a baking sheet. Heat your oven to 350°F (175°C) and roast for about 10-15 minutes. This keeps the veggies crispy and warm. You can also reheat them in a skillet over medium heat for a few minutes. Just stir often to avoid burning. If you want to add a little moisture, a splash of balsamic vinegar can help revive the flavors. Enjoy your meal!
FAQs
Can I make this salad ahead of time?
Yes, you can make this salad ahead. Roast the veggies and prepare the salad. Keep the roasted veggies and greens separate. Store them in the fridge. Mix them just before serving for the best taste and texture.
What types of greens pair best with roasted vegetables?
Mixed greens work great with roasted veggies. I love using arugula, spinach, or kale. They add crunch and a fresh taste. You can choose any greens you enjoy. Just pick ones that won’t wilt fast.
How long do balsamic roasted vegetables last in the fridge?
Balsamic roasted vegetables last about 3 to 5 days in the fridge. Store them in an airtight container. The flavors will deepen over time, making them even tastier. Just reheat them before serving for a warm dish.
Is it okay to use frozen vegetables in this recipe?
You can use frozen vegetables, but fresh is best. Frozen veggies may release more water while cooking. If using frozen, roast them a bit longer. This helps them get nice and crispy.
Balsamic roasted vegetable salad is easy and fun to make. We covered the ingredients, step-by-step instructions, and tips for the best results. You can customize this salad with different veggies or proteins. Proper storage keeps leftovers fresh, and I shared FAQs to answer common questions. Try this salad for a tasty and healthy meal. Enjoy making it your own!
![To create this vibrant salad, gather these fresh ingredients: - 1 medium zucchini, sliced into half-moons - 1 bell pepper (red or yellow for sweetness), chopped into bite-sized pieces - 1 small eggplant, diced into uniform cubes - 1 cup cherry tomatoes, halved for a burst of sweetness - 1 red onion, cut into wedges for flavor - 3 tablespoons balsamic vinegar for a tangy kick - 2 tablespoons extra-virgin olive oil for richness - 1 tablespoon honey to balance the acidity - Sea salt and freshly cracked pepper to taste - 1 teaspoon dried oregano for an aromatic touch - 1 cup mixed greens (arugula, spinach, or your favorites) - ¼ cup feta cheese, crumbled (optional, for creaminess) - Fresh basil leaves for a fragrant garnish Not all ingredients need to be set in stone. Here are some smart swaps: - Use yellow squash instead of zucchini. The texture remains similar. - Any color bell pepper works well; green adds a more bitter taste. - Swap eggplant for mushrooms for a different texture and flavor. - Try different vinegars, like red wine vinegar, if balsamic is not available. - Maple syrup can replace honey for a vegan option. - For a dairy-free choice, omit feta cheese or use a vegan alternative. Choosing the right veggies makes a big difference. Here’s how to select the best: - Look for firm zucchini with shiny, smooth skin. Avoid soft spots. - Choose bell peppers that feel heavy and have smooth skin. - For eggplant, pick ones that are shiny and feel heavy for their size. - Cherry tomatoes should be plump and free from blemishes. - Pick red onions that are firm and have a vibrant color. - Visit local farmers' markets for the freshest produce whenever possible. These small choices can bring your Balsamic Roasted Vegetable Salad to life. For the complete recipe, check the [Full Recipe]. First, set your oven to 425°F (220°C). This high heat helps the veggies roast nicely. While the oven heats, grab a large mixing bowl. Add your sliced zucchini, chopped bell pepper, diced eggplant, halved cherry tomatoes, and red onion wedges. Mix them well. This step ensures every bite is packed with flavor. Next, take a small bowl. In it, combine 3 tablespoons of balsamic vinegar, 2 tablespoons of extra-virgin olive oil, and 1 tablespoon of honey. Add a pinch of sea salt and freshly cracked pepper. Finally, mix in 1 teaspoon of dried oregano. Whisk these ingredients together until smooth. This vinaigrette will bring a tangy and sweet kick to your salad. Now, line a baking sheet with parchment paper. Spread your mixed vegetables in a single layer. Make sure they are not crowded, as this helps them roast evenly. Place the baking sheet in the oven and roast for 20-25 minutes. Stir the vegetables halfway through. This mix ensures they cook evenly and get that lovely caramelization. Once the veggies are tender and golden, take them out and let them cool for a few minutes. In a large serving bowl, add your fresh mixed greens. Then, toss in the roasted vegetables. Gently mix until the greens and vegetables blend well. If you like, sprinkle ¼ cup of crumbled feta on top. Finally, add fresh basil leaves for a fragrant touch. Enjoy your colorful and tasty salad! For the full recipe, check out the details provided above. To get the best flavor, cut your vegetables into similar sizes. This step helps them roast evenly. Place them in a single layer on the baking sheet. Crowding the pan can cause steaming instead of roasting. Stir the vegetables halfway through cooking. This simple action helps them brown nicely on all sides. Always dress your salad right before serving. This keeps the greens fresh and crunchy. Use just enough dressing to coat the veggies. A light touch prevents sogginess. When mixing, toss gently to avoid bruising the greens. If you prefer more flavor, add more balsamic vinegar or a splash of lemon juice. Fresh herbs can elevate your salad. Try adding chopped parsley or cilantro for a fresh twist. You can also add a pinch of red pepper flakes for a kick. Experiment with spices like cumin or paprika for unique flavors. These additions can make your salad truly special and memorable. {{image_4}} You can mix and match veggies to suit your taste. Try adding carrots for sweetness or broccoli for crunch. Swap in asparagus for a fresh twist. You can even use sweet potatoes for a hearty base. The options are endless! Each veggie brings its own flavor and texture. You can create a new salad every time. Want to make this salad filling? Add proteins like grilled chicken or shrimp. Chickpeas or black beans also work well for plant-based options. They boost the protein without altering the salad's great taste. If you want a creamy touch, add avocado slices. These options turn your salad into a complete meal. This salad is easy to make vegan and gluten-free. Just skip the feta cheese or use a plant-based alternative. Use gluten-free grains like quinoa for added texture. You can also mix in nuts or seeds for crunch. These simple swaps keep your salad tasty while meeting dietary needs. Enjoy the fresh flavors without worry! For the full recipe, check out the Balsamic Roasted Vegetable Salad. Store leftover Balsamic Roasted Vegetable Salad in an airtight container. Make sure the salad is cool before sealing it. This keeps the flavors fresh and prevents sogginess. Try to eat the leftovers within three days for the best taste. I recommend using glass containers for storing your salad. Glass is non-reactive and helps keep the food fresh longer. If you prefer plastic, choose BPA-free containers. Make sure they fit your salad snugly to limit air exposure. To reheat roasted vegetables, place them on a baking sheet. Heat your oven to 350°F (175°C) and roast for about 10-15 minutes. This keeps the veggies crispy and warm. You can also reheat them in a skillet over medium heat for a few minutes. Just stir often to avoid burning. If you want to add a little moisture, a splash of balsamic vinegar can help revive the flavors. Enjoy your meal! Yes, you can make this salad ahead. Roast the veggies and prepare the salad. Keep the roasted veggies and greens separate. Store them in the fridge. Mix them just before serving for the best taste and texture. Mixed greens work great with roasted veggies. I love using arugula, spinach, or kale. They add crunch and a fresh taste. You can choose any greens you enjoy. Just pick ones that won’t wilt fast. Balsamic roasted vegetables last about 3 to 5 days in the fridge. Store them in an airtight container. The flavors will deepen over time, making them even tastier. Just reheat them before serving for a warm dish. You can use frozen vegetables, but fresh is best. Frozen veggies may release more water while cooking. If using frozen, roast them a bit longer. This helps them get nice and crispy. Balsamic roasted vegetable salad is easy and fun to make. We covered the ingredients, step-by-step instructions, and tips for the best results. You can customize this salad with different veggies or proteins. Proper storage keeps leftovers fresh, and I shared FAQs to answer common questions. Try this salad for a tasty and healthy meal. Enjoy making it your own!](https://goldendishy.com/wp-content/uploads/2025/06/26f5156f-9b75-49f6-aa69-260bfc3a782d-300x300.webp)


![- Bell pepper (red, yellow, or green) - Zucchini and yellow squash - Red onion and cherry tomatoes - Mushrooms When I make grilled veggie skewers, I choose a mix of colorful vegetables. They not only look great but also taste fantastic. Bell peppers are a must. You can pick red, yellow, or green. Each type adds a sweet taste. Zucchini and yellow squash are next. Their soft texture and mild flavor work well on the grill. I like to cut them into thick rounds. This helps them hold their shape while cooking. Red onions add a nice bite. I cut them into wedges so they cook evenly. Cherry tomatoes are fun and juicy. I use them whole, so they burst with flavor when grilled. Finally, I love mushrooms. They soak up the marinade and get smoky when grilled. - Olive oil, garlic powder, smoked paprika - Salt and black pepper To bring out the flavors, I use a simple marinade. I drizzle extra virgin olive oil over the veggies. It helps the spices stick and adds richness. I sprinkle garlic powder for a savory kick and smoked paprika for a hint of smoke. Don’t forget to add salt and black pepper. They enhance all the natural flavors. I mix everything well, so each piece is coated. This step is crucial for a tasty outcome. - Fresh basil leaves After grilling, I like to add fresh basil leaves. They give a burst of color and flavor. Just tear them up and sprinkle on top of the skewers. This final touch makes the dish even more inviting. For the full recipe, check out the [Full Recipe]. First, we need to get our grill ready. Preheating is key to good grilling. It helps to cook the veggies evenly and gives them nice grill marks. Set your grill to medium-high heat. This temperature is perfect for cooking our colorful skewers. Let’s prep our vegetables. Start by cutting them into pieces. Cut the bell pepper into 1-inch chunks. Slice the zucchini and yellow squash into thick rounds. Cut the red onion into wedges. Keep the cherry tomatoes whole and use whole mushrooms or half them if they are large. Next, we’ll mix the veggies. Place all the cut veggies in a big bowl. Drizzle them with olive oil and sprinkle in garlic powder, smoked paprika, salt, and black pepper. Now, toss everything gently with your hands or a spatula. Make sure each piece is well-coated with the seasoning. This step adds a lot of flavor! Now comes the fun part: assembling the skewers. Take a skewer and start threading the veggies. Alternate the types of veggies to create a colorful mix. This not only looks great but also adds different flavors in every bite. Be careful when handling the skewers. The ends can be sharp, so keep your hands clear when you thread the veggies. Once you finish, your skewers are ready for the grill. For the full recipe, check out the details above. Grilling veggie skewers is simple and fun. Aim for a medium-high heat. This ensures your veggies cook well. Grill them for about 10-12 minutes. Turn them often to get nice grill marks. You want them tender but not mushy. To boost flavor, try adding spices like cumin or dill. A splash of lemon juice also brightens the taste. For a smoky flavor, use smoked paprika or a dash of liquid smoke. Marinades can add depth, too. A blend of olive oil, vinegar, and herbs works great. For a beautiful presentation, stand skewers upright in a holder. You can also lay them on a platter. Drizzle with olive oil and sprinkle fresh herbs. Pair the skewers with dips like hummus or tzatziki. These add flavor and make serving easier. Check out the Full Recipe for more ideas! {{image_4}} You can mix and match veggies for your skewers. Seasonal vegetables make great choices. In summer, try zucchini and corn. In fall, use butternut squash and Brussels sprouts. You can also add eggplant for a nice smoky taste. Asparagus gives a nice crunch and fresh flavor. If you can’t grill, you can bake or roast your skewers. For oven-baking, preheat your oven to 400°F (200°C). Place the skewers on a baking sheet. Bake for about 20 minutes. Keep an eye on them to ensure they don’t burn. Roasting gives a rich taste and helps the flavors blend well. This recipe is easy to adapt for different diets. For a vegan version, stick to the veggies and oil. If you need gluten-free options, all ingredients in this recipe work well. Just make sure to check labels on sauces or seasonings. You can enjoy tasty skewers that fit your needs by making small swaps. For the full recipe, check the details above. To keep your grilled veggie skewers fresh, use airtight containers. Store them in the fridge right after they cool down. Make sure to eat them within three days for the best taste and quality. If you notice any moisture, add a paper towel inside the container to soak it up. You can reheat skewers in the microwave or on the grill. For the microwave, place them on a plate and cover them with a damp paper towel. Heat in short bursts to avoid overcooking. To reheat on the grill, warm it up and place the skewers back on for a few minutes. This keeps the texture nice and doesn't make them soggy. To freeze skewers, wrap them tightly in plastic wrap and place them in a freezer bag. Make sure to remove as much air as possible. They can last for up to three months in the freezer. When you’re ready to eat them, thaw them in the fridge overnight. Reheat on the grill or in the oven to restore their flavor and texture. For the full recipe, check out the details above. I prefer metal skewers for grilling. They heat up quickly and help cook the veggies evenly. They are also reusable, making them eco-friendly. Wooden skewers are lighter but can burn easily. If you use wooden skewers, you need to soak them in water first. This helps prevent them from catching fire. Both types work well, so choose what you like best. Yes, you can use frozen vegetables. They are convenient and save time. However, frozen veggies may not have the same texture as fresh ones. They can become mushy when cooked. If you choose to use them, thaw them first. Pat them dry to remove extra moisture before grilling. This helps keep them from steaming and allows for better grilling. To prevent sticking, coat your vegetables with olive oil. This adds flavor and creates a barrier. Preheat your grill well before adding the skewers. A hot grill helps to sear the veggies quickly. Turn them gently with tongs. Avoid using a fork, as this can pierce the vegetables and let juices escape. Keep an eye on them, so they don't burn. Soaking wooden skewers is a good idea. It prevents them from burning on the grill. Soak them for at least 30 minutes before using. This helps them stay intact while grilling. If you skip soaking, watch them closely as they cook. You might need to turn down the heat to avoid burning. Soaking is a simple step that makes grilling easier. This blog post guides you on making vibrant vegetable skewers. We covered key ingredients, including bell peppers, zucchini, and cherry tomatoes. I shared tips for preparing the grill and veggies, along with assembling skewers safely. Remember optimal grilling time and temperature for the best results. You can try different vegetables or cooking methods for variety. Don’t forget about storing leftovers properly for later enjoyment. With the right techniques, you’ll create tasty skewers that impress. Your grilling skills can elevate any meal!](https://goldendishy.com/wp-content/uploads/2025/06/899b9bee-2fb2-475c-b5a5-3b543ce01d01-768x768.webp)


![- 1 pound fresh asparagus, trimmed - 3 tablespoons unsalted butter - 2 tablespoons freshly squeezed lemon juice - Zest of 1 lemon - 2 cloves garlic, finely minced Fresh asparagus is key to this dish. When you choose asparagus, look for bright green stalks that feel firm. The butter adds richness, while the lemon juice and zest bring a bright, zesty punch. Garlic gives a nice aroma and flavor, making the dish exciting. - Salt and freshly ground black pepper, to taste Salt and pepper enhance all the flavors. Use good-quality salt for the best taste. Freshly ground black pepper adds warmth and a bit of spice. - 1 tablespoon fresh parsley, finely chopped (for garnish) Fresh parsley adds color and freshness. You can also use lemon wedges for extra zing. They allow you to customize how much lemon flavor you want. These small touches make the dish look and taste even better. For the full recipe, check out the details above! Start by washing the fresh asparagus. Rinse it well under cool water to remove dirt. Next, trim the tough ends. You can snap them off or cut 1-2 inches from the bottom. This makes the asparagus more tender and easy to eat. In a large skillet, melt the unsalted butter over medium heat. Watch for the butter to bubble and foam; this means it is hot enough. Once it is ready, add the minced garlic. Cook the garlic for about 30 seconds and stir often. It should smell great but not turn brown. Brown garlic can taste bitter. Now, add the trimmed asparagus to the skillet. Toss it gently in the garlic butter. Make sure each piece gets coated well. Sauté the asparagus for 4-6 minutes. Turn it with tongs so it cooks evenly. You want it bright green and still a bit crisp. Once cooked, drizzle the lemon juice over the asparagus and sprinkle the zest on top. Season with salt and black pepper. Toss everything together to mix the flavors. Finally, transfer the asparagus to a serving dish. Garnish with chopped parsley for a lovely look. For the complete recipe, check the [Full Recipe]. To cook asparagus just right, start with fresh, vibrant stalks. Look for asparagus that is firm and bright green. Trim the ends, as they can be tough. When cooking, aim for a tender yet crisp texture. Sauté for 4 to 6 minutes. The color should become a vivid green. If you want to test doneness, simply pierce a stalk with a fork. It should be easy to pierce but still hold its shape. If you're out of any ingredients, don't worry! You can swap unsalted butter for olive oil. This will give a different flavor but still taste great. For lemon juice, you can use lime juice instead. If you lack fresh garlic, try garlic powder. Use half the amount, as it's stronger. Fresh parsley can be replaced with basil or cilantro for a fun twist. These substitutions keep the dish flavorful while using what you have. How you present your dish matters! Arrange the asparagus neatly on a white platter. This will highlight the bright green color. For a pop of color, add lemon wedges around the sides. This not only looks nice but also invites guests to add more lemon. You can sprinkle extra parsley on top for a fresh look. A simple, clean presentation makes your lemon butter asparagus look gourmet. {{image_4}} You can make Lemon Butter Asparagus a full meal by adding protein. Chicken or shrimp works well. For chicken, use thin strips and sauté them in the butter first. Cook until they turn golden brown. Then, add the asparagus and follow the recipe as usual. For shrimp, add them after the garlic. Cook until they turn pink, then toss in the asparagus. This adds flavor and makes it more filling. To spice things up, add red pepper flakes. Just a pinch can bring a nice kick. You can mix them in with the garlic for a burst of heat. If you love bold flavors, try adding lemon zest or herbs like thyme or basil. These add depth and make the dish more exciting. Feel free to mix in other seasonal vegetables. Cherry tomatoes, bell peppers, or snap peas all pair nicely with asparagus. Add them in the skillet after the garlic to keep them fresh. This not only enhances the taste but also boosts the nutrition of your dish. For the full recipe, check out the details above. After enjoying your Lemon Butter Asparagus, you might have some left. Store it in an airtight container. Keep it in the fridge for up to three days. The asparagus will stay fresh, but it may lose its crispness over time. To reheat, use a skillet over medium heat. Add a splash of water or a bit of butter. This helps keep the asparagus moist. Cook for about 3-4 minutes. Stir occasionally until warm. You can also use a microwave. Heat in 30-second bursts until hot. Freezing is a great option if you want to save this dish for later. Start by blanching the asparagus for 2-3 minutes in boiling water. Then, cool it quickly in ice water. Once cool, drain and pat dry. Place it in a freezer-safe bag, removing as much air as possible. It can stay frozen for up to three months. When you're ready to eat, thaw it in the fridge overnight before reheating. Yes, you can use frozen asparagus. It is a great option if fresh asparagus is not available. Just remember to thaw it first. Drain any excess water before cooking. You may need to adjust cooking time. Frozen asparagus cooks faster, so keep an eye on it. Aim for a tender yet crisp texture. Lemon Butter Asparagus pairs well with many dishes. Here are some ideas: - Grilled chicken - Pan-seared fish - Quinoa or rice - Pasta with olive oil - A fresh salad These options balance the flavors and add variety to your meal. Making lemon butter sauce is simple. Here’s how: 1. Melt butter in a pan over medium heat. 2. Add minced garlic and sauté until fragrant. 3. Stir in freshly squeezed lemon juice and zest. 4. Season with salt and pepper. This easy lemon butter sauce elevates many dishes, not just asparagus. For the full recipe, refer to the earlier sections. In this post, we covered everything you need for Lemon Butter Asparagus. I shared the fresh ingredients, pantry staples, and optional garnishes. We went through step-by-step instructions to prepare and cook each part. Tips and tricks helped you perfect your dish and suggested tasty variations. Finally, I gave you storage info and answered common questions. Embrace this dish, and enjoy your cooking adventure!](https://goldendishy.com/wp-content/uploads/2025/07/9c4cbd12-069a-483d-8240-a9afe0533cf0-768x768.webp)
